Overview of Cortana Skills Kit
Short introduction
Imagine digital assistant which supports you with different tasks like booking hotel or ordering taxi. Imagine that you have access to it through the phone, personal computer or tablet. Yes it is possible with personal digital assistant from Microsoft called Cortana. You can communicate with it by text or voice. Sounds unreal? Lets dive into Cortana Skills Kit.
Cortana configuration
Cortana is available in Windows 10 system (but not only - iOS and Android platforms are supported too) and it is so simple to enable it.
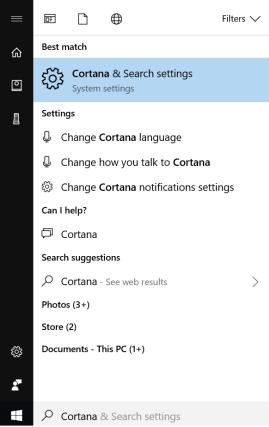
Click “Windows” button, type “Cortana” and select “Cortana & Search settings”:
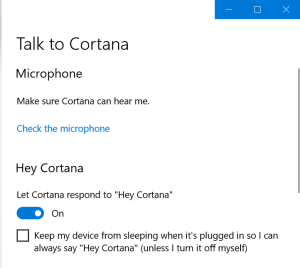
Enable “Let Cortana respond to Hey Cortana”:
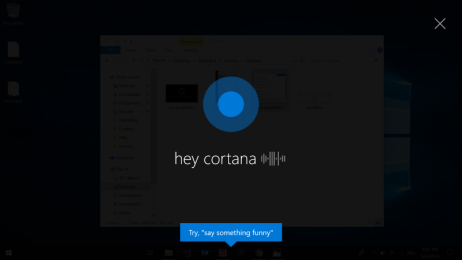
That’s it! Now say to your computer “Hey Cortana!”. Remember to enable sound. You should see that Cortana virtual assistant appeared:
Currently Cortana is available in english only. Once Cortana is configured we can start exploring Cortana Skills Kit.
Cortana's Ecosystem
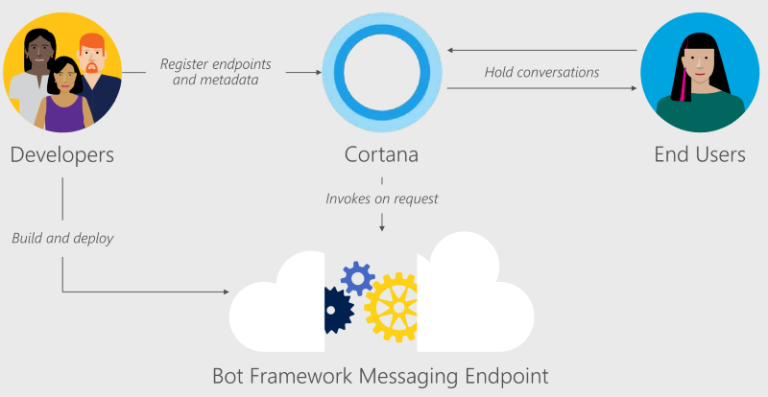
Before I describe Cortana Skills Kit and show it’s capabilities I would likt to present this nice slide presented during the MS Build 2018 session related with Cortana’s Ecosystem:
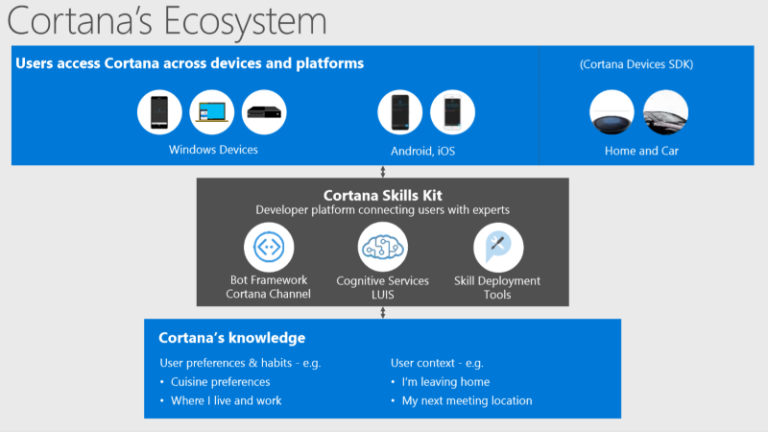
As you can see Cortana can be accessed from many devices and platforms. Pay attention to Cortana Skills Kit part.
Cortana Skills Kit
Before I describe the solution it is worth to start from clarification - what is a sklill? As mentioned during MS Build 2018 “skill is a unit of conversational intelligence that enables Cortana to help users using their services”.
Now Cortana Skills Kit is a suite of tools that help developers build skills that connect users to their custom services and solutions.
There are two components from which Skills Kit consists:
- Microsoft Bot Framework - framework which enables developers to create intelligent application which communicate with users through different channels like Skype or Cortana. You can read more in my previous article here. You can for instance create bot which can make flight booking.
- Cortana Skills Dashboard - dashboard where you can manage Cortana skills. This is the place where you can deploy skill to yourself (for testing purpose), a group of users, or the world. This is also the place where you can publish your bot created with Bot Framework so it can be available through Cortana for all users. You can access dashboard here.
To clarify - creating bot is not required. You can directly create skill in Cortana Skills Dashboard and decide how conversation flow will look like. Cortana Skills Kit is currently in public preview at the moment of writing this article so some elements can change in the future.
To make it more understandable I presented below how to create skill as bot created with Microsoft Bot Framework and without it using Semantic Composition Language (SCL) in Cortana Skills Dashboard (also called Knowledge.Store).
Create skill as Bot Framework chat bot
Bot Framework enables creating skill logic. In this section I will create simple bot with Microsoft Bot Framework which will be connected with Language Understanding Intelligence Service (LUIS).
This will be medical bot which ask questions related with user’s health.
Users can communicate with it through Cortana (by text or voice). In this case skill is a bot hosted on Microsoft Azure cloud. Below diagram presents steps we will do in this section:

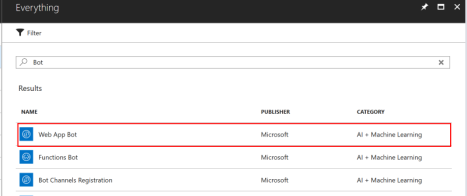
- Login to Azure portal and search for “Bot” in Marketplace:
- Fill all required configuration:
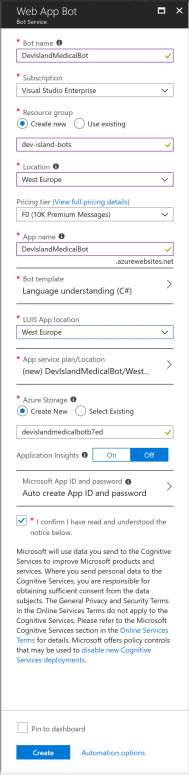
Please especially pay attention to bot template section. I selected “Language Understanding” template because I will integrate my bot with Language Understanding Intelligence Service (LUIS):

Second important note - LUIS app location should be the same as location of the bot (so in my case West Europe).
Click “Create” until resources are ready.

- Now it is time to configure LUIS and add some intents. LUIS is one of the cognitive services from Microsoft Azure that enables applications to understand what the user is saying in natural language.
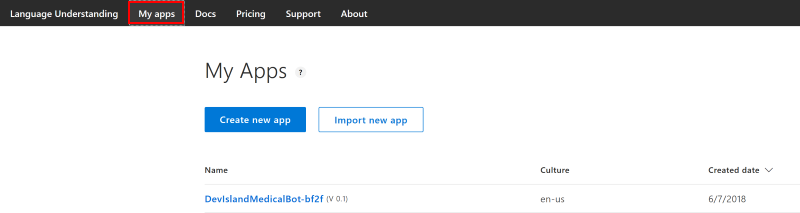
Sign in to LUIS portal and click “My apps”. Before you do this please check URL address for you region. In my case I selected West Europe location so I should sign in under: eu.luis.ai
You can check URL for your region here.
You should see “Intents” section with the list:

Before I go through them it is worth to explain some key concepts related with LUIS.
Intent
An intent represents actions the user wants to perform. The intent is a purpose or goal expressed in a user’s input, such as booking a flight or paying a bill. You have to define and name intents that correspond to these actions. A support app may define an intent named “GetComputer.”
Utterance
An utterance is text input from the user that application needs to understand. It may be a sentence, like “Where can I get my computer?”, or a fragment of a sentence, like “Computer” or “Computer order”.
Entiy
An entity represents detailed information that is relevant in the utterance. For instance, in the utterance “Order new computer on 25 of January”, “25 of January” is a date here. Entities which are mentioned in the user’s utterance can help LUIS to choose the specific action to take to answer a user’s request.
Five types of entities are available:
Simple
A simple entity is a generic entity that describes a single concept like computer or order.
Hierarchical
A hierarchical entity is a special type of a simple entity; defining a category and its members in the form of parent-child relationship. There can be Location entity with FromLocation and ToLocation child entities.
Composite
A composite entity is made up of other entities, such as prebuilt entities, list entities, and simple. The separate entities form a whole entity. PlaneTicketOrder is an example of such entity because it can have Number and ToLocation child entities.
List
List entities represent a fixed, closed set (white list) of related words in your system. City list is a good example because it allows variations of city names including city of airport (Sea-tac), airport code (SEA), postal zip code (98101), and phone area code (206).
Regex
A regular expression (regex) entity ignores case and ignores cultural variant. For instance regex entity kb[0-9]{6,} matches kb123456.
As I mentioned on the beginning of this section this will be medical bot which can ask questions related with user’s health. I will add some key intents by clicking “Create new intent”. Here are my intents:
-
SoarThroat
-
HeadAke
-
TwistedAnke
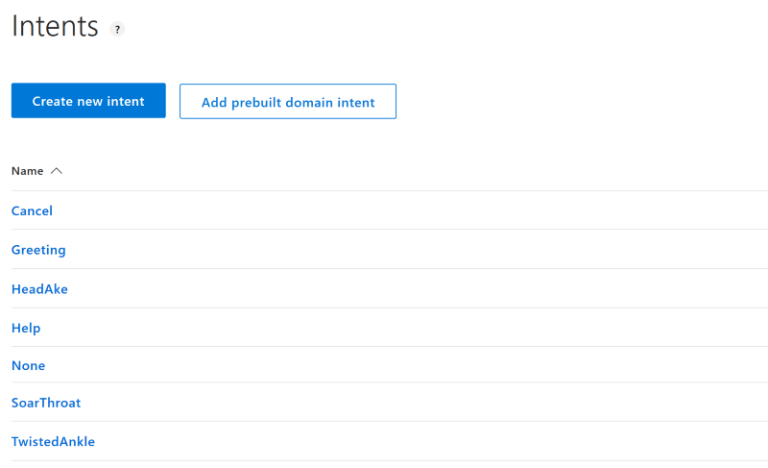
Rest of the intents can stay as they are. For each of my three intents I will add five utterances which user can send to bot.
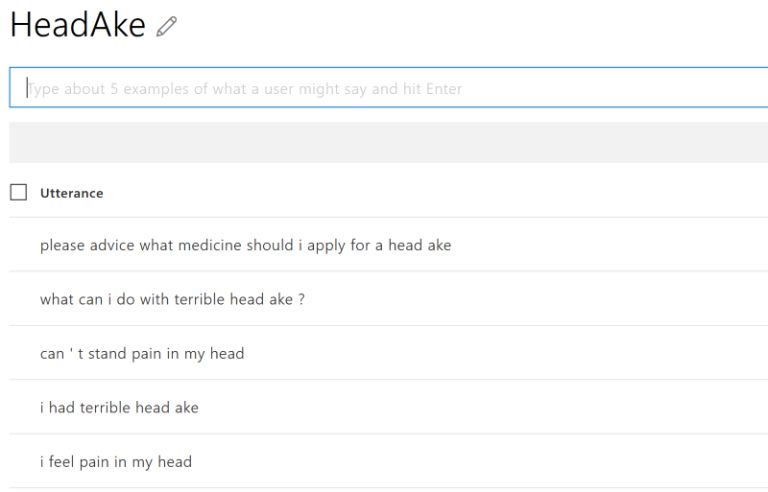
For HeadAke intent I applied below utterances:
For SoarThroat intent I applied below utterances:

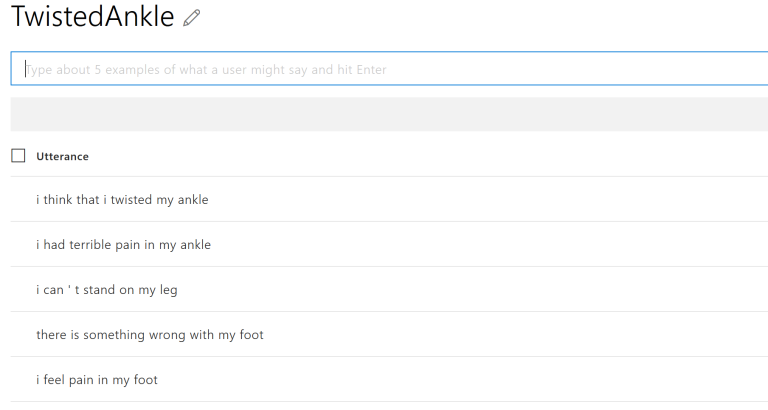
For TwistedAnkle intent I applied below utterances:
Now it is time to train LUIS so it can corrrectly discover intents from utterances sent by users. Click “Train” button:

You should see confirmation after few seconds:

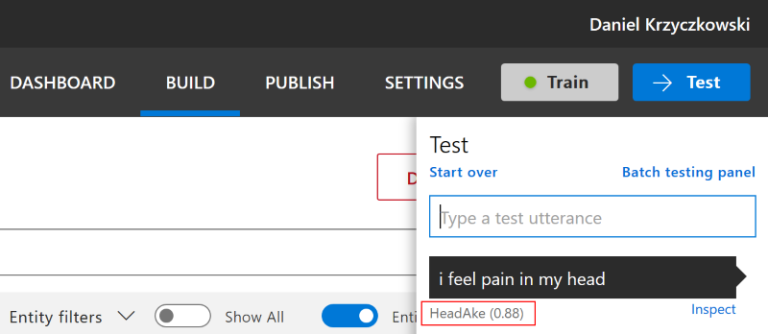
Now click “Test” and type utterance: “I feel pain in my head”. You should see that LUIS analyzed utterance and matched it with “HeadAke” intent:
Now click “Publish” section and then click “Publish” button:

LUIS application is successfully published. Now we can connect to it from the bot. Before we move forward please copy AppID and Key from “Resources and Keys” section on the same page. Remember to switch to your region (in my case West Europe):

- Verify app settings of the bot. It is worth to check that correct LUIS Key and AppID is added in application settings. To verify it click Web App Bot in Azure portal:


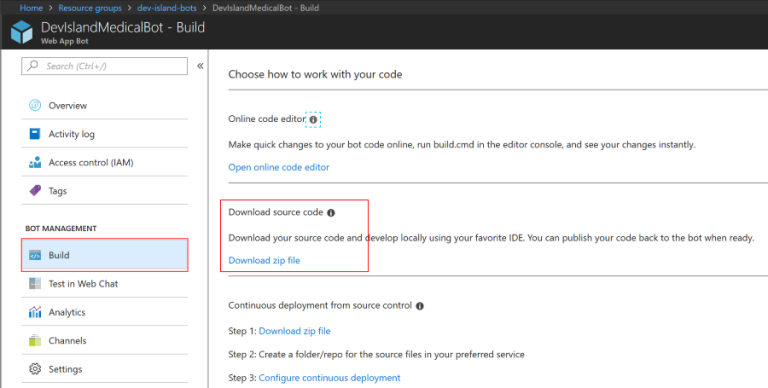
- Download and update bot source code
Go to “Build” tab and click “Download zip file”:
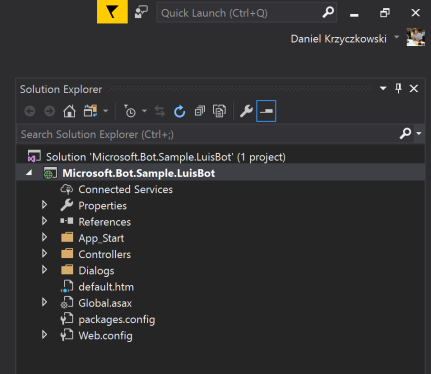
Extract zip file and open project in Visual Studio.
First of all add below settings inside appSettings tag in WebConfig file:
  <appSettings>
   <add key="MicrosoftAppId" value="" />
   <add key="MicrosoftAppPassword" value="" />
   <add key="LuisAppId" value="" />
   <add key="LuisAPIKey" value="" />
   <add key="LuisAPIHostName" value="" />
   <add key="AzureWebJobsStorage" value="" />
  </appSettings>
You can get all these values from Azure portal, from “Application settings” tab mentioned earlier:

Now open “LuisDialog.cs” file. You can see that there is pre-definied code for default intents from LUIS portal:
// Go to https://luis.ai and create a new intent, then train/publish your luis app.
// Finally replace "Greeting" with the name of your newly created intent in the following handler
        [LuisIntent("Greeting")]
        public async Task GreetingIntent(IDialogContext context, LuisResult result)
        {
            await this.ShowLuisResult(context, result);
        }

        [LuisIntent("Cancel")]
        public async Task CancelIntent(IDialogContext context, LuisResult result)
        {
            await this.ShowLuisResult(context, result);
        }

        [LuisIntent("Help")]
        public async Task HelpIntent(IDialogContext context, LuisResult result)
        {
            await this.ShowLuisResult(context, result);
        }
Now lets add three additional intents I defined in the LUIS portal: TwistedAnkle, HeadAke and SoarThroat. I also refactored the code so bot now can individually answer each utterance send by users connected with these three intents:
[Serializable]
public class BasicLuisDialog : LuisDialog<object>
{
public BasicLuisDialog() : base(new LuisService(new LuisModelAttribute(
ConfigurationManager.AppSettings["LuisAppId"],
ConfigurationManager.AppSettings["LuisAPIKey"],
domain: ConfigurationManager.AppSettings["LuisAPIHostName"])))
{
}
[LuisIntent("Greeting")]
public async Task GreetingIntent(IDialogContext context, LuisResult result)
{
var reply = context.MakeMessage();
reply.Speak = "Hello! How can I help you?";
reply.Text = "Hello! How can I help you?";
await context.PostAsync(reply);
context.Wait(MessageReceived);
}
[LuisIntent("SoarThroat")]
public async Task SoarThroatIntent(IDialogContext context, LuisResult result)
{
var reply = context.MakeMessage();
reply.Speak = "If it is soar throat I think that you should drink hot tea.";
reply.Text = "If it is soar throat I think that you should drink hot tea.";
reply.Attachments.Add(new Attachment()
{
ContentUrl = "https://assets.tetrapak.com/static/publishingimages/find-by-food/rollup/juice-drinks-tea.jpg",
ContentType = "image/jpg",
Name = "Tea.png"
});
await context.PostAsync(reply);
context.Wait(MessageReceived);
}
[LuisIntent("HeadAke")]
public async Task HeadAkeIntent(IDialogContext context, LuisResult result)
{
var reply = context.MakeMessage();
reply.Speak = "If it is head ake I think that you should get aspirine.";
reply.Text = "If it is head ake I think that you should get aspirine.";
reply.Attachments.Add(new Attachment()
{
ContentUrl = "https://atlas-content-cdn.pixelsquid.com/assets_v2/11/1158052823821195061/jpeg-600/G02.jpg",
ContentType = "image/jpg",
Name = "Aspirin.png"
});
await context.PostAsync(reply);
context.Wait(MessageReceived);
}
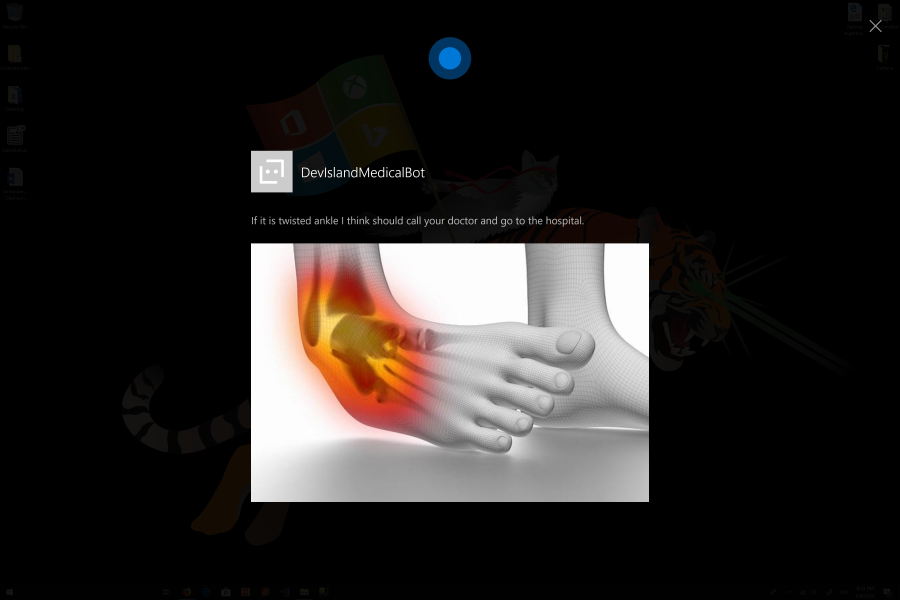
[LuisIntent("TwistedAnkle")]
public async Task TwistedAnkleIntent(IDialogContext context, LuisResult result)
{
var reply = context.MakeMessage();
reply.Speak = "If it is twisted ankle I think should call your doctor and go to the hospital.";
reply.Text = "If it is twisted ankle I think should call your doctor and go to the hospital.";
reply.Attachments.Add(new Attachment()
{
ContentUrl = "https://injuryhealthblog.com/wp-content/uploads/2017/11/shutterstock_227120620-min.jpg",
ContentType = "image/jpg",
Name = "Ankle.png"
});
await context.PostAsync(reply);
context.Wait(MessageReceived);
}
}
Please note that each reply has “Text”, “Speak” and “Attachments” properties. This is because we want Cortana to say response to the user, write answer on Cortana’s canvas and also display attachment - in this case image.
To build the bot I am using Bot Builder SDK available for .NET C#. You can read more here about it.
I also published whole source code of my simple medical bot on my GitHub. There is also great documentation related with Bot Builder.
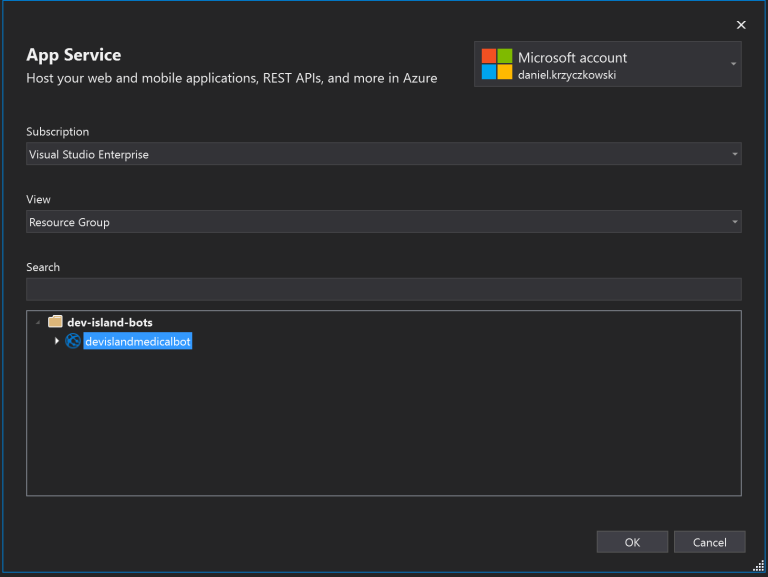
- Now it is time to deploy bot source code on Azure. Right click on solution in Visual Studio and click “Publish”:


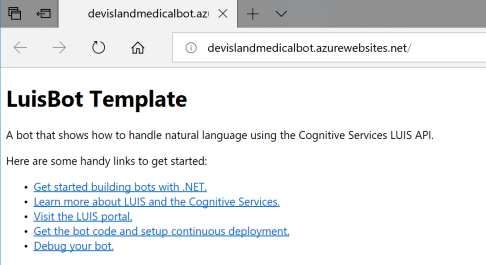
Once publishing is completed browser should open:
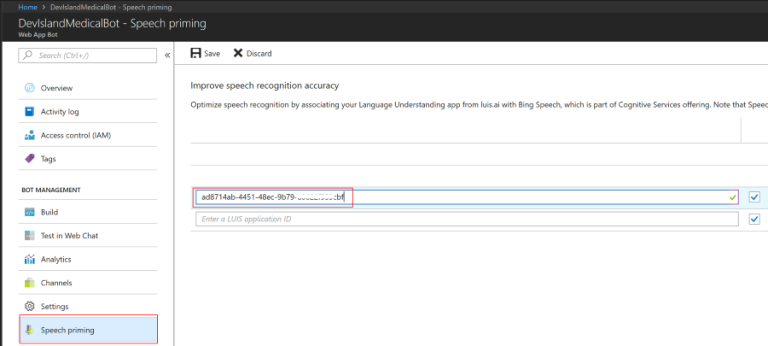
- Get back to the Azure portal and enable “Speech priming” - to improve speech recognition accuracy. You have to paste your LUIS app id here and click “Save”:
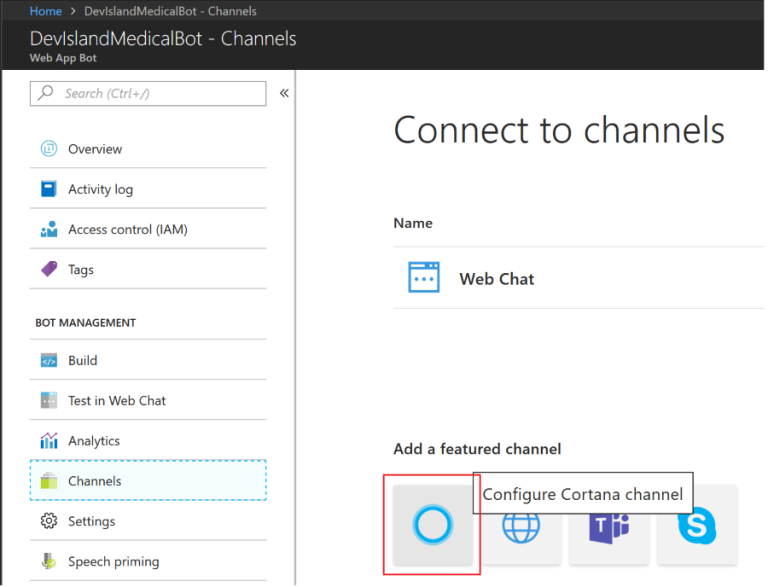
- Enable Cortana channel so users can communicate with your bot through Cortana smart assistant:
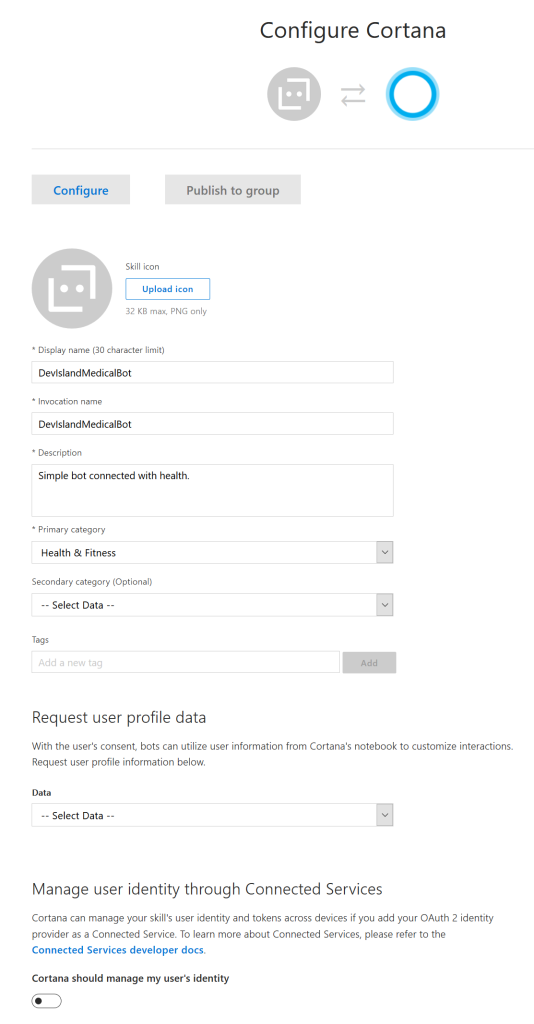
Fill required details as “Display Name”, “Description” or “Primary category”. You ca put it like in the picture below. Then click “Save” button:
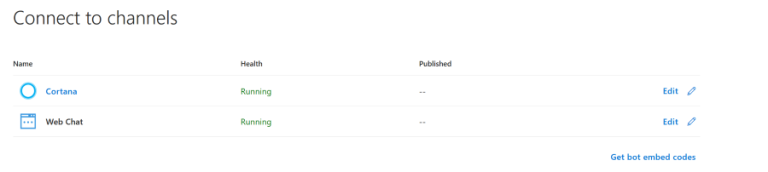
After few seconds you should see that Cortana channel was configured for the bot. It is time to test it!
Talk to your bot through Cortana
IMPORTANT! Make sure you are signed in to Cortana with the same Microsoft account that you used to register your bot.
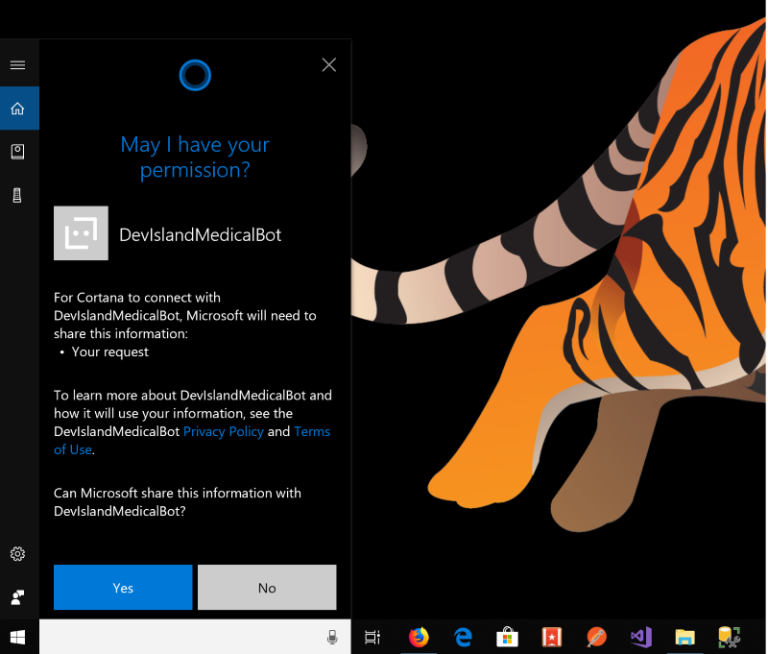
If you enabled Cortana (I presented how to do it on the beginning of this article) you can try to say: “Het Cortana, ask <Your Bot Name> about twisted ankle”. You should see that Cortana asks for permission. Click “YES”:
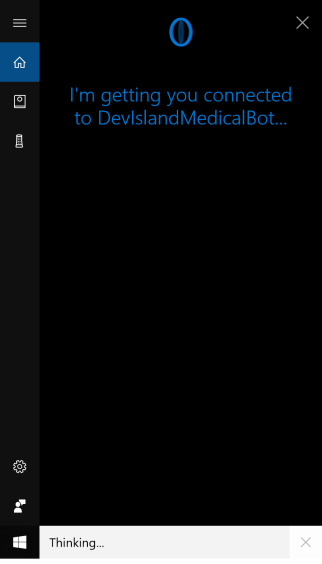
Cortana will contect to the bot hosted on Azure:
You can say “I feel pain in my leg” and see how Cortana reacts:
I published short video to present whole concept.
Create skill with Semantic Composition Language (SCL)
In this section I would like to present how to create Cortana skill using Semantic Composition Language (SCL).
Before I move forward it is worth to explain some key concepts related with SCL and Cortana skills dictionary.
Botlets
Botlets are the building blocks of a conversational flow. They contain part of the flow logic. They are reusable and can be chained together to create a more complex user experience. Please refer to documentation to see how to create botlet.
Semantic Composition Language (SCL)
Semantic Composition Language (SCL - pronounced skill) is a procedural domain specific language for botlet development where the flow reads in a linear fashion and enables developers to stitch together components from different sources.
Microsoft Ontology (MSO)
MSO (Microsoft Ontology) is a set of entity definitions which describe many real-world objects, such as people, restaurant reservations, movies, or stock prices. Each MSO entity includes properties to define the features of the item it classifies. For example, mso.person includes fields for the given_name, family_name, gender, and occupation.
For more please refer to great documentation related with skills.
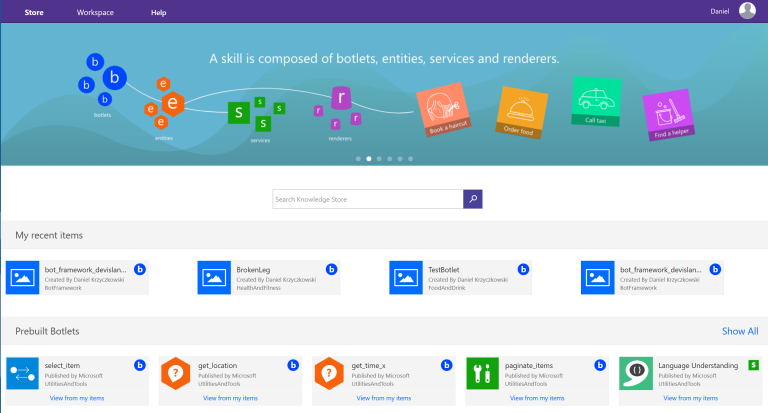
-
Login to Knowledge.Store
-
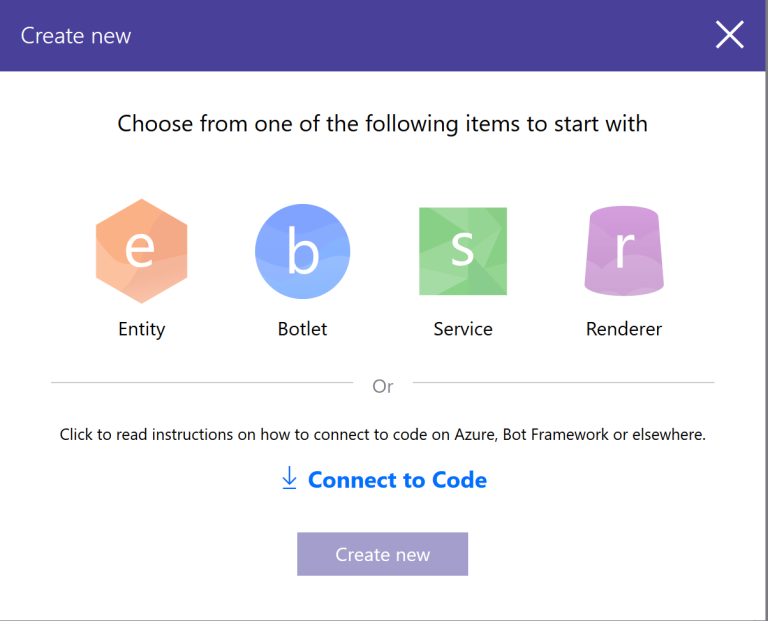
Create new botlet:
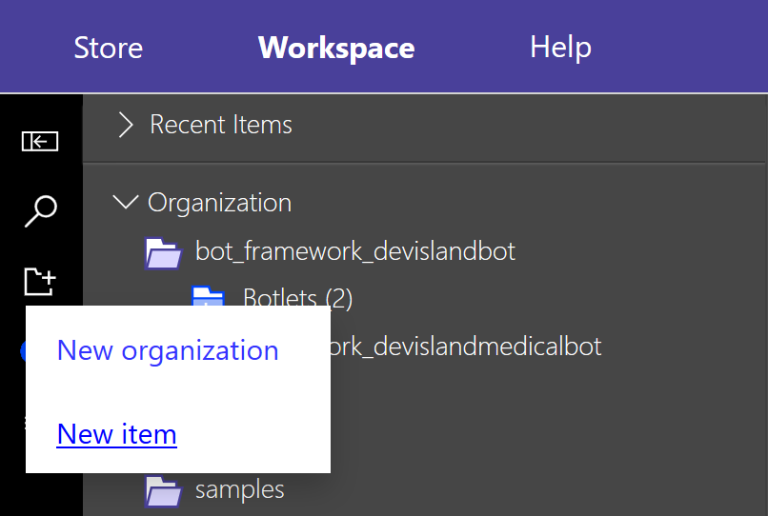
- Select “Botlet”:
- Once you fill all required fields you can start using SCL language to define the skill. In my case I created similar conversation flow as with my medical bot:
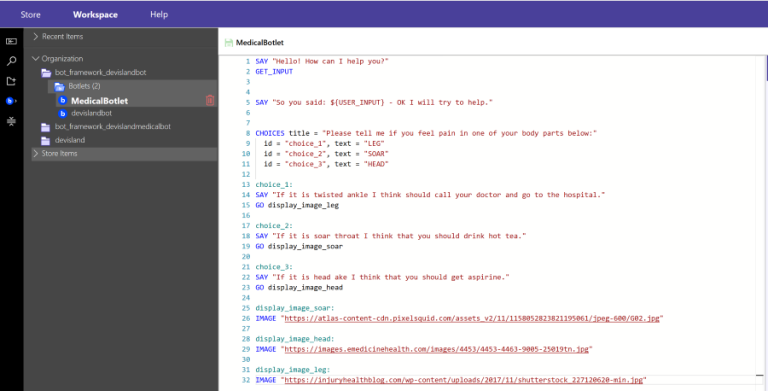
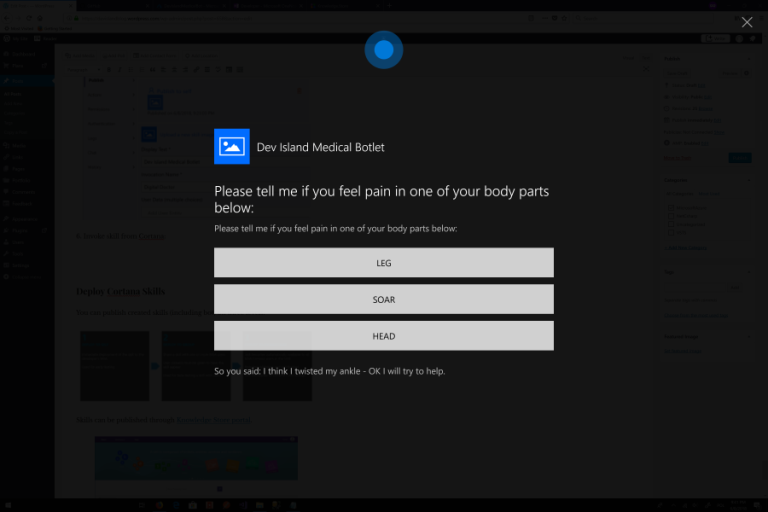
This is my conversation flow defined. Cortana will welcome user and thank ask what happened. Basing on the user input Crotana suggests what to do.
SAY "Hello! How can I help you?"
GET_INPUT


SAY "So you said: ${USER_INPUT} - OK I will try to help."


CHOICES title = "Please tell me if you feel pain in one of your body parts below:"
  id = "choice_1", text = "LEG"
  id = "choice_2", text = "SOAR"
  id = "choice_3", text = "HEAD"

choice_1:
SAY "If it is twisted ankle I think should call your doctor and go to the hospital."
GO display_image_leg

choice_2:
SAY "If it is soar throat I think that you should drink hot tea."
GO display_image_soar

choice_3:
SAY "If it is head ake I think that you should get aspirine."
GO display_image_head

display_image_soar:
IMAGE "https://atlas-content-cdn.pixelsquid.com/assets_v2/11/1158052823821195061/jpeg-600/G02.jpg"

display_image_head:
IMAGE "https://images.emedicinehealth.com/images/4453/4453-4463-9005-25019tn.jpg"

display_image_leg:
IMAGE "https://injuryhealthblog.com/wp-content/uploads/2017/11/shutterstock_227120620-min.jpg"
- Publish skill so you can invoke it from Cortana. In “Publish” tab type:
Display name - this is how your botlet will be named in the Knowledge Store.
Invocation Name - this is how you will invoke the skill. In my case I will invoke it saying to Cortana: “Hey Cortana, ask Digital Doctor about twisted ankle”.

- Invoke skill from Cortana:
Do not hesitate to use my source code for botlet. That’s it!
Deploy Cortana Skills
You can publish created skills (including bot) on three levels:
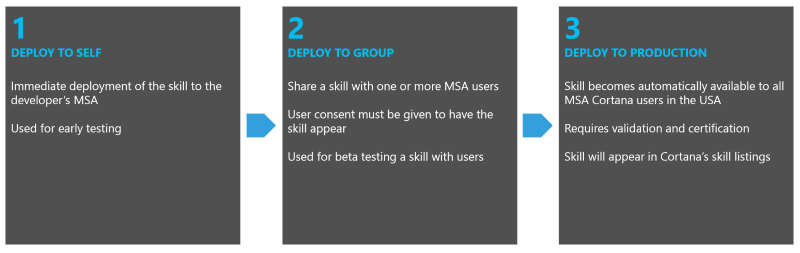
Skills can be published through Knowledge Store portal.
You can read more about it in the official documentation in “Discovery and Management” section.
Wrapping up
With Cortana smart assistant you can communicate with services in simple and “human-friendly” way by voice or text. You can also see that whole topic is complex so I wanted to create this article to make it easier to start using Cortana Skills Kit.