Introduction
This is the next article from the series called DevSecOps practices for Azure cloud workloads. In this article, I would like to focus on Azure Policies and how we can utilize DevOps automation to automate Azure cloud governance. As always, it is good to understand some fundamentals first.
Understand the Azure Policy concept
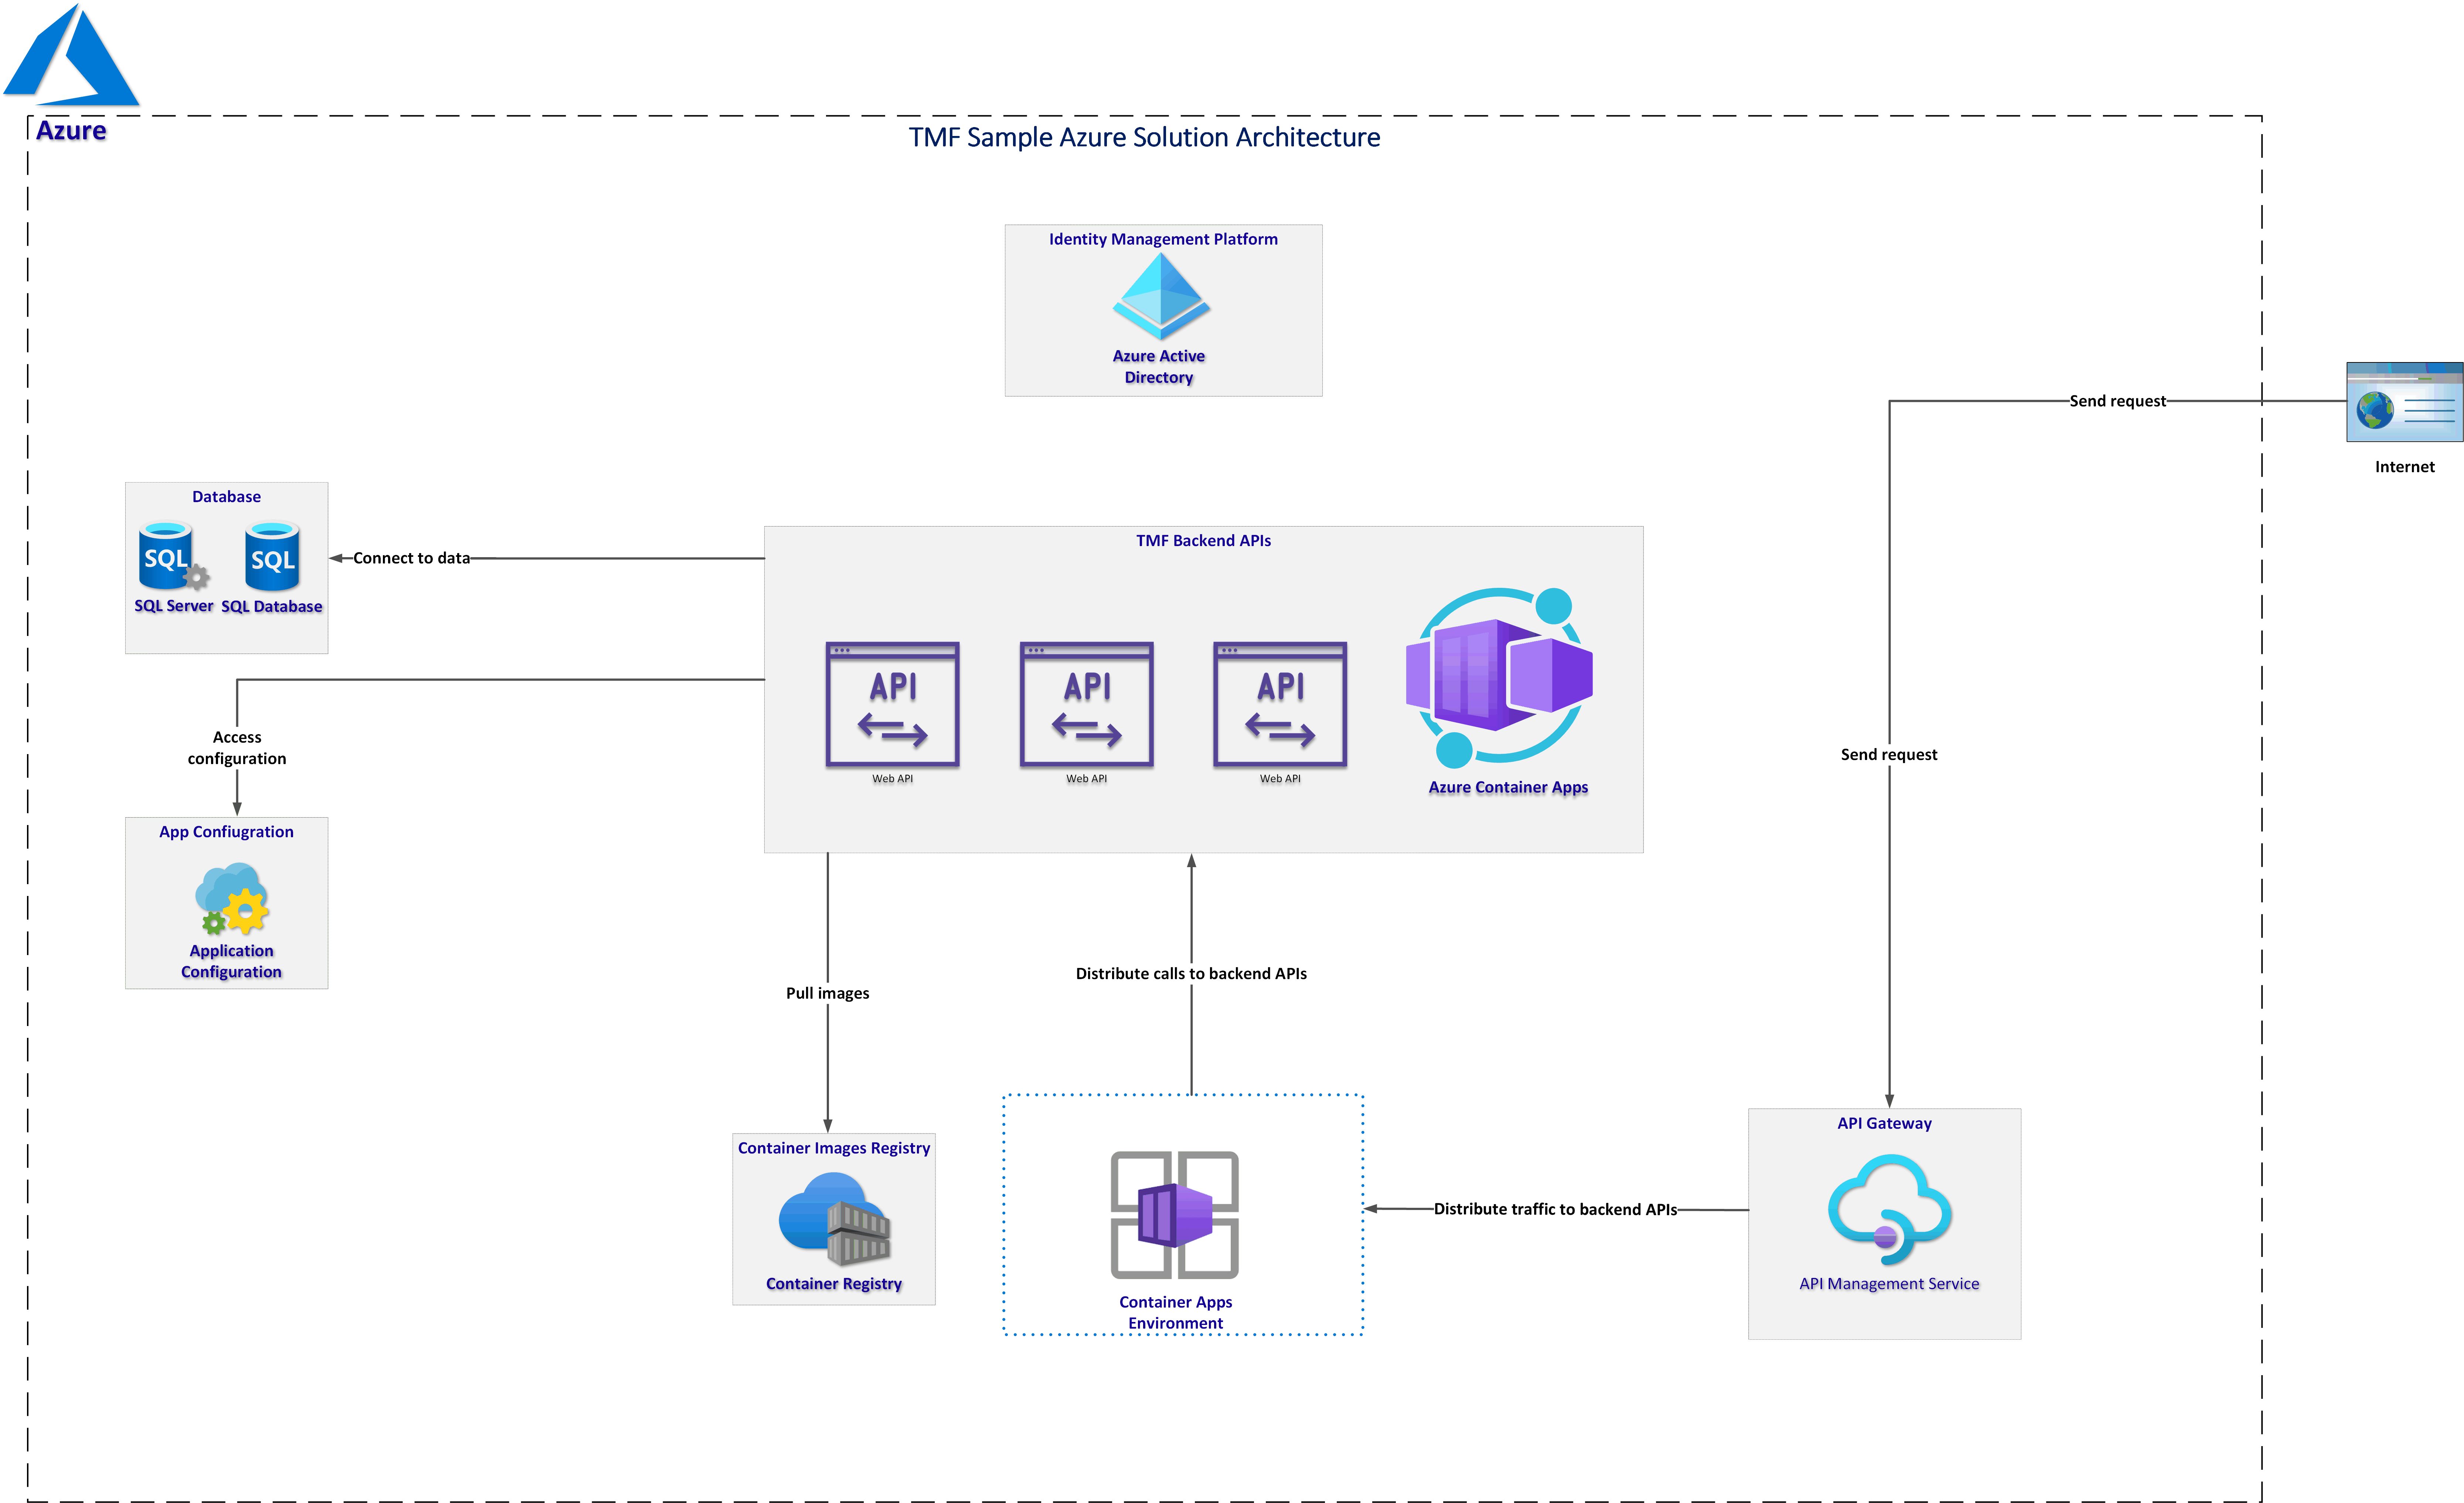
Probably most of us are familiar with creating resources in the Azure cloud. We can use Azure Portal or we can create resources using ARM/Bicep, or other tools like Azure CLI. The typical approach is to create an Azure Resource Group and then create Azure Resources inside it. Eventually, we have one container with all Azure resources in one place. However, the real-world situation looks quite different. Organizations that utilize Azure cloud, create many Azure Resources inside many Resource Groups and need a way to efficiently manage access, policies, compliance, and track costs. This is why it is important to understand the core Azure architectural components.
Azure management levels and hierarchy
Azure provides four levels of management:
- Management groups
- Subscriptions
- Resource groups
- Resources
The following diagram shows the relationship between these levels:
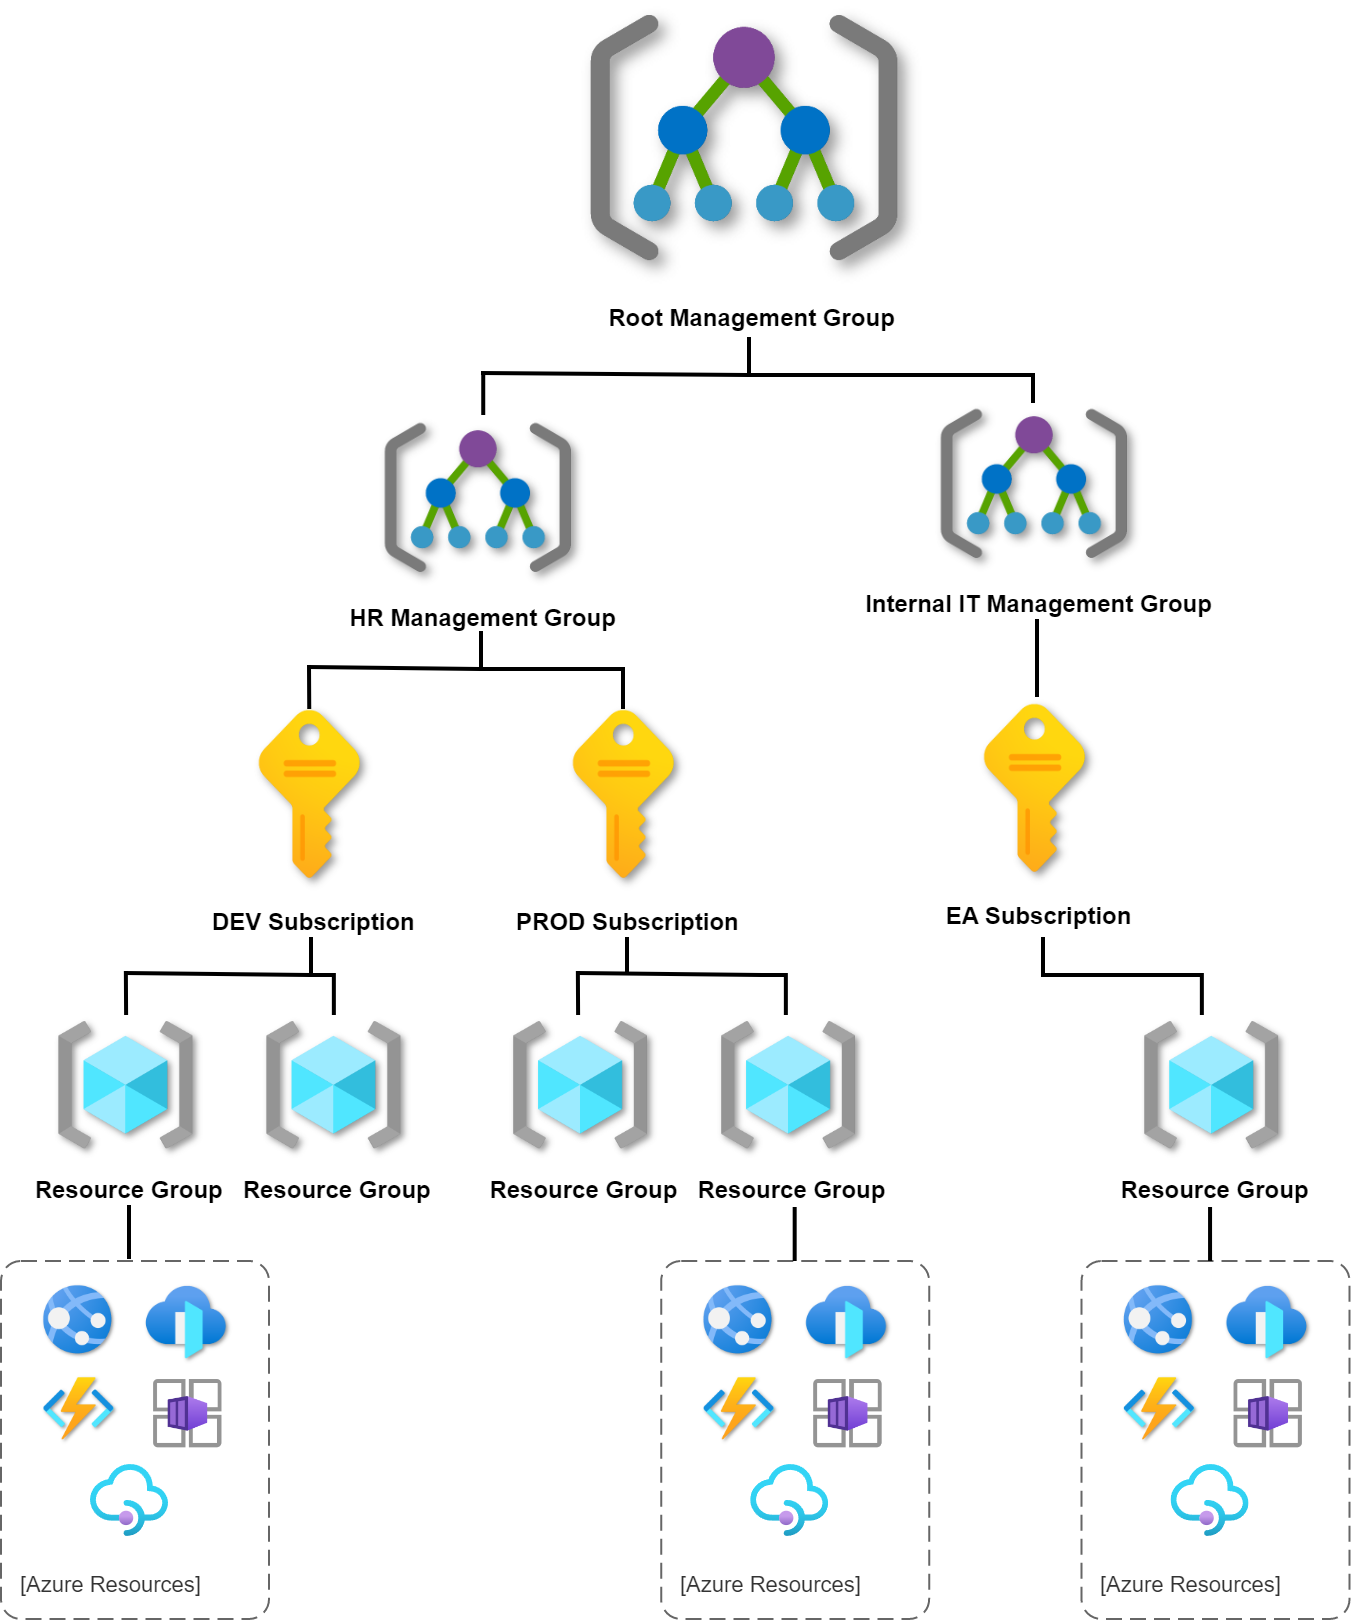
Azure arranges Management Groups in a single hierarchy. This hierarchy can be defined in our Azure Active Directory (Azure AD) tenant to align with our organization’s structure and needs. The top level is called the Root Management Group. We can define up to six levels of management groups in your hierarchy. Only one Management Group contains a Subscription. Let me collect some important details about each level:
Management Groups
- Management groups can include multiple Azure subscriptions.
- Subscriptions inherit conditions applied to the Management Group.
- 10,000 Management Groups can be supported in a single Azure Active Directory.
- Management Group tree can support up to six levels of depth (there can be six Management Groups under a single Management Group)
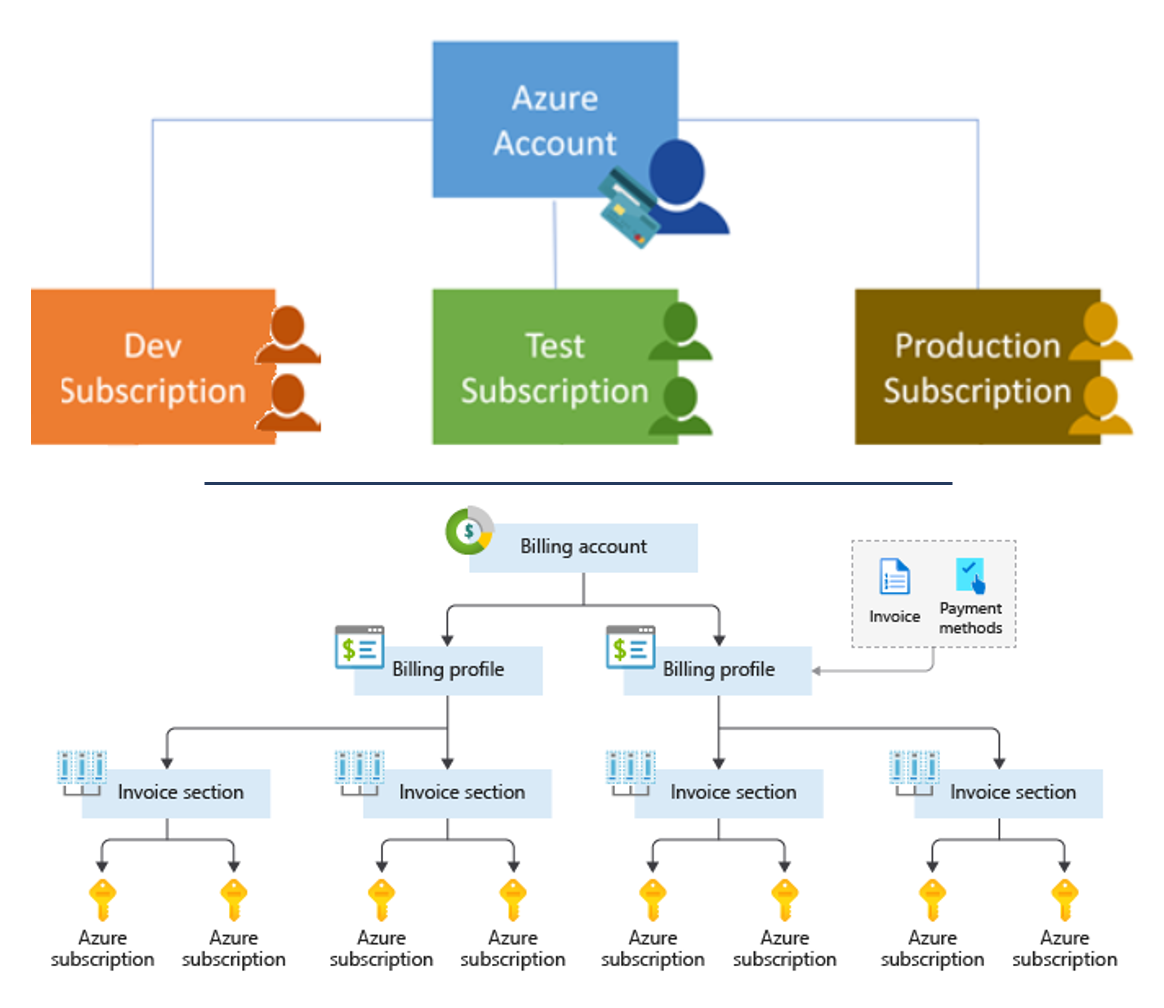
Azure Subscriptions
- Azure Subscription provides authenticated and authorized access to Azure accounts. Only identities in Azure AD, or a directory that is trusted by Azure AD, can create an Azure Subscription.
- Azure subscription establishes billing boundary. We can generate separate billing reports and invoices for each Azure Subscription.
- Azure subscription establishes access control boundary. We manage and control access to the resources that users can provision with specific Azure Subscriptions.
Resource Groups
- Resource Group is a container to manage and aggregate Azure Resources in a single unit.
- Resources can exist in only one Azure Resource Group.
- Applications can utilize multiple Resource Groups.
- One Resource Group can be assigned to only one Azure Subscription.
Azure Resources
- Azure resource is a concrete service we create like Azure Web App or Azure Container Registry.
- Resources can exist in different regions.
- Some Azure Resources can be moved to different Resource Groups.
- Applications can utilize multiple resource groups.
Enforce rules on Azure resources

Now we understand the management of levels and hierarchy of Azure, it is time to talk about how to organize Azure resources, and enforce organizational standards like naming conventions or Azure regions where resources can be created. If we have only a few subscriptions, it is quite easy to manage them independently. However, managing compliance at scale requires a more efficient approach. Azure Policy helps to enforce organizational standards and to assess compliance at scale. Provides governance and resource consistency with regulatory compliance, security, cost, and management. We can define multiple policies to enforce different rules over Azure resource configurations so the configurations stay compliant with corporate standards. We can apply the policies to Azure Resources by using Management Groups.
Here are a few use cases for Azure Policies:
- Require tag and its value – Enforces a required tag and its value (like Environment:PROD, or Department:Marketing)
- Allowed locations – Restrict the locations our organization can specify when deploying resources.
- Allowed resource types – Specify the resource types that your organization can deploy.
Define Azure policy
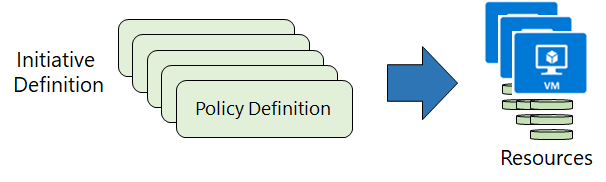
Azure Policy is used to create policies that define conventions for Azure Resources. A policy definition describes the compliance conditions for a resource, and the actions to complete when the conditions are met. One or more policy definitions are grouped into an initiative definition, to control the scope of policies and evaluate the compliance of Azure Resources.
There are four steps when creating and using Azure Policies:
- We create Policy definitions.
- We create Initiative Definitions with a collection of Policies.
- We set the scope for the Initiative Definition - scope can be: Management Group, Subscription, or Resource Group. We cannot assign policies directly to Azure resources, like Azure Web Apps.
- We determine compliance.
Policy definition creation
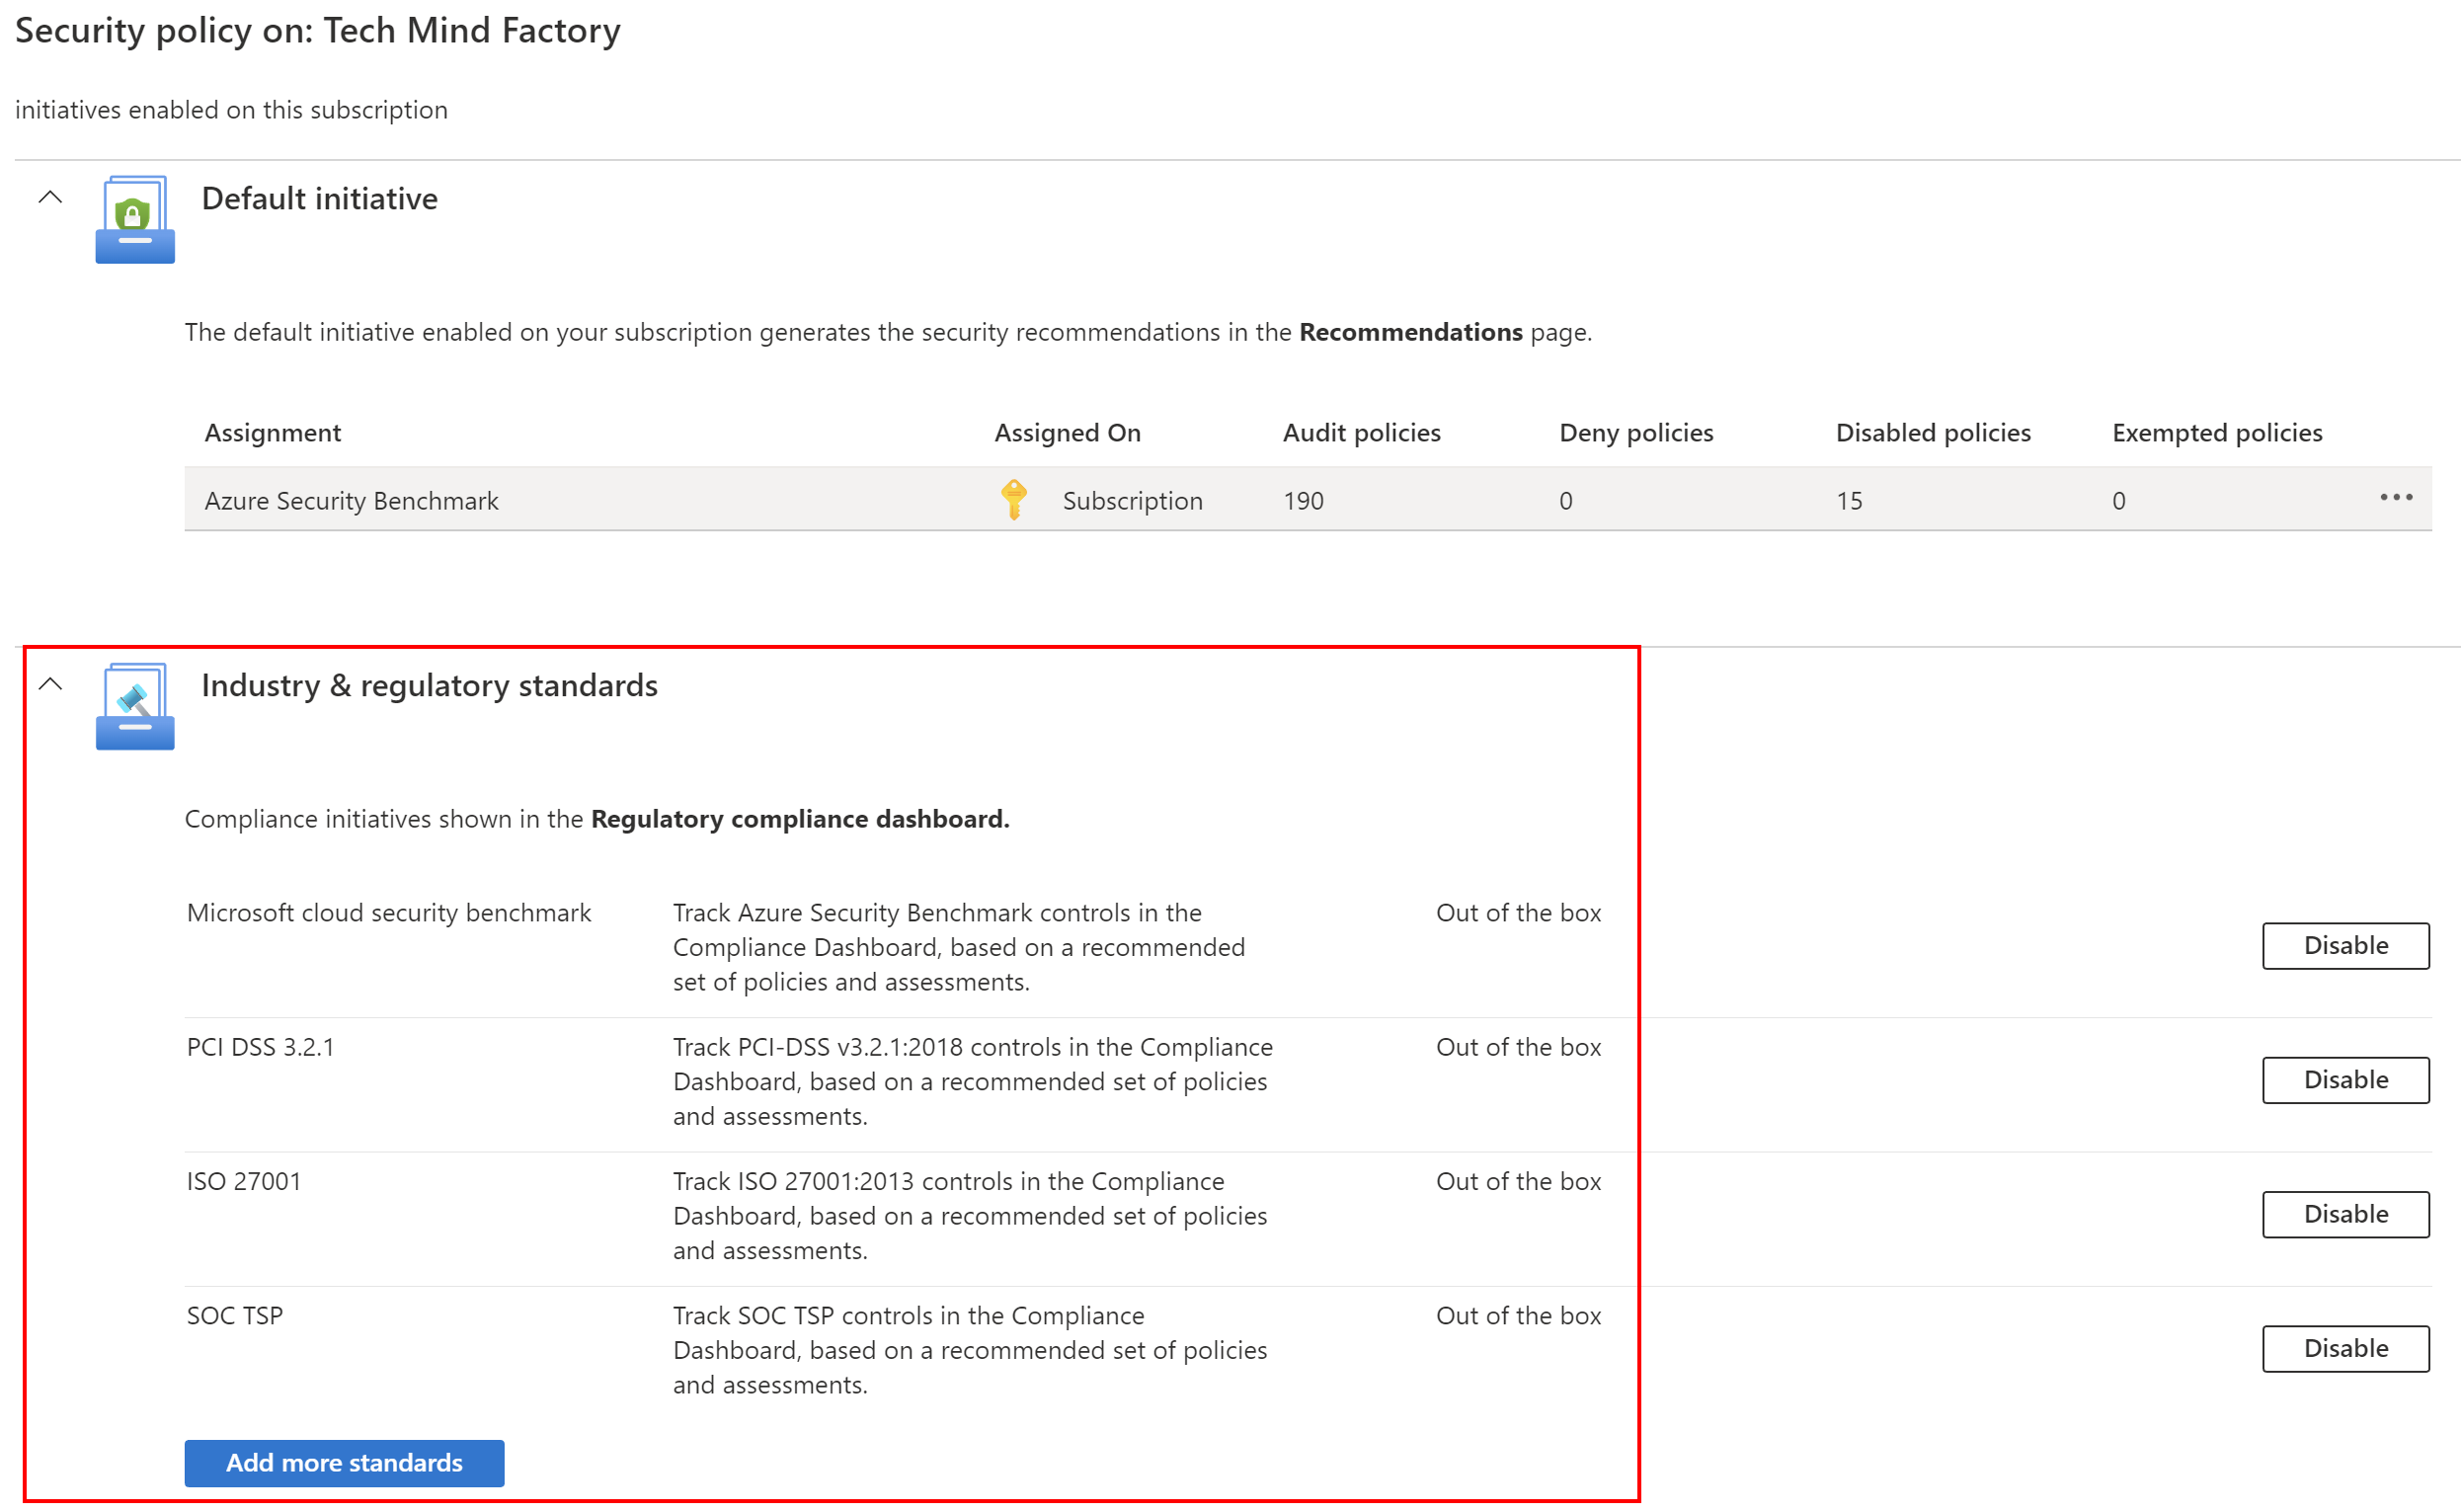
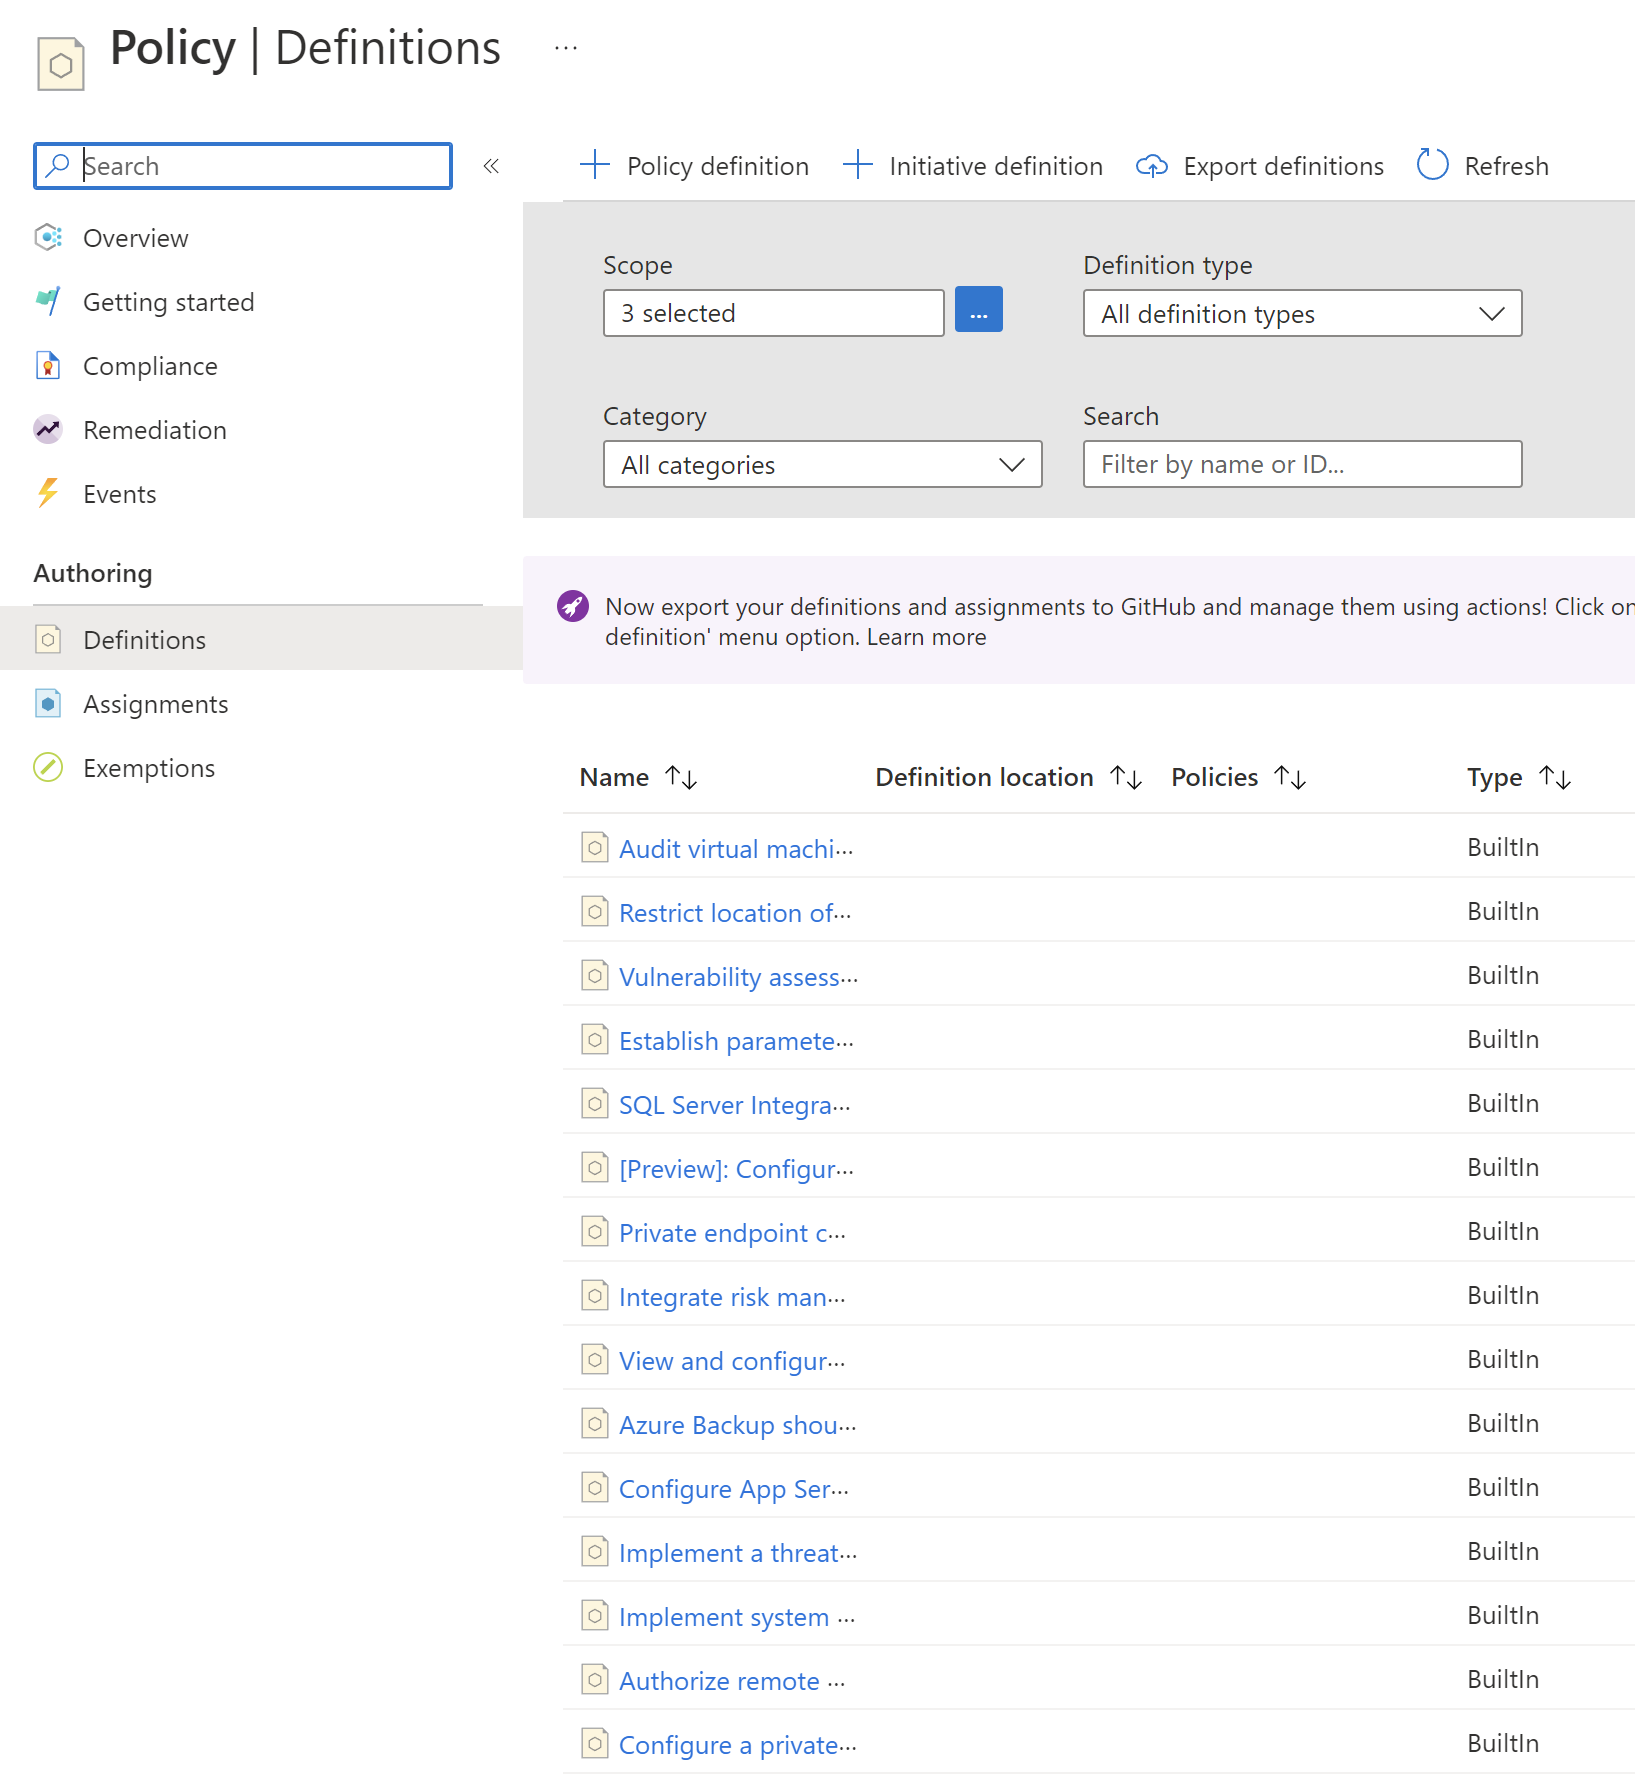
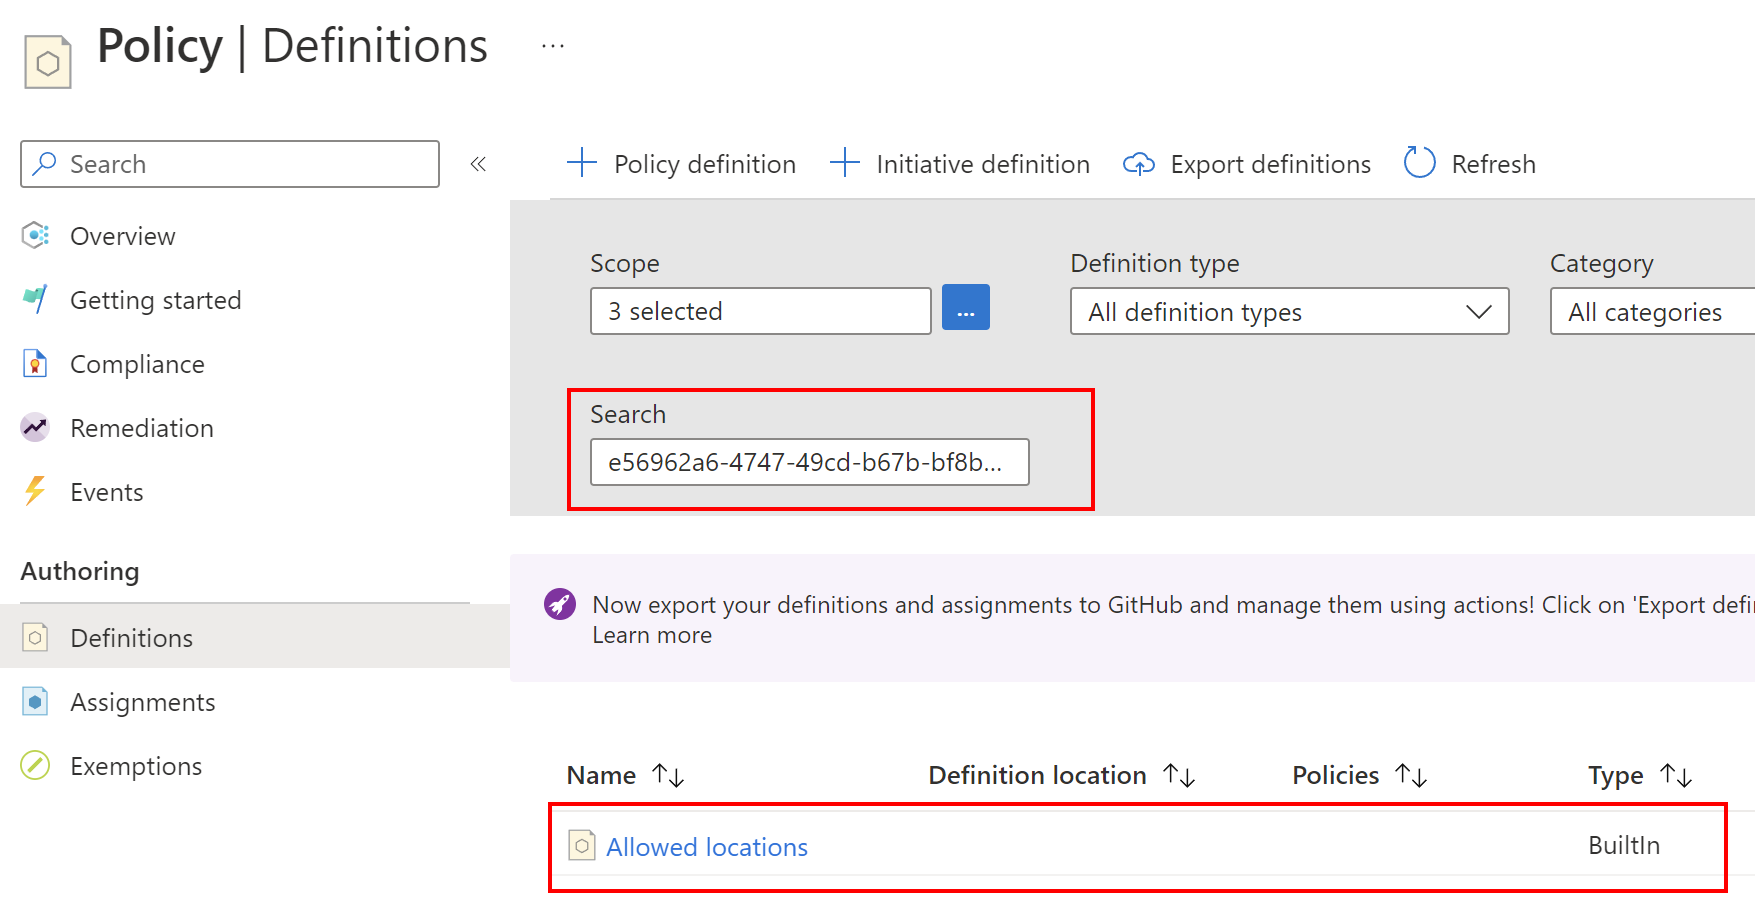
It is important to say that many different definitions are already available to us so we do not need to create all of the from scratch. If we open Azure Policy built-in definitions for Azure Resource Manager we can access many different definitions. All of them are available on GitHub. In the Azure Portal, we can access definitions and filter them out based on our needs:
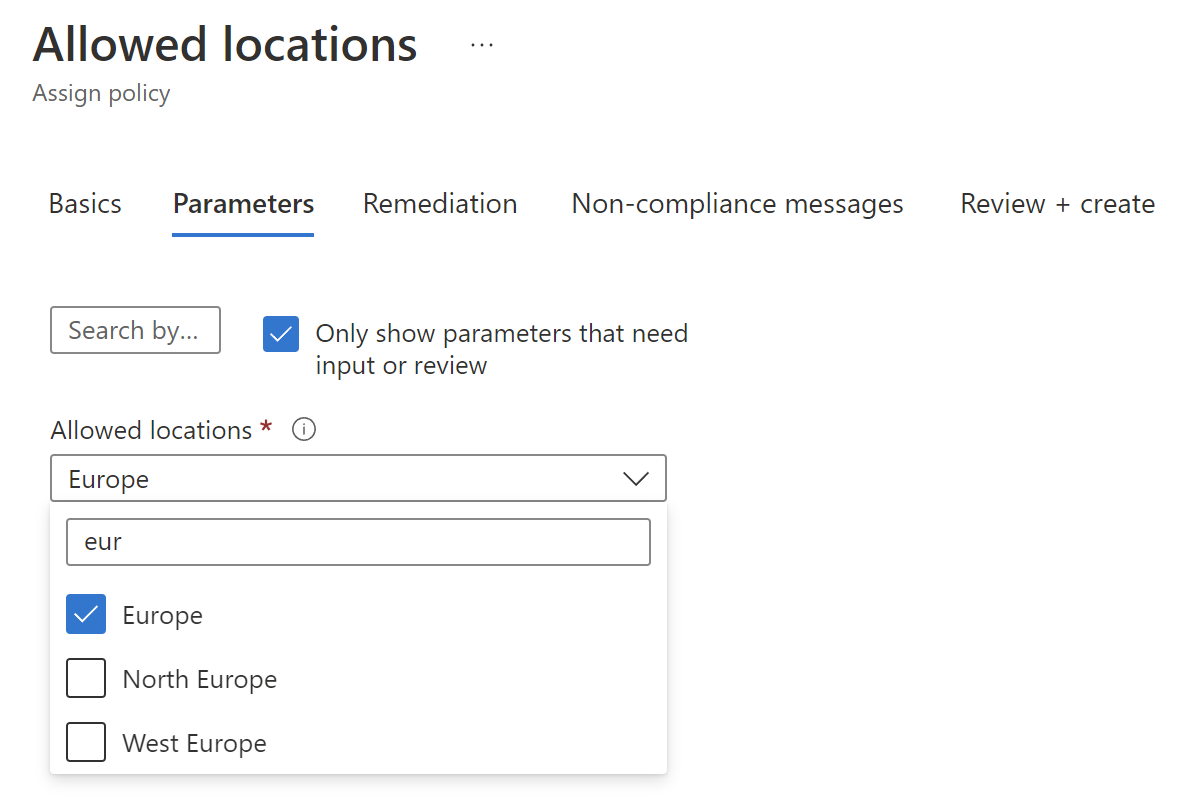
We can for instance limit Azure regions in which we can create Azure Resources:
All policy definitions have a specific JSON format. Here is an example of policy definition to restrict the locations our organization can specify when deploying Azure Cosmos DB resources:
{
  "properties": {
    "displayName": "Azure Cosmos DB allowed locations",
    "policyType": "BuiltIn",
    "mode": "Indexed",
    "description": "This policy enables you to restrict the locations your organization can specify when deploying Azure Cosmos DB resources. Use to enforce your geo-compliance requirements.",
    "metadata": {
      "version": "1.1.0",
      "category": "Cosmos DB"
    },
    "parameters": {
      "listOfAllowedLocations": {
        "type": "Array",
        "metadata": {
          "displayName": "Allowed locations",
          "description": "The list of locations that can be specified when deploying Azure Cosmos DB resources.",
          "strongType": "location"
        }
      },
      "policyEffect": {
        "type": "String",
        "metadata": {
          "displayName": "Policy Effect",
          "description": "The desired effect of the policy."
        },
        "allowedValues": [
          "audit",
          "Audit",
          "deny",
          "Deny",
          "disabled",
          "Disabled"
        ],
        "defaultValue": "Deny"
      }
    },
    "policyRule": {
      "if": {
        "allOf": [
          {
            "field": "type",
            "equals": "Microsoft.DocumentDB/databaseAccounts"
          },
          {
            "count": {
              "field": "Microsoft.DocumentDB/databaseAccounts/Locations[*]",
              "where": {
                "value": "[replace(toLower(first(field('Microsoft.DocumentDB/databaseAccounts/Locations[*].locationName'))), ' ', '')]",
                "in": "[parameters('listOfAllowedLocations')]"
              }
            },
            "notEquals": "[length(field('Microsoft.DocumentDB/databaseAccounts/Locations[*]'))]"
          }
        ]
      },
      "then": {
        "effect": "[parameters('policyEffect')]"
      }
    }
  },
  "id": "/providers/Microsoft.Authorization/policyDefinitions/0473574d-2d43-4217-aefe-941fcdf7e684",
  "type": "Microsoft.Authorization/policyDefinitions",
  "name": "0473574d-2d43-4217-aefe-941fcdf7e684"
}
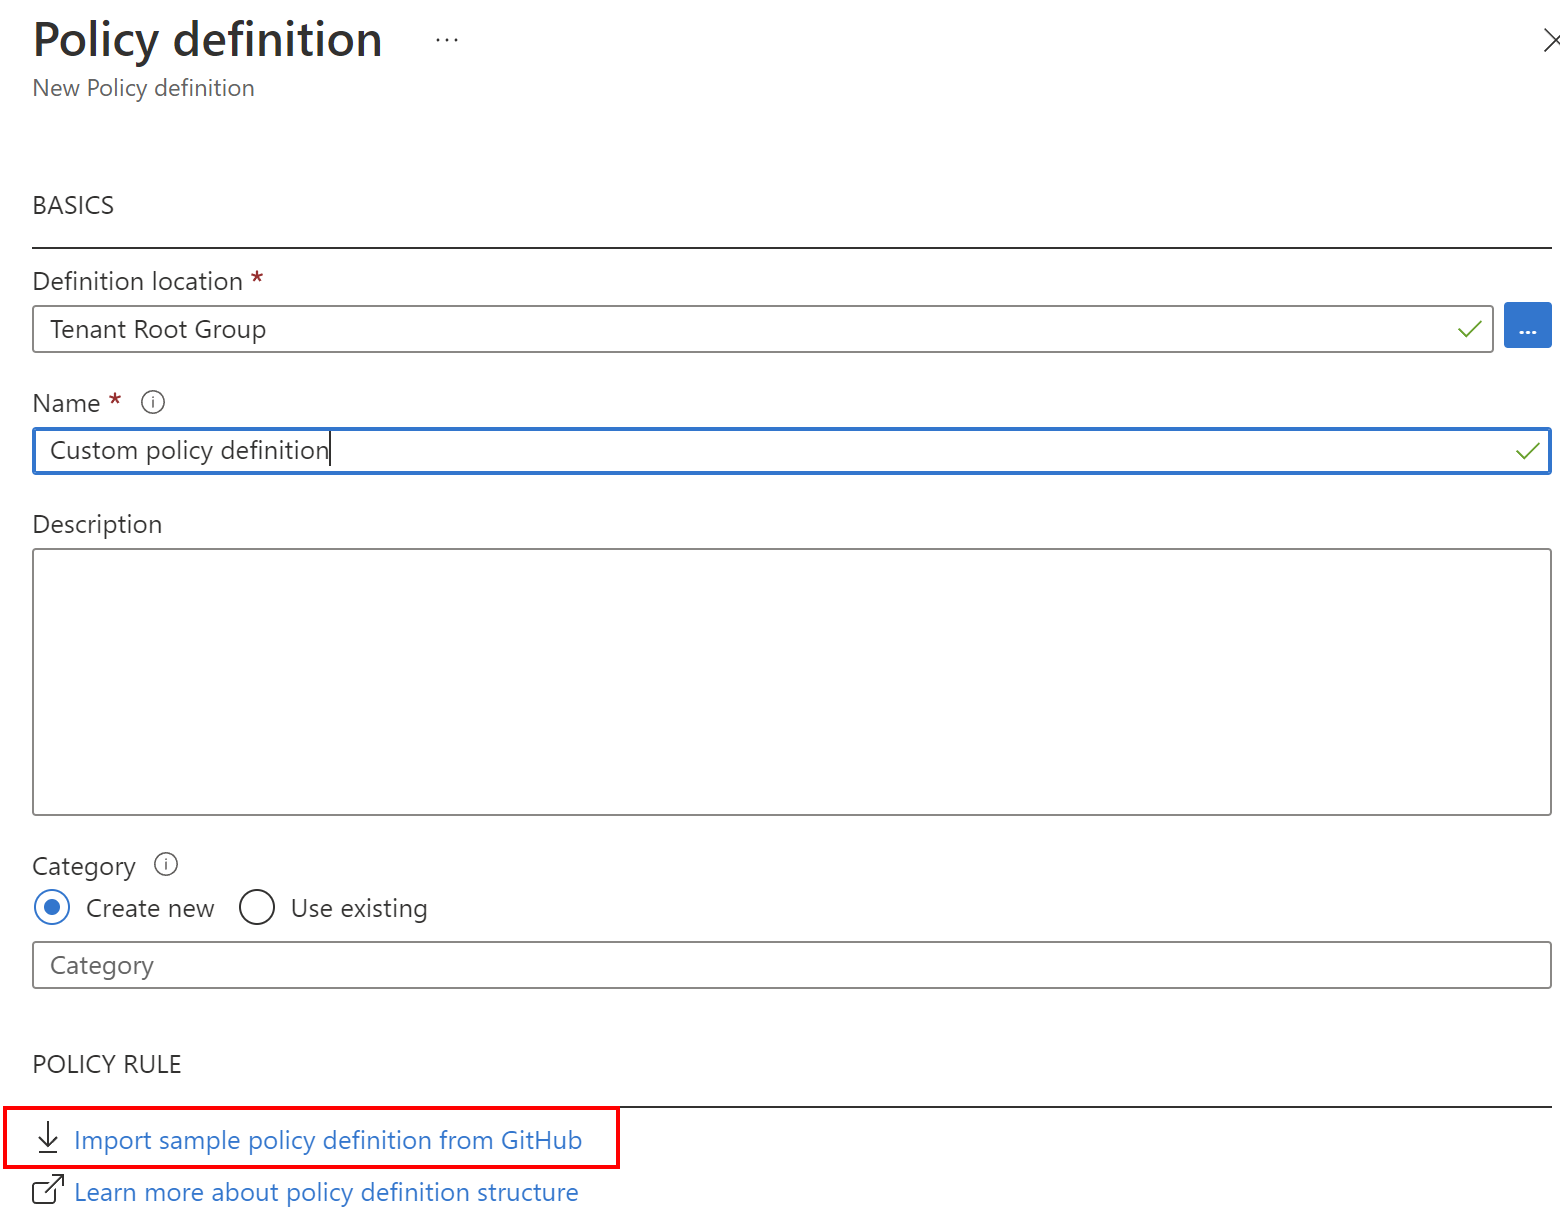
We can also create custom policy definitions and even export them to GitHub:
Initiative definition creation
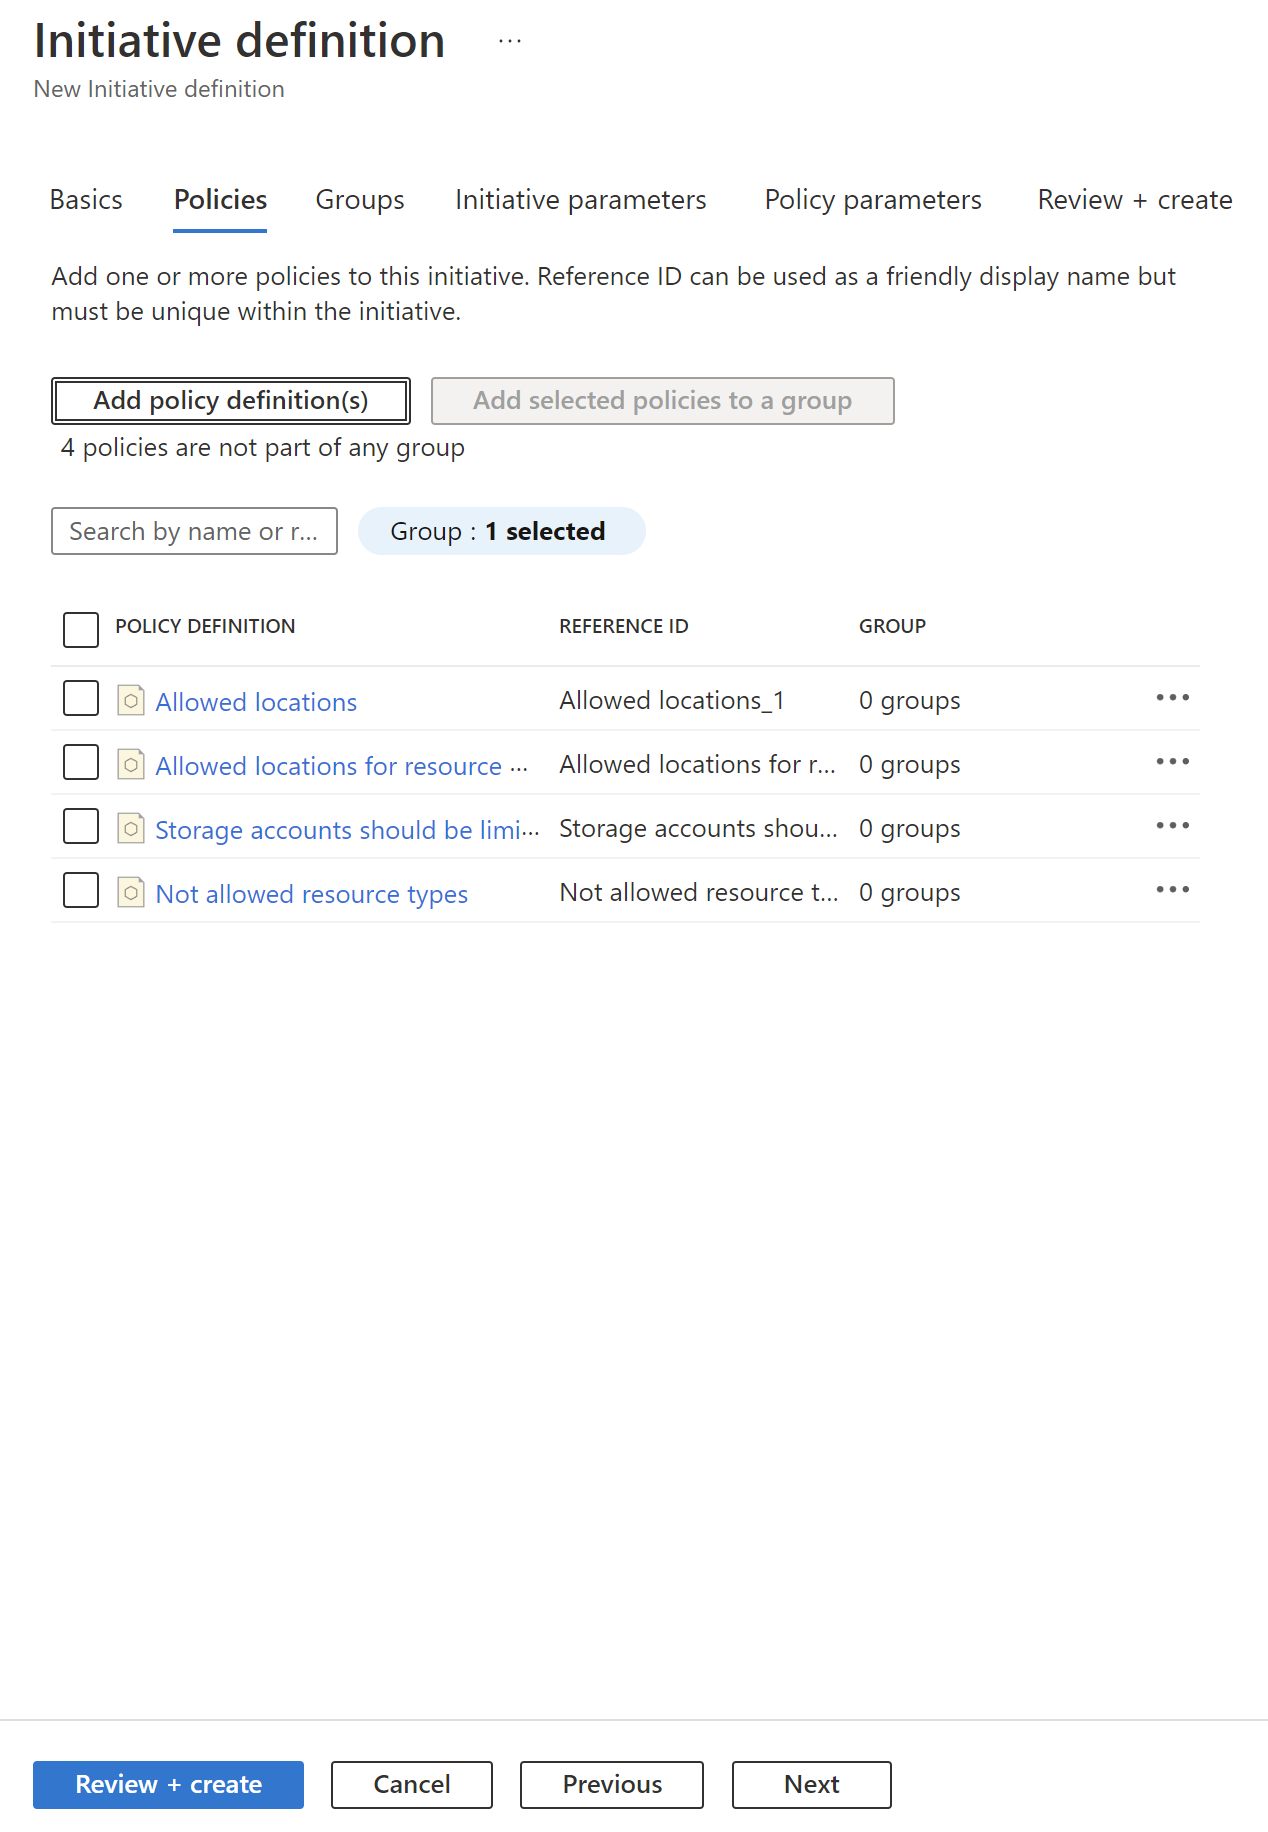
As mentioned before, Initiative groups policy definitions and include one or more policies. Initiatives have also a specific JSON format. Here is an example of how we can specify multiple policies for the initiative in the Azure Portal:
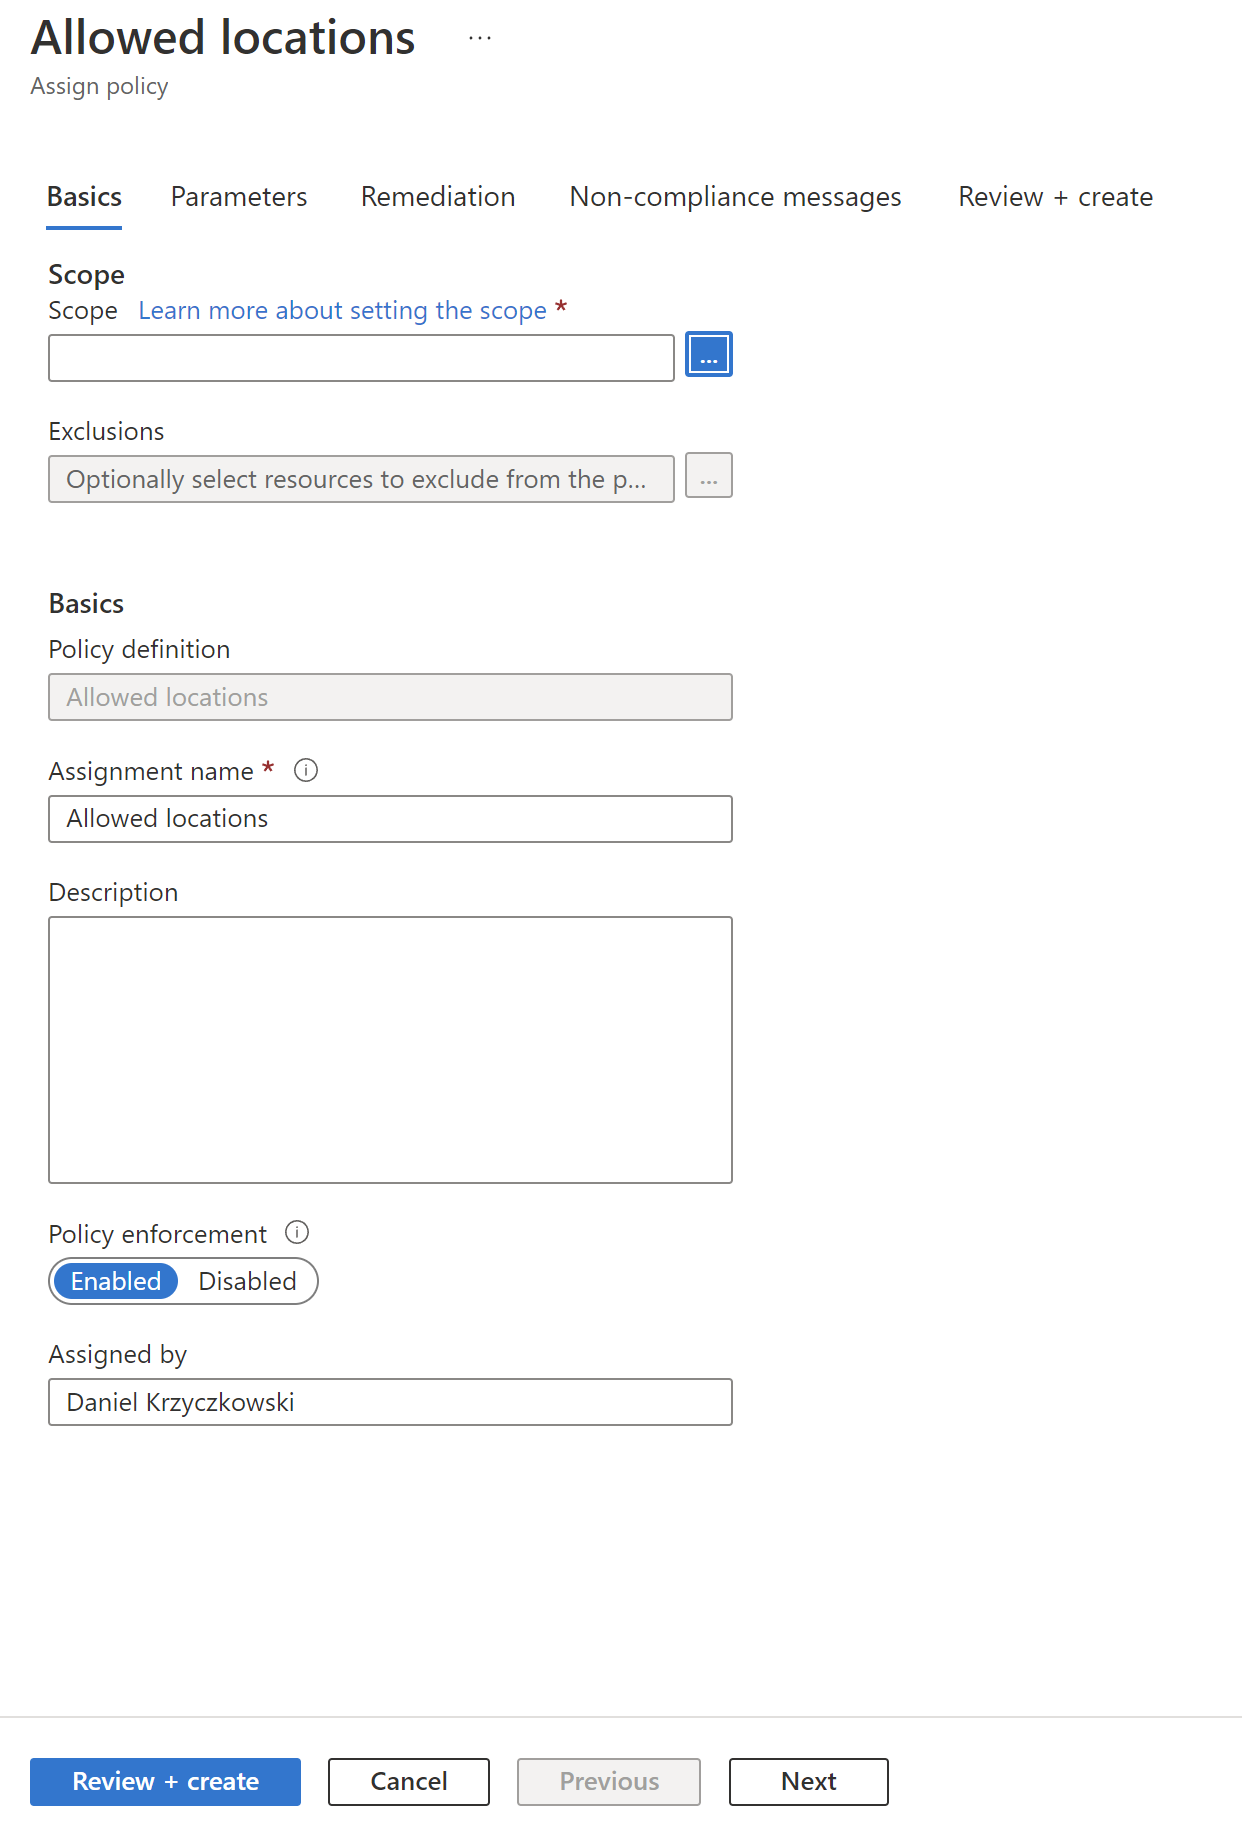
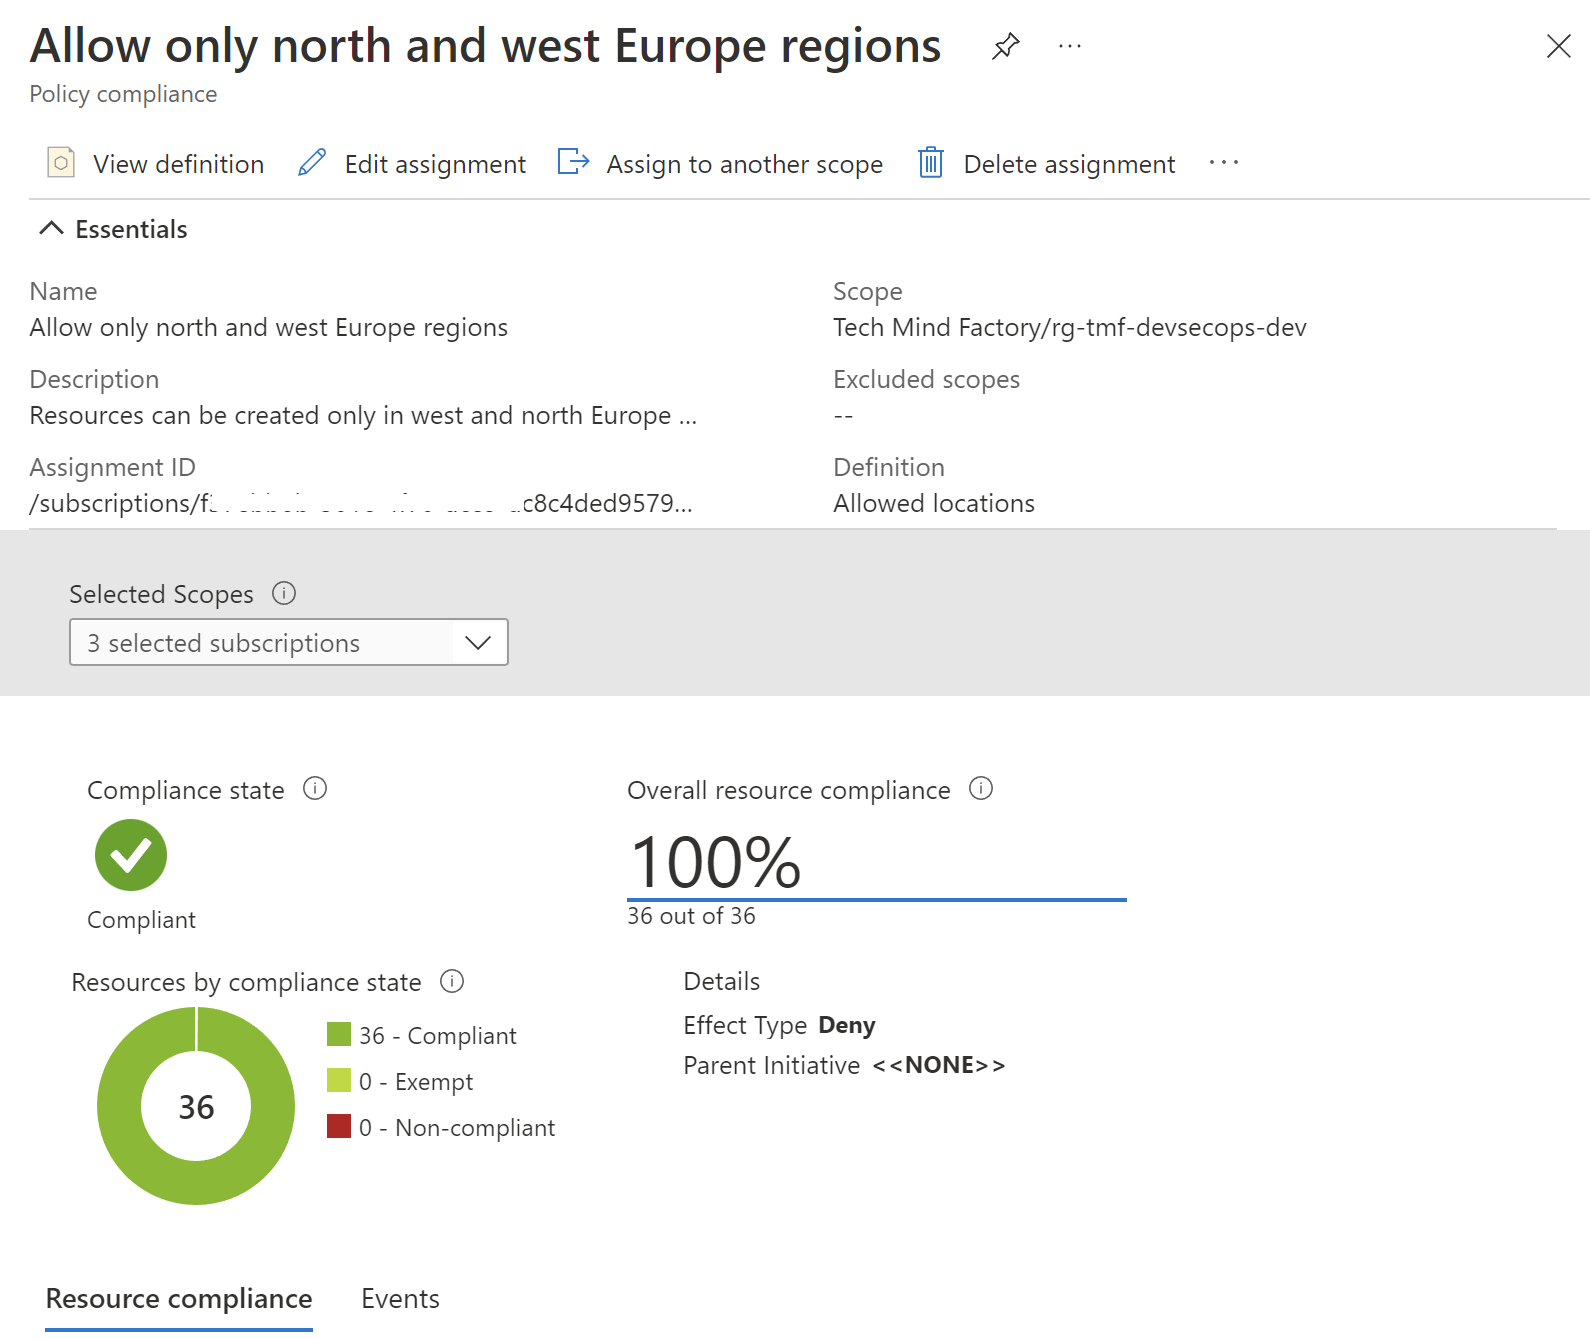
This is a sample policy I created. It restricts Azure regions in which resources can be created only to north and west Europe regions:
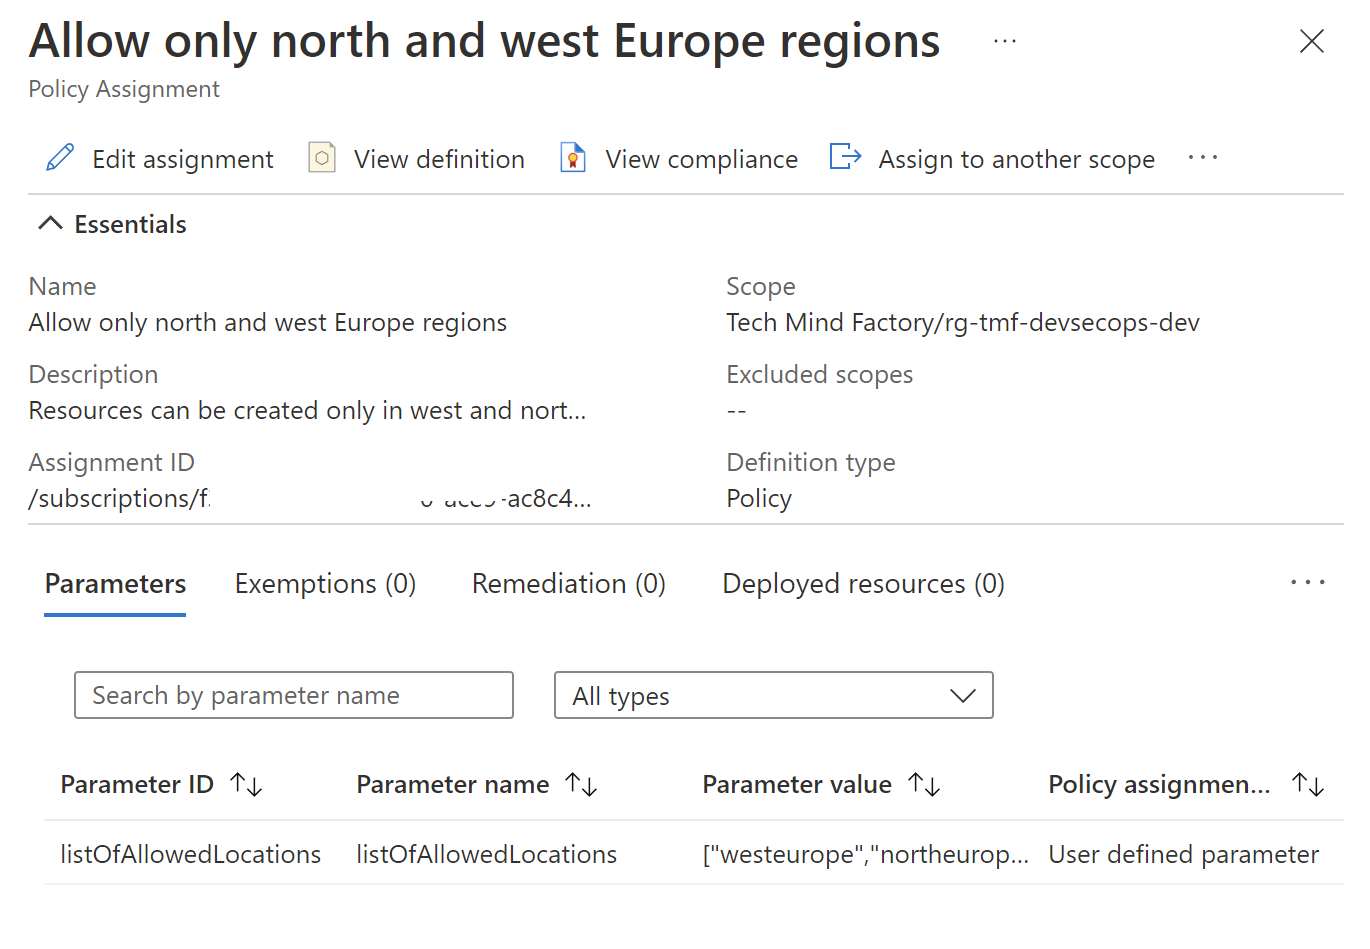
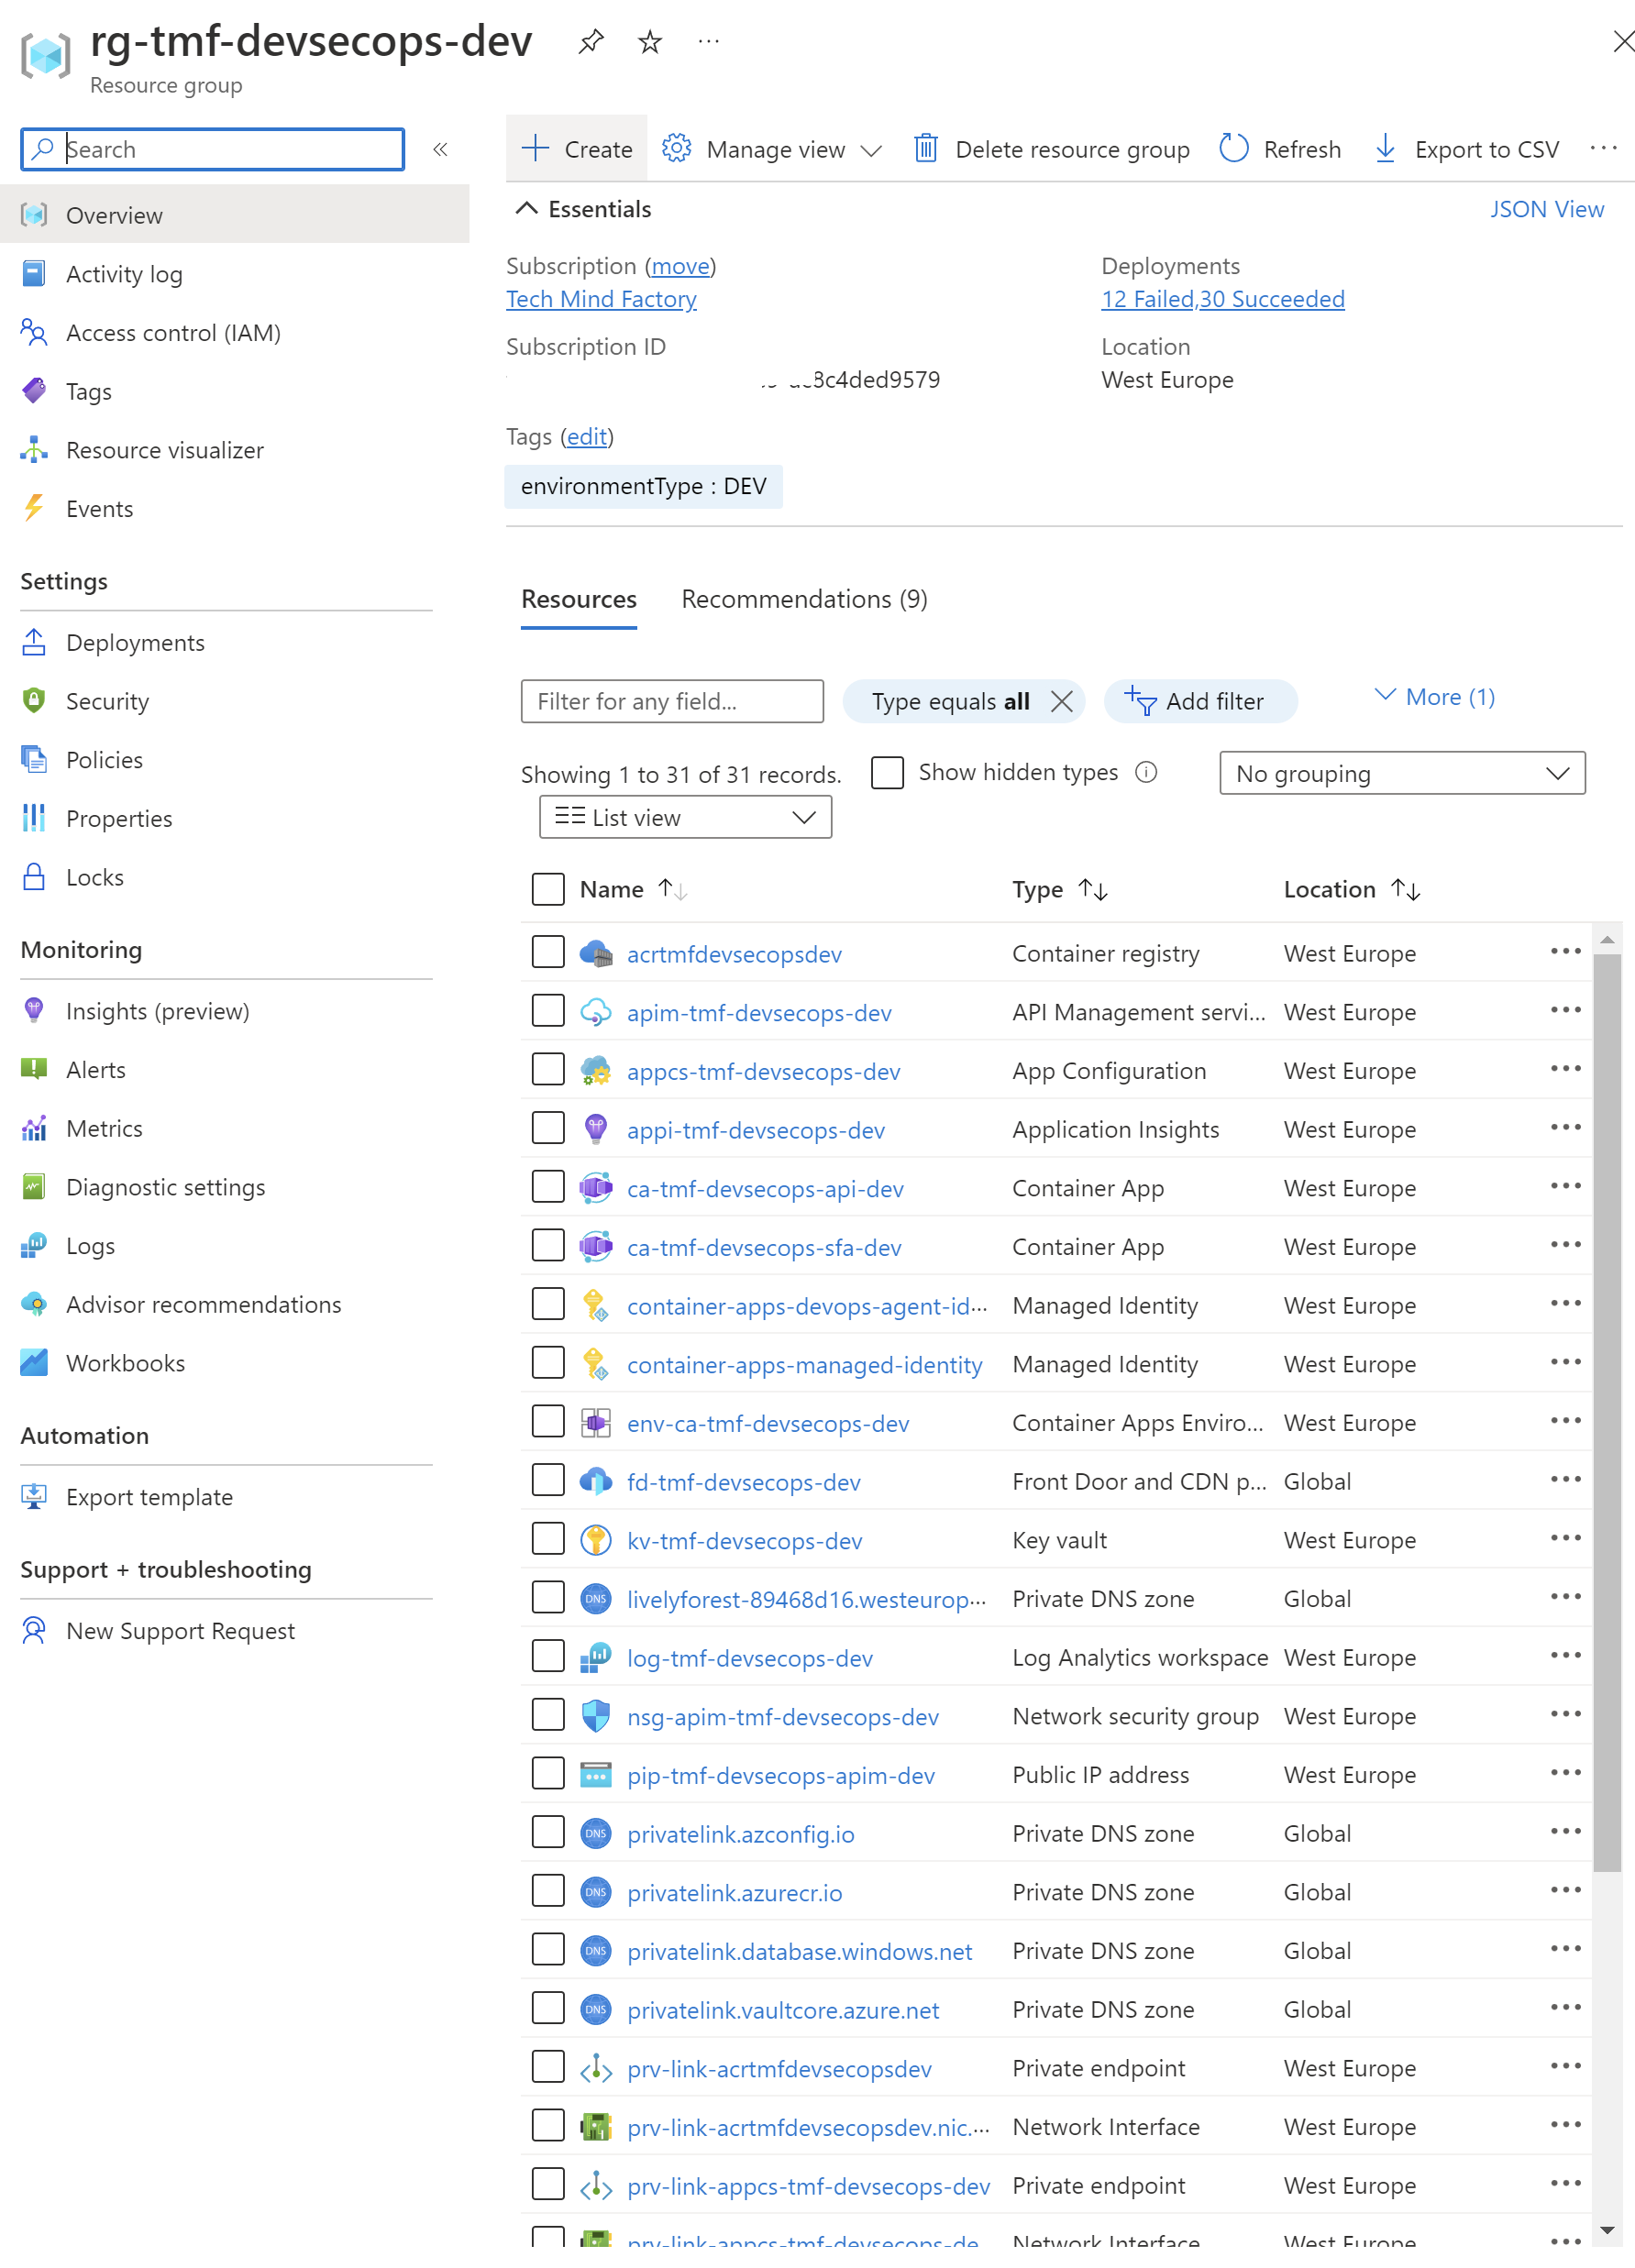
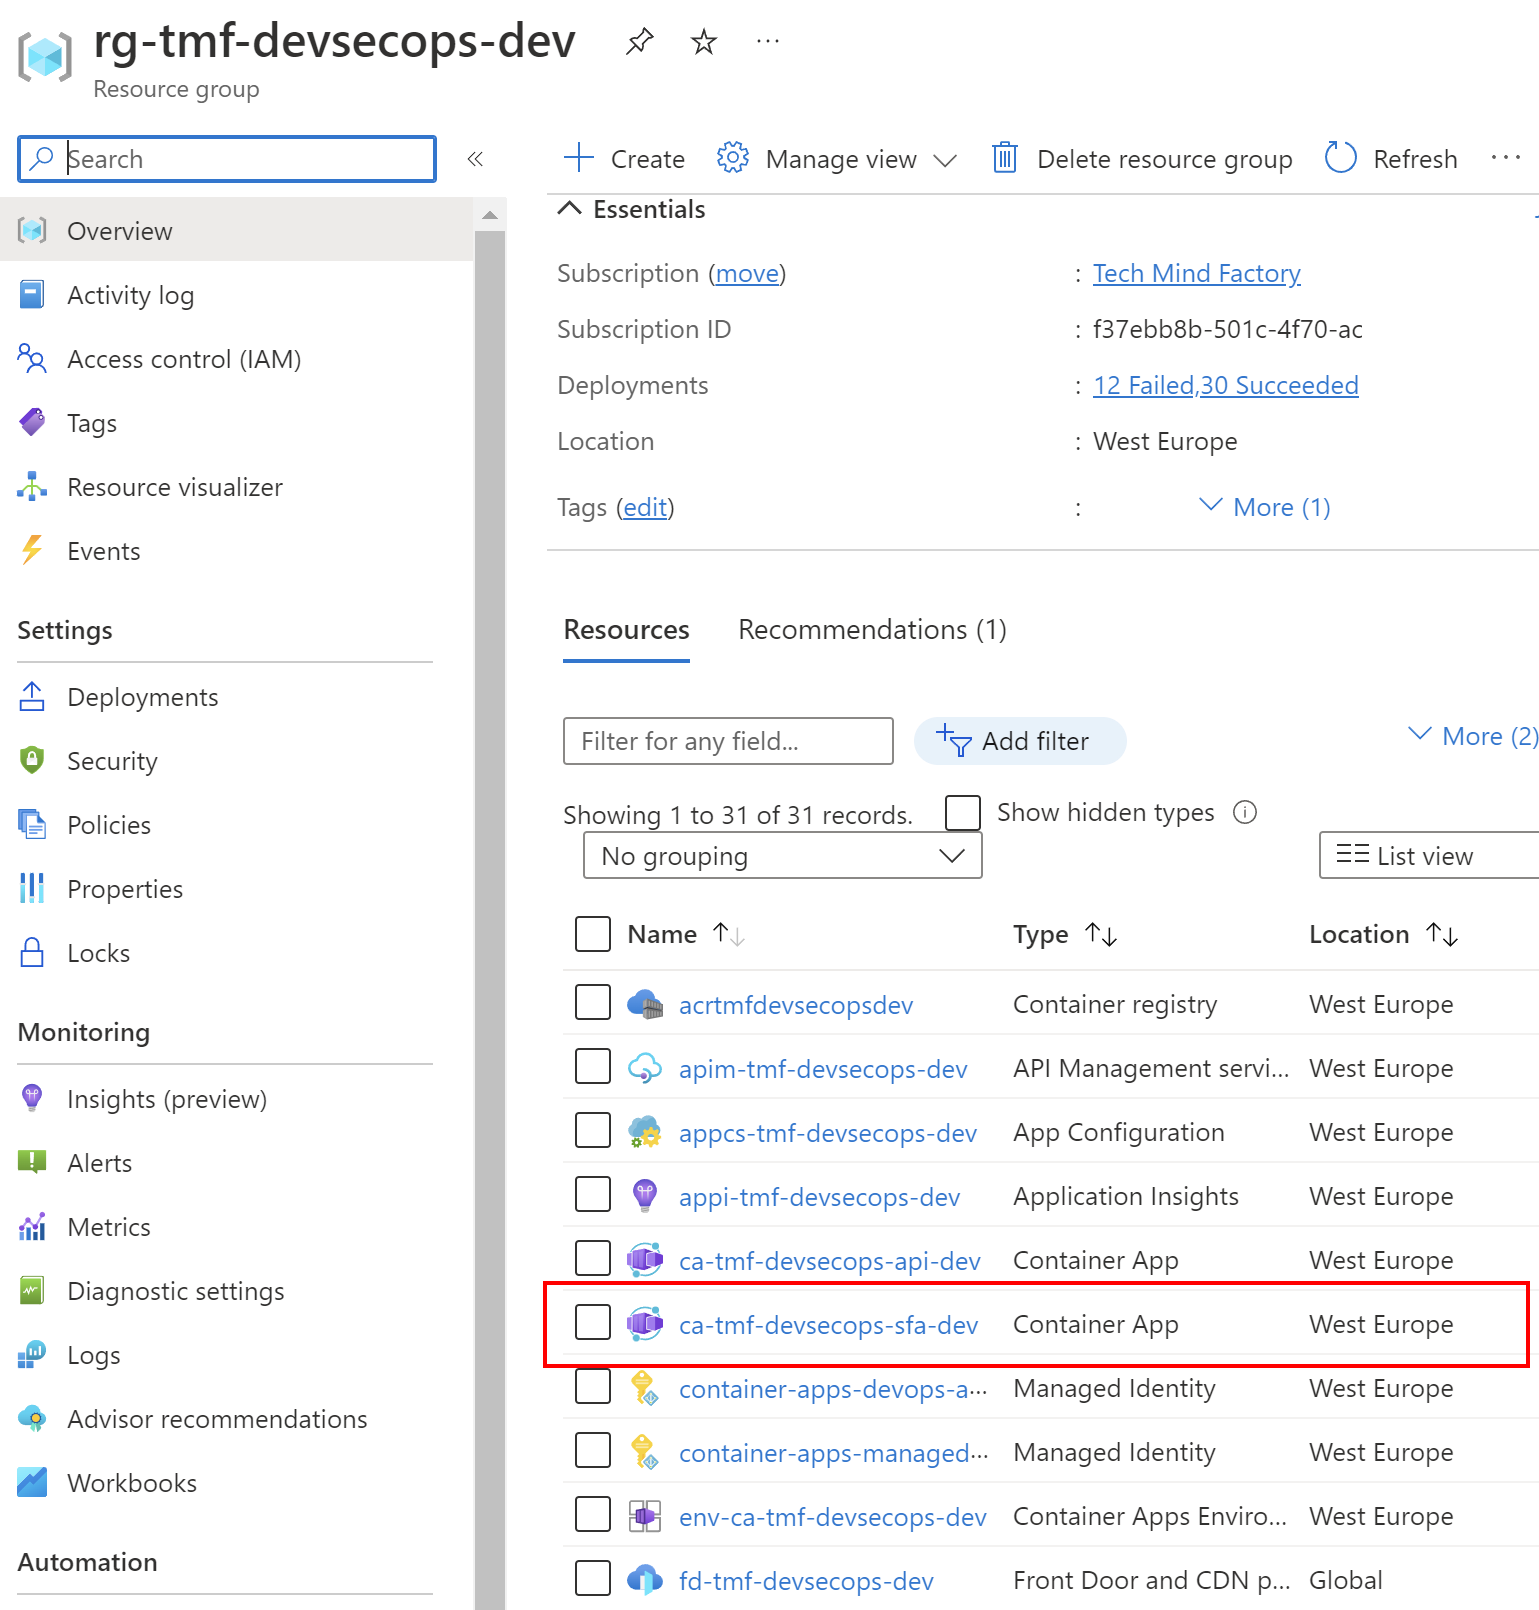
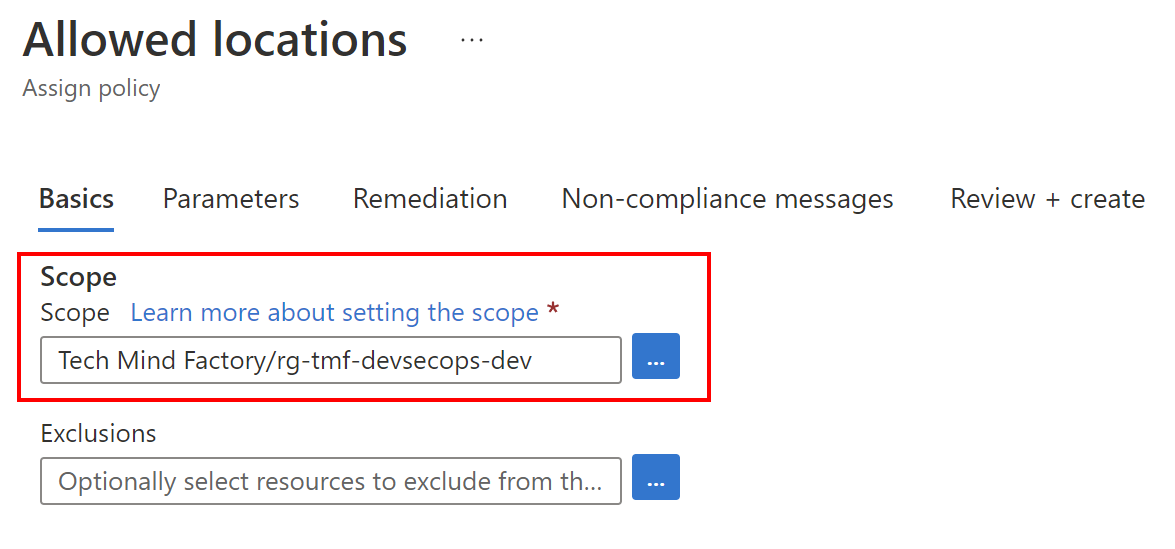
For this specific policy I set the scope to specific Azure Resource Group - rg-tmf-devsecops-dev:
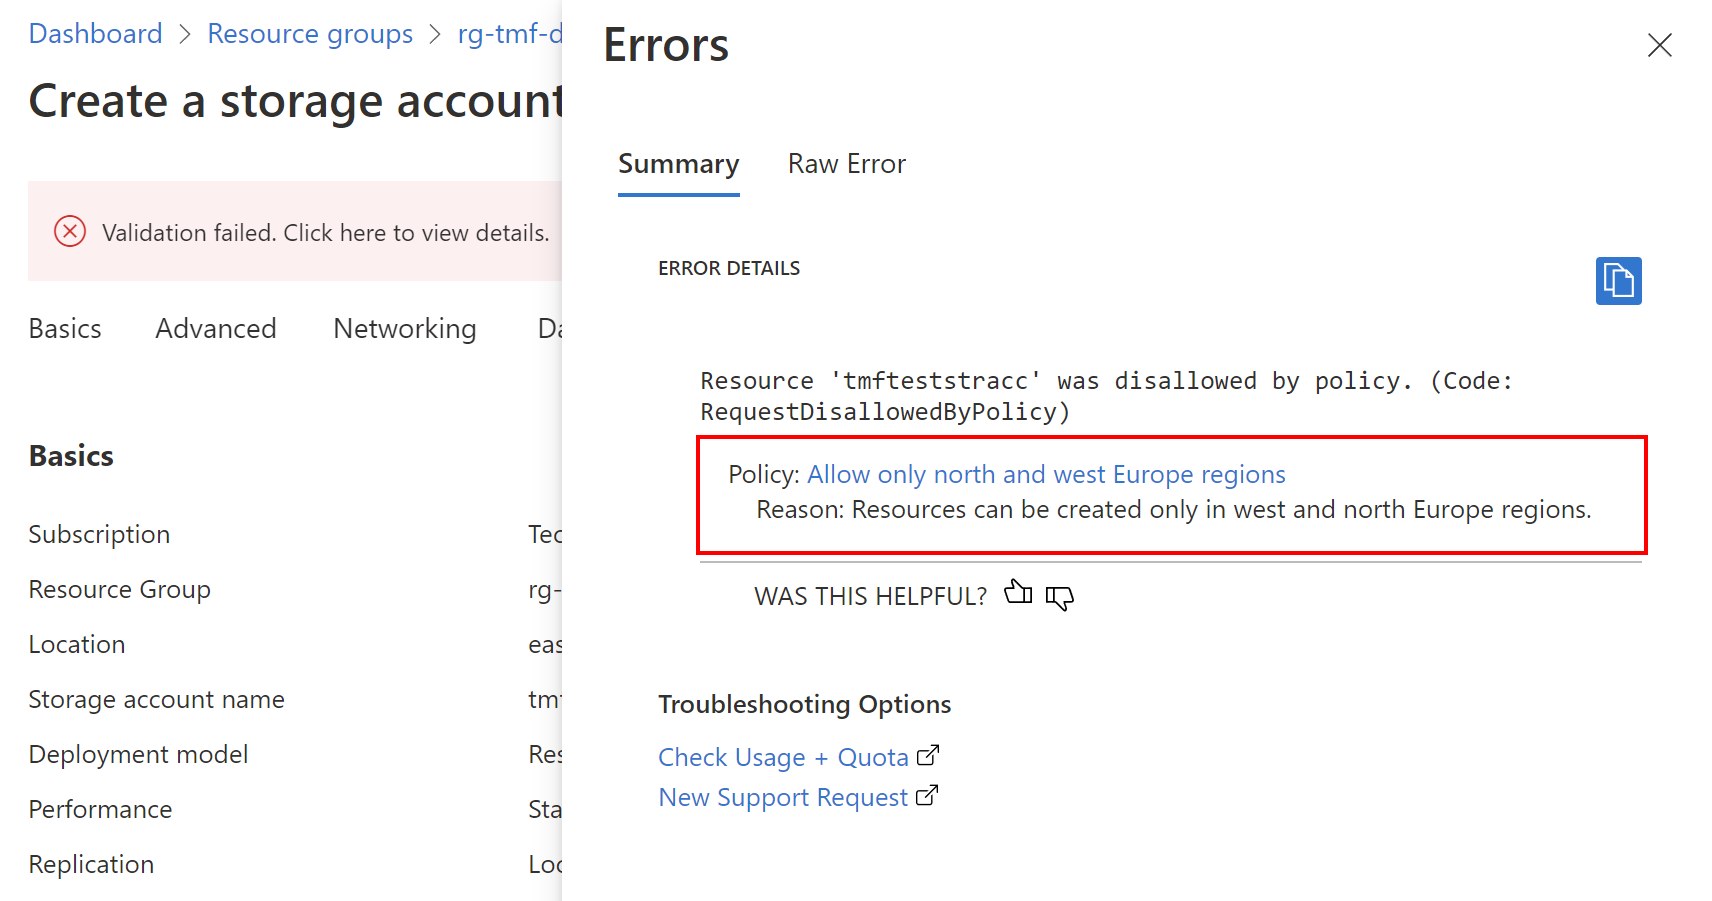
Here is an example of how the policy will enforce compliance. When I try to create Azure Storage Account in a region different than north or west Europe, there is the information displayed in the Azure Portal:
DevOps relation to Azure Policy
I mentioned before that Azure Policies and Initiatives underneath are JSON files so they can be stored in the source code repository. Before we move forward, I would like to underline important facts about definitions structure, and data format.
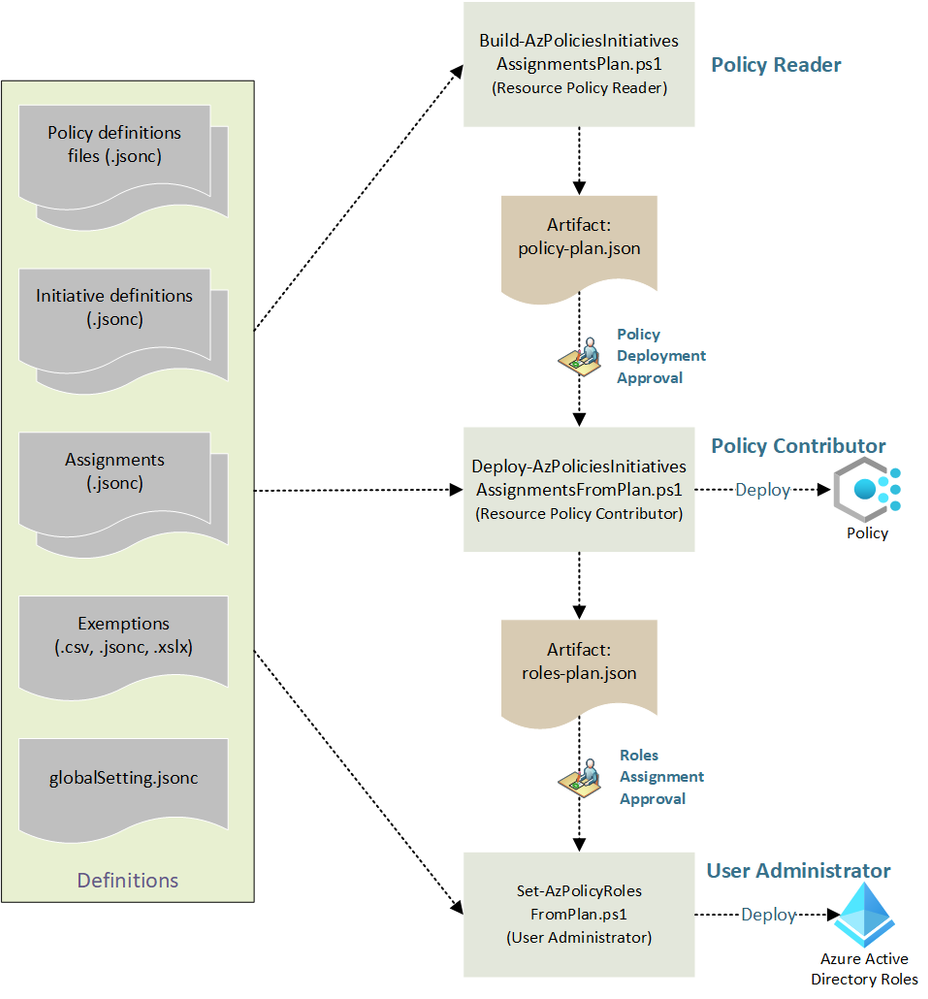
We can keep Policies and Initiatives definitions as pure JSON files or we can define them using other approaches like ARM Templates, Bicep files or Terraform. Azure Policy as Code is the approach used to keep policy definitions in the source control and whenever a change is made, test, and validate that change. The recommended general workflow of Azure Policy as Code looks like this diagram:
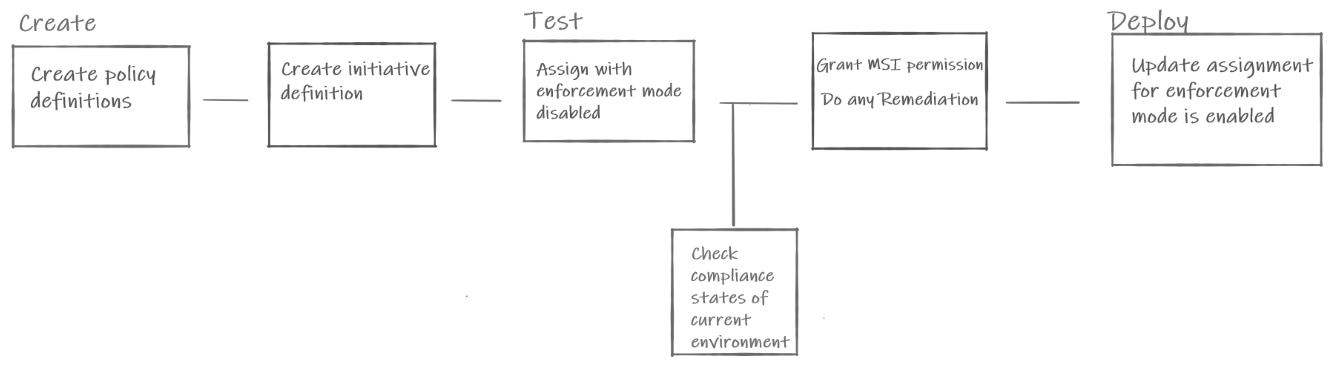
I encourage you to read more about the above approach in the official documentation.
Policies and Initiatives as pure JSON files
Here we can see examples of pure Policies and Initiatives definitions:
Policy definition in JSON:
{
  "properties": {
    "displayName": "Allowed locations",
    "policyType": "BuiltIn",
    "mode": "Indexed",
    "description": "This policy enables you to restrict the locations your organization can specify when deploying resources. Use to enforce your geo-compliance requirements. Excludes resource groups, Microsoft.AzureActiveDirectory/b2cDirectories, and resources that use the 'global' region.",
    "metadata": {
      "version": "1.0.0",
      "category": "General"
    },
    "parameters": {
      "listOfAllowedLocations": {
        "type": "Array",
        "metadata": {
          "description": "The list of locations that can be specified when deploying resources.",
          "strongType": "location",
          "displayName": "Allowed locations"
        }
      }
    },
    "policyRule": {
      "if": {
        "allOf": [
          {
            "field": "location",
            "notIn": "[parameters('listOfAllowedLocations')]"
          },
          {
            "field": "location",
            "notEquals": "global"
          },
          {
            "field": "type",
            "notEquals": "Microsoft.AzureActiveDirectory/b2cDirectories"
          }
        ]
      },
      "then": {
        "effect": "deny"
      }
    }
  },
  "id": "/providers/Microsoft.Authorization/policyDefinitions/e56962a6-4747-49cd-b67b-bf8b01975c4c",
  "type": "Microsoft.Authorization/policyDefinitions",
  "name": "e56962a6-4747-49cd-b67b-bf8b01975c4c"
}
Initiative definition in JSON:
{
  "name": "general-allowed-locations-policy-set",
  "properties": {
    "displayName": "Allowed locations Initiative",
    "description": "This initiative contains the policies necessary to limit Azure region deployments for all resources and resource groups.",
    "metadata": {
      "version": "1.0.0",
      "category": "Org Governance"
    },
    "parameters": {
      "AllowedLocations": {
        "type": "Array",
        "defaultValue": [
          "centralus",
          "eastus",
          "eastus2",
          "southcentralus"
        ]
      }
    },
    "PolicyDefinitions": [
      {
        "policyDefinitionReferenceId": "allowed-locations-resources",
        "policyDefinitionName": "e56962a6-4747-49cd-b67b-bf8b01975c4c",
        "parameters": {
          "listOfAllowedLocations": {
            "value": "[parameters('AllowedLocations')]"
          }
        }
      },
      {
        "policyDefinitionReferenceId": "allowed-locations-resource-groups",
        "policyDefinitionName": "e765b5de-1225-4ba3-bd56-1ac6695af988",
        "parameters": {
          "listOfAllowedLocations": {
            "value": "[parameters('AllowedLocations')]"
          }
        }
      }
    ]
  }
}
To manage and update the above, we can utilize Azure Policy extension for Visual Studio Code.
Policies and Initiatives created with Azure Bicep
We can also define Azure Policies and Initiatives using Azure Bicep. There are basically three main resource types we use:
- Microsoft.Authorization policyDefinitions - with this Bicep resource we can define Azure Policy structure and restrictions.
- Microsoft.Authorization policySetDefinitions - with this Bicep resource we can group multiple Azure Policies definitions and define Initiatives.
- Microsoft.Authorization policyAssignments - with this Bicep resource we can assign Policies and Initatives to specific scopes, like Management Groups.
Start using Azure Policies with Azure Bicep
In this article, I utilize Azure Bicep to create, test and assign Azure Policies. Let me show you how easily you can start using Azure Policies and Initiatives with Azure Bicep.
Assign existing Policy to specific scope
Below we can see an example of how to assign built-in Azure Policy to a specific scope, in this case, specific Resource Group:
@description('An array of the allowed locations, all other locations will be denied by the created policy.')
param listOfAllowedLocations array
param policyDefinitionID string

resource policyAssignment 'Microsoft.Authorization/policyAssignments@2021-06-01' = {
  name: 'resources-location-lock'
  scope: resourceGroup()
  properties: {
    displayName: 'Allow only north and west Europe regions'
    description: 'Resources can be created only in west and north Europe regions.'
    policyDefinitionId: policyDefinitionID
    nonComplianceMessages: [
      {
        message: 'Resources can be created only in west and north Europe regions.'
      }
    ]
    parameters: {
      listOfAllowedLocations: {
        value: listOfAllowedLocations
      }
    }
  }
}
Here is the parameters file content:
{
    "$schema": "https://schema.management.azure.com/schemas/2019-04-01/deploymentParameters.json#",
    "contentVersion": "1.0.0.0",
    "parameters": {
        "listOfAllowedLocations" : {
            "value": [
                "westeurope",
                "northeurope"
              ]
        },
        "policyDefinitionID":{
            "value": "/providers/Microsoft.Authorization/policyDefinitions/e56962a6-4747-49cd-b67b-bf8b01975c4c"
        }
    }
}
When we deploy the above Policy assignment, only resources with the north and west Europe region will be allowed to be deployed. We define listOfAllowedLocations parameter to indicate allowed regions and also we reference existing (built-in) policy definition by policyDefinitionID parameter. If we open Azure Portal, we can find this policy definition using ID:
Create a custom Policy and assign it to specific scope
We can also define custom policies and then assign them to specific scopes. In this case we create custom Policy which will be assigned to specific Management Group:
targetScope = 'managementGroup'

@description('Target Management Group')
param targetMG string

@description('An array of the allowed locations, all other locations will be denied by the created policy.')
param allowedLocations array = [
  'westeurope'
  'northeurope'
]

var mgScope = tenantResourceId('Microsoft.Management/managementGroups', targetMG)
var policyDefinitionName = 'LocationRestriction'

resource policyDefinition 'Microsoft.Authorization/policyDefinitions@2020-03-01' = {
  name: policyDefinitionName
  properties: {
    policyType: 'Custom'
    mode: 'All'
    parameters: {}
    policyRule: {
      if: {
        not: {
          field: 'location'
          in: allowedLocations
        }
      }
      then: {
        effect: 'deny'
      }
    }
  }
}

resource policyAssignment 'Microsoft.Authorization/policyAssignments@2020-03-01' = {
  name: 'location-lock'
  properties: {
    scope: mgScope
    policyDefinitionId: extensionResourceId(mgScope, 'Microsoft.Authorization/policyDefinitions', policyDefinition.name)
  }
}
Create Initiative and assign it to specific scope
We can also create Initiatives with multiple Azure policies. These policies can be either built-in, or custom. Then we can assign initative to specific scope, like Azure Subscription:
targetScope = 'subscription'

param listOfAllowedLocations array = [
  'westeurope'
  'northeurope'
]

param listOfAllowedSKUs array = [
  'Standard_B1ls'
  'Standard_B1ms'
  'Standard_D2s_v3'
  'Standard_D4s_v3'
]

var initiativeDefinitionName = 'BICEP Example Initiative'

resource initiativeDefinition 'Microsoft.Authorization/policySetDefinitions@2019-09-01' = {
  name: initiativeDefinitionName
  properties: {
    policyType: 'Custom'
    displayName: initiativeDefinitionName
    description: 'Initiative Definition for Resource Locatoin and VM SKUs'
    metadata: {
      category: 'BICEP Example Initiative'
    }
    parameters: {
      listOfAllowedLocations: {
        type: 'Array'
        metadata: ({
          description: 'The List of Allowed Locations for Resource Groups and Resources.'
          strongtype: 'location'
          displayName: 'Allowed Locations'
        })
      }
      listOfAllowedSKUs: {
        type: 'Array'
        metadata: any({
          description: 'The List of Allowed SKUs for Virtual Machines.'
          strongtype: 'vmSKUs'
          displayName: 'Allowed Virtual Machine Size SKUs'
        })
      }
    }
    policyDefinitions: [
      {
        policyDefinitionId: '/providers/Microsoft.Authorization/policyDefinitions/e765b5de-1225-4ba3-bd56-1ac6695af988'
        parameters: {
          listOfAllowedLocations: {
            value: '[parameters(\'listOfAllowedLocations\')]'
          }
        }
      }
      {
        policyDefinitionId: '/providers/Microsoft.Authorization/policyDefinitions/e56962a6-4747-49cd-b67b-bf8b01975c4c'
        parameters: {
          listOfAllowedLocations: {
            value: '[parameters(\'listOfAllowedLocations\')]'
          }
        }
      }
      {
        policyDefinitionId: '/providers/Microsoft.Authorization/policyDefinitions/cccc23c7-8427-4f53-ad12-b6a63eb452b3'
        parameters: {
          listOfAllowedSKUs: {
            value: '[parameters(\'listOfAllowedSKUs\')]'
          }
        }
      }
      {
        policyDefinitionId: '/providers/Microsoft.Authorization/policyDefinitions/0015ea4d-51ff-4ce3-8d8c-f3f8f0179a56'
        parameters: {}
      }
    ]
  }
}

resource initiativeDefinitionPolicyAssignment 'Microsoft.Authorization/policyAssignments@2019-09-01' = {
  name: initiativeDefinitionName
  properties: {
    scope: subscription().id
    enforcementMode: 'Default'
    policyDefinitionId: initiativeDefinition.id
    parameters: {
      listOfAllowedLocations: {
        value: listOfAllowedLocations
      }
      listOfAllowedSKUs: {
        value: listOfAllowedSKUs
      }
    }
  }
}
Deploy Azure policies defined with Bicep
We can deploy Azure Policies defined with Azure Bicep in the exactly same way as we deploy other Azure resources. On the ocal machine we can utilize Azure CLI:
az deployment group create --name $deploymentName --resource-group rg-tmf-devsecops-dev --template-file bicep/main.bicep --parameters bicep/parameters/main-deploy.parameters.json
We can also utilize Azure DevOps or GitHub to deploy Azure Policies and Initiatives. Here is a nice tutorial on how to Implement Azure Policy as Code with GitHub.
In the Azure Portal we can verify compliance after applying specific policies:
Test Azure Policies with Pester
Azure Policies can be stored in the source code repository, so they can be tested before they got deployed. To test Azure Infrastructure (not only Azure Policies), there is also a great tool called Pester - testing and mocking framework for PowerShell. Pester is most commonly used for writing unit and integration tests, but it is not limited to just that. It is also a base for tools that validate whole environments, computer deployments, and database configurations. In this article, I will not explain in detail how to start with Pester but I recommend checking the link above as Pester has great documentation and a quick start section.
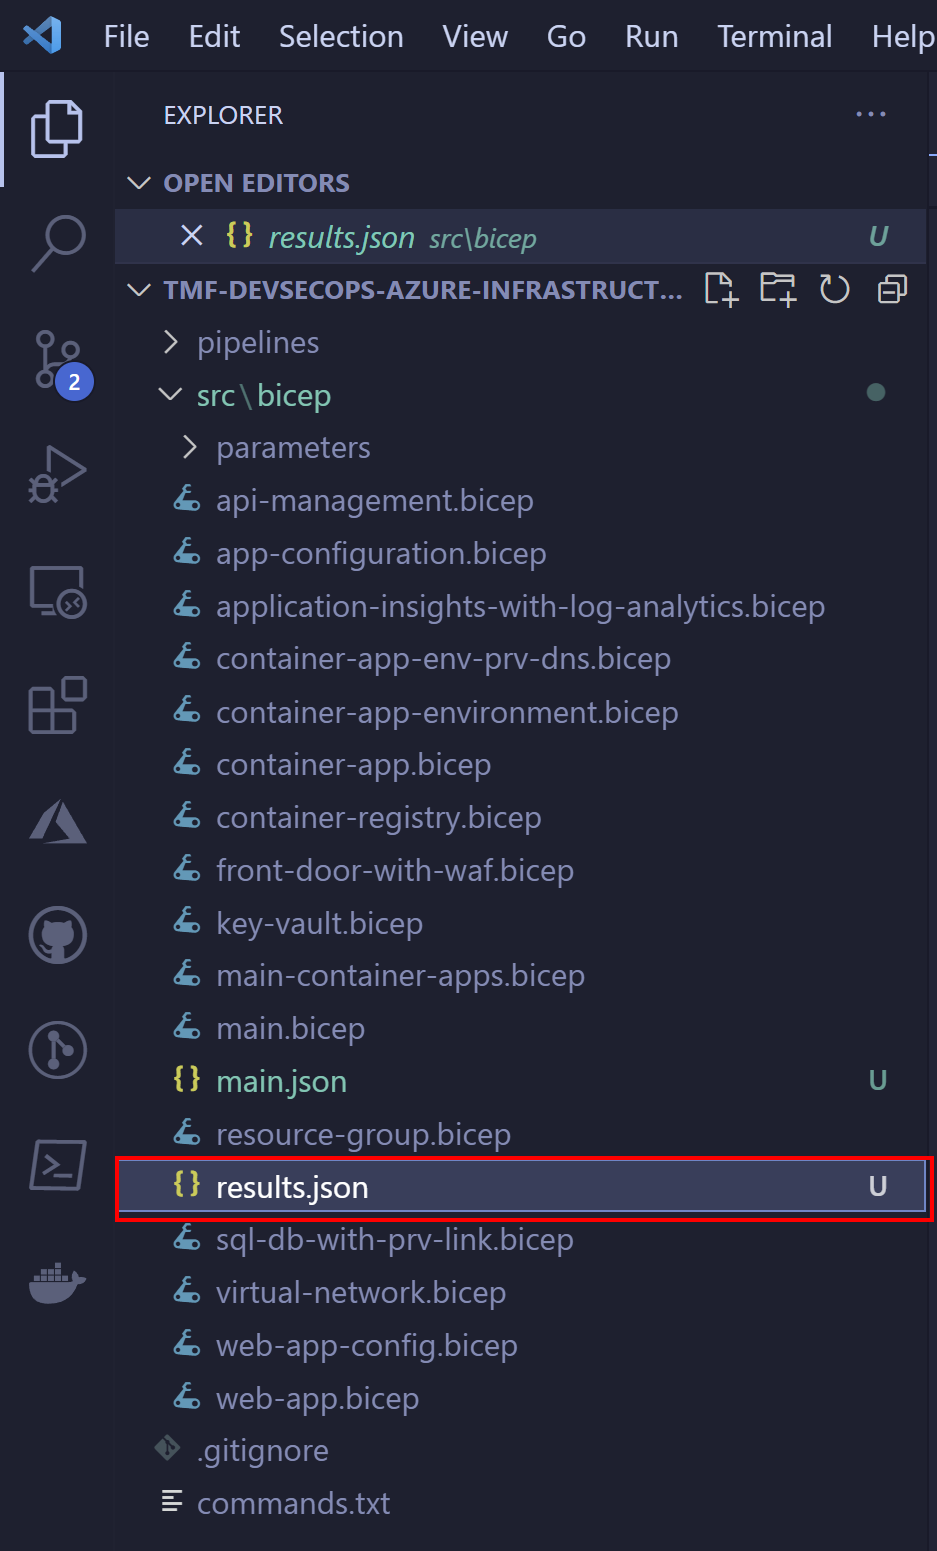
Here I would like to present a simple test written with Pester to validate Azure Policy. This is the structure of the files on my local machine:
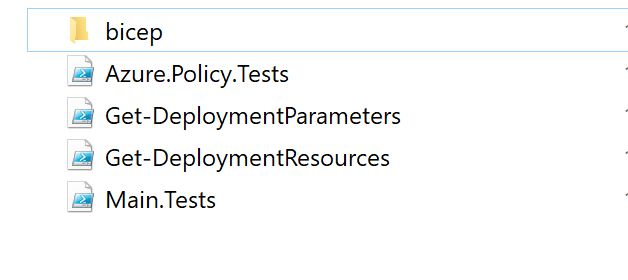
Under Bicep directory I have main.bicep file together with parameters file:
@description('An array of the allowed locations, all other locations will be denied by the created policy.')
param listOfAllowedLocations array
param policyDefinitionID string

resource policyAssignment 'Microsoft.Authorization/policyAssignments@2021-06-01' = {
  name: 'resources-location-lock'
  scope: resourceGroup()
  properties: {
    displayName: 'Allow only north and west Europe regions'
    description: 'Resources can be created only in west and north Europe regions.'
    policyDefinitionId: policyDefinitionID
    nonComplianceMessages: [
      {
        message: 'Resources can be created only in west and north Europe regions.'
      }
    ]
    parameters: {
      listOfAllowedLocations: {
        value: listOfAllowedLocations
      }
    }
  }
}
Here is the parameters file content:
{
    "$schema": "https://schema.management.azure.com/schemas/2019-04-01/deploymentParameters.json#",
    "contentVersion": "1.0.0.0",
    "parameters": {
        "listOfAllowedLocations" : {
            "value": [
                "westeurope",
                "northeurope"
              ]
        },
        "policyDefinitionID":{
            "value": "/providers/Microsoft.Authorization/policyDefinitions/e56962a6-4747-49cd-b67b-bf8b01975c4c"
        }
    }
}
Now I use Pester to validate Azure Policy definition. To start Pester tests, I created Main.Tests file:
$Data = @{
    AllowedLocations = @(
        'westeurope'
        'northeurope'
    )
    TemplatePath = ".\bicep"
}
$container = New-PesterContainer -Path '.\Azure.Policy.Tests.ps1' -Data $Data
Invoke-Pester -Container $container -Output Detailed
Above I declared AllowedLocations collection with two Azure regions. I want to validate whether Azure Policy has those defined.
In the Azure.Policy.Tests file I have three tests defined. Let me explain the below content. We have to pass two parameters:
- TemplatePath - path to bicep files.
- AllowedLocations - a collection with allowed Azure regions.
In the BeforeAll block we reference two files:
- Get-DeploymentResources - file which loads the content of main.bicep file:
function Get-DeploymentResources ([string] $TemplatePath) {
    $bicepTemplatePath = "$TemplatePath\main.bicep"
    $armTemplatePath = "$TemplatePath\main.json"
    az bicep build --file $bicepTemplatePath
    $maintemplate = Get-Content $armTemplatePath -Raw
    $templateJson = ConvertFrom-Json -InputObject $maintemplate
    $resources = $templateJson
    return $resources
}
- Get-DeploymentParameters - file which loads the content of parameters file:
function Get-DeploymentParameters ([string] $ParametersFilePath) {
    $parametersFilePath = "$ParametersFilePath\parameters\main-deploy.parameters.json"
    $maintemplate = Get-Content $parametersFilePath -Raw
    $templateJson = ConvertFrom-Json -InputObject $maintemplate
    $deploymentParameters = $templateJson
    return $deploymentParameters
}
Then in the Describe we define our tests. In this case, I want to validate if:
- There are two Azure regions defined in the parameters file for Azure Policy deployment.
- Validate if defined regions are set to north and west Europe.
- Validate if the non-compliant user-friendly message that will be displayed for non-compliant resources is: Resources can be created only in west and north Europe regions.
AfterAll block is executed once all tests are executed. In this case, we want to delete main.json ARM template file generated by Get-DeploymentResources function to transform Bicep to ARM (JSON) file.
param (
    [parameter(Mandatory = $true)]
    [string]$TemplatePath,
    [parameter(Mandatory = $true)]
    [array]$AllowedLocations
)


BeforeAll {
    . $PSScriptRoot/Get-DeploymentParameters.ps1
    . $PSScriptRoot/Get-DeploymentResources.ps1
}

Describe 'Azure Policy Tests' {
    It 'Allowed locations should contain 2 regions' {
        $allParameters = Get-DeploymentParameters -ParametersFilePath $TemplatePath
        $count = $allParameters.parameters.listOfAllowedLocations.value.Count
        $count | Should -Be 2
    }

    It 'North and west Europe regions are allowed only' {
        $allLocationsCompliant = $true
        $allParameters = Get-DeploymentParameters -ParametersFilePath $TemplatePath
        $declaredLocations = $allParameters.parameters.listOfAllowedLocations.value
        foreach ($location in $AllowedLocations)
        {
            Write-Host $location
            $containsAllowedLocations = $declaredLocations -contains $location
            if($containsAllowedLocations -eq $false)
            {
                $allLocationsCompliant = $false
            }
        }

        $allLocationsCompliant | Should -Be $true
    }

    It 'NonComplianceMessage should be: Resources can be created only in west and north Europe regions.' {
        $allResources = Get-DeploymentResources -TemplatePath $TemplatePath
        $message = $allResources.resources[0].properties.nonComplianceMessages[0].message
        $message | Should -Contain 'Resources can be created only in west and north Europe regions.'
    }
}

AfterAll {
        Remove-Item "$TemplatePath/main.json"
    }
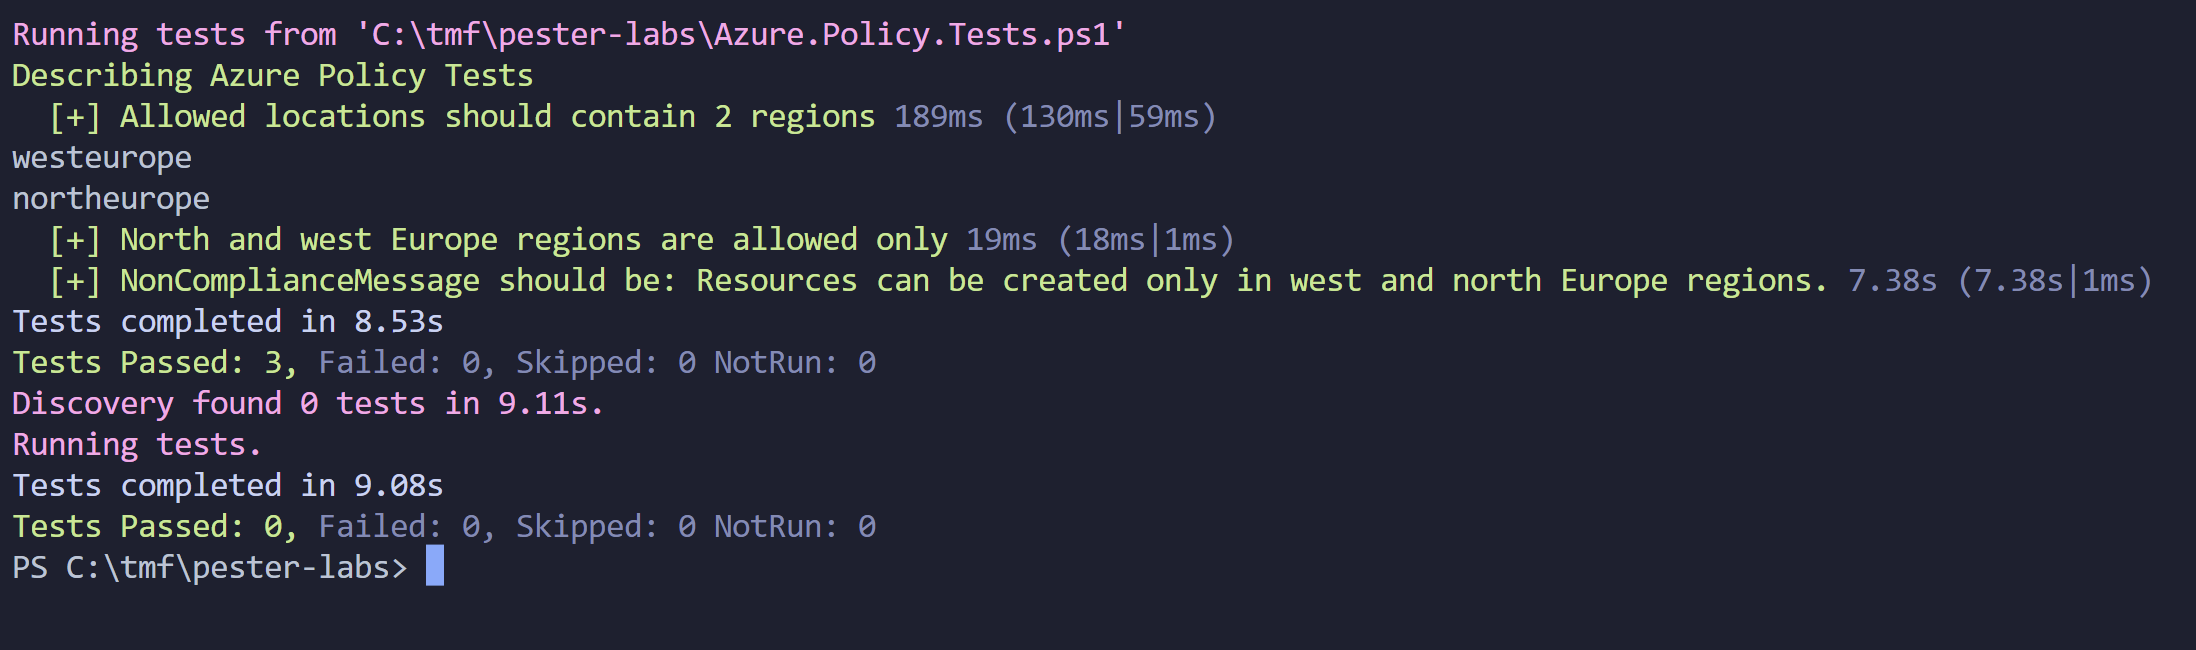
This is the output after running tests:
Now when I change regions in parameters file, tests should break:
{
    "$schema": "https://schema.management.azure.com/schemas/2019-04-01/deploymentParameters.json#",
    "contentVersion": "1.0.0.0",
    "parameters": {
        "listOfAllowedLocations" : {
            "value": [
                "westeurope",
                "northeurope"
              ]
        },
        "policyDefinitionID":{
            "value": "/providers/Microsoft.Authorization/policyDefinitions/e56962a6-4747-49cd-b67b-bf8b01975c4c"
        }
    }
}
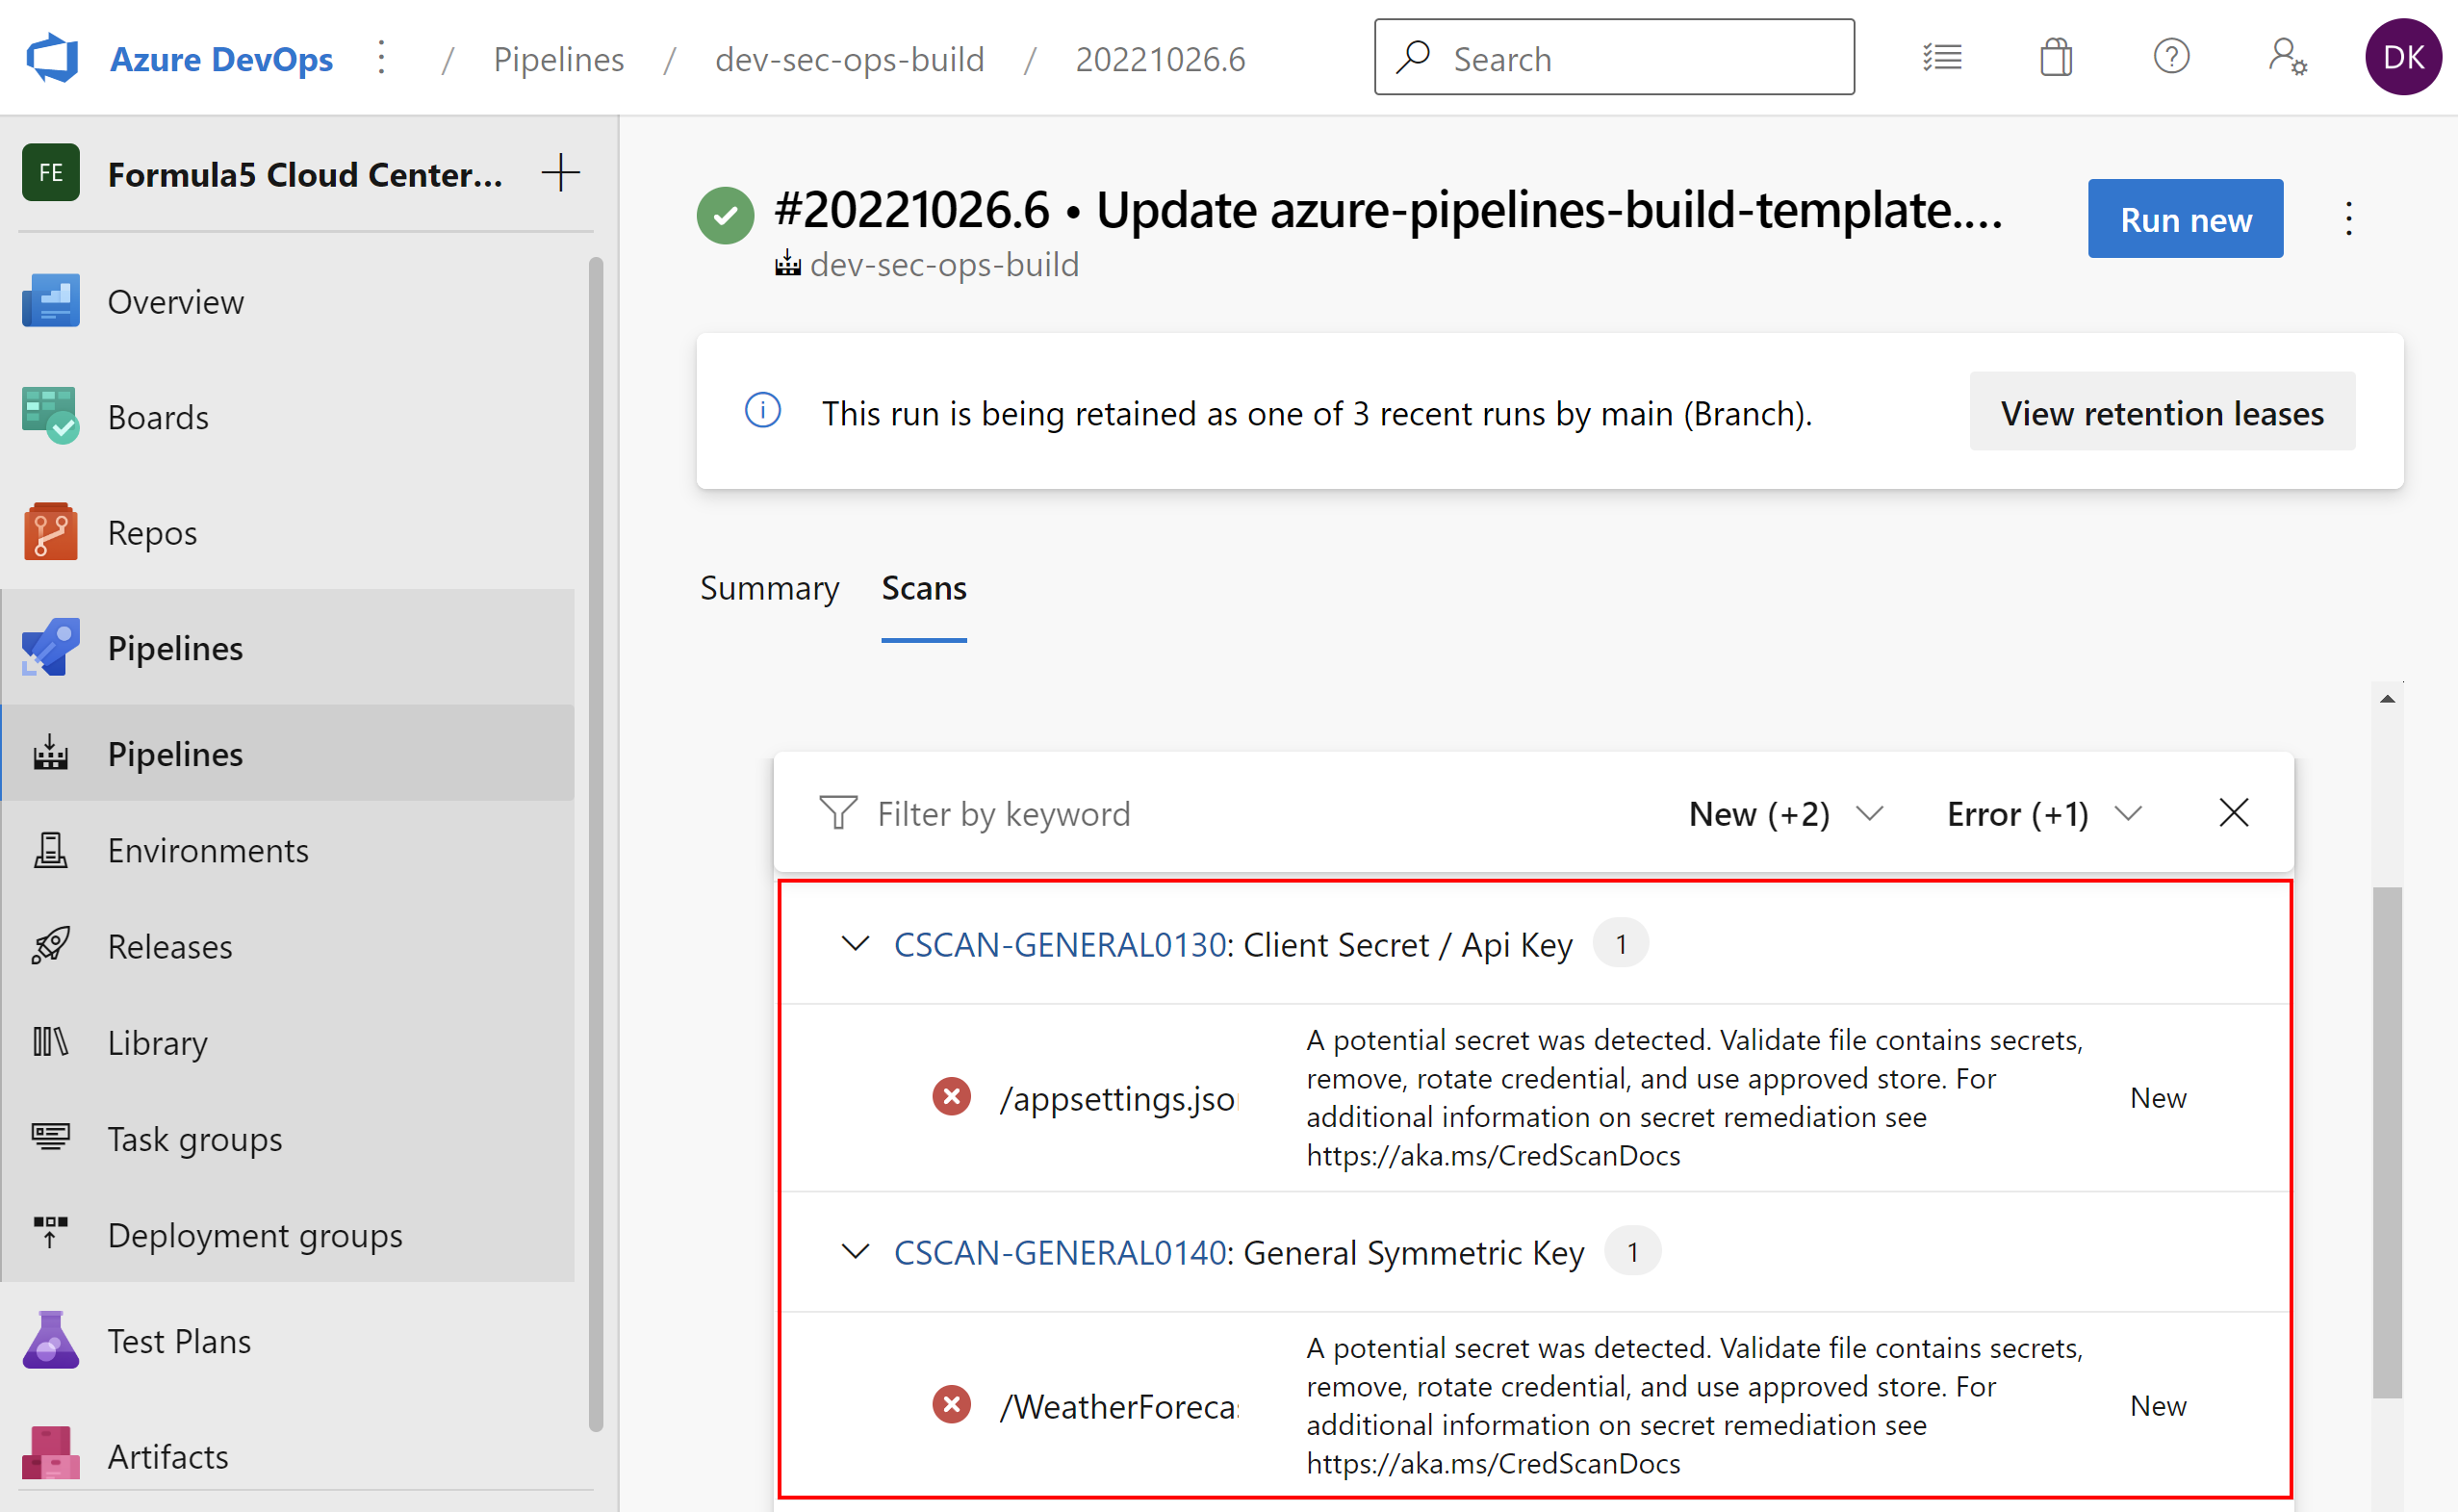
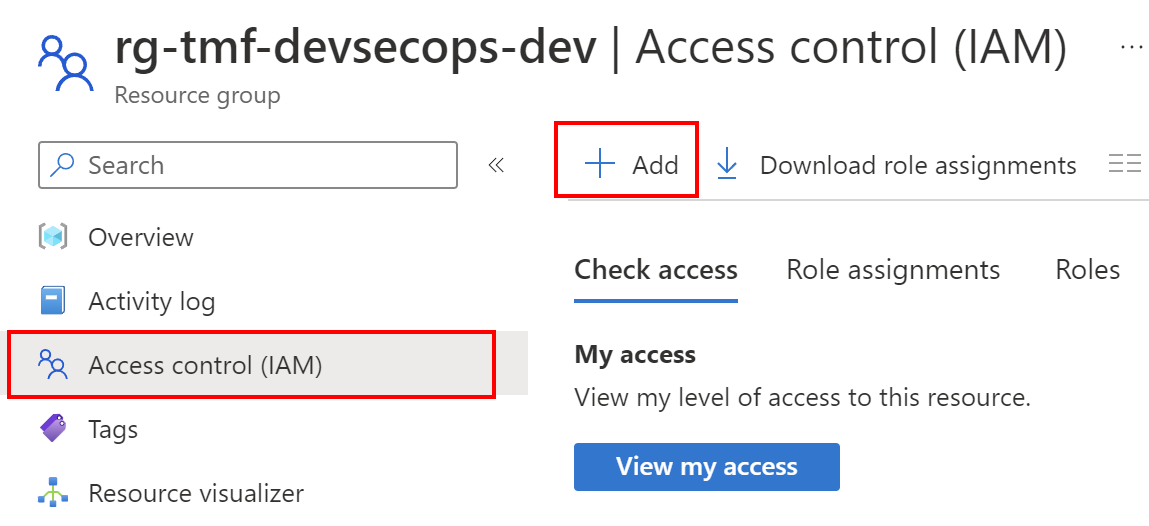
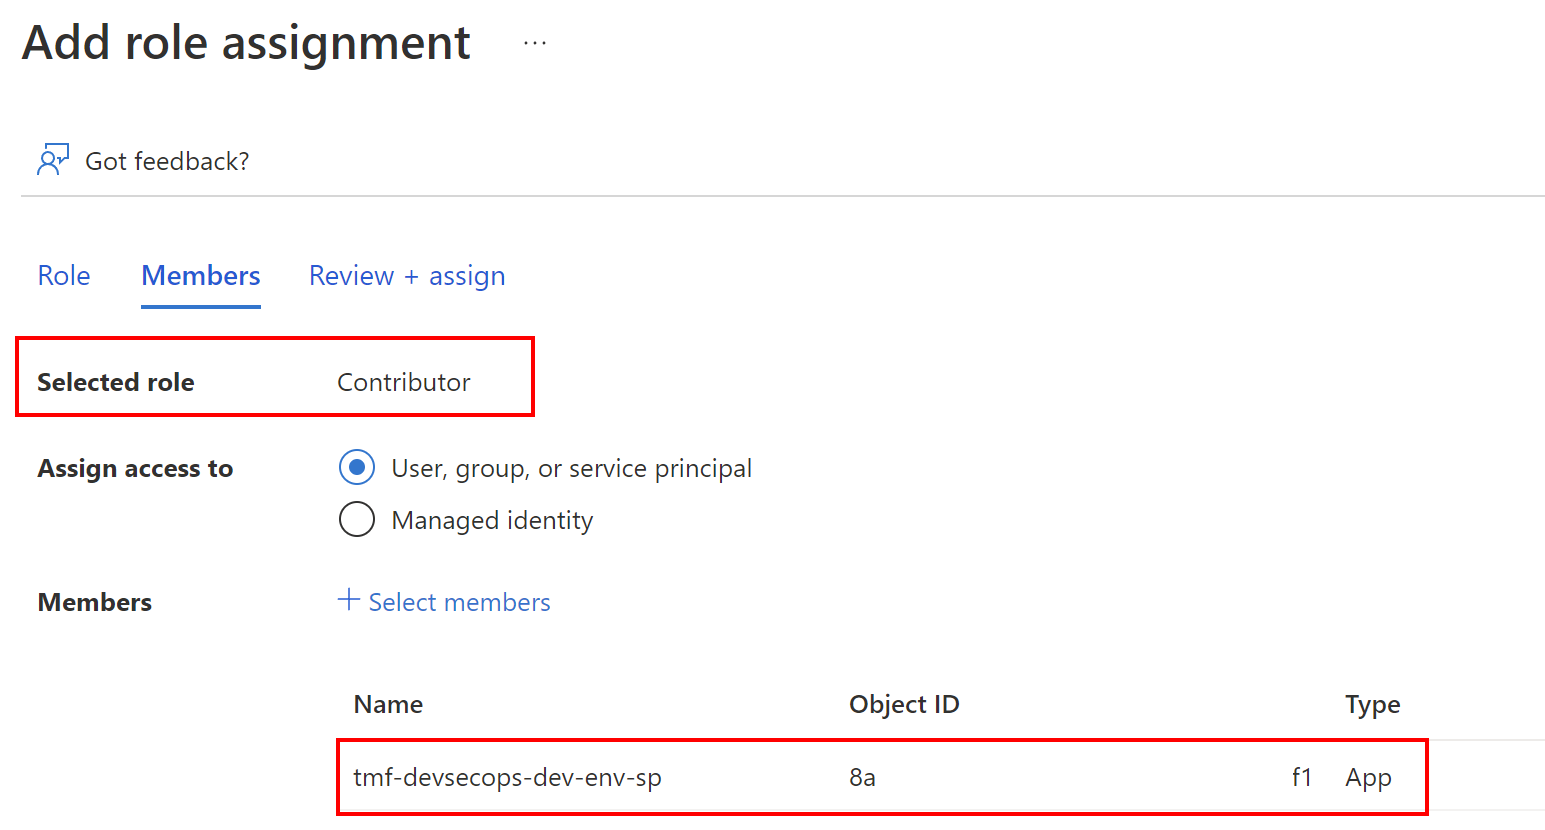
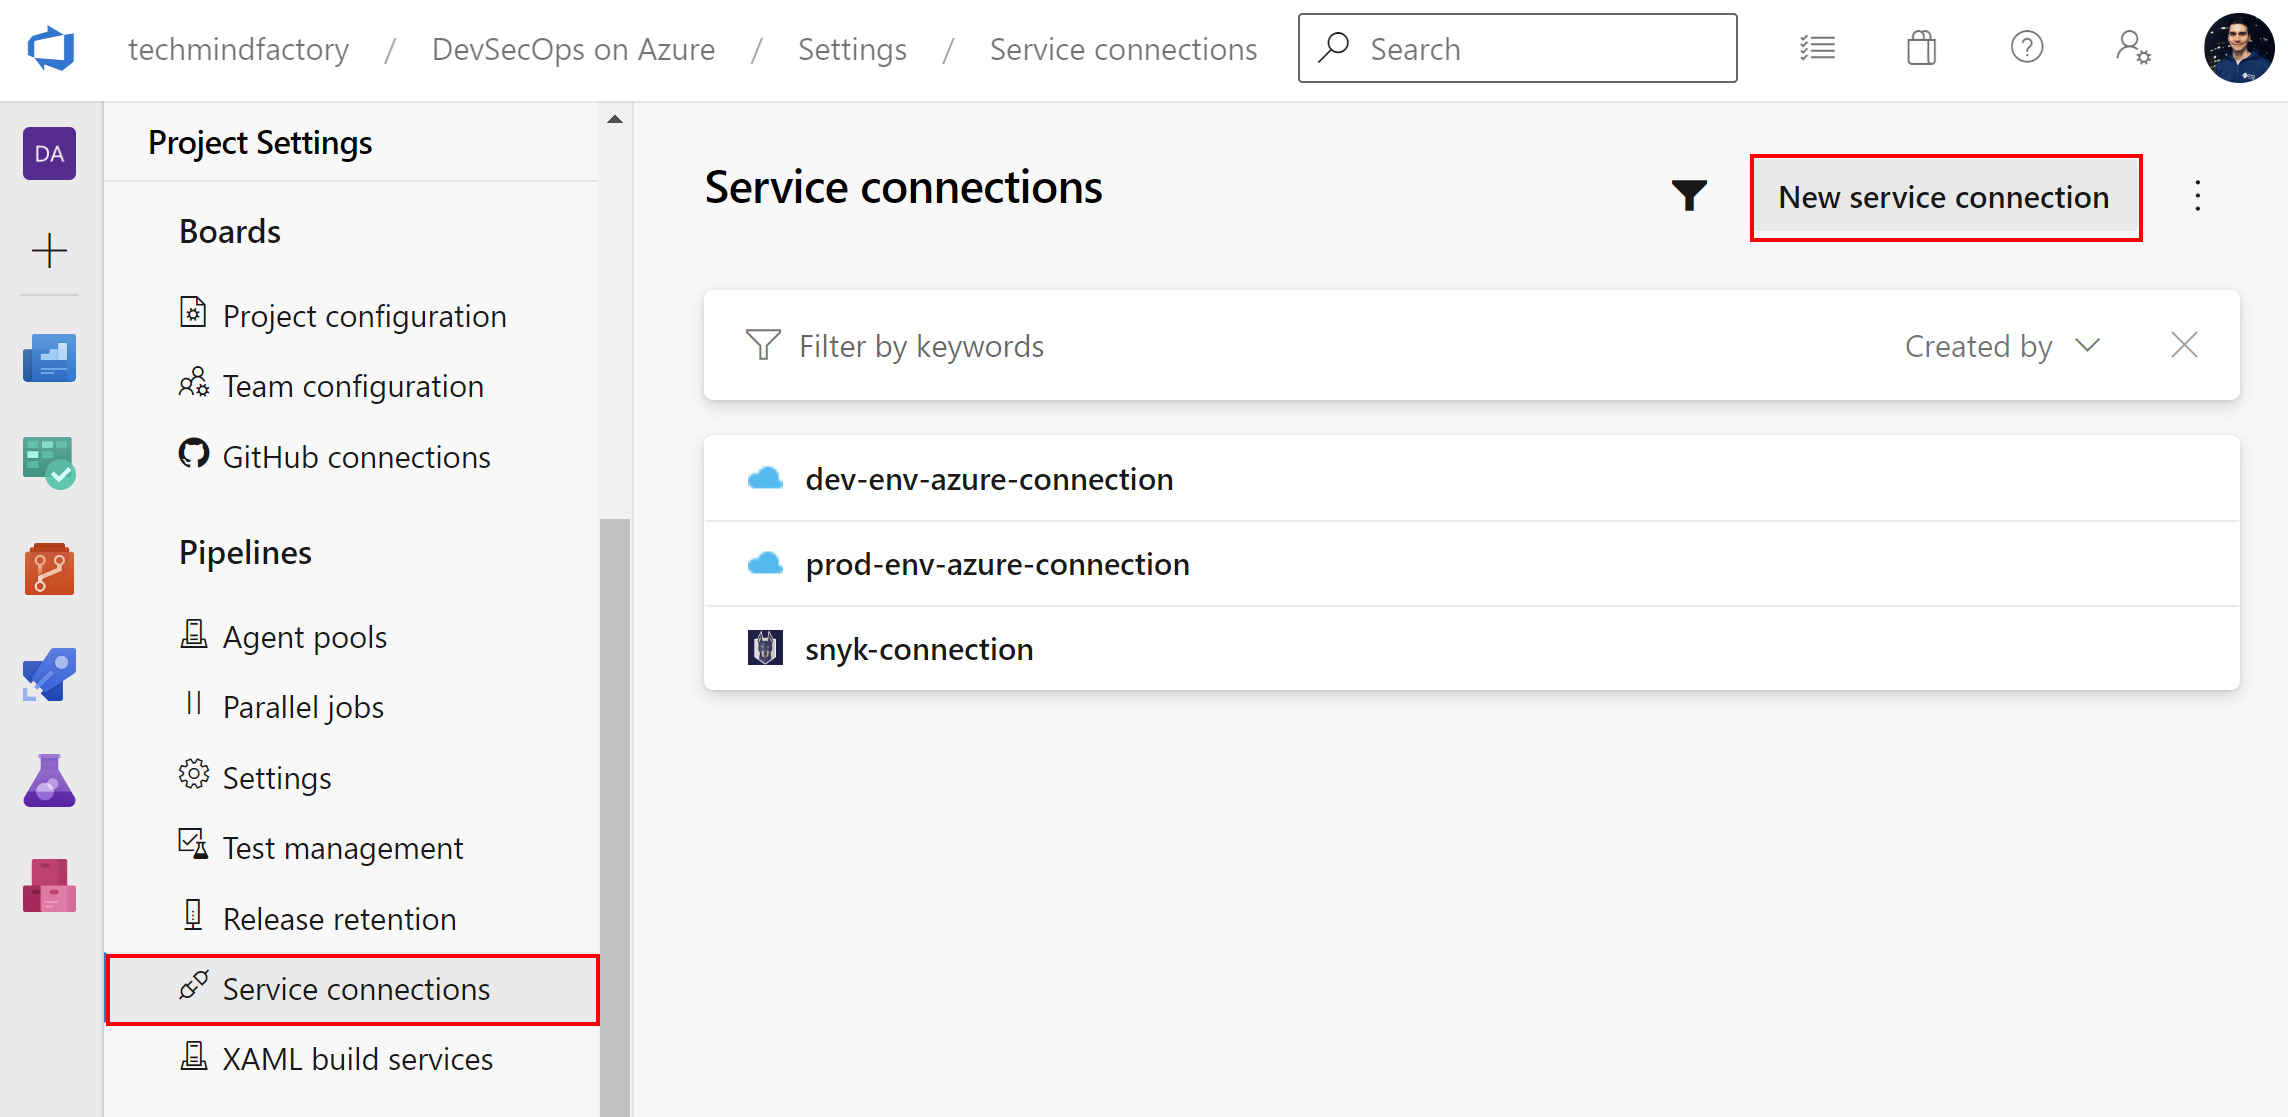
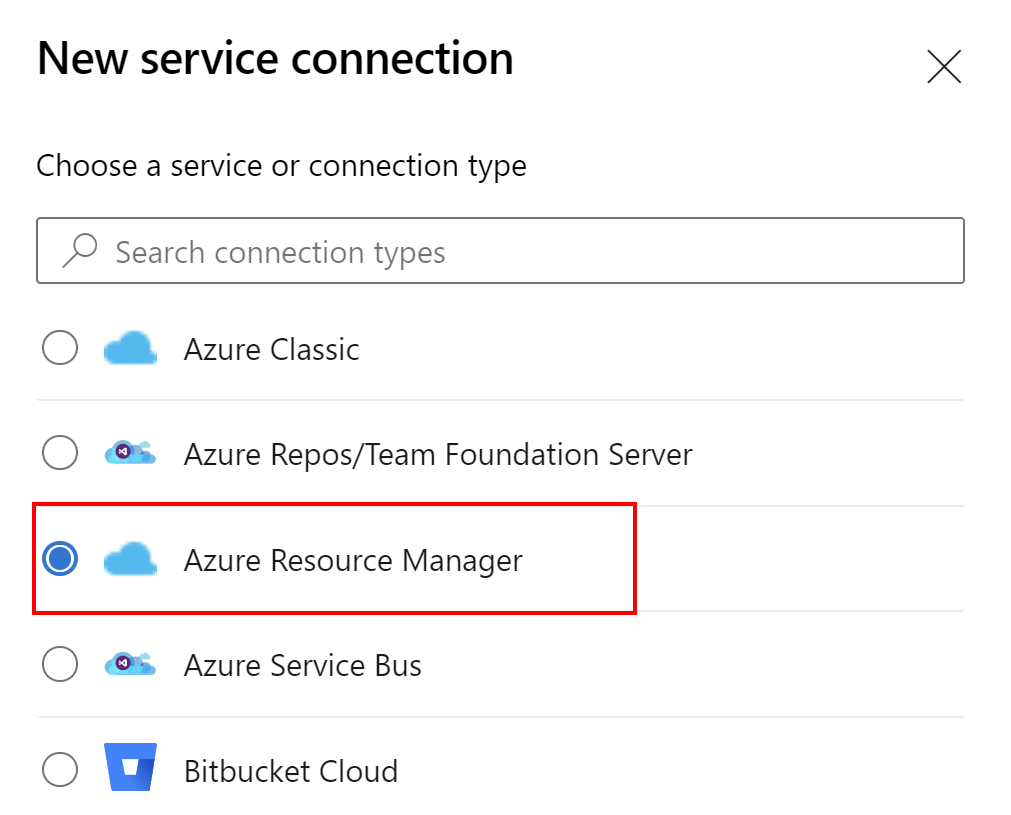
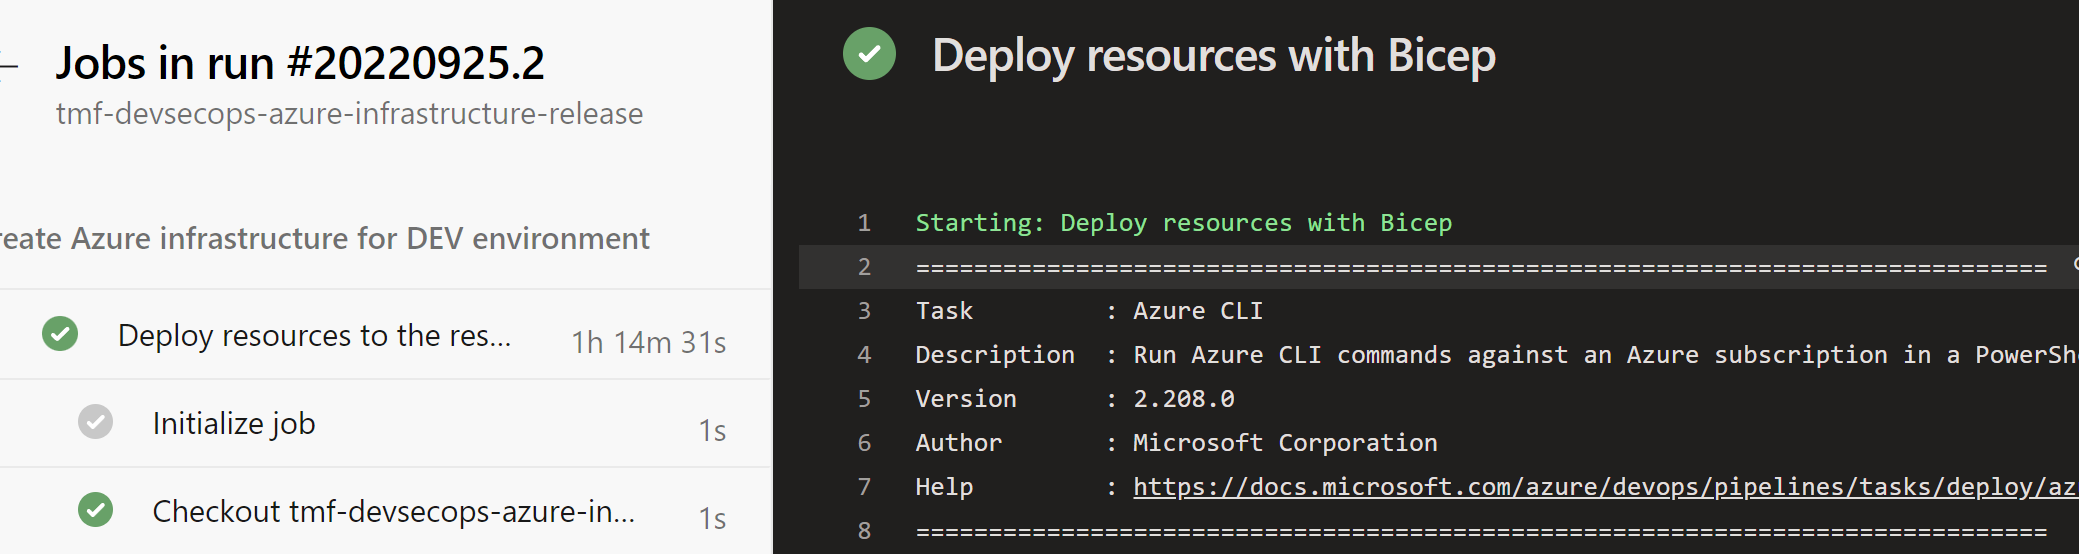
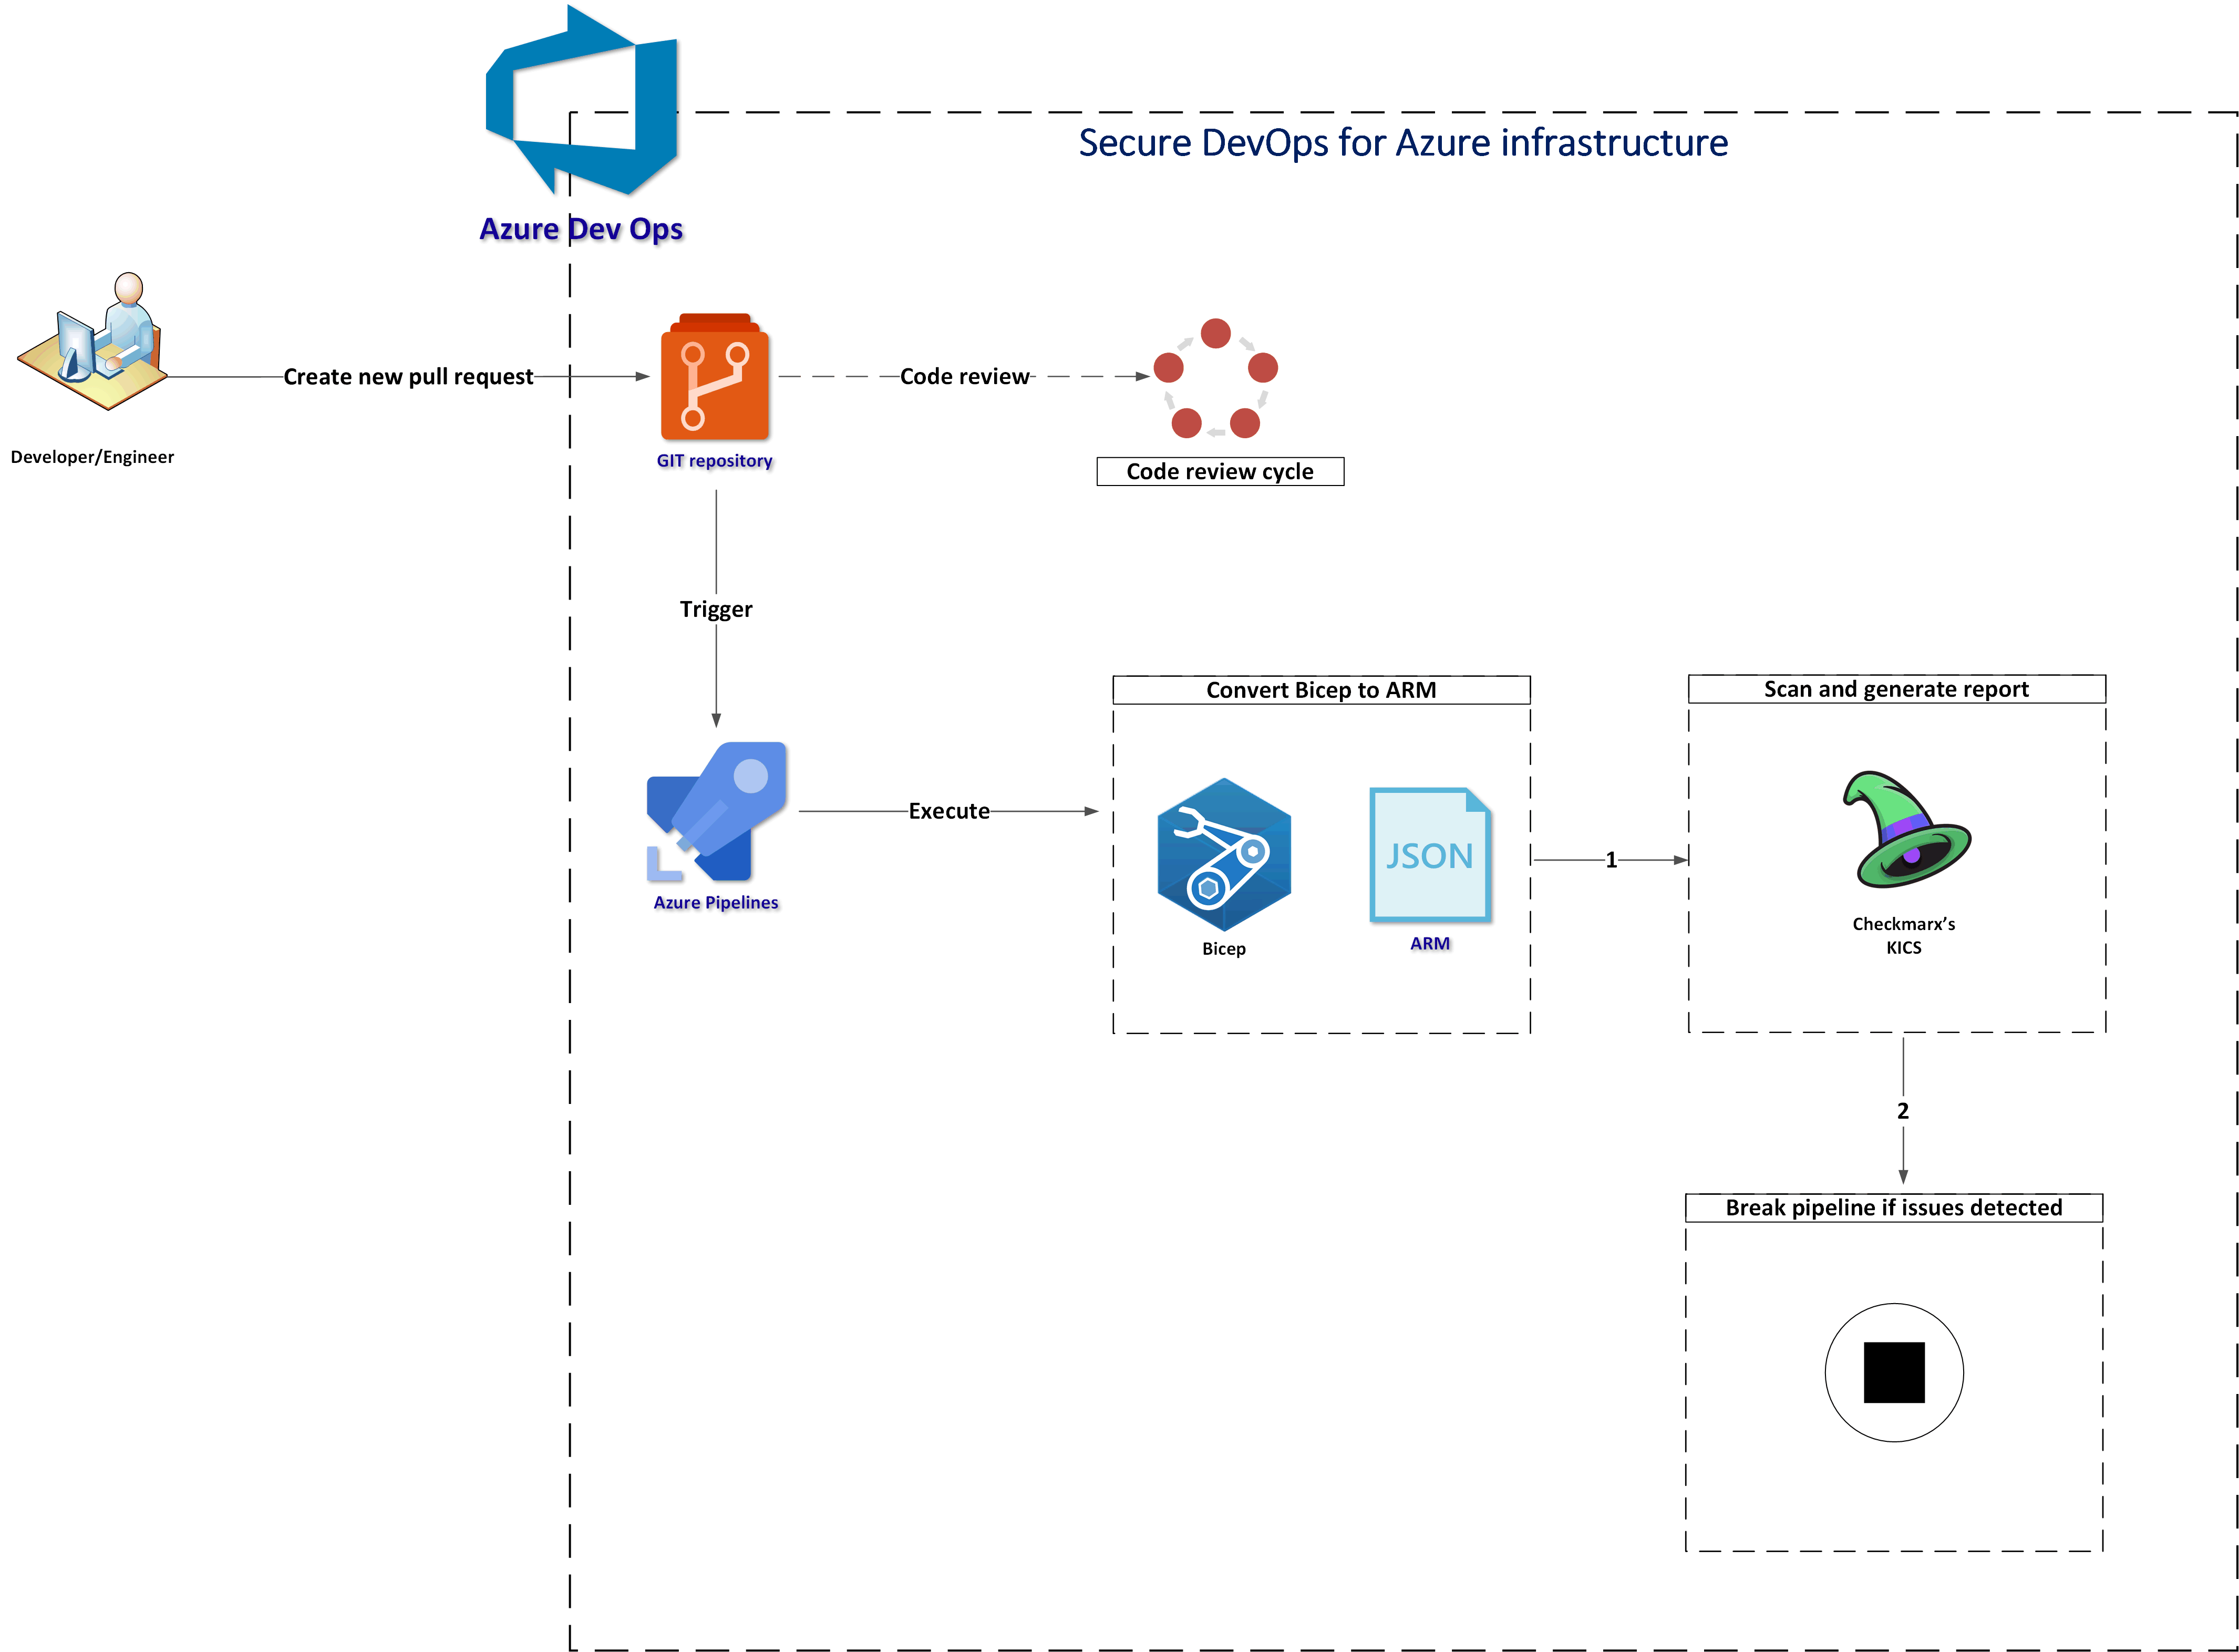
Azure Policies enforcement when creating Azure resources with Azure DevOps
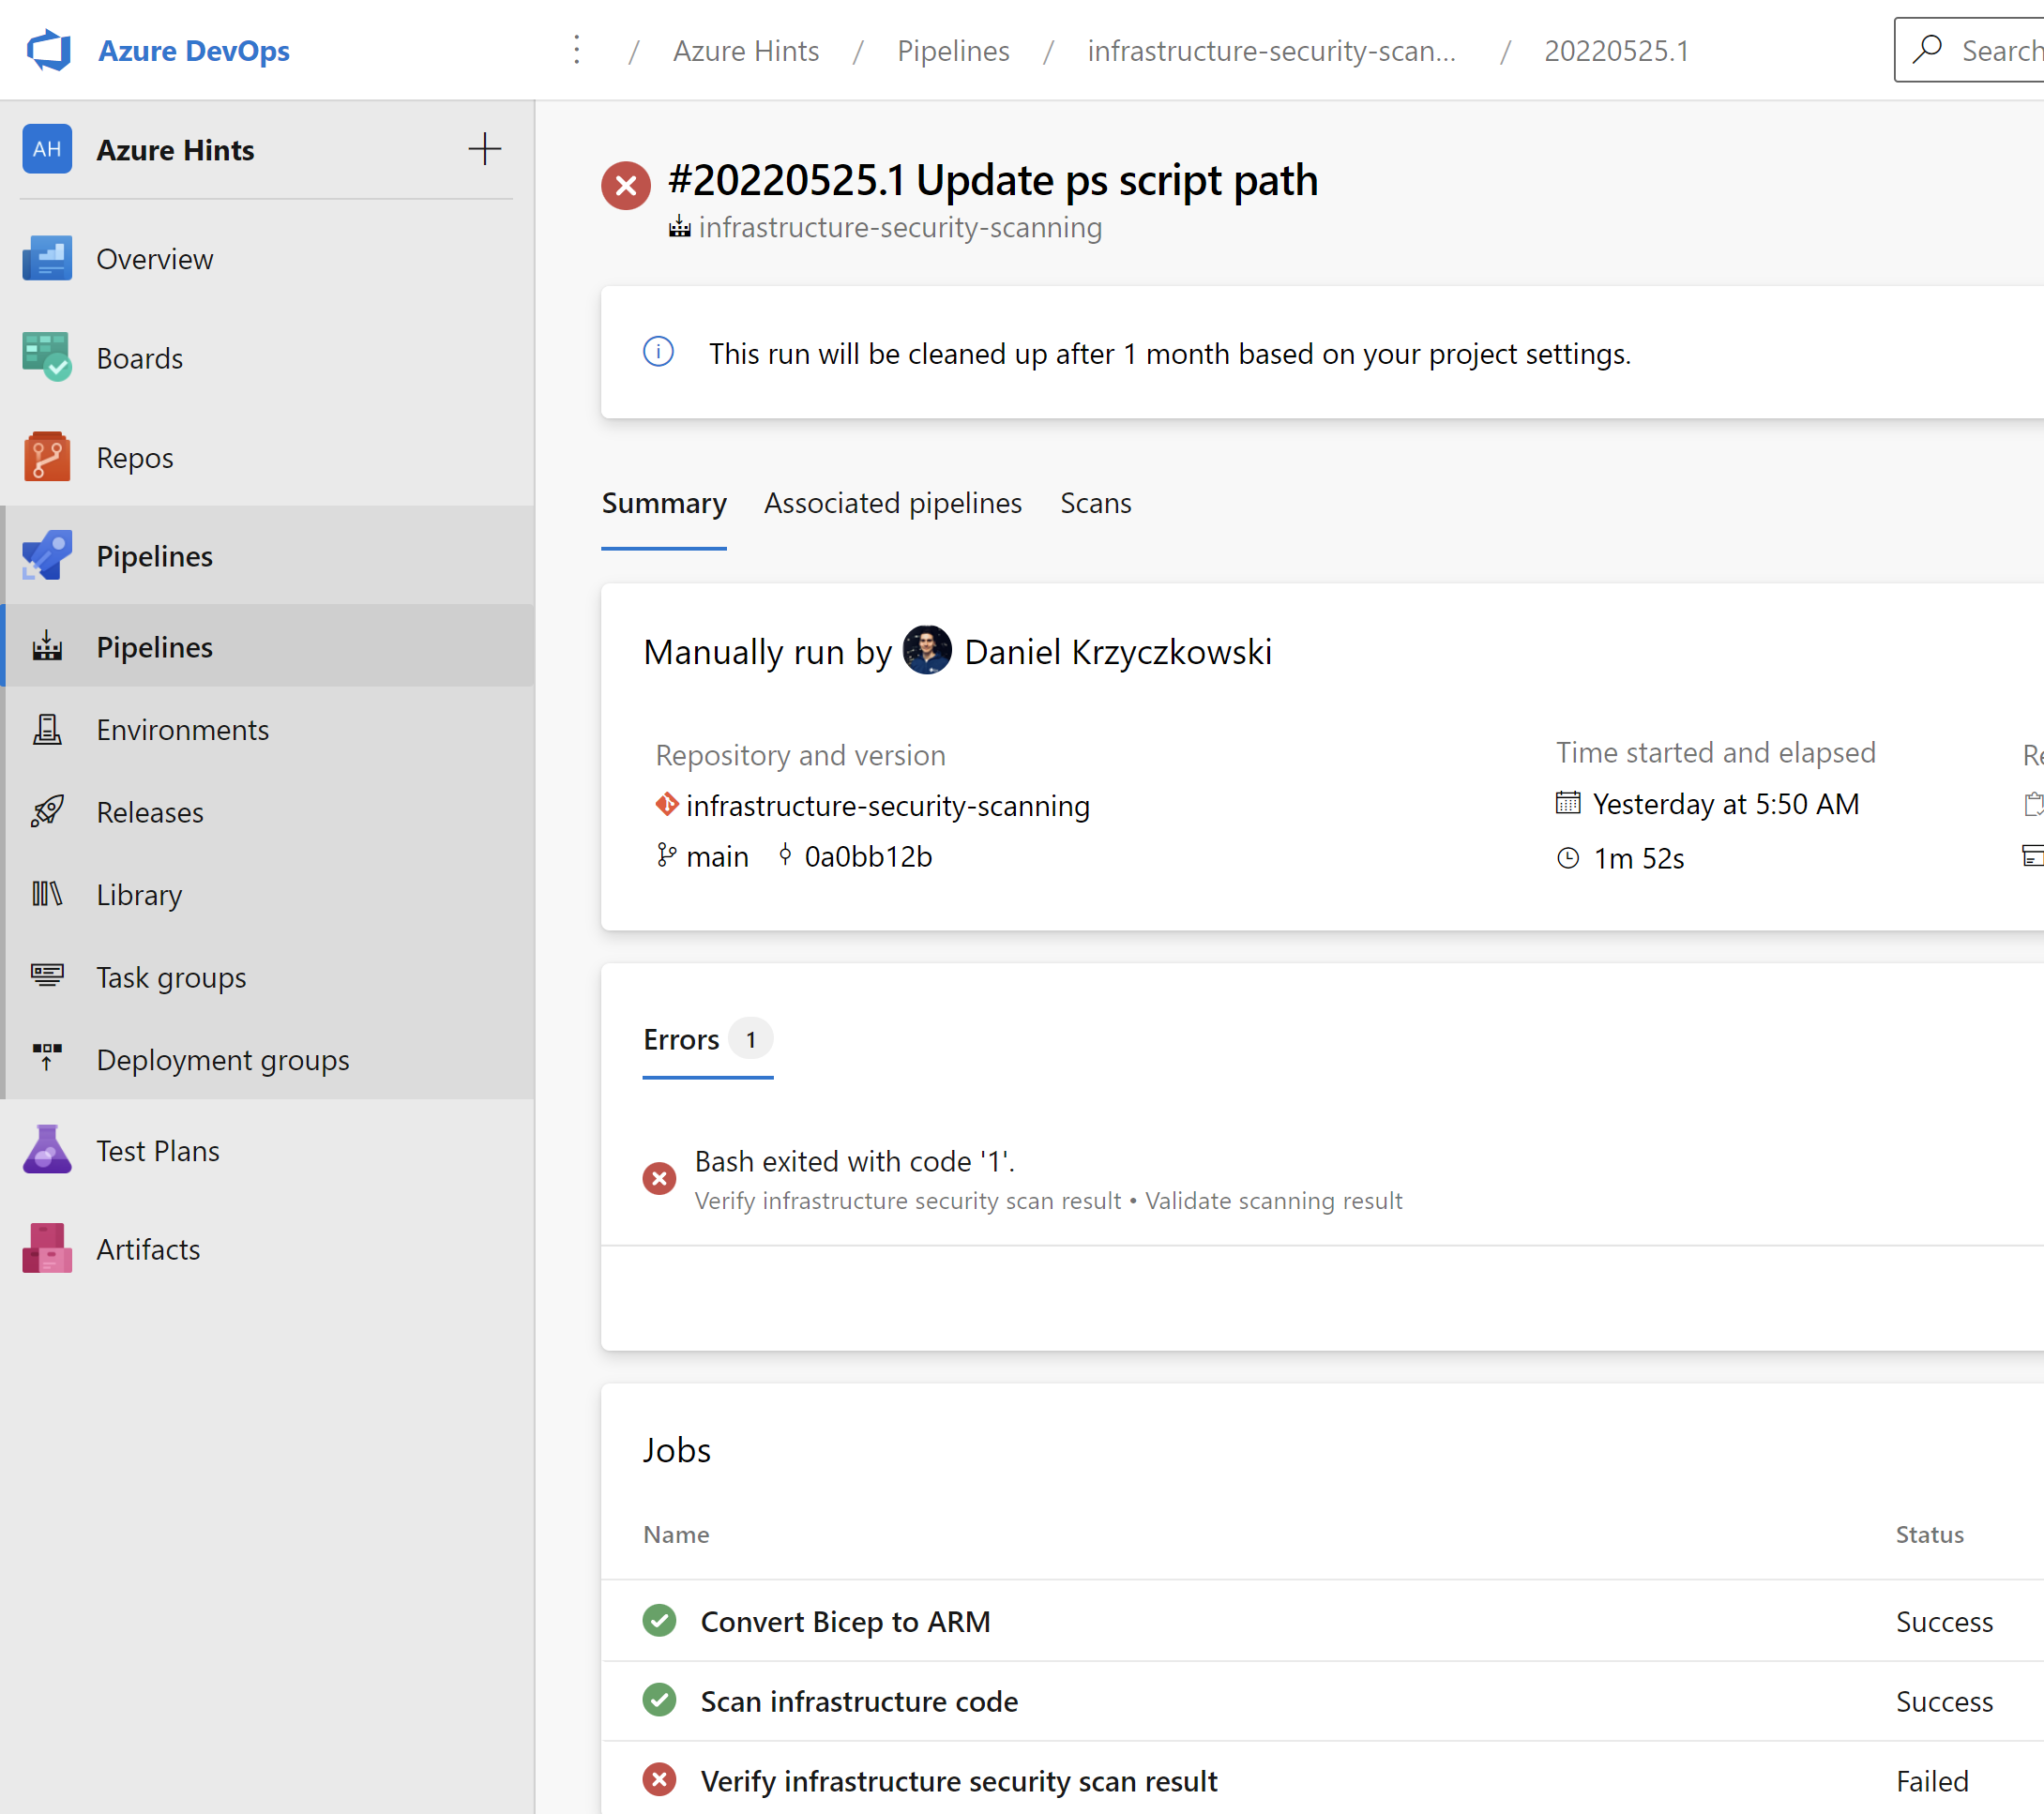
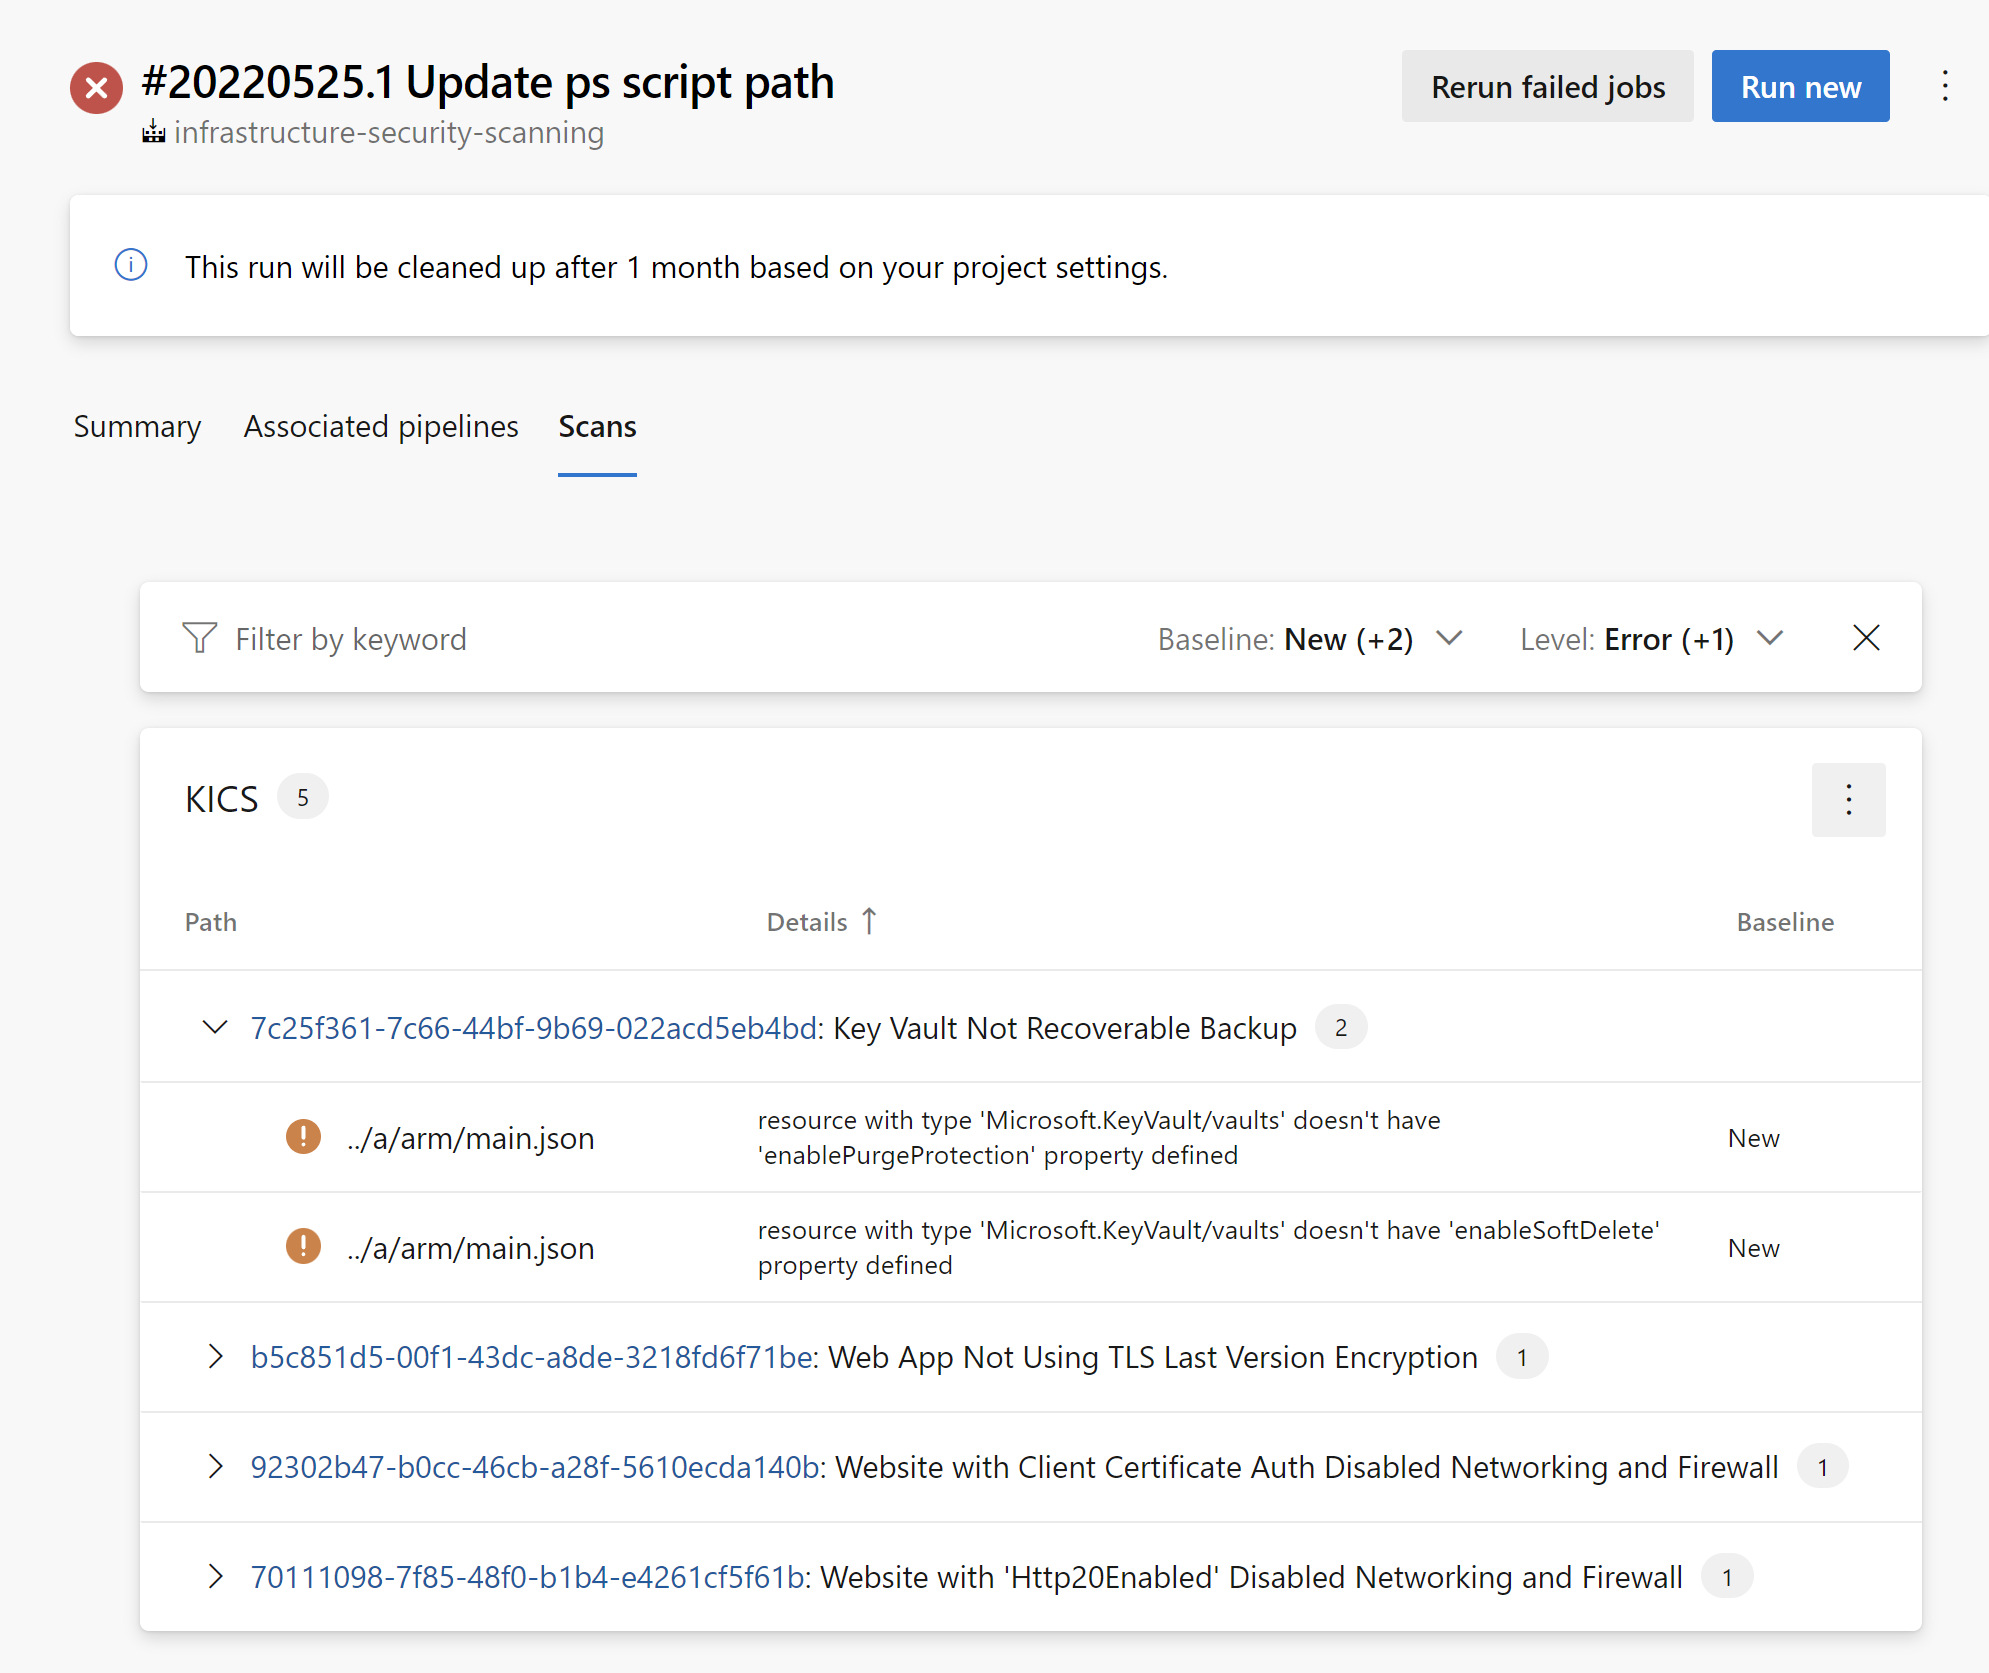
Now once we understand Policies structure and we know that they can be stored in the source code repository, we can easily set up deployments using Azure DevOps or GitHub. This is the Azure DevOps pipeline responsible for deploying resources to a specific resource group. I changed the location for Key Vault to be westus and then triggered the pipeline. This is the end result:
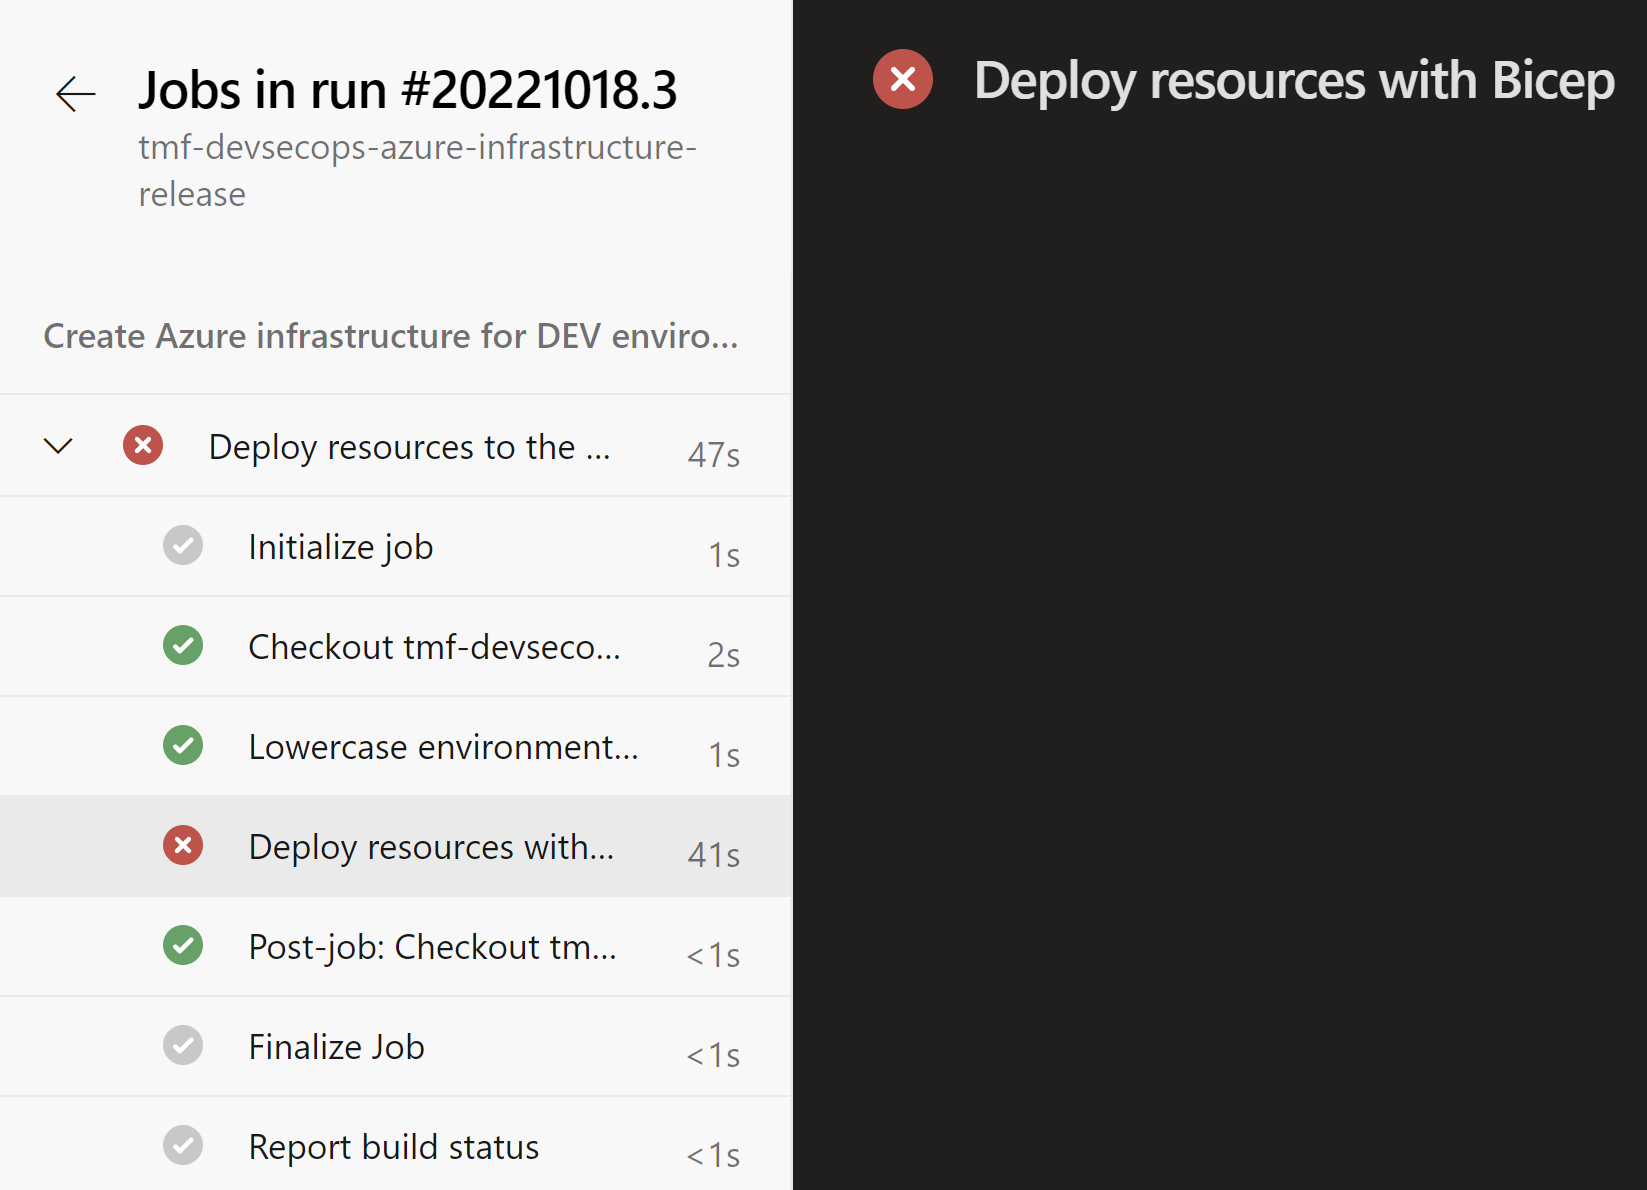
Here is the error message displayed in the logs:
Resource ‘kv-tmf-devsecops-dev-pt’ was disallowed by policy. Reasons: ‘Resources can be created only in west and north Europe regions.
New, additional approach - Azure Enterprise Policy as Code
There is also one more approach which was recently described in detail on Tech Community Blog here. This approach utilizes pure JSON policies and Initiatives together with PowerShell scripts. It is also worth checking!
Summary
In this article, I explained Azure cloud governance with Azure Policy and how we can automate Policy management using Policy as code approach. In this case, we can utilize DevOps automation to update policy definitions and assign them to different scopes in the Azure cloud.
If you like my articles, and find them helpful, please buy me a coffee:

]]>