Docker and Azure Kubernetes Service for .NET Developers
Short introduction
I planned to write this article some time ago but this topic is so big that I did not how to start and how to collect all valuable details I learned. Finally - Docker and Azure Kubernetes Service for .NET Developers article is ready. Application containerization is not young concept but tools and new capabilities around this topic are still fresh and worth to track. In this article I would like to describe some concepts around containerized ASP .NET Core applications, Docker, Azure Container Registry and Azure Kubernetes Service. I hope that this content will help not only .NET Developers but also everyone who would like to understand the whole concept of containers.
Prerequisites
Before moving forward there are few prerequisites. First of all I would like to notice that I used Windows to prepare all the stuff presented below.
There are some tools you have to install before:
● Install Docker for Windows available here - with Docker installed you can run containers locally on your machine
● Install Azure Command Line Interface available here - with Azure CLI you are able to connect to your Azure subscription and manage its resources through the command line
● Visual Studio 2017 available here - you will use Visual Studio 2017 to create simple ASP .NET Core Web API application.
ASP .NET Core
Let me start from simple ASP .NET Core Web API application. I suppose that most of you had chance to create simple web application using this technology. In this article I will use basic template from Visual Studio.
IMPORTANT
Before this part make sure that Docker for Windows is running:
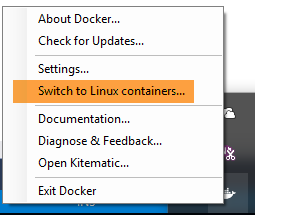
Make sure that Docker is running Linux containers:
- Open Visual Studio 2017 and create new ASP .NET Core Web Application:
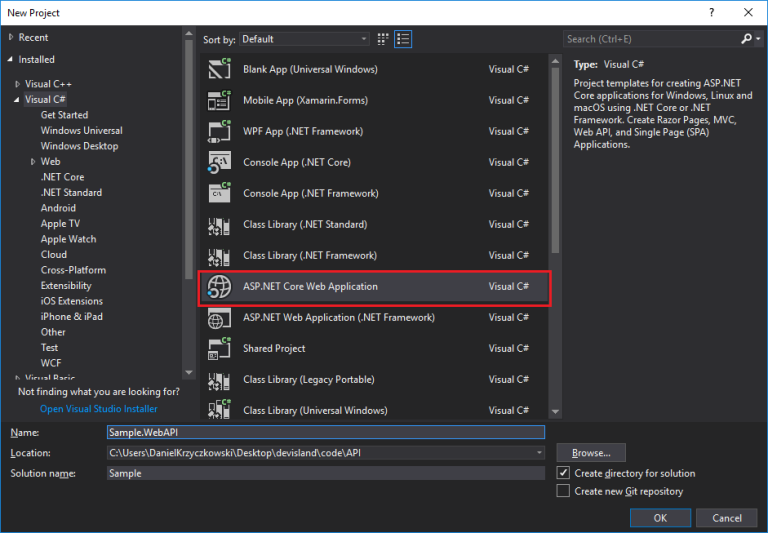
- When choosing default template select “API” and remember to select “Enable Docker Support”. As Operating System (OS) select Linux - simple reason why is that containers on Linux are more mature:

Once solution is created you should see additional parts:
● docker-compose
● Dockerfile
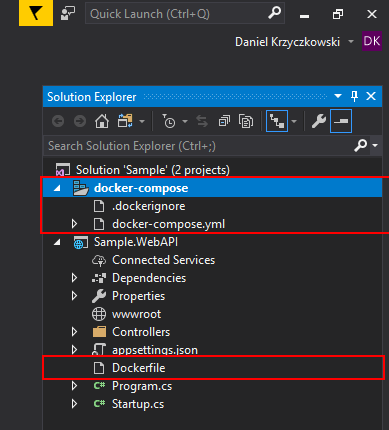
I will describe them in details in the next section so for now I will only mention that they are required to run our application in Docker container.
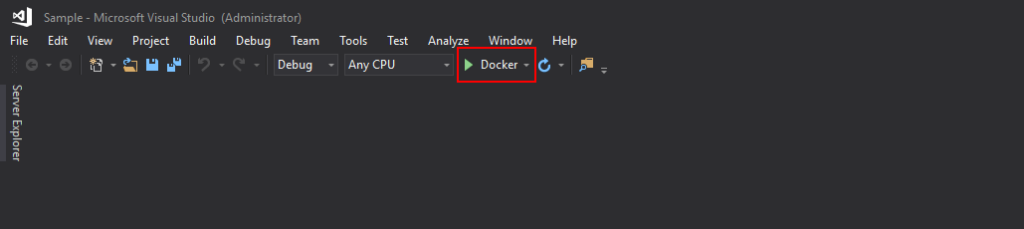
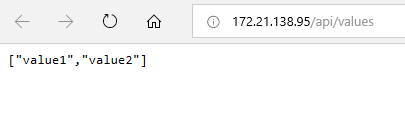
Plese note that at the bottom bar you have option to run your application with Docker. Click it and after few seconds browser should be displayed with two default values returned from Values controller in our Web API:
Congratulations! You just deployed and started application in Docker container!
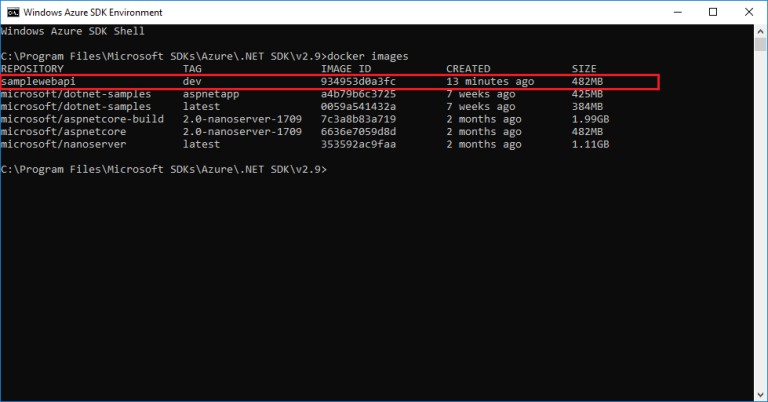
Once you started application, Visual Studio created Docker image for you using Docker tools. You can verify this. Open Azure CLI or PowerShell and type: docker images :
This first time when you managed to start Asp .NET Core web app with Docker… Great but is it all about containers? Am I ready to start creating highly scalable applications using containers? Not really… Not yet.
Docker
In above sample we used Docker - but what Docker exactly is and what are main concepts connected with it?
Docker
An open, containerization platform for developers and sysadmins to build, ship, and run distributed applications. It enables to package and deploy an application or service as an isolated unit containing all of its dependencies whether on laptops, data center VMs, or the cloud.
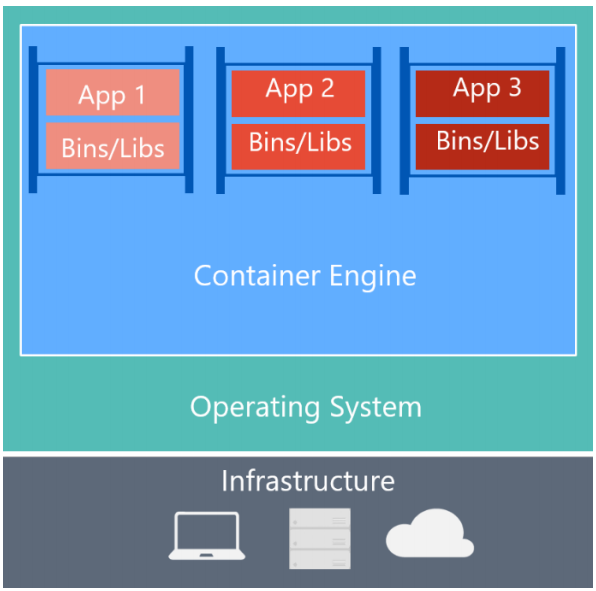
Container image
Container image an be explained as a box with all the dependencies and information required to create a container instance. Image is defined by the Docker file (described below) and it becomes immutable once built. Images can inherit configuration from other images - so the same as in .NET class can extend another class. It is much easier to create new image without starting from scratch. For instance for the application we created on the beginning of this article there was ASP .NET Core base image used, create by Microsoft. Open Dockerfile from the project and you should notice below line:
FROM microsoft/aspnetcore:2.0 AS base
Container
Docker container is an instance of a Docker image and represents the execution of a single application, process, or service. You can create multiple container instances from the same image. In our case we runned one container with ASP .NET Core Web API application.
Container image tag
Docker images can be tagged. You can apply labels to images to differentiate them. For our ASP .NET Core Web API application image Visual Studio applied “dev” tag (you can see screenshot from the console above).
Container host
Docker host is the underlying Operating System (OS) on which you will run Docker containers. It can be Physical or Virtual computer system. Docker will utilize shared OS kernel resources to run containers. Currently there are two types of Docker hosts: Linux and Windows.
Dockerfile
A text file that contains instructions for how to build a Docker image. Below there is Dockerfile from our sample ASP .NET Core Web API project:
FROM microsoft/aspnetcore:2.0 AS base
WORKDIR /app
EXPOSE 80

FROM microsoft/aspnetcore-build:2.0 AS build
WORKDIR /src
COPY Sample.WebAPI/Sample.WebAPI.csproj Sample.WebAPI/
RUN dotnet restore Sample.WebAPI/Sample.WebAPI.csproj
COPY . .
WORKDIR /src/Sample.WebAPI
RUN dotnet build Sample.WebAPI.csproj -c Release -o /app

FROM build AS publish
RUN dotnet publish Sample.WebAPI.csproj -c Release -o /app

FROM base AS final
WORKDIR /app
COPY --from=publish /app .
ENTRYPOINT ["dotnet", "Sample.WebAPI.dll"]
}
As I mentioned before Docker image can base on the other Docker images so you can choose a base image that contains the elements you need, and then copy in your own application on top. In our case ASP .NET Core base images provided by Microsoft was used.
Docker Compose
Docker compose YAML file specifies one or more containers that make up a single application or system. Within this file you have to specify the images that need to be started inside Docker containers, what are their dependencies or under which ports they should be available. Sample Docker Compose file content looks like below (taken from our simple Web API project). Docker Compose is also a command-line tool so using a single command (docker-compose up) you can deploy the whole multi-container application.
version: '3.4'

services:
  sample.webapi:
    image: ${DOCKER_REGISTRY}samplewebapi
    build:
      context: .
      dockerfile: Sample.WebAPI/Dockerfile
Images repository
Images repository contains Docker images collection labeled with a tag that indicates the image version.
Registry
Registry is a service that provides access to images repositories. The most popular Docker registry is Docker Hub which provides access to many different image repositories. Another example can be Azure Container Registry described below in the article.
Docker glossary
In this section I would like to present and describe some helpful Docker commands. Use them either in Azure CLI or in PowerShell.
● docker images - Display all Docker images available on host
● docker build PATH_TO_DOCKERFILE - Build Docker image from the Dockerfile
● docker rmi IMAGE_NAME - Remove Docker image with specific name
● docker rmi [IMAGE_NAME]:[TAG_NAME] - Remove Docker image with specific name and tag
● docker tag [IMAGE_NAME]:[TAG] - Tag Docker image
● docker-compose build - Build the images but do not start Docker container instances
● docker-compose up - Build the images if they do not exist and start containers instances
● docker-compose up –build - Build images even they already exist and then start container instances
● docker push - Push an image or a repository to a registry
Azure Container Registry (ACR)
Azure Container Registry is cloud container registry available on Microsoft Azure cloud platform for storing and managing Docker container images but not only - ACR allows you to store images for all types of container deployments including DC/OS, Docker Swarm, Kubernetes, and Azure services such as App Service, Batch, Service Fabric.
Azure Kubernetes Service (AKS)
Before talking about AKS is worth to describe what Kubernetes exactly is.
Kubernetes
Kubernetes is an open-source system for automating deployment, scaling, and management of containerized applications. It is also called “containers orchestrator” because it enables managing groups of running containers and their lifecycle.
It gives the freedom to take advantage of on-premises, hybrid, or public cloud infrastructure - so in this case Microsoft Azure cloud. I encourage you to read more about Kubernetes on the official website.
Below I described some Kubernetes concepts:
Namespace
Namespace can be compared to namespace from .NET world. Each namespace is isolated. Each application (or micro-service) can be deployed to specific namespace. Kubernetes cluster has at least two built-in namespaces. These are default and kube-system.
Node
Node is a host withing a Kubernetes cluster - either physical or virtual machine. Nodes are managed by master - a collection of components, such as API server, scheduler, and controller manager. You can increase or decrease number of nodes withing Kubernetes cluster.
Cluster
Kubernetes cluster consists of nodes ( physical or virtual machines that run applications and cloud workflows).
Pod
Kubernetes Pod hosts application instance. A Pod is a Kubernetes abstraction that represents a group of one or more application containers (in our case Docker) and some shared resources for those containers like: shared storage or networking. A Pod models an application-specific “logical host”.
Service
Kubernetes Service is an abstraction which defines a logical set of Pods including policy by which to access them. To clarify and not make topic so complicated imagine that service is just an abstraction which enables decoupling between pods and external world and access to applications within containers in the pod. For instance you can define port number or transport protocol.
ReplicaSet
ReplicaSet manages a group of pods of the same type and ensures that a specific number of pods are always running. If a pod crashes, a replica set restores it.
Deployment
Deployment is a resource that ensures the reliable roll out of an application. It creates a replica set that is used to manage a group of pods of the same type. If a pod crashes then another one is automatically created through the replica set.
Ingress
Ingress is load balancer which enables exposition one or more services to the outside world providing externally visible URLs to services and load-balance traffic with SSL termination. Ingresses can also be used to define network routes between namespaces and pods in conjunction with network policies. Ingress Controller managing them with actions such as requests limitation or URLs redirection.
ConfigMap
ConfigMap enables keeping image configuration options separate from containers and pods. Configuration options are stored as a key-value pairs and exposed as an environment variables.
Secret
Secrets are very similar to ConfigMaps but they are responsible for storing sensitive information like passwords.
Azure Kubernetes Service (AKS)
Azure Kubernetes Service enables reduction of the complexity and operational overhead of managing Kubernetes. With AKS you do not have to create and configure each part of Kubernetes manually - Azure handles critical tasks like health monitoring or maintenance. It is worth to mention that AKS service is free, you only pay for the agent nodes within the clusters.
There are few additional benefits from using Azure Kubernetes Service:
● Kubernetes master and all nodes are deployed and configured
● Azure Kubernetes Service supports the Docker image format
● AKS clusters are created with support for Azure Files and Azure Disks
● Integration with with Azure Container Registry (ACR)
● HTTP Application Routing solution makes it easy to access applications deployed to AKS cluster
To sum up it is much easier to configure and use Kubernetes with Azure Kubernetes Service.
Kubernetes glossary
In this section I would like to describe some concepts of Kubernetes and present some helpful commands. Use them either in Azure CLI or in PowerShell.
● kubectl- command line interface for running commands against Kubernetes clusters
● kubectl get pods - command to display all pods in the default namespace
● kubectl apply -f sample-app-microservice.yaml - command to deploy new service
● kubectl get deployment - command to display deployments in the default namespace
● kubectl apply -f sample-configmap.yaml - command to create new ConfigMap from YAML file
All together
Now when you have some bigger knowledge it is time to connect the dots. For the purpose of this article I prepared configuration instructions so you can start using Azure Kubernetes Service together with Docker containers and Azure Container Registry. We will use simple ASP .NET Core Web API application we created on the beginning of this article. It will be running inside Docker container orchestrated by Kubernetes.
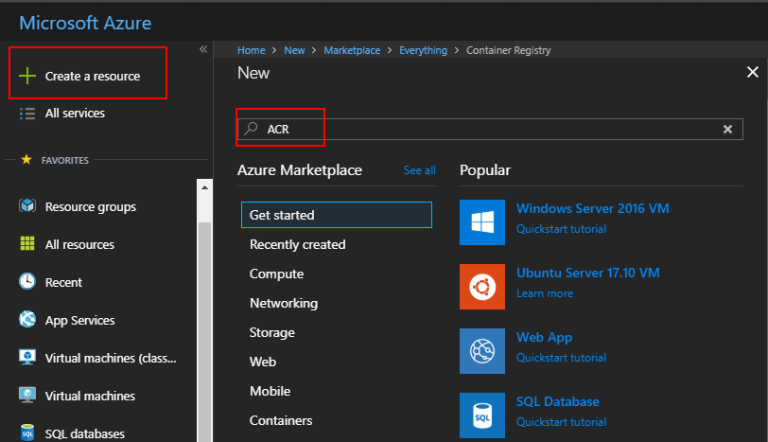
Create Azure Container Registry
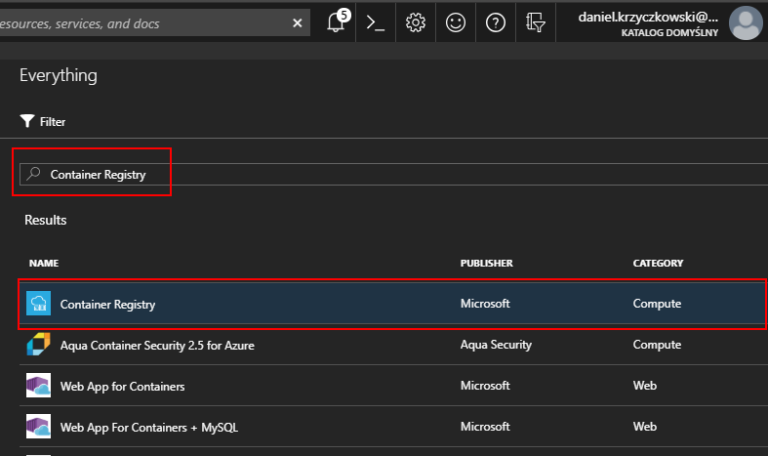
- Open Azure portal and type “ACR” in the “New Resource” window:
- Select “Container Registry”:
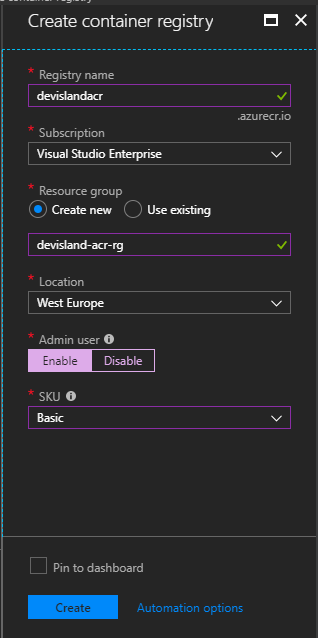
- Type the name of your registry and resource group. SKU can be set to “Basic”. Then click “Create”:
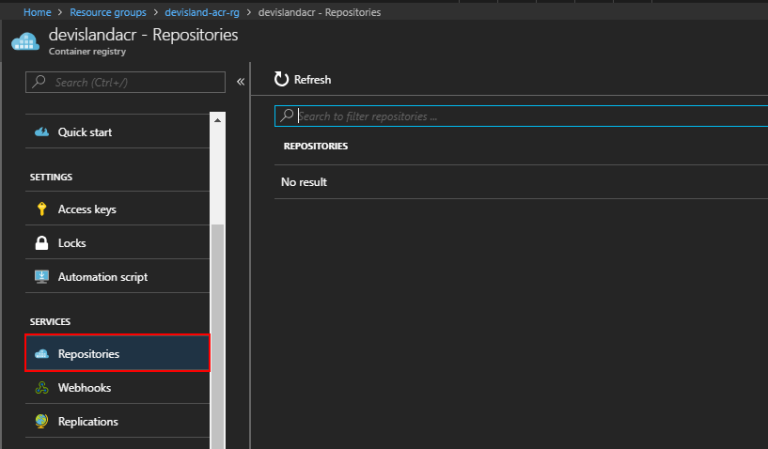
- Once ACR is created you can see it in the dashboard:

- Click it and go to “Repositories” tab. You should see empty list:
- It is time to add application Docker image to ACR. To achieve it you have to use Azure CLI and sign in to your Azure subscription:
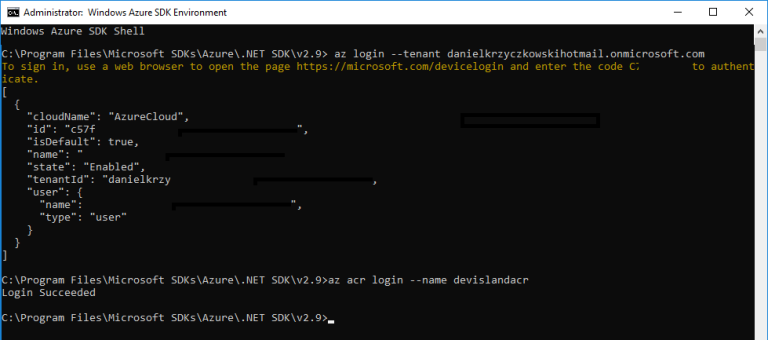
You can sign in with this command:
az login –tenant <<YOUR_TENANT_HERE>>
Once you authenticate you have access to your Azure resources.
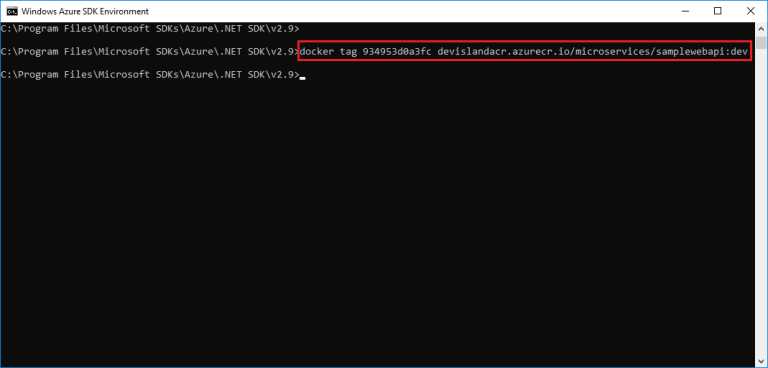
- Before we push the image to Azure Container Registry we have to tag it. We will use “dev” tag. You can tag your image with this command:
docker tag [Image ID] [ACR_NAME].azureacr.io/microservices/samplewebapi:dev
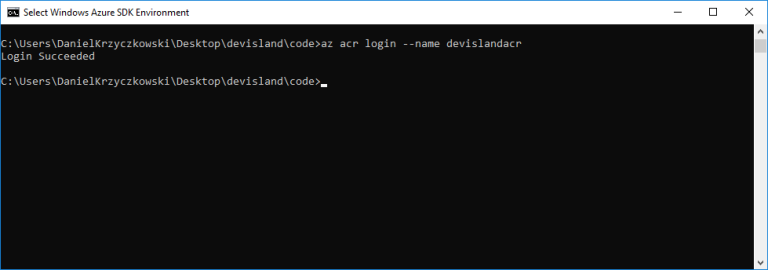
- Login to ACR using below command:
az acr login –name [ACR_NAME]
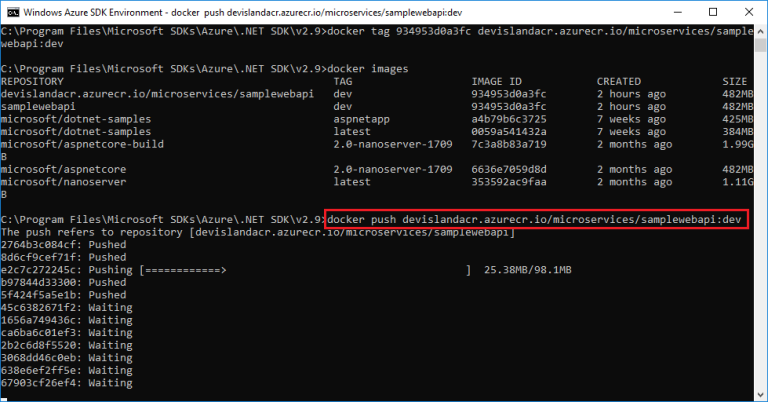
- Push image to ACR with below command:
docker push [ACR_NAME].azure.io/microservices/samplewebapi:dev
Now go to Azure portal and verify if there is new image with “dev” tag for your application:
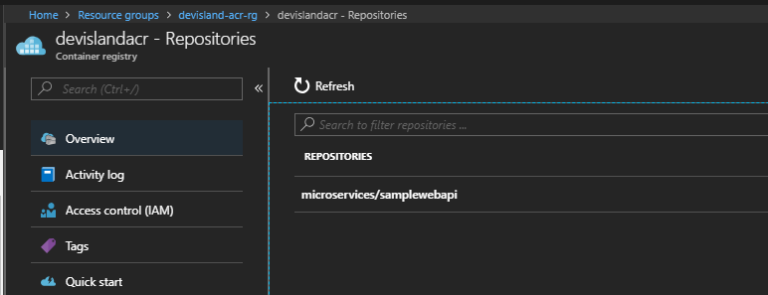

Image is ready - it can be pulled from Kubernetes so lets see how to configure AKS below.
Create Azure Kubernetes Service
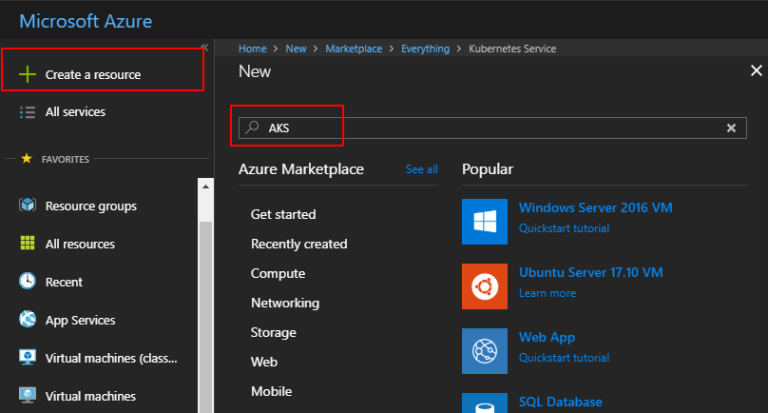
- Open Azure portal and type “AKS” in the “New Resource” window:
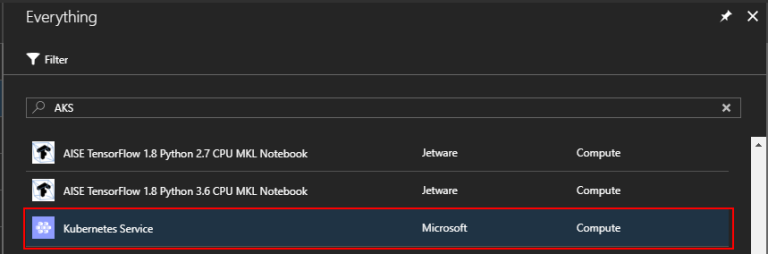
2. Select “Kubernetes Service”:
- Now setup AKS accordingly to below screens:
In the first step you have to provide some important details like cluster name, resource group where it will be created, region, Kubernetes version, node size and node count:

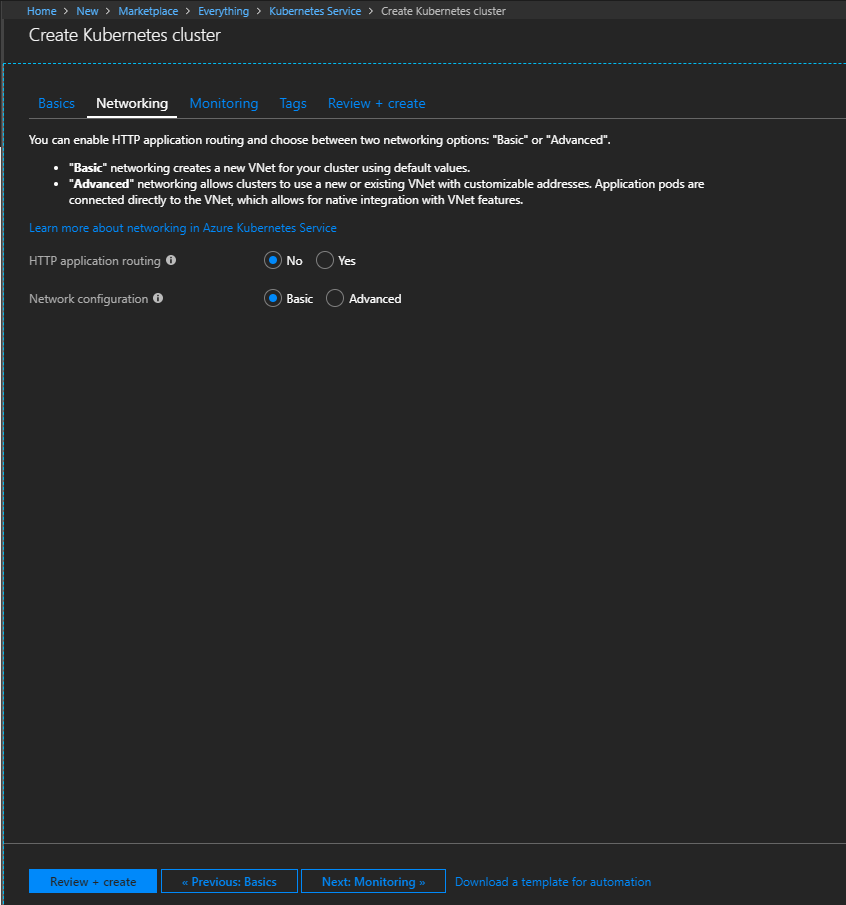
Next section should look like below. We want basic network configuration and no HTTP application routing:
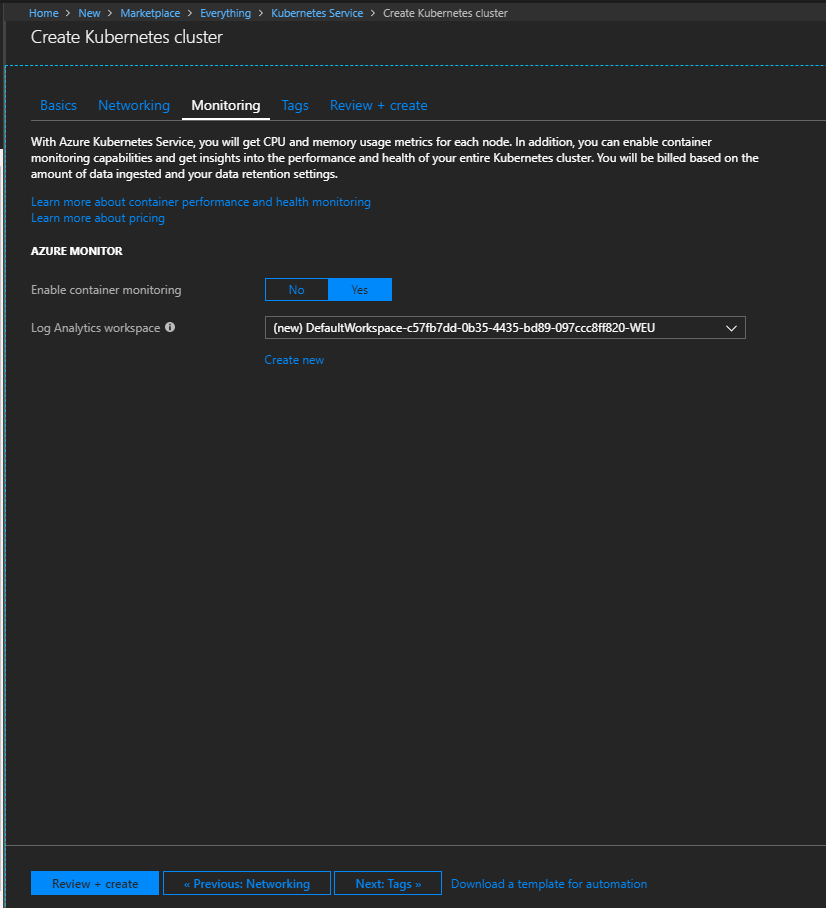
It is good to enable Azure Monitor to measure Kubernetes cluster performance:
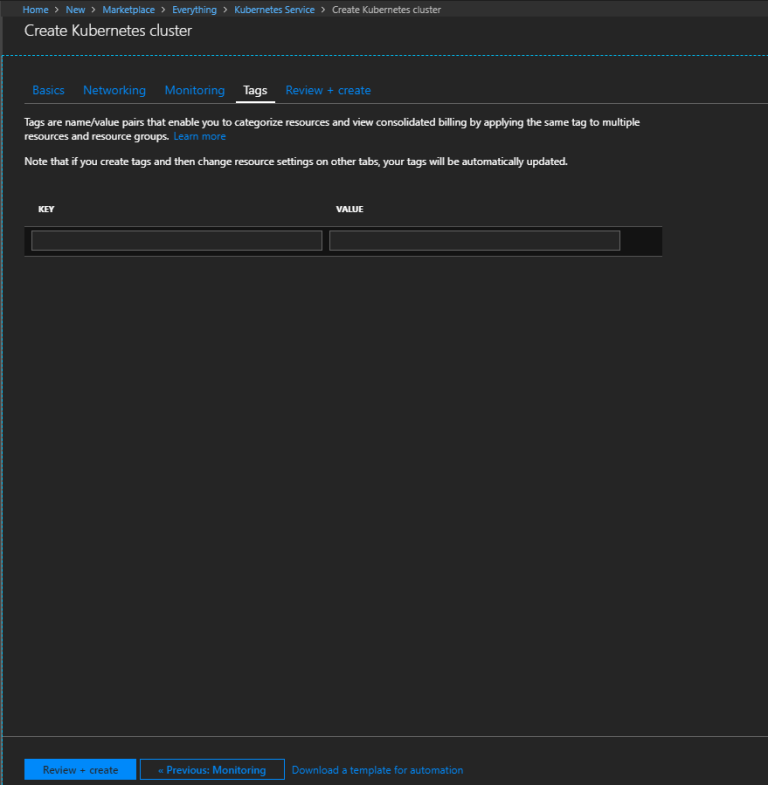
There will be no tags:
Verification and summary:
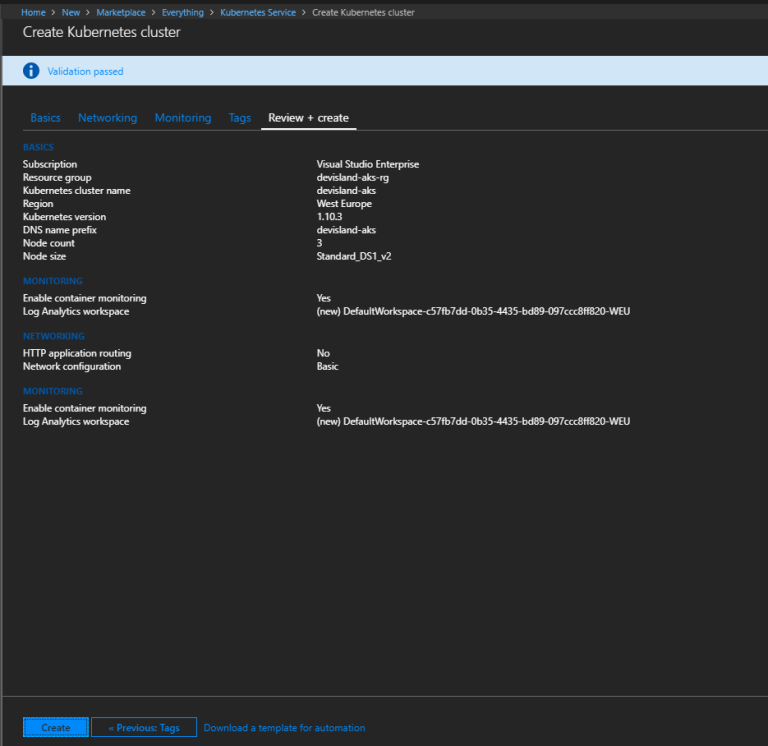
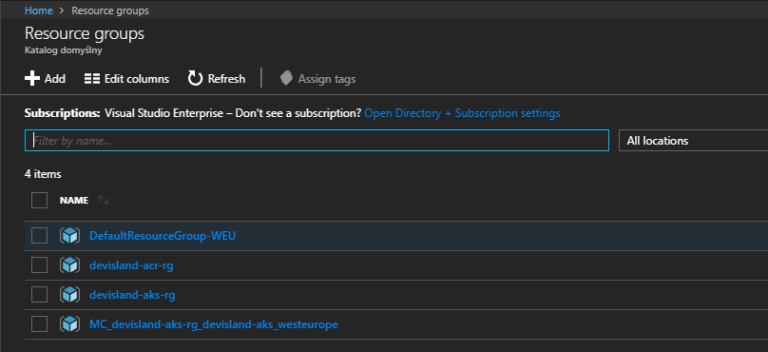
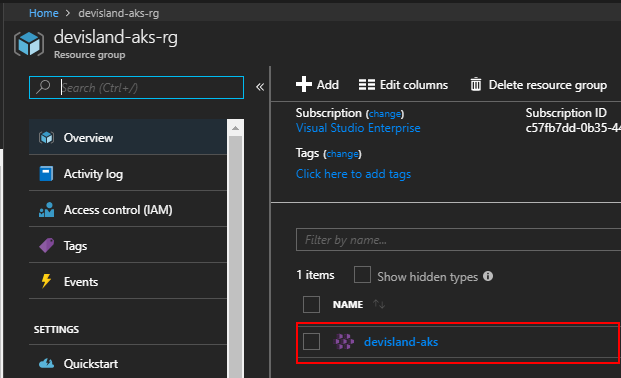
Click “Create” button to create AKS cluster. After few minutes you should see the result. Please open resource groups blade - note that there are two additional resource groups created. Select name of the resource group you set during configuration:
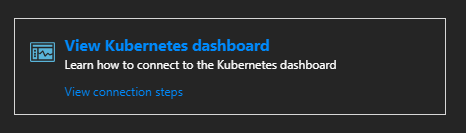
Select cluster - you should see main tab with “View Kubernetes dashboard” section:
Once you select it three commands will be presented:
● az aks install-cli - enables you to install Kubernetes tools so you can access Kubernetes cluster from Azure CLI
● az aks get-credentials –resource-group devisland-aks-rg –name devisland-aks - Get credentials so you can access Kubernetes cluster
● az aks browse –resource-group devisland-aks-rg –name devisland-aks - open dashboard in browser
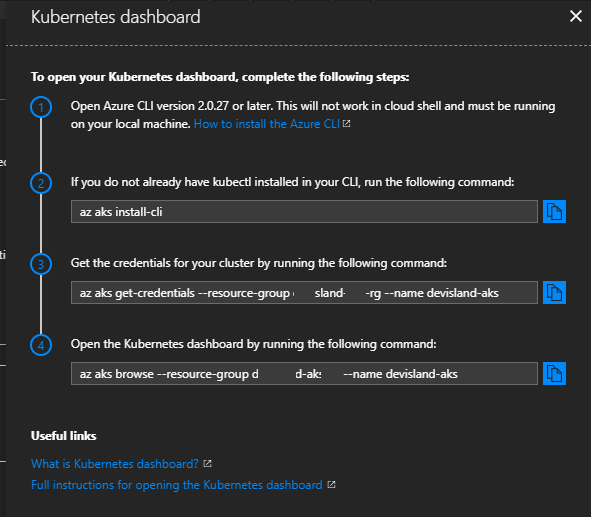
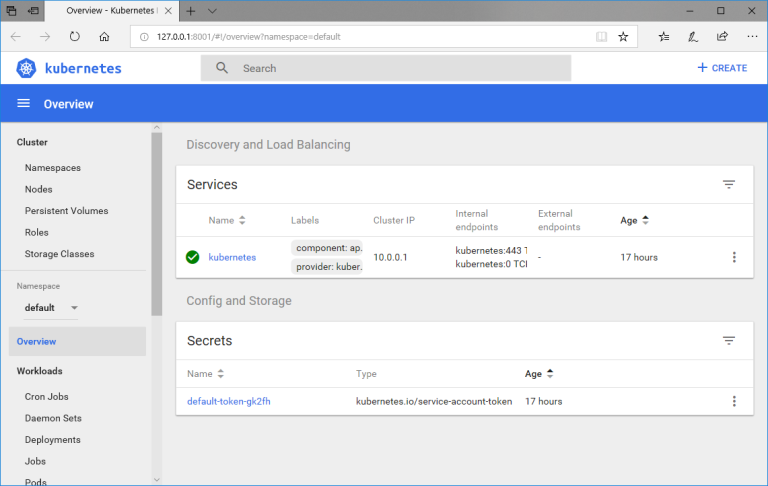
Once you apply last command Kubernetes dashboard will appear:
Setup connection between Azure Kubernetes Service and Azure Container Registry
We have to configure access to ACR from Kubernetes cluster. To do it we can setup secret. Remember that you have to be logged in to your Azure subscription through Azure CLI first.
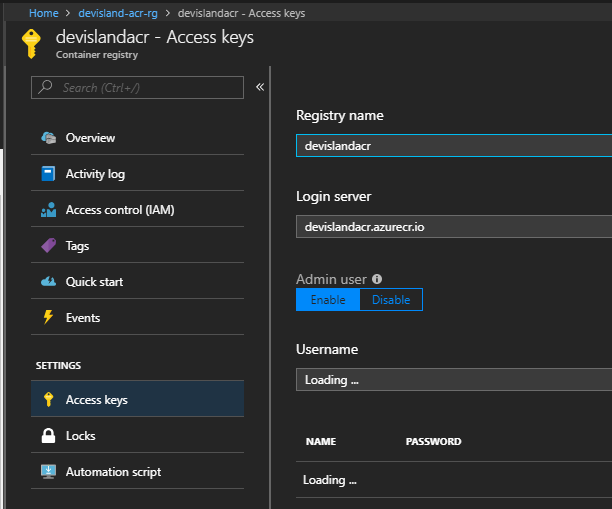
- Open ACR blade in Azure portal and go to “Keys” tab. We will use this information in the next step (copy registry name, username and password):
- In Azure CLI type below command:
kubectl create secret docker-registry [ACR_NAME]-connection –docker-server=[ACR_NAME] –docker-username=[ACR_NAME] –docker-password=[PASSWORD_FROM_THE_PORTAL] –docker-email=[YOUR_EMAIL]
This command creates ACR secret in Kubernetes so it can access ACR repository with Docker images.
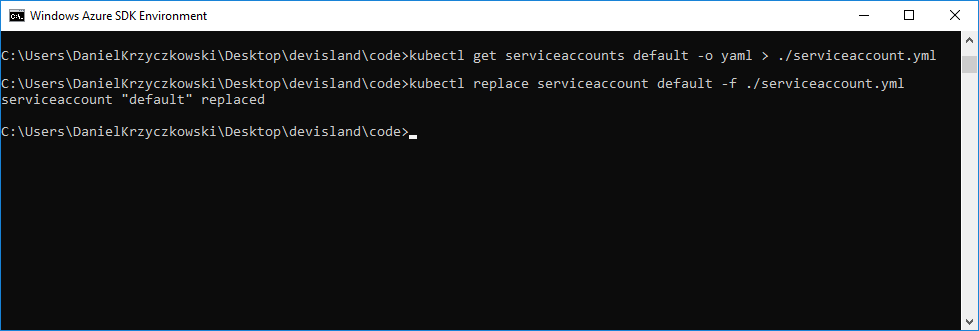
- Get ServiceAccount.yml file from Kubernetes with below command:
kubectl get serviceaccounts default -o yaml > ./serviceaccount.yml
ServiceAccount YAML file contains configuration for pods used in Kubernetes. They are tied to a set of credentials stored as Secrets.
At the end of the file add imagePullSecrets section to provide access to ACR secret:
apiVersion: v1
kind: ServiceAccount
metadata:
  creationTimestamp: 2018-06-30T20:17:46Z
  name: default
  namespace: default
  resourceVersion: "141"
  selfLink: /api/v1/namespaces/default/serviceaccounts/default
  uid: a7385849-7ca2-11e8-85bd-0a58ac1f0f54
secrets:
- name: default-token-txw4m
imagePullSecrets:
- name: devislandacr-connection
Update file on Kubernetes using below command:
kubectl replace serviceaccount default -f ./serviceaccount.yml
Once you created static IP save it somewhere - we will use it soon.
Configure NGINX ingress loadbalancer
Ingress controller is using “ingress resource” with all micro services (APIs) mapping so we can have many pods and ingress will handle connection redirection to them. We are using NGINX.
With ingress we do not have to create separate IP for each service in Kubernetes.
There are few ways to install ingress - in this case I am using Helm.
Helm

Helm is package manager for Kubernetes like NuGet in Visual Studio. We are using Helm to install nginx ingress controller in Kubernetes cluster.
Download Helm. I used Helm application for Windows. To use helm you have to switch directory in Azure CLI to directory where Helm application file is located.
Sign in to Kubernetes cluster in Azure CLI first (using command from the Azure portal I presented above) and then apply below command:
helm init
Helm has two major components:
● Helm Client is a command-line client for end users
● Tiller Server is an in-cluster server that interacts with the Helm client, and interfaces with the Kubernetes API server
Once Helm is ready we can install NGINX with below command:
helm install stable/nginx-ingress –name [NAME_UP_TO_YOU]-nginx –set rbac.create=false
You should see that ingress was installed with success:

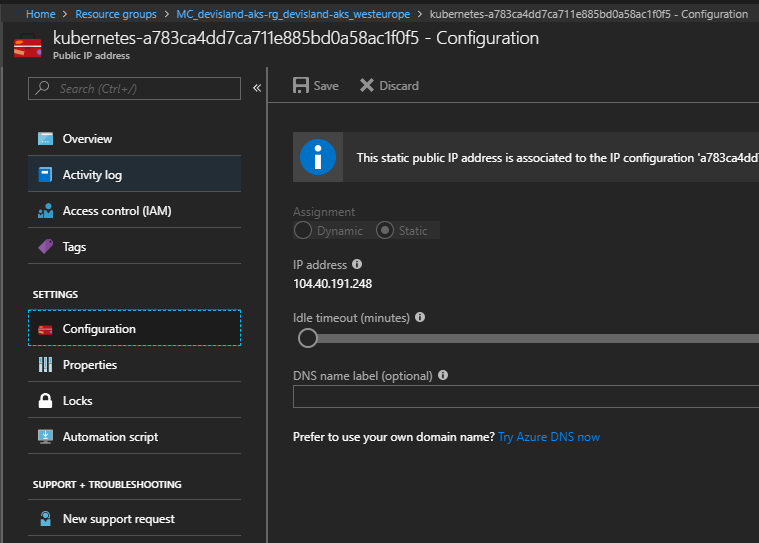
Verify public IP to access Kubernetes microservices from the Internet
If we want to access our Web API hosted as microservice in Kubernetes we have to check public static IP. You can find it in the resource group which starts with “MC…”:
![]()
Update YAML files
Now we have to update ingress resource (ingress.yaml file) so ingress controller knows the mapping of different micro-services (in our case one with sample Web API application):
apiVersion: extensions/v1beta1
kind: Ingress
metadata:
  name: devisland-ingress
  namespace: default
  annotations:
    nginx.ingress.kubernetes.io/rewrite-target: /
    kubernetes.io/ingress.class: "nginx"
    nginx.ingress.kubernetes.io/enable-cors: "true"
    nginx.ingress.kubernetes.io/ssl-redirect: "false"
spec:
  rules:
  - http:
      paths:
      - path: /testpath
        backend:
          serviceName: devisland-sample-webapi-service
          servicePort: 8080
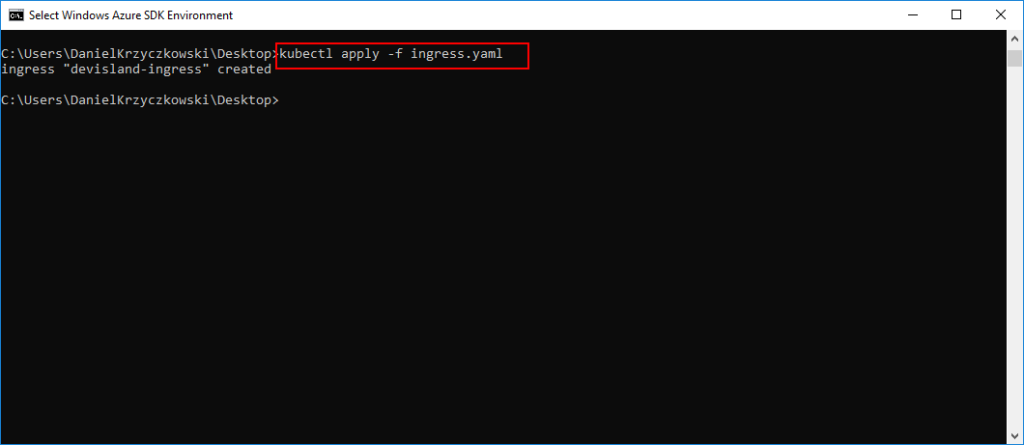
Use below command to apply changes. Remember to change “serviceName” if you chose different:
kubectl apply -f ingress.yaml
Then we have to update ingress service file with our public static IP address obtained earlier:
apiVersion: v1
kind: Service
metadata:
  creationTimestamp: null
  labels:
    app: nginx-ingress
    chart: nginx-ingress-0.22.0
    component: controller
    heritage: Tiller
    release: devisland-nginx
  name: devisland-nginx-nginx-ingress-controller
  selfLink: /api/v1/namespaces/default/services/devisland-nginx-nginx-ingress-controller
spec:
  externalTrafficPolicy: Local
  loadBalancerIP: 104.40.191.248
  ports:
  - name: http
    nodePort: 30781
    port: 80
    protocol: TCP
    targetPort: http
  - name: https
    nodePort: 32026
    port: 443
    protocol: TCP
    targetPort: https
  selector:
    app: nginx-ingress
    component: controller
    release: devisland-nginx
  sessionAffinity: None
  type: LoadBalancer
kubectl apply -f ingress-service.yaml
Then we have to create Service for our Web API application with sample-web-service-api.yaml file:
apiVersion: v1
kind: Service
metadata:
  name:  devisland-sample-webapi-service
  namespace: default
spec:
  type: NodePort
  selector:
    app:  devisland-sample-webapi-app
  ports:
  - name: http
    port: 8080
    targetPort: 80
kubectl apply -f sample-web-service-api.yaml
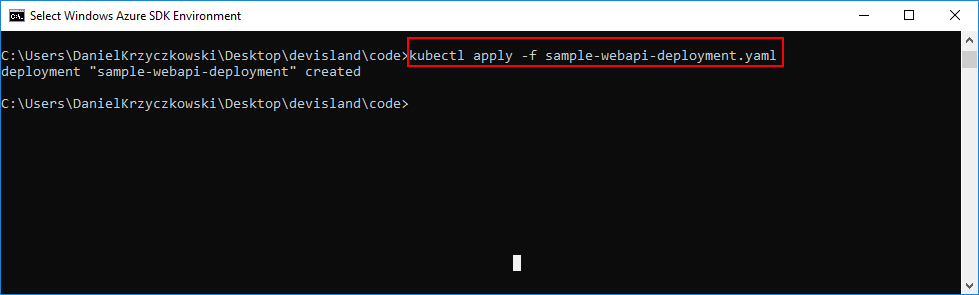
Once we defined Service for our Web API app we have to create Deployment with sample-webapi-deployment.yaml file. Note that in this file we are defining number of pods and from which container registry Docker image should be pulled:
apiVersion: apps/v1 # for versions before 1.9.0 use apps/v1beta2
kind: Deployment
metadata:
  name: sample-webapi-deployment
  namespace: default
spec:
  selector:
    matchLabels:
      app: devisland-sample-webapi-app
  replicas: 2 # tells deployment to run 2 pods matching the template
  template: # create pods using pod definition in this template
    metadata:
      labels:
        app: devisland-sample-webapi-app
    spec:
      containers:
      - name: devisland-sample-webapi-container
        image: devislandacr.azurecr.io/microservices/samplewebapi:dev
        imagePullPolicy: Always
        ports:
        - containerPort: 80
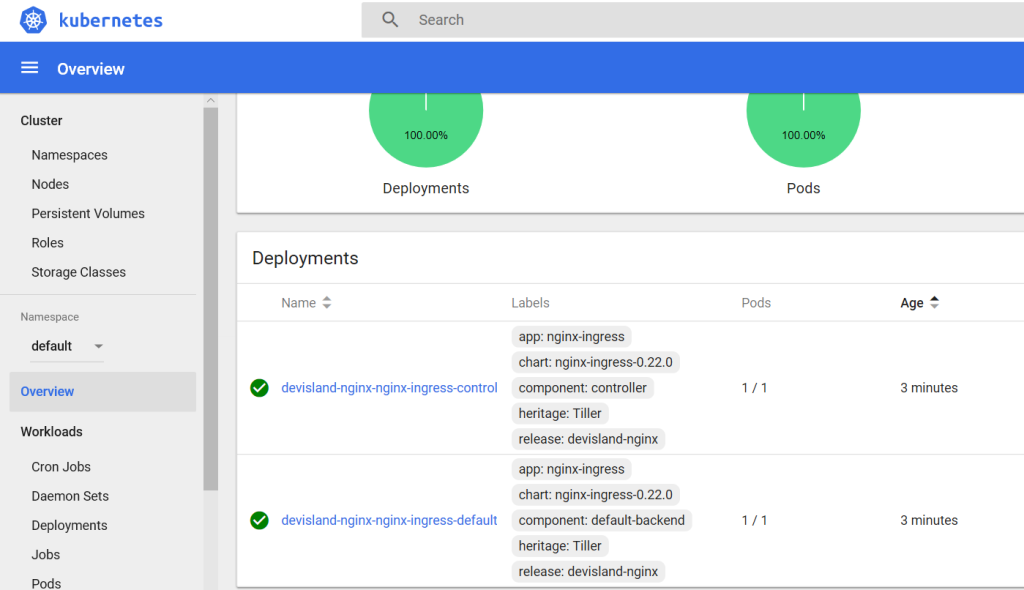
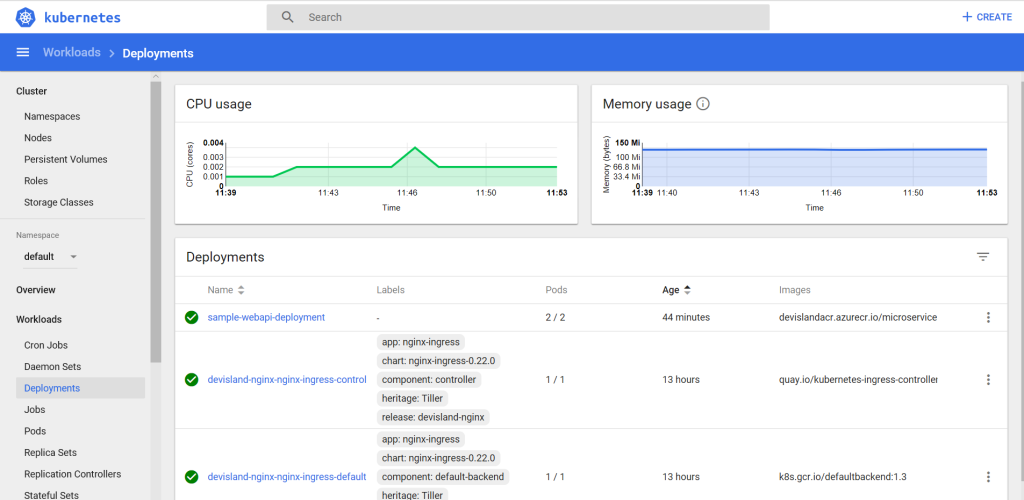
Open Kubernetes dashboard and verify result:
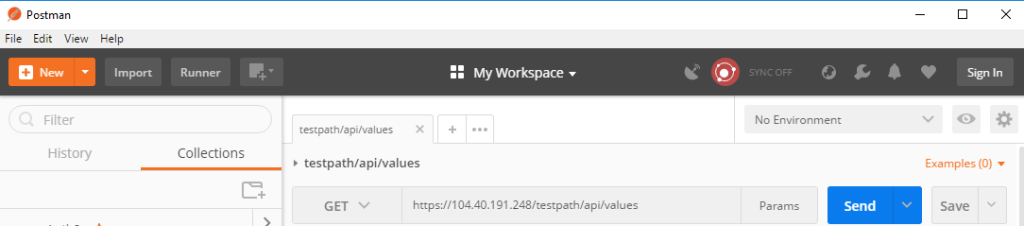
Test with Postman
Open Postman and type IP addess and path to your sample Web API:
Wrapping up
The end.
I hope that this article helped you understand some concepts related with Docker and Kubernetes. We discussed how to create Docker image, how to push it to the Azure Container Registry and how to run ASP .NET Core Web API app inside Kubernetes pod and Docker container. I encourage you to do all the steps by yourself so you can understand clearly what is happening in each of them. Good luck!