Entity Framework Core with ASP .Net Core Web API - jump start

Short introduction
In this article I would like to briefly introduce you to Entity Framework Core object-relational mapper used together with ASP .NET Core Web API. I tried to include code samples, some best practices and of course some common pitfalls.
Before we start
Before we start using Entity Framework Core we have to create relational database. We will use Azure SQL Database which can be created using Microsoft Azure cloud platform. Lets create free Microsoft Azure account here.
Once you have access to the Azure account please use this instructions to create Azure SQL Database. Once you create database, copy connection string - we will use it later in the sample application code.
We will use Visual Studio 2017 available for free here
Entity Framework - core concepts
First of all Entity Framework needs to know how it should translate entities like classes or properties back and forth into the tables and columns in the database. It provides APIs which are responsible for these mappings.
Entity - An entity is a class which is mapped to an Entity Framework context, and has an identity - property which uniquely identifies its instance. An entity is usually persisted on its own table in the database. Below I pasted example of Entity:
public class Car
    {
        public Guid Id { get; set; }
        public Guid UserId { get; set; }
        public string VIN { get; set; }
        public string RegistrationNumber { get; set; }
        public string Name { get; set; }
        public string Brand { get; set; }
        public string Model { get; set; }
    }
Context - Exposes a number of entity collections. Context can be thought of as a box in which we can make changes to a collection of entities and then apply those changes in the database. In the code it is represented by class that inherits from DbContext (provided by Entity Framework Core) and exposes a number of entity collections in the form of DbSet<T> properties. Below I pasted example of DbContext:
public class ApplicationDbContext : IdentityDbContext
    {
        public ApplicationDbContext(DbContextOptions<ApplicationDbContext> options)
          : base(options)
        {
        }

        public DbSet<Car> Cars { get; set; }
    }
Relationships - Represented by a foreign key constraint in the database, relationship is about how two entities relate to each other. For instance there is Car entity with property called OwnerId which is foreign key and created relationship between Car and Owner entities.
You can read more about relationships under this link.
Data Annotations- Enables overriding EF Core’s default behavior by using attributes which can be placed on a class or property to specify metadata about that class or property. Below I pasted example of using data annotations. This is the first option to override EF mapping configuration. Second one is described below - Fluent API.
[Table("Cars", Schema = "dbo")]
public class Car
    {
        [Key]
        public Guid Id { get; set; }
        [ForeignKey("Owner")]
        public Guid UserId { get; set; }
        public string VIN { get; set; }
        public string RegistrationNumber { get; set; }
        public string Name { get; set; }
        public string Brand { get; set; }
        public string Model { get; set; }
    }
Fluent API- Another way to override conventions of Entity Framework Core is to use Fluent API which is based on a Fluent API design pattern. It is more elegant than Data Annotations approach because everything is set in the single class (discussed later). Below I pasted example of Fluent API:
 modelBuilder.Entity<Car>()
                .Property(b => b.VIN)
                .HasMaxLength(15);

modelBuilder.Entity<Car>()
                .Property(b => b.RegistrationNumber)
                .HasMaxLength(6);
Data Annotations versus Fluent API
Data annotations must be used on the entity model classes themselves, which can cause mess in the code if there are a lot of annotations and classes. This is because you are contaminating model with data annotations related to the infrastructure database. On the other hand, Fluent API is a convenient way to change most conventions and mappings within your data persistence infrastructure. Both approaches are acceptable.
This is just a small portion of information to make it easier for you to understand basic concepts. I encourage you to visit great Microsoft Docs documentation about Entity Framework Core.
Migrations
Entity Framework Core offers a code-based approach for dealing with changes in schema: migrations - for instance when we want to add additional column to existing table in the database. Migrations can be enabled and managed with Package Manager Console in the Visual Studio. I will present how to use migrations later in the article.
Solution structure
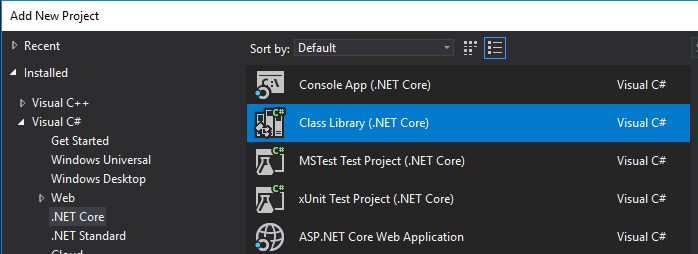
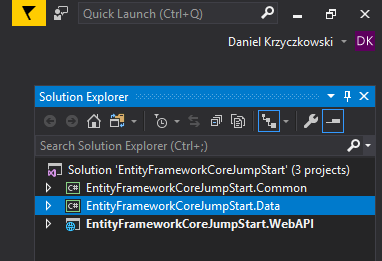
We will use Entity Framework together with ASP .NET Core Web API project created in the Microsoft Visual Studio. Because we want our solution to have clear structure we will create three separate projects:
- ASP .NET Core Web API called "EntityFrameworkCoreJumpStart.WebAPI"
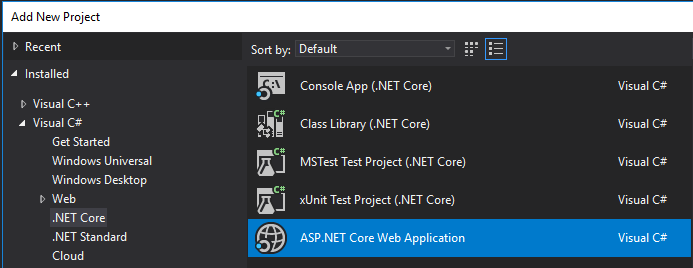
- .NET Core Class Library project - for Entity Framework related code called "EntityFrameworkCoreJumpStart.Data"
- .NET Core Class Library project - for common code shared between two above projects called "EntityFrameworkCoreJumpStart.Common"
Please type the name of the solution as “EntityFrameworkCoreJumpStart”:
Once we have solution structure we have to add two NuGet packages to the “EntityFrameworkCoreJumpStart.Data” project:
First NuGet package contains the provider for SQL Server. Second one provides tools for NuGet packages console in Visual Studio (for applying updates on the database for instance).
Entity Framework Core in action - code review
I prepared code sample available on my Github so you can review the code.
First of all we have to setup “ApplicationDbContext” class which inherits from DbContext and should be located in the “EntityFrameworkCoreJumpStart.Data” project. We will have two DbSets: Cars and Owners:
  public class ApplicationDbContext : DbContext
    {
        public ApplicationDbContext(DbContextOptions<ApplicationDbContext> options)
          : base(options)
        {
        }

        public DbSet<Car> Cars { get; set; }
        public DbSet<Owner> Owners { get; set; }

        protected override void OnModelCreating(ModelBuilder modelBuilder)
        {
            modelBuilder.Entity<Car>()
                .HasOne<Owner>()
                .WithMany()
                .HasForeignKey(a => a.OwnerId);

            modelBuilder.Entity<Car>()
                .Property(b => b.RegistrationNumber)
                .HasMaxLength(7);
        }
    }
As you can see we are using Fluent API in the “OnModelCreating” method. This is the place where we are setting up relation between cars and owners - car can have only one owner. What is more, registration number cannot be longer than 7 characters.
Note that in the constructor there is parameter “DbContextOptions<ApplicationDbContext>”. This is required because we will inject connection string to SQL Database located in Microsoft Azure cloud.
Car entity looks like below:
    public class Car : IEntity
    {
        public Guid Id { get; set; }

        public string RegistrationNumber { get; set; }
        public string Brand { get; set; }
        public string Model { get; set; }

        public Guid OwnerId { get; set; }
    }
Owner entity looks like below:
    public class Owner : IEntity
    {
        public Guid Id { get; set; }

        public string FirstName { get; set; }

        public string LastName { get; set; }

        public string PhoneNumber { get; set; }
    }
Note that each class implements interface called “IEntity”. In this interface there is one property - “Id” which should be found in each Entity.
    public interface IEntity
    {
        Guid Id { get; set; }
    }
Now in the Web API project in the “Startup” class we have to indicate that we are using Entity Framework and database connection:
services.AddDbContext<ApplicationDbContext>(options =>
              options.UseSqlServer(
                  Configuration.GetConnectionString("ApplicationDbContext")
              )
          );
Connection string should be retrieved from “appsettings.json” file:
    "ConnectionStrings": {
      "ApplicationDbContext": "<<Connection string>>"
    }
We want to make it possible to easily add, delete, update and list Cars and Owners. Code responsible for these operations is contained by below repositories.
Owners:
public class OwnersRepository : IGenericRepository<Owner>
    {
        private readonly ApplicationDbContext _applicationDbContext;

        public OwnersRepository(ApplicationDbContext applicationDbContext)
        {
            _applicationDbContext = applicationDbContext;
        }

        public async Task<IEnumerable<Owner>> AllAsync()
        {
            var owners = await _applicationDbContext.Owners
               .ToListAsync();

            return owners;
        }

        public async Task<bool> DeleteAsync(Guid id)
        {
            var owner = await _applicationDbContext.Owners
           .Where(x => x.Id == id)
           .SingleOrDefaultAsync();

            if (owner == null)
                return false;

            _applicationDbContext.Owners.Remove(owner);
            await _applicationDbContext.SaveChangesAsync();

            return true;
        }

        public async Task<Owner> GetAsync(Guid id)
        {
            return await _applicationDbContext.Owners
               .Where(x => x.Id == id)
               .SingleOrDefaultAsync();
        }

        public async Task<Owner> InsertAsync(Owner owner)
        {
            owner.Id = Guid.NewGuid();

            await _applicationDbContext.Owners.AddAsync(owner);
            await _applicationDbContext.SaveChangesAsync(true);

            return owner;
        }

        public async Task<Owner> UpdateAsync(Owner owner)
        {
            var existingOwner = await _applicationDbContext.Owners
               .Where(x => x.Id == owner.Id)
               .SingleOrDefaultAsync();

            if (existingOwner == null)
                return null;

            existingOwner.FirstName = owner.FirstName;
            existingOwner.LastName = owner.LastName;
            existingOwner.PhoneNumber = owner.PhoneNumber;

            await _applicationDbContext.SaveChangesAsync(true);

            return existingOwner;
        }
    }
Cars:
 public class CarsRepository : IGenericRepository<Car>
    {
        private readonly ApplicationDbContext _applicationDbContext;

        public CarsRepository(ApplicationDbContext applicationDbContext)
        {
            _applicationDbContext = applicationDbContext;
        }

        public async Task<IEnumerable<Car>> AllAsync()
        {
            var cars = await _applicationDbContext.Cars
               .ToListAsync();

            return cars;
        }

        public async Task<bool> DeleteAsync(Guid id)
        {
            var car = await _applicationDbContext.Cars
           .Where(x => x.Id == id)
           .SingleOrDefaultAsync();

            if (car == null)
                return false;

            _applicationDbContext.Cars.Remove(car);
            await _applicationDbContext.SaveChangesAsync();

            return true;
        }

        public async Task<Car> GetAsync(Guid id)
        {
            return await _applicationDbContext.Cars
               .Where(x => x.Id == id)
               .SingleOrDefaultAsync();
        }

        public async Task<Car> InsertAsync(Car car)
        {
            car.Id = Guid.NewGuid();

            await _applicationDbContext.Cars.AddAsync(car);
            await _applicationDbContext.SaveChangesAsync(true);

            return car;
        }

        public async Task<Car> UpdateAsync(Car car)
        {
            var existingCar = await _applicationDbContext.Cars
               .Where(x => x.Id == car.Id)
               .SingleOrDefaultAsync();

            if (existingCar == null)
                return null;

            existingCar.Brand = car.Brand;
            existingCar.Model = car.Model;

            await _applicationDbContext.SaveChangesAsync(true);

            return existingCar;
        }
    }
Both of above classes implements generic interface called “IGenericRepository”:
    public interface IGenericRepository<TEntity> where TEntity : class, IEntity
    {
        Task<TEntity> GetAsync(Guid id);
        Task<TEntity> InsertAsync(TEntity entity);
        Task<TEntity> UpdateAsync(TEntity entity);
        Task<bool> DeleteAsync(Guid id);
        Task<IEnumerable<TEntity>> AllAsync();
    }
Remember to register repositories in the IoC container in the “Startup” class:
   services.AddScoped<IGenericRepository<Owner>, OwnersRepository>();
   services.AddScoped<IGenericRepository<Car>, CarsRepository>();
Remember to update connection string in the “appsettings.json” file so you can access database.
In the “EntityFrameworkCoreJumpStart.WebAPI” project we have two separate controllers responsible for handling HTTP requests (to handle get, insert, update, delete operations):
CarsController looks like below. As you can see we are using “CarsRepository” here:
    [Route("api/[controller]")]
    public class CarsController : ControllerBase
    {
        private readonly IGenericRepository<Car> _carsRepository;

        public CarsController(IGenericRepository<Car> carsRepository)
        {
            _carsRepository = carsRepository;
        }

        // GET api/cars
        [HttpGet]
        public async Task<IActionResult> Get()
        {
            var cars = await _carsRepository.AllAsync();
            if (cars == null)
                return NotFound();

            return Ok(cars);
        }

        // GET api/cars/1
        [HttpGet("{id}")]
        public async Task<IActionResult> Get(Guid id)
        {
            var car = await _carsRepository.GetAsync(id);
            if (car == null)
                return NotFound();

            return Ok(car);
        }

        // POST api/cars
        [HttpPost]
        public async Task<IActionResult> Post([FromBody] Car car)
        {
            var createdCar = await _carsRepository.InsertAsync(car);

            return Created(new Uri($"/api/cars/{createdCar.Id}", UriKind.Relative), createdCar);
        }

        // PUT api/cars/1
        [HttpPut("{id}")]
        public async Task<IActionResult> Put(Guid id, [FromBody] Car car)
        {
            var existingCar = await _carsRepository.GetAsync(id);
            if (existingCar == null)
                return NotFound();

            car.Id = id;
            existingCar = await _carsRepository.UpdateAsync(car);

            return NoContent();
        }

        // DELETE api/cars/1
        [HttpDelete("{id}")]
        public async Task<IActionResult> Delete(Guid id)
        {
            bool deletedCar = await _carsRepository.DeleteAsync(id);

            if (!deletedCar)
                return NotFound();

            return NoContent();
        }
    }
OwnersController looks like below. As you can see we are using “OwnersRepository” here:
    [Route("api/[controller]")]
    public class OwnersController : ControllerBase
    {
        private readonly IGenericRepository<Owner> _ownersRepository;

        public OwnersController(IGenericRepository<Owner> ownersRepository)
        {
            _ownersRepository = ownersRepository;
        }

        // GET api/owners
        [HttpGet]
        public async Task<IActionResult> Get()
        {
            var owners = await _ownersRepository.AllAsync();
            if (owners == null)
                return NotFound();

            return Ok(owners);
        }

        // GET api/owners/1
        [HttpGet("{id}")]
        public async Task<IActionResult> Get(Guid id)
        {
            var owner = await _ownersRepository.GetAsync(id);
            if (owner == null)
                return NotFound();

            return Ok(owner);
        }

        // POST api/owners
        [HttpPost]
        public async Task<IActionResult> Post([FromBody] Owner owner)
        {
            var createdOwner = await _ownersRepository.InsertAsync(owner);

            return Created(new Uri($"api/owners/{createdOwner.Id}", UriKind.Relative), createdOwner);
        }

        // PUT api/owners/1
        [HttpPut("{id}")]
        public async Task<IActionResult> Put(Guid id, [FromBody] Owner owner)
        {
            var existingOwner = await _ownersRepository.GetAsync(id);
            if (existingOwner == null)
                return NotFound();

            owner.Id = id;
            existingOwner = await _ownersRepository.UpdateAsync(owner);

            return NoContent();
        }

        // DELETE api/owners/1
        [HttpDelete("{id}")]
        public async Task<IActionResult> Delete(Guid id)
        {
            bool deletedOwner = await _ownersRepository.DeleteAsync(id);

            if (!deletedOwner)
                return NotFound();

            return NoContent();
        }
    }
Now its time to initialize the database with Cars and Owners tables with prepared schema.
Database initialization and migrations
Once application code is ready and all models are defined, it is time to initialize the database with initial migration.
We need one more class to be added called “ApplicationDbContextFactory”. This context factory is used by entity framework database migration mechanism only:
    public class ApplicationDbContextFactory : IDesignTimeDbContextFactory<ApplicationDbContext>
    {
        public ApplicationDbContext CreateDbContext(string[] args)
        {
            var configuration = CoreConfigurationProvider.BuildConfiguration();

            var builder = new DbContextOptionsBuilder<ApplicationDbContext>();
            builder.UseSqlServer(configuration.GetConnectionString("ApplicationDbContext"), b => b.MigrationsAssembly("EntityFrameworkCoreJumpStart.Data"));
            return new ApplicationDbContext(builder.Options);
        }
    }
Now its time to add initial migration. To achieve that open “Package Manager Console” and change default project to “EntityFrameworkCoreJumpStart.Data”:

Type below command to create initial migration:
Add-Migration Initial
After few seconds Initial Migration auto-generated code should be displayed:
 public partial class Initial : Migration
    {
        protected override void Up(MigrationBuilder migrationBuilder)
        {
            migrationBuilder.CreateTable(
                name: "Owners",
                columns: table => new
                {
                    Id = table.Column<Guid>(nullable: false),
                    FirstName = table.Column<string>(nullable: true),
                    LastName = table.Column<string>(nullable: true),
                    PhoneNumber = table.Column<string>(nullable: true)
                },
                constraints: table =>
                {
                    table.PrimaryKey("PK_Owners", x => x.Id);
                });

            migrationBuilder.CreateTable(
                name: "Cars",
                columns: table => new
                {
                    Id = table.Column<Guid>(nullable: false),
                    RegistrationNumber = table.Column<string>(maxLength: 7, nullable: true),
                    Brand = table.Column<string>(nullable: true),
                    Model = table.Column<string>(nullable: true),
                    OwnerId = table.Column<Guid>(nullable: false)
                },
                constraints: table =>
                {
                    table.PrimaryKey("PK_Cars", x => x.Id);
                    table.ForeignKey(
                        name: "FK_Cars_Owners_OwnerId",
                        column: x => x.OwnerId,
                        principalTable: "Owners",
                        principalColumn: "Id",
                        onDelete: ReferentialAction.Cascade);
                });

            migrationBuilder.CreateIndex(
                name: "IX_Cars_OwnerId",
                table: "Cars",
                column: "OwnerId");
        }

        protected override void Down(MigrationBuilder migrationBuilder)
        {
            migrationBuilder.DropTable(
                name: "Cars");

            migrationBuilder.DropTable(
                name: "Owners");
        }
    }
Note that new folder called “Migrations” was created:
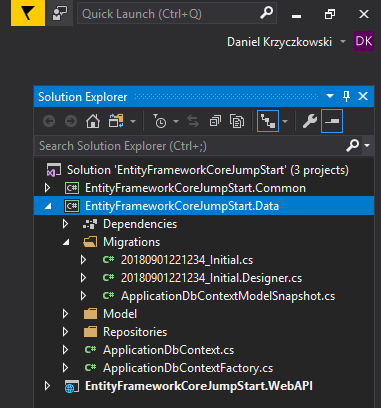
Use below command to apply changes in the database (to create tables):
Update-Database
Once update is finished you should see confirmation in the console window. Now its time to check tables. You can use SQL Server Management Studio to access database and display tables:
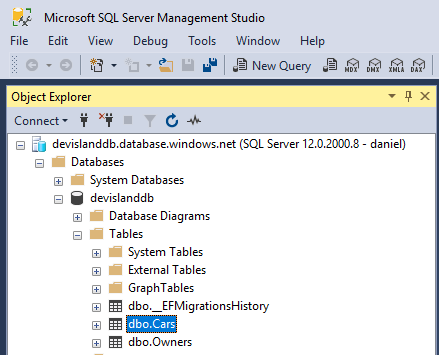
Please note that Entity Framework Core saves migrations history in the database (“dbo.EFMigrationsHistory”).
Now you can launch the ASP .NET Core Web API application on localhost and try to to some POST or DELETE requests. After that check changes in the database.
To prepare HTTP requests you can use free Postman application.
Entity Framework Core - common pitfalls
Unfortunately there are some common pitfalls connected with Entity Framework Core. Below I listed the most important:
- Group By is performed in memory - EF will fetch all the records from the database and then perform the grouping in memory on the client-side. It is because the translation of Group By to SQL hasn’t been implemented yet
- Changes are not sent to the database unless SaveChanges method is called
- No support for date and time or mathematical operations - standard SQL query has to be used for them. Nontrivial queries over DateTime, DateTimeOffset, TimeSpan, or using the Math static methods will result in errors
Wrapping up
In this article I wanted to briefly introduce you to the Entity Framework Core. This is just a small portion of knowledge but now you are familiar with some basics and what is more know how to use EF Core with ASP .NET Core Web API. You can find full sample on my GitHub here. In my next article I will present some more advanced features like using LInq Expressions or ChangeTracker. Happy coding!


