
Windows 10 IoT Core device connected to the Microsoft Azure cloud
Short introduction
In this article I would like to introduce you to the Windows 10 IoT core system, show how to install it and use together with Raspberry Pi 2 and how to connect this device with Microsoft Azure IoT Hub in the cloud.
Before we dive deeper into whole solution I would like to describe what Windows 10 IoT Core is.
Windows IoT Core introduction
Windows IoT Core is a version of Windows 10 optimized for smaller devices with or without a display which run on ARM or x86/x64 devices.
Microsoft prepared great documentation which contains tutorial in three steps:
-
Choose a board
-
Setup device
-
Add an app
You can find it under this link.
I decided to present whole solution using Raspberry Pi 2 board.
Windows 10 IoT Core Dashboard
Windows 10 IoT Core Dashboard is a place to download, set up and connect Windows 10 IoT Core devices from the PC. You can download it under this link.
You can install the system either connecting your device via USB or just insert SD card to the slot. In my case I have SD card which is displayed in the dashboard:
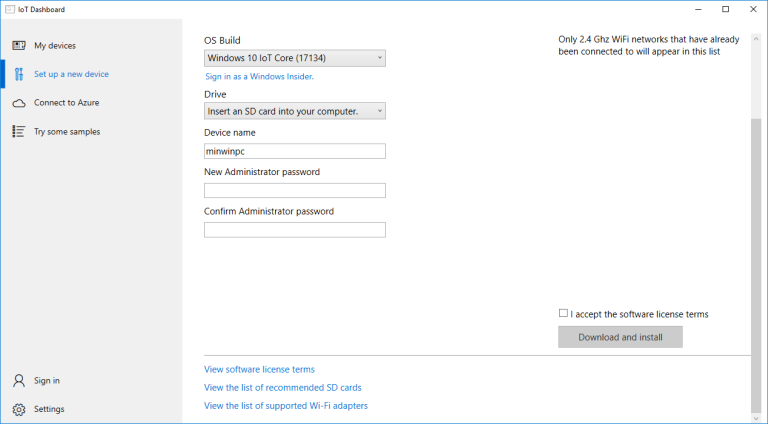
Once you click “Download and install” button Windows 10 IoT Core operating system is installed on the card.
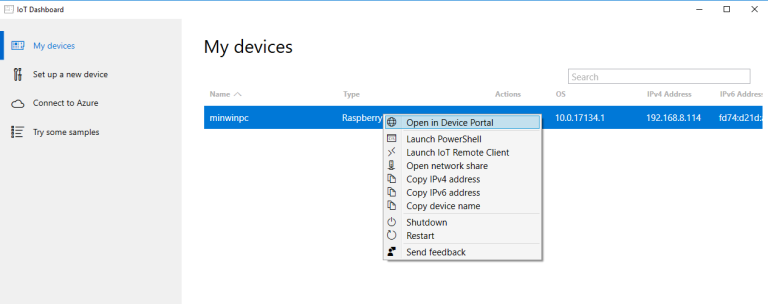
Under “My devices” tab you can see your devices, in my case this is Raspberry Pi 2:
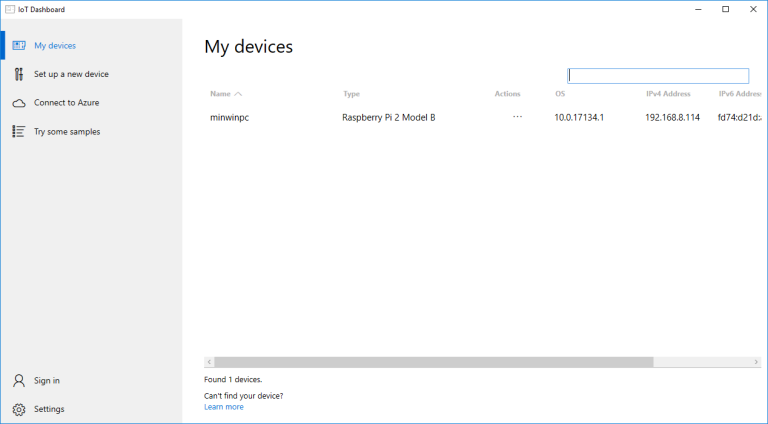
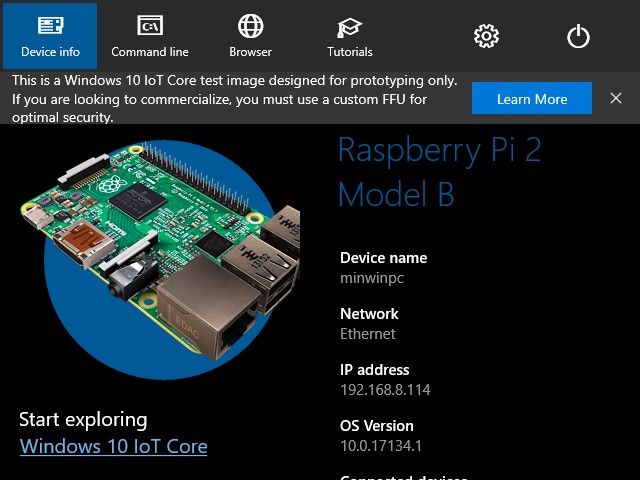
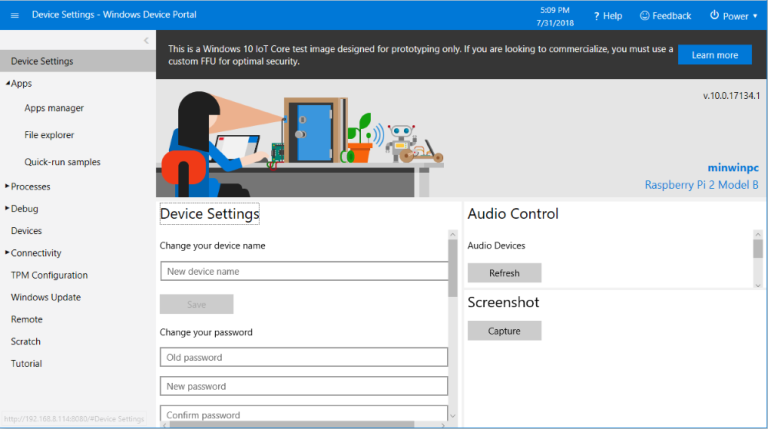
To access you device right click on it on the list and select “Open in Device Portal”:
Windows Device Portal
Windows Device Portal is the place where you can manage your device and its applications remotely over your local network.
You device should be available in the LAN (Local Area Network) - it means that you have to connect it to the router with cable or WI-FI.
You can read more about Windows Device Portal here.
Windows IoT Core samples
There is a great place to start coding UWP applications for Windows IoT Core. Windows IoT Core samples repository on GitHub provides samples created with templates available in Visual Studio which demonstrate the usage patterns for the Microsoft Windows 10 IoT Core operating system.
In my solution I will use Temperature and force sensor sample. I have force sensor which will be connected to Raspberry Pi 2 device with Windows IoT 10 Core system. There will be additional code responsible for sending data to Azure IoT Hub described below.
Microsoft Azure IoT Hub introduction

Microsoft Azure IoT Hub is a fully managed service that enables reliable and secured bidirectional communication between millions of IoT devices. It supports communication both from the device to the cloud and from the cloud to the device.
In this article I will use Azure IoT Hub to send data retrieved by force sensor connected with Raspbery Pi 2.
Building applications that run on IoT devices and interact with IoT Hub is possible with Azure IoT device SDK. In my solution I used C# SDK but please not that there are other langauges supported.
You can read more about Azure IoT Hub here.
Solution structure
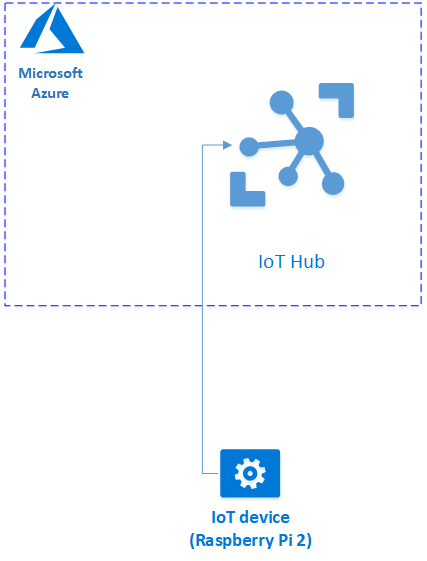
I decided to connect Raspberry Pi 2 device with Azure IoT Hub. In this case we will send data collected by force sensor to the cloud.
Setup Azure IoT Hub
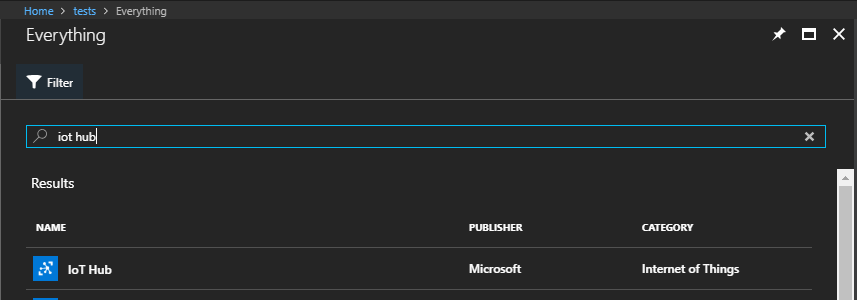
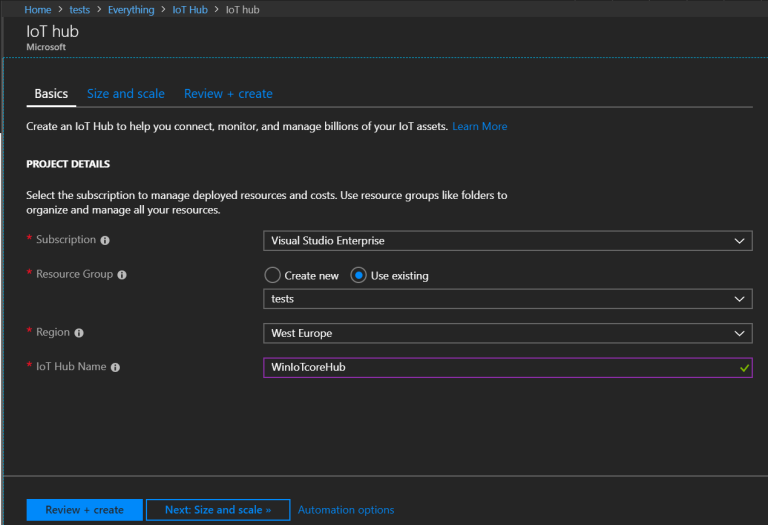
Login to Azure portal and search for IoT Hub:
Type the name of your IoT Hub and create new resource group (or select existing if you wish):
Click “Review + create” and change pricing tier to free:
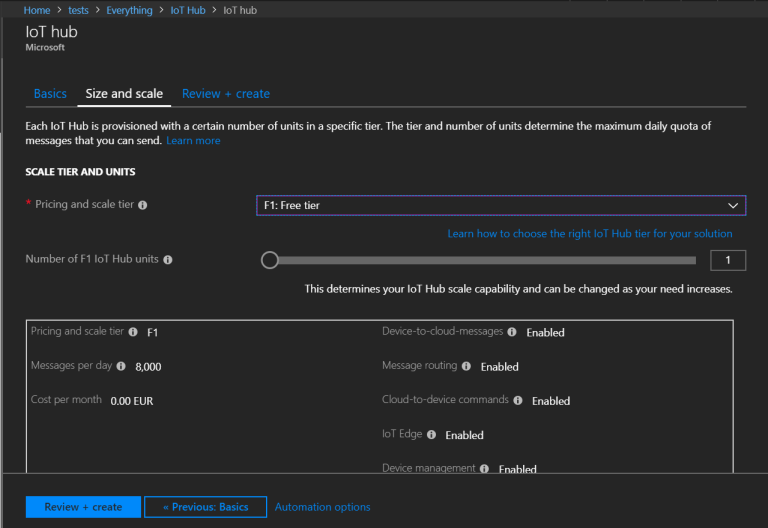
Please note that with this plan you can send 8000 messages per day.
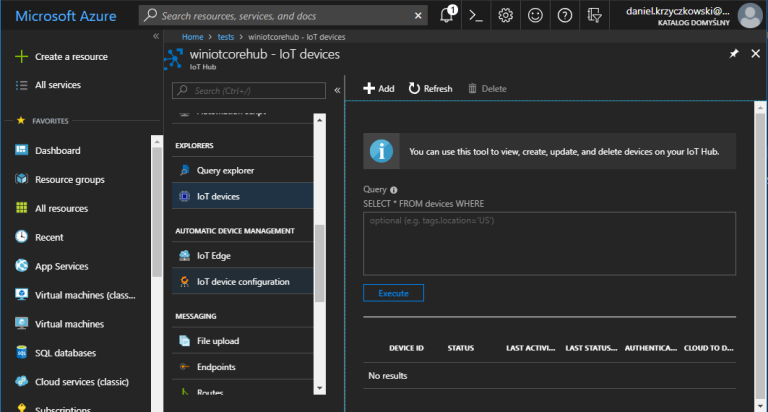
Once IoT Hub is created open “IoT devices” tab and click “Add” button:
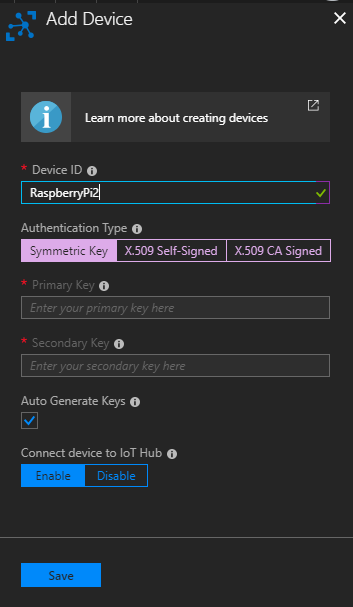
You have to provide the name of your device. I just typed “RaspberyPi2”. Then click “Save” button:
Now if you click on the device displayed on the list you have access to keys and connection strings. Copy “Connection string (primary key):
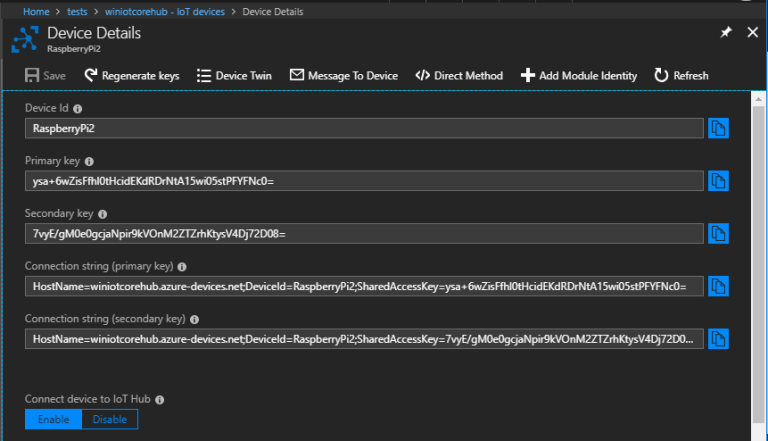
We will use it in the source code of UWP application discussed below.
Setup Universal Windows Platform IoT app
We will use “Temperature and force sensor” UWP application sample available on GitHub here.
Once you download it, open it using Visual Studio.
Install Microsoft.Azure.Devices.Client NuGet package containing Microsoft Azure IoT Device Client SDK which enables communication with Azure IoT Hub.
Once you install the package we can move forward to the code implementation. Please note that sample contains comments in the code so you know what is happening:
    ///
<summary>
    /// An empty page that can be used on its own or navigated to within a Frame.
    /// </summary>

    public sealed partial class MainPage : Page
    {
        enum ADCChip  {
            mcp3002, // 2 channel 10 bit
            mcp3008, // 8 channel 10 bit
            mcp3208  // 8 channel 12 bit
        }
        ADCChip whichADCChip = ADCChip.mcp3008;

        public MainPage()
        {
            this.InitializeComponent();
            this.InitializeComponent();
            timer = new DispatcherTimer();
            timer.Interval = TimeSpan.FromMilliseconds(500);
            timer.Tick += Timer_Tick;
            timer.Start();

            whichADCChip = ADCChip.mcp3008;
            switch (whichADCChip)
            {
                case ADCChip.mcp3002:
                    {
                        // To line everything up for ease of reading back (on byte boundary) we
                        // will pad the command start bit with 1 leading "0" bit

                        // Write 0SGO MNxx xxxx xxxx
                        // Read  ???? ?N98 7654 3210
                        // S = start bit
                        // G = Single / Differential
                        // O = Chanel data
                        // M = Most significant bit mode
                        // ? = undefined, ignore
                        // N = 0 "Null bit"
                        // 9-0 = 10 data bits

                        // 0110 1000 = 1 0 pad bit, start bit, Single ended, odd (channel 0), MSFB only, 2 clocking bits
                        // 0000 0000 = 8 clocking bits
                        readBuffer = new byte[2] { 0x00, 0x00 };
                        writeBuffer = new byte[2] { 0x68, 0x00 };
                    }
                    break;

                case ADCChip.mcp3008:
                    {
                        // To line everything up for ease of reading back (on byte boundary) we
                        // will pad the command start bit with 7 leading "0" bits

                        // Write 0000 000S GDDD xxxx xxxx xxxx
                        // Read  ???? ???? ???? ?N98 7654 3210
                        // S = start bit
                        // G = Single / Differential
                        // D = Chanel data
                        // ? = undefined, ignore
                        // N = 0 "Null bit"
                        // 9-0 = 10 data bits

                        // 0000 01 = 7 pad bits, start bit
                        // 1000 0000 = single ended, channel bit 2, channel bit 1, channel bit 0, 4 clocking bits
                        // 0000 0000 = 8 clocking bits
                        readBuffer = new byte[3] { 0x00, 0x00, 0x00 };
                        writeBuffer = new byte[3] { 0x01, 0x80, 0x00 };
                    }
                    break;

                case ADCChip.mcp3208:
                    {
                        /* mcp3208 is 12 bits output */
                        // To line everything up for ease of reading back (on byte boundary) we
                        // will pad the command start bit with 5 leading "0" bits

                        // Write 0000 0SGD DDxx xxxx xxxx xxxx
                        // Read  ???? ???? ???N BA98 7654 3210
                        // S = start bit
                        // G = Single / Differential
                        // D = Chanel data
                        // ? = undefined, ignore
                        // N = 0 "Null bit"
                        // B-0 = 12 data bits


                        // 0000 0110 = 5 pad bits, start bit, single ended, channel bit 2
                        // 0000 0000 = channel bit 1, channel bit 0, 6 clocking bits
                        // 0000 0000 = 8 clocking bits
                        readBuffer = new byte[3] { 0x00, 0x00, 0x00 };
                        writeBuffer = new byte[3] { 0x06, 0x00, 0x00 };
                    }
                    break;
            }

            InitSPI();
        }

        private async void InitSPI()
        {
            try
            {
                var settings = new SpiConnectionSettings(SPI_CHIP_SELECT_LINE);
                settings.ClockFrequency = 500000;// 10000000;
                settings.Mode = SpiMode.Mode0; //Mode3;
                var controller = await SpiController.GetDefaultAsync();
                SpiDisplay = controller.GetDevice(settings);
            }

            /* If initialization fails, display the exception and stop running */
            catch (Exception ex)
            {
                throw new Exception("SPI Initialization Failed", ex);
            }
        }
        private void Timer_Tick(object sender, object e)
        {
            DisplayTextBoxContents();
        }
        public void DisplayTextBoxContents()
        {
            SpiDisplay.TransferFullDuplex(writeBuffer, readBuffer);
            res = convertToInt(readBuffer);
            textPlaceHolder.Text = res.ToString();
            System.Diagnostics.Debug.WriteLine("VALUE: " + res.ToString());
        }
        public int convertToInt(byte[] data)
        {
            int result = 0;
            switch (whichADCChip)
            {
                case ADCChip.mcp3002:
                    {
                        /*mcp3002 10 bit output*/
                        result = data[0] & 0x03;
                        result <<= 8;
                        result += data[1];
                    }
                    break;
                case ADCChip.mcp3008:
                    {
                        /*mcp3008 10 bit output*/
                        result = data[1] & 0x03;
                        result <<= 8;
                        result += data[2];
                    }
                    break;

                case ADCChip.mcp3208:
                    {
                        /* mcp3208 is 12 bits output */
                         result = data[1] & 0x0F;
                         result <<= 8;
                         result += data[2];
                    }
                    break;
            }

            return result;
        }

        /*RaspBerry Pi2  Parameters*/
        private const string SPI_CONTROLLER_NAME = "SPI0";  /* For Raspberry Pi 2, use SPI0                             */
        private const Int32 SPI_CHIP_SELECT_LINE = 0;       /* Line 0 maps to physical pin number 24 on the Rpi2        */


        byte[] readBuffer = null;                           /* this is defined to hold the output data*/
        byte[] writeBuffer = null;                          /* we will hold the command to send to the chipbuild this in the constructor for the chip we are using */


        private SpiDevice SpiDisplay;

        // create a timer
        private DispatcherTimer timer;
        int res;

    }
I created new simple class called “AzureIoTHubService” which is responsible for initializing connection with Azure IoT Hub and sending data:
    public class AzureIoTHubService
    {
        private DeviceClient _deviceClient;

        public AzureIoTHubService()
        {
            _deviceClient = DeviceClient.CreateFromConnectionString("<>CONNECTION STRING>", TransportType.Mqtt);
        }

        public async Task<bool> SendDataToAzure(string data)
        {
            var messageString = JsonConvert.SerializeObject(data);
            var message = new Message(Encoding.ASCII.GetBytes(messageString));

            await _deviceClient.SendEventAsync(message);

            Debug.WriteLine("{0} > Sending telemetry: {1}", DateTime.Now, messageString);
            return true;
        }
    }
“DeviceClient” class is provided by NuGet package we added earlier.
Replace connection string with the one you generated in Azure portal.
Now in “MainPage” class initialize “AzureIoTHubService”. I changed the default code a little bit so each half of second new message is send to Azure:
            timer.Tick += async (s, e) =>
            {
                SpiDisplay.TransferFullDuplex(writeBuffer, readBuffer);
                res = convertToInt(readBuffer);
                var forceSensorValue = res.ToString();

                textPlaceHolder.Text = forceSensorValue;
                System.Diagnostics.Debug.WriteLine("FORCE SENSOR VALUE: " + forceSensorValue);

                if (res > 0)
                    await _azureIoTHubService.SendDataToAzure(forceSensorValue);
            };
You can review whole source code of the app on my GitHub here.
Setup device components
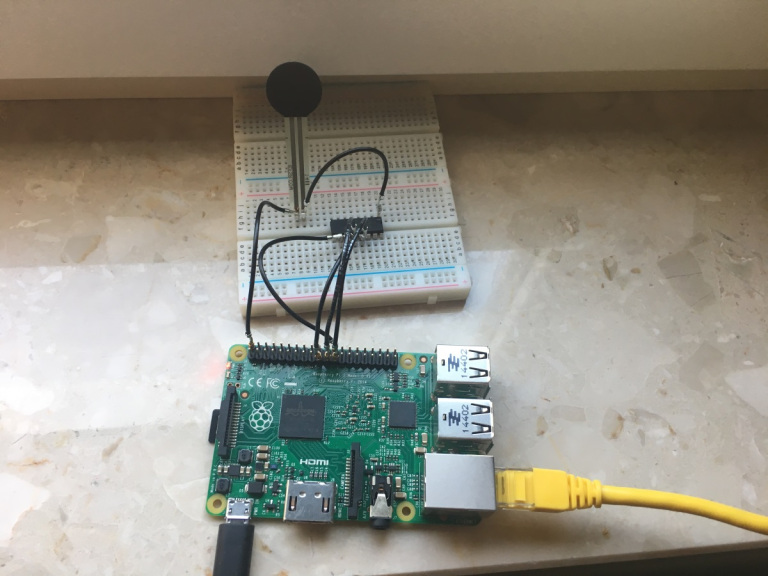
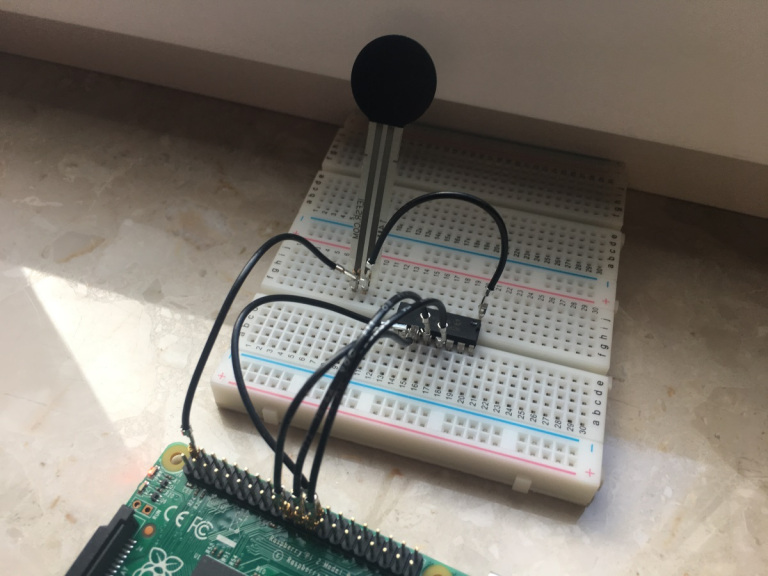
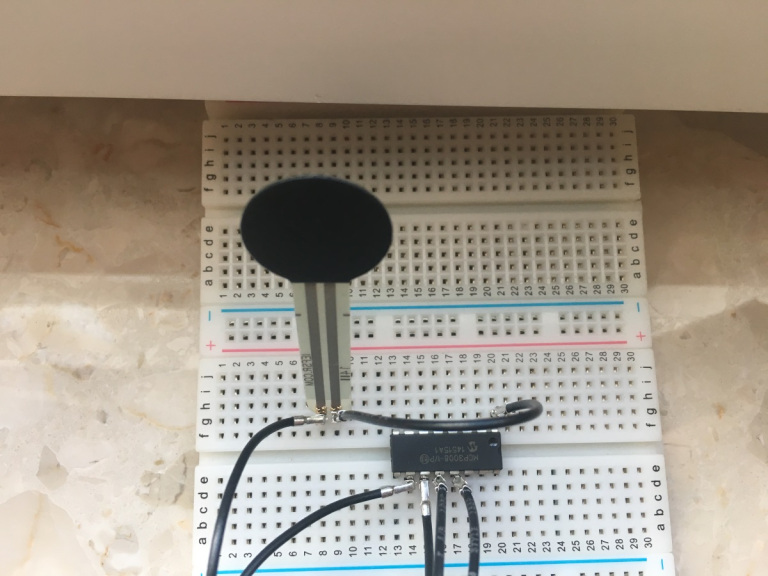
I used Raspbery Pi 2 with Windows10 IoT Core system connected to the Internet with cable. I also used force sensor and analog-to-digital converter.
All together:
In details:
Test solution
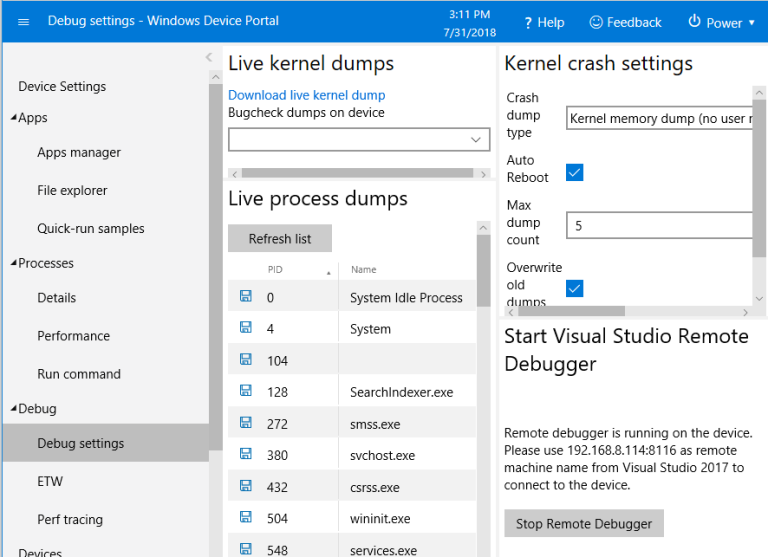
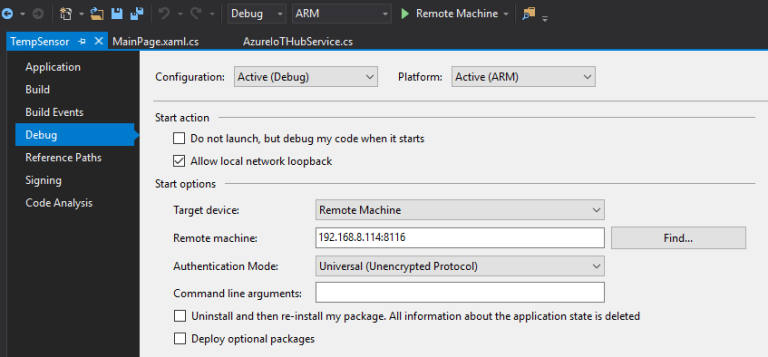
Launch the application in Visual Studio using “Remote Machine” setup. Before that remember to enable remote debugging using below option in the Device Portal:
In the Visual Studio we have to setup “Target device” to “Remote Machine” and paste its IP address together with port:
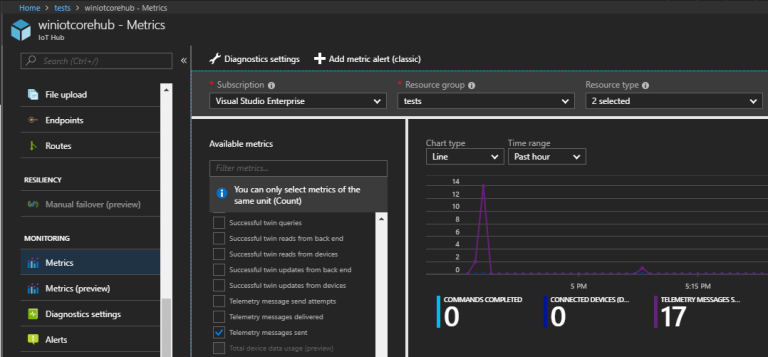
Touch force sensor and check data on the console in Visual Studio and in Azure portal - go to “Metrics” tab to see data sent from the device:
PRO-TIP
You can be stacked with unauthorized status even if your connection string is correct - this can be caused by wrong datetime on the device. In my case I had different time zone, date and hour set.
To set correct time zone you can go to “Device Settings” tab and search for “Time zone” section.
Changing date and time is more complicated. You can do it with Power Shell. To instantiate session go through Using PowerShell for Windows IoT documentation.
I used below script to update date and time:
[minwinpc]: PS C:\Data\Users\Administrator\Documents> set-date

cmdlet Set-Date at command pipeline position 1
Supply values for the following parameters:
Date: 08/14/2018 16:46:00PM
Result will be visible on the console: Tuesday, August 14, 2018 4:46:00 PM
Wrapping up
Using Windows 10 IoT Core operating system makes it easy to build UWP apps for IoT devices and connect them with Azure cloud. Developers can use Visual Studio IDE to create, debug and deploy applications. Azure IoT Hub enables collecting data using reliable and secured bidirectional communication between millions of IoT devices. With Windows 10 IoT Core it is much easier to enter the IoT world. This was just a small portion of information. I encourage you to read more about Windows 10 IoT Core here and about Azure IoT Hub under this link.