DevSecOps on Azure - part5: Keep Azure infrastructure code secure

Introduction
This is the next article from the series called DevSecOps practices for Azure cloud workloads. I would like to talk about Azure infrastructure security, show how to keep infrastructure code secure, and how to implement the process of constant security posture verification for Azure infrastructure templates using Azure DevOps, and Checkmark’s KICS - open-source solution for static code analysis of Infrastructure as Code.
Securing Microsoft Azure
Let me start with some theory around security for Azure cloud before we will jump into implementation tasks. Have you ever wondered how security standards and practices are defined for Azure cloud workloads? Of course, there is well-written documentation but it is important to understand what is the real source.
The Azure Security Benchmark (ASB) provides prescriptive best practices and recommendations to help improve the security of workloads, data, and services running on the Azure cloud. This benchmark is part of a set of holistic security guidance that also includes:
- Azure Cloud Adoption Framework - guidance on security, including strategy, roles, and responsibilities
- Azure Well-Architected Framework - guidance on securing workloads running on Azure
- Microsoft Security Best Practices - security recommendations together with examples on Azure
- Microsoft Cybersecurity Reference Architectures (MCRA) - visual diagrams and guidance for security components and relationships
The Azure Security Benchmark focuses on cloud-centric control areas. These controls are consistent with well-known security benchmarks, such as those described by the Center for Internet Security (CIS) Controls, National Institute of Standards and Technology (NIST), and Payment Card Industry Data Security Standard (PCI-DSS).
Here is a sample page from CIS Azure Benchmark:
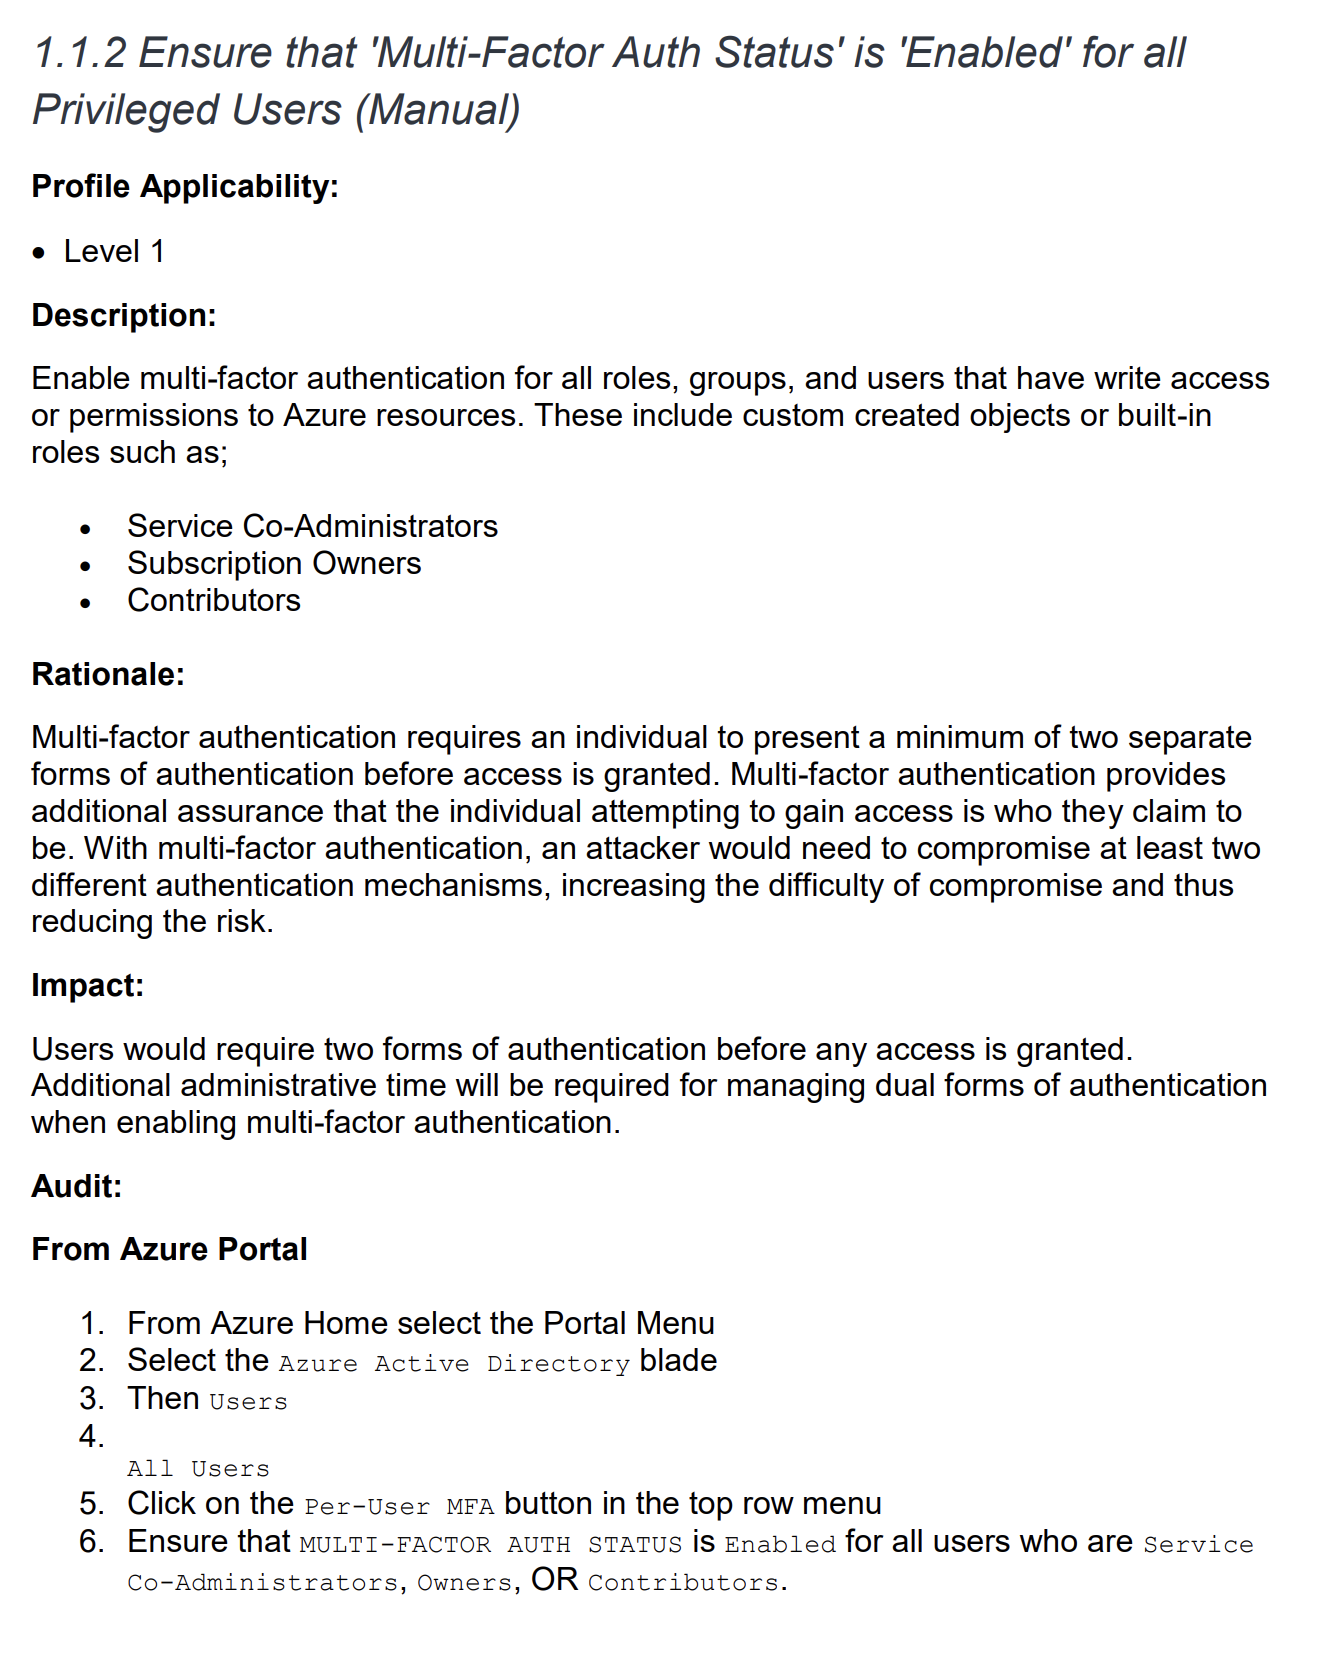
As we can see above, there is a rationale provided, impact, and audit steps to verify the security status of specific security control. There is also a remediation step provided.
With a recommendation from them, we can implement the Azure Security Benchmark with the following approach and steps:
- Plan - review the documentation for the enterprise controls and service-specific baselines to plan the control framework
- Monitor - constantly verify compliance with Azure Security Benchmark status (and other control sets) using the Microsoft Defender for Cloud regulatory compliance dashboard.
- Establish - enforce compliance with Azure Security Benchmark with Azure Blueprints and Azure Policy.
Using the above recommendations we can improve the security posture of our Azure cloud workloads… and DevSecOps practices too! In the section called Security Control v3: DevOps security we can find helpful details on how to implement secure DevOps. Under DS-6: Enforce security of workload throughout DevOps lifecycle we can read that we should automate the deployment by using Azure or third-party tooling in the CI/CD workflow, infrastructure management (infrastructure as code), and testing to reduce human error and attack surface.
This is why in this article we are going to talk about Azure infrastructure code and its security.
Security scan for Azure Infrastructure Code
There are different tools we can utilize to verify security posture of Azure infrastructure configuration. I decided to use Checkmark’s KICS which is an open-source solution for static code analysis of Infrastructure as Code. There are a few reasons behind the choice:
- KICS verifies security posture utilizing Azure Security Benchmark’s security controls
- KICS was created by the company which has estabilished a position in the security testing space
- KICS can be easily used on the local machine and integrated with Azure DevOps Pipelines, and GitHub Actions
Let’s see how to use KICS on a local machine first to scan Azure infrastructure code.
Scanning infrastructure code on the local machine
With shift left approach, we want to solve all bugs and security issues at the earlier step, before they will be discovered on the production environment. Infrastructure scanning can be also executed on the local machine using Docker. Here you can read more about how to set up it. I used the approach with checkmarx/kics Docker container locally to scan Azure infrastructure code written with Bicep. The important fact is that KICS does not support Bicep file scanning directly so we have to first convert Bicep to ARM (JSON) files.
Converting Bicep to ARM
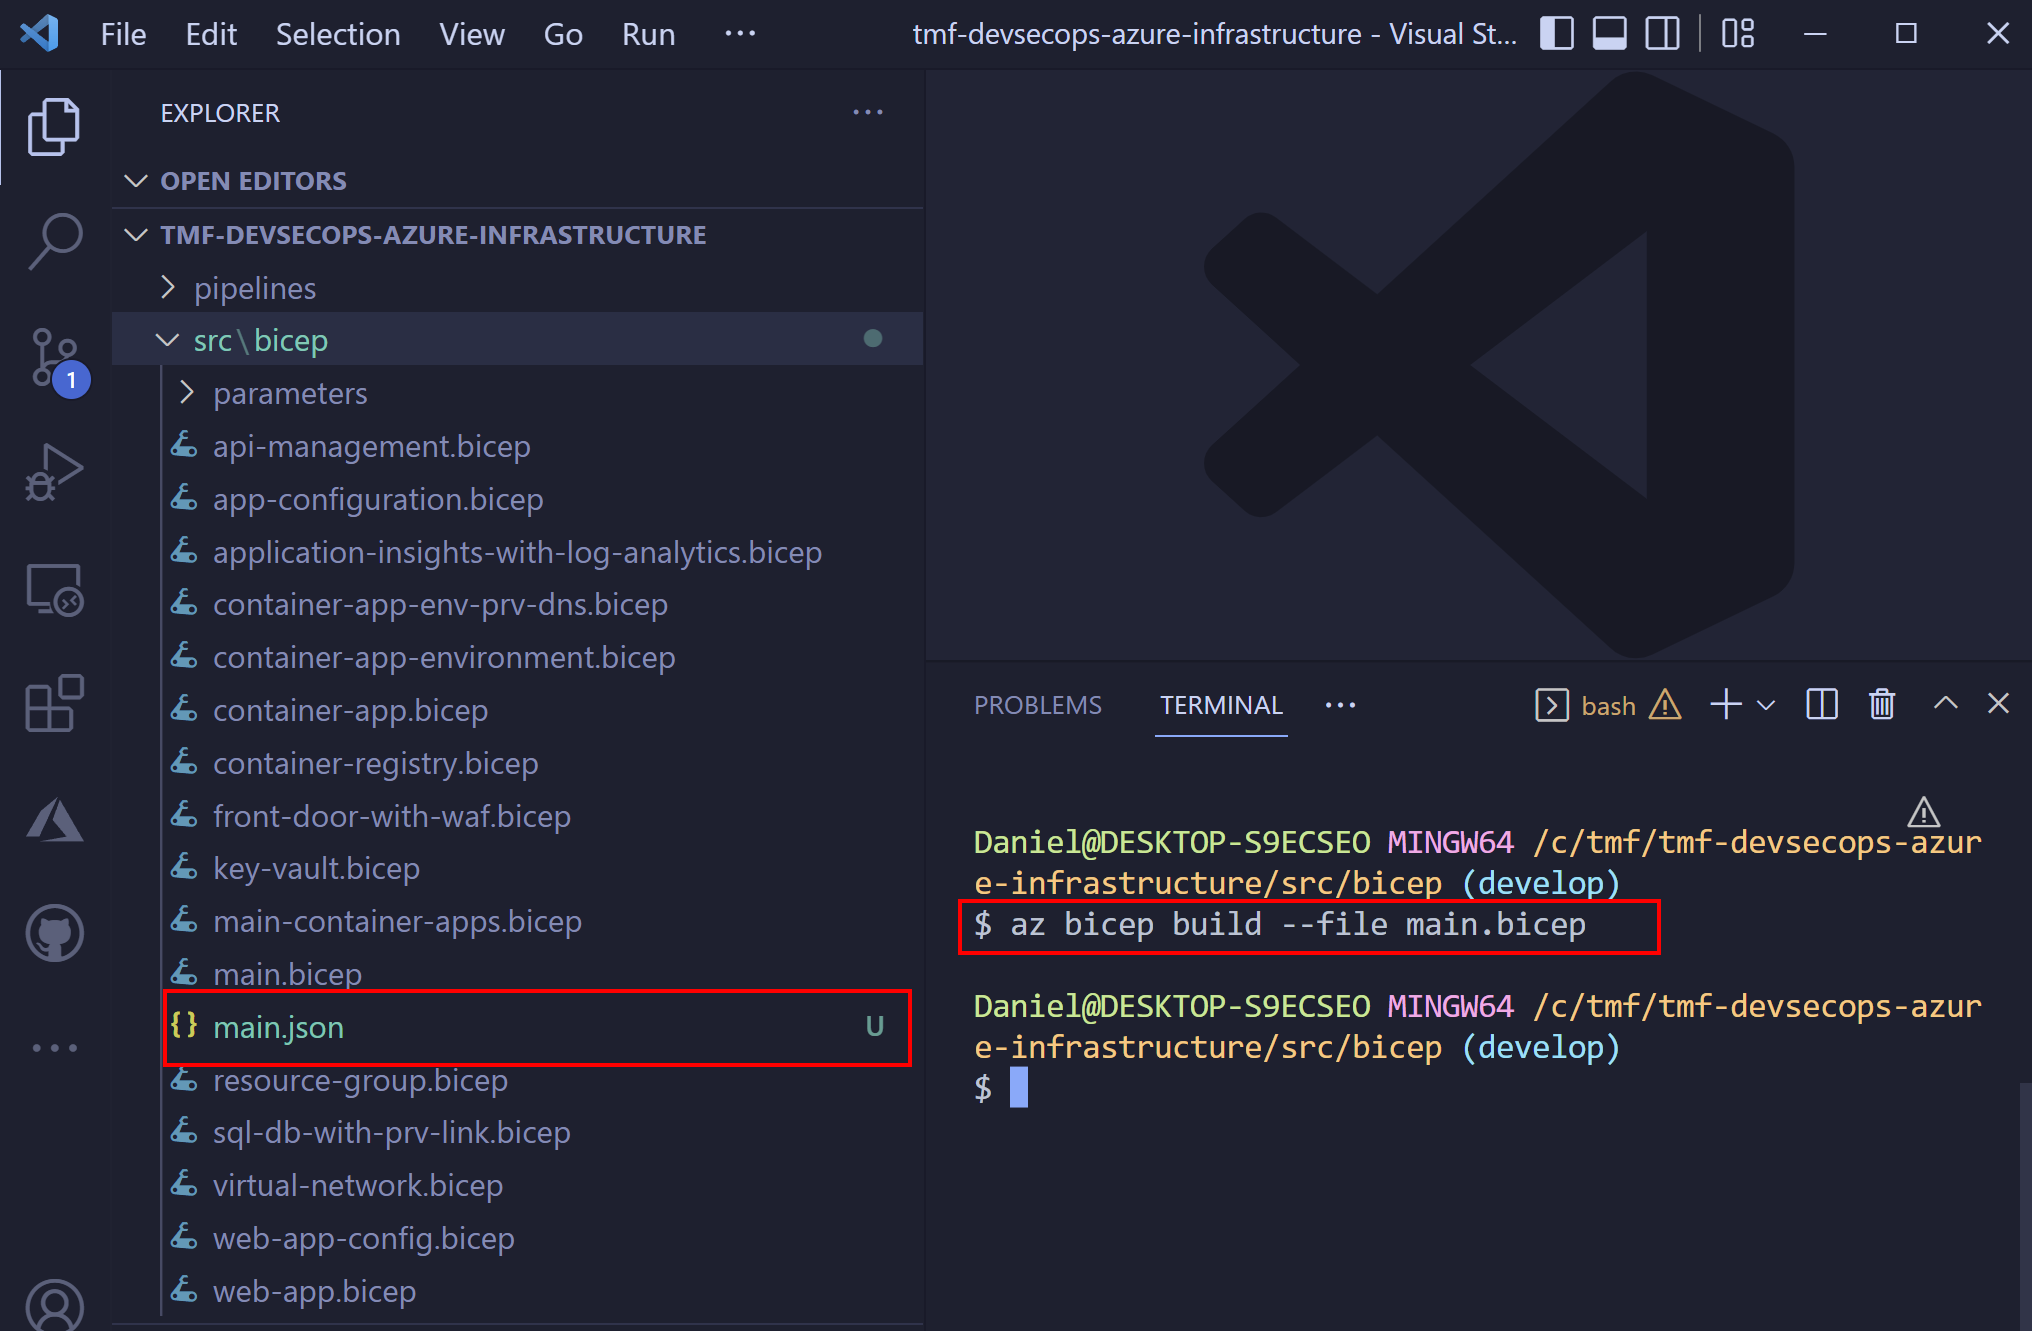
To scan Azure infrastructure code locally we have to first convert Bicep to ARM (JSON) file. We can do it using the below command:
az bicep build --file main.bicep
Scan with KICS
Once we have ARM file, we can apply KICS scanning on it using the below command:
docker run -v "C:\tmf\tmf-devsecops-azure-infrastructure\src\bicep":/path checkmarx/kics scan -p "/path" -o "/path"
After a while report is available:
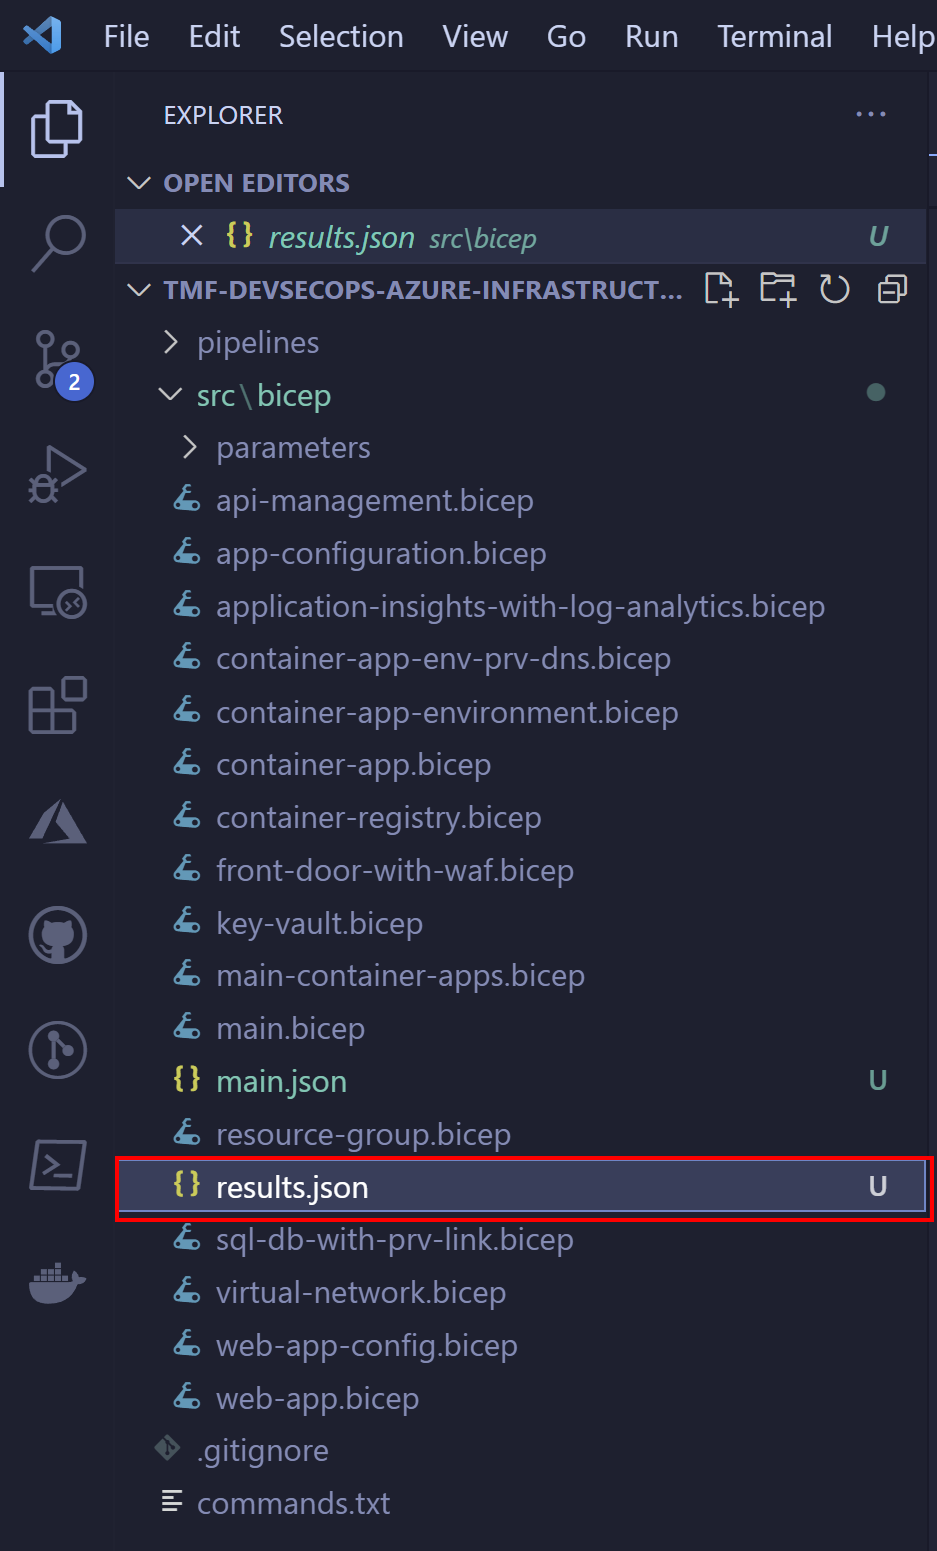
Here is the fragment of it:
"queries": [
    {
      "query_name": "Key Vault Not Recoverable",
      "query_id": "7c25f361-7c66-44bf-9b69-022acd5eb4bd",
      "query_url": "https://docs.microsoft.com/en-us/azure/templates/microsoft.keyvault/2019-09-01/vaults?tabs=json#vaultproperties-object",
      "severity": "HIGH",
      "platform": "AzureResourceManager",
      "category": "Backup",
      "description": "Key Vault should have 'enableSoftDelete' and 'enablePurgeProtection' set to true",
      "description_id": "8e3ca202",
      "cis_description_id": "CIS Security - CIS Microsoft Azure Foundations Benchmark v1.3.1 - Rule 8.4",
      "cis_description_title": "Ensure the key vault is recoverable",
 .... REMOVED FOR BREVITY.......
      "files": [
        {
          "file_name": "../../path/main.json",
 .... REMOVED FOR BREVITY.......
        },
As we can see above, the Key Vault we declared does not have soft deletion and purge protection enabled. We can also see the source of recommendation: CIS Security - CIS Microsoft Azure Foundations Benchmark v1.3.1 - Rule 8.4. This
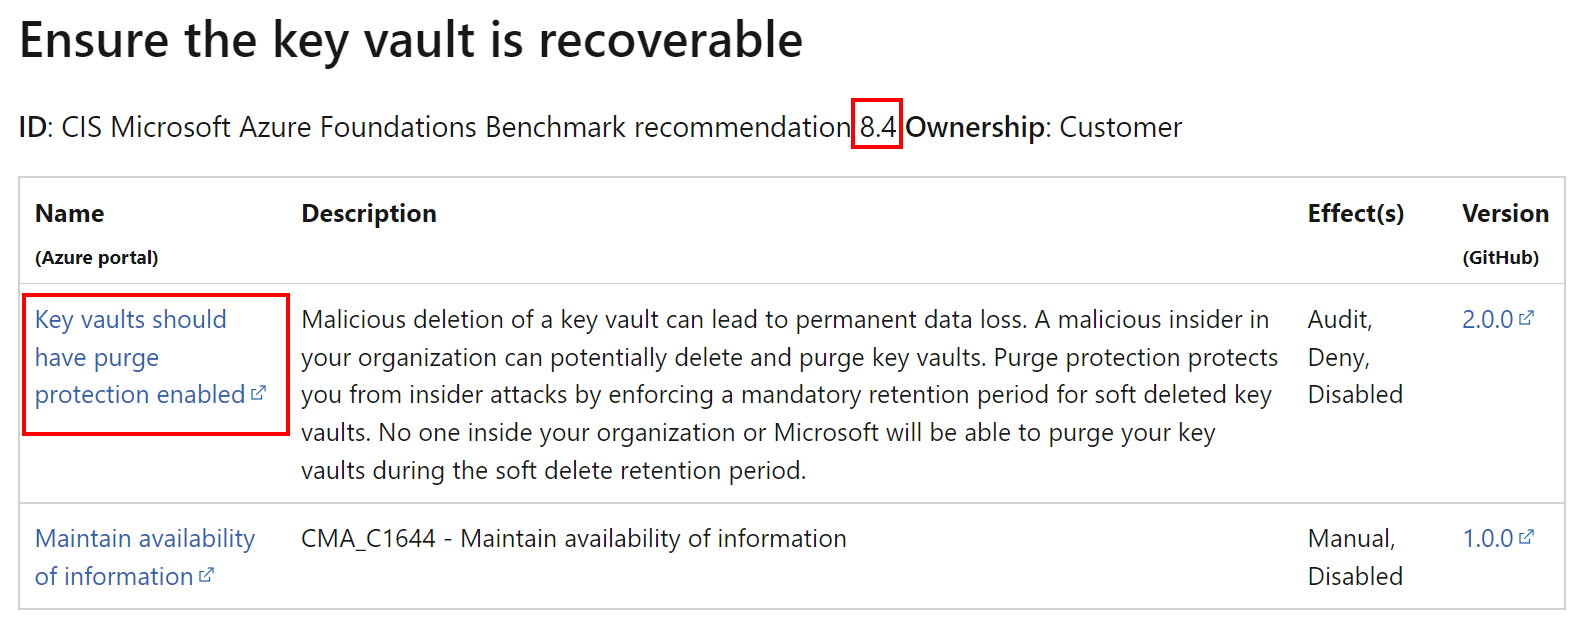
Once we check the report, we can apply improvements so for the above recommendation we have to update Bicep module for Azure Key Vault:
    resource keyVault 'Microsoft.KeyVault/vaults@2021-10-01' = {
      name: keyVaultName
      location: location
      tags:{
        environment:environmentType
      }
      properties:{
        sku: {
          name: 'standard'
          family: 'A'
        }
        #HERE WE ENABLE PURGE PROTECTION AND SOFT DELETION#
        enablePurgeProtection: true
        enableSoftDelete: true
        #HERE WE ENABLE PURGE PROTECTION AND SOFT DELETION#
        tenantId: subscription().tenantId
        networkAcls: {
          bypass: 'AzureServices'
          defaultAction: 'Deny'
          virtualNetworkRules: []
        }
        accessPolicies:[]
        publicNetworkAccess: 'Disabled'
      }
    }
Azure infrastructure scanning automation
The below diagram explains the process implemented using Azure DevOps pipelines:
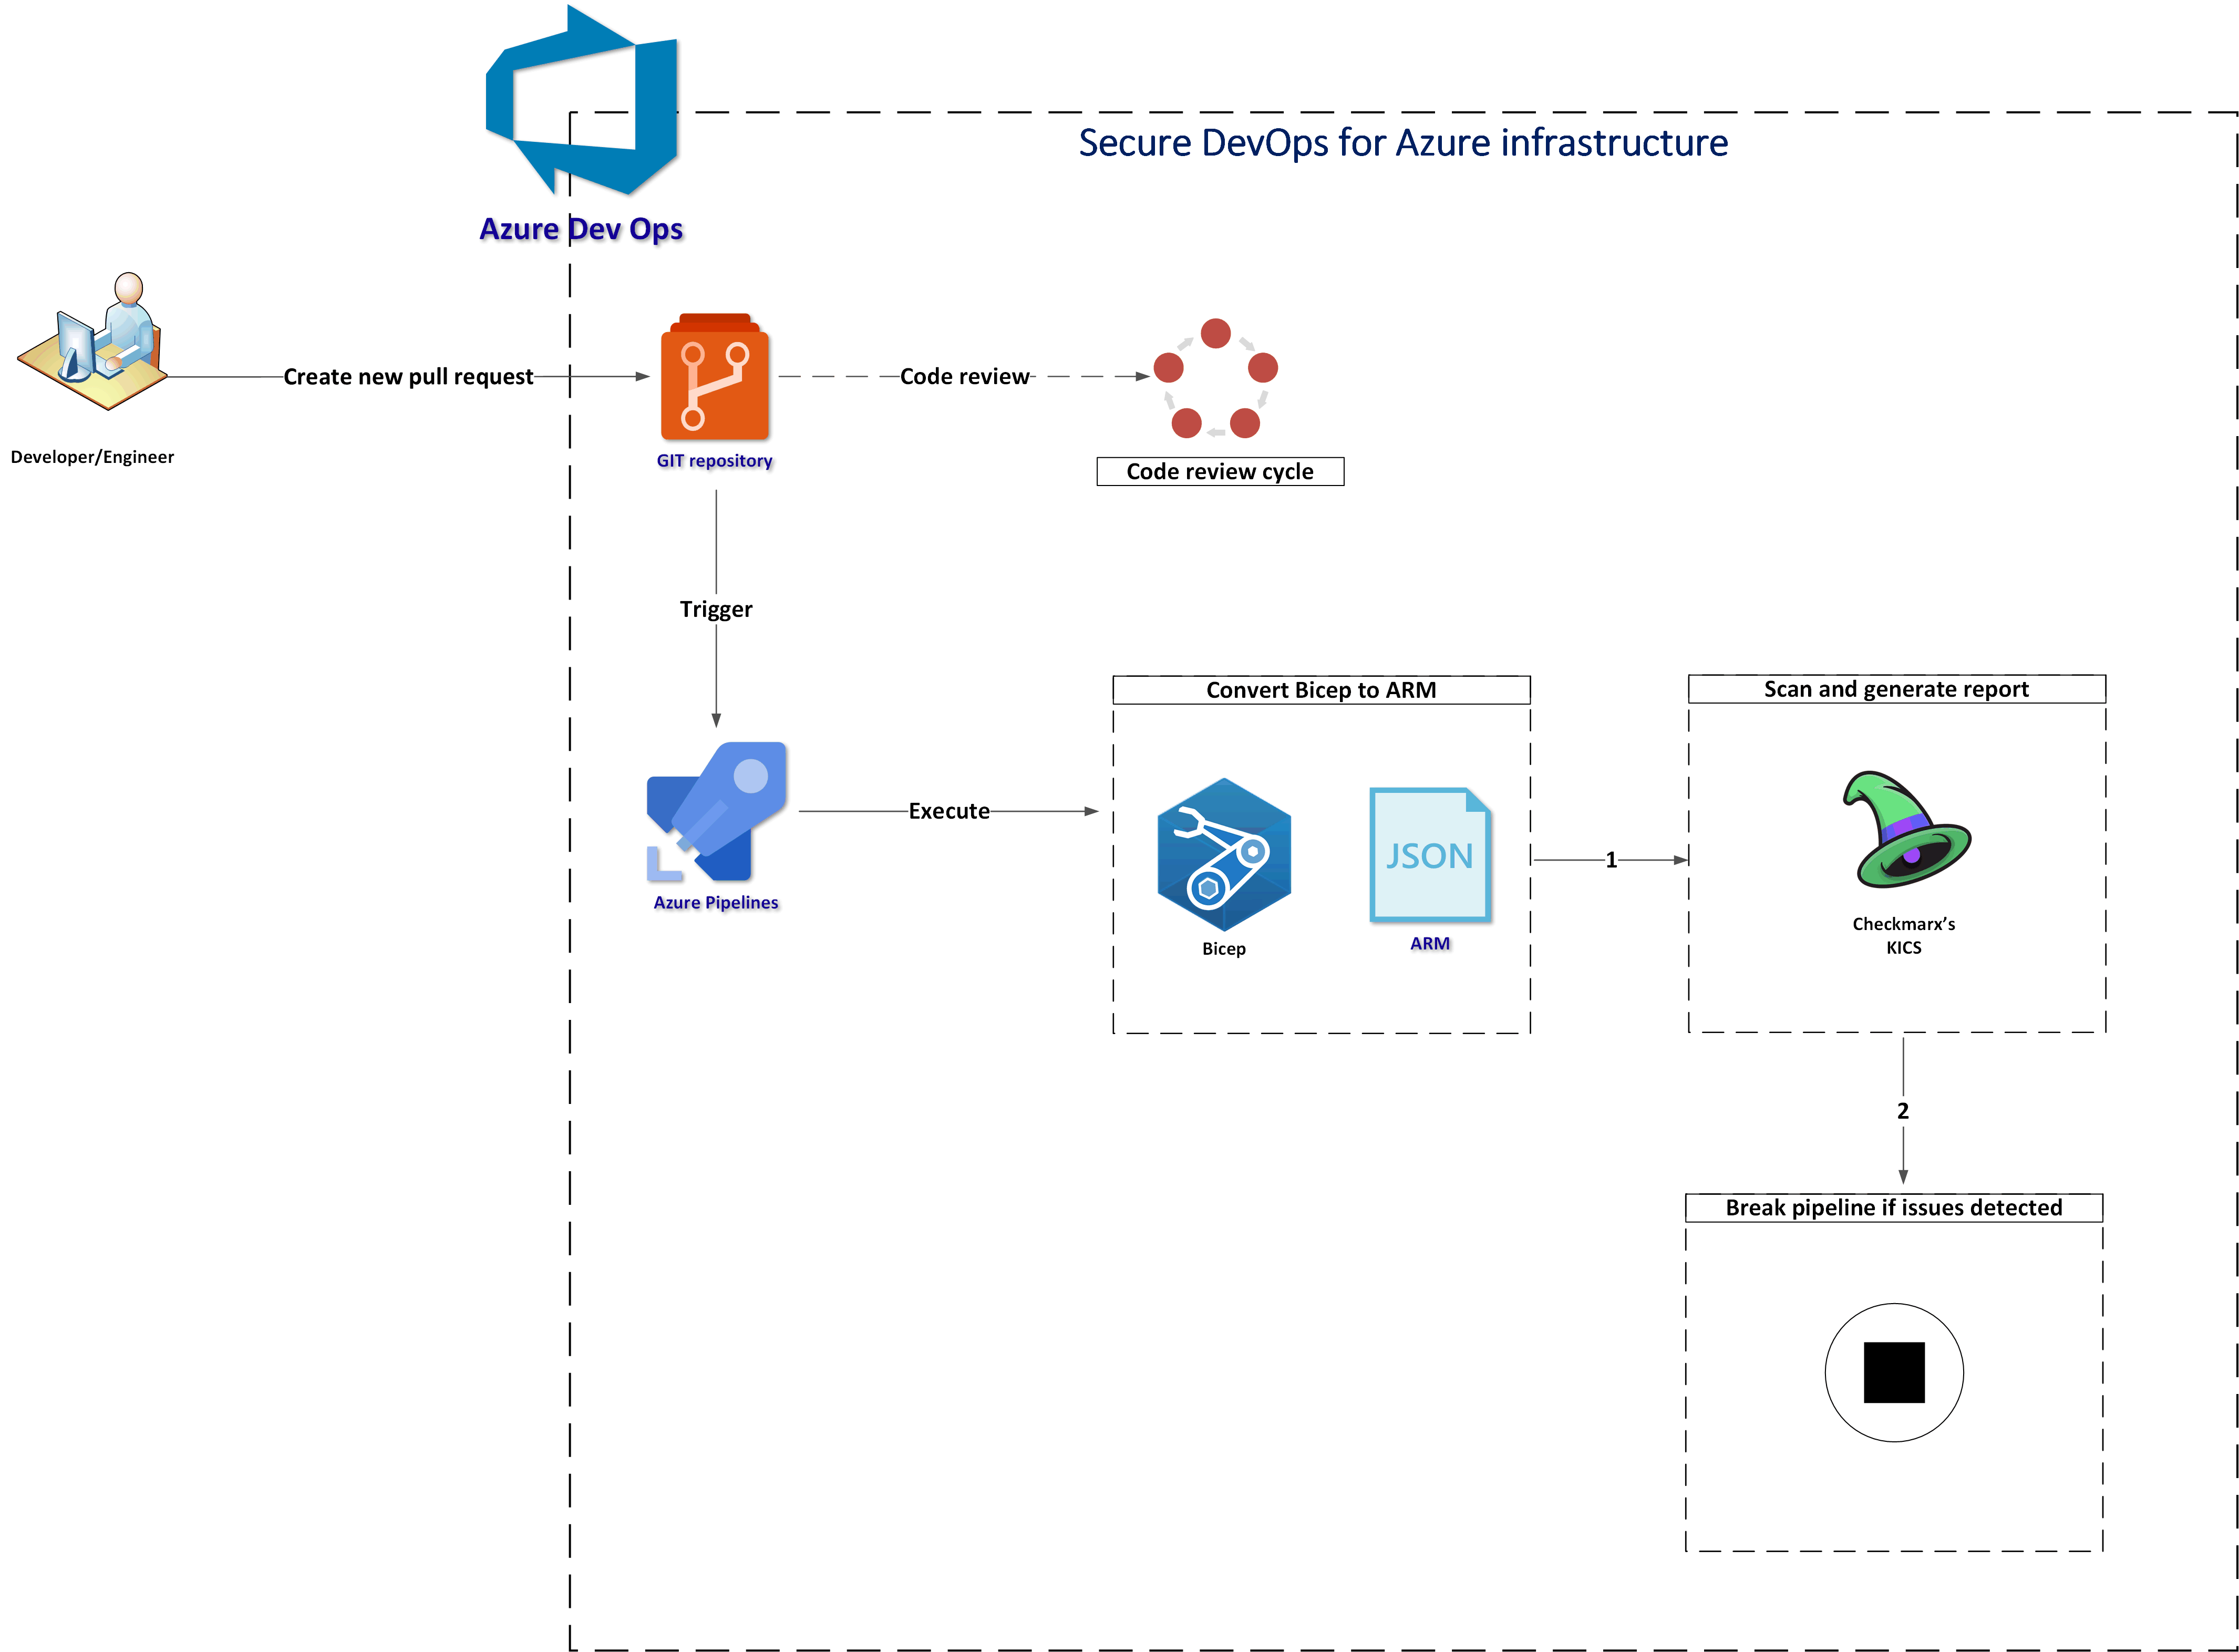
Let me explain the steps:
- First there is a new pull request created
- Azure Pipeline is triggered
- Bicep files are converted to ARM (JSON) - this is required as of now KICS does not support Bicep directly
- ARM files are scanned with KICS and a security report is generated
- Pipeline is stopped if “HIGH” severity issues were detected
End result
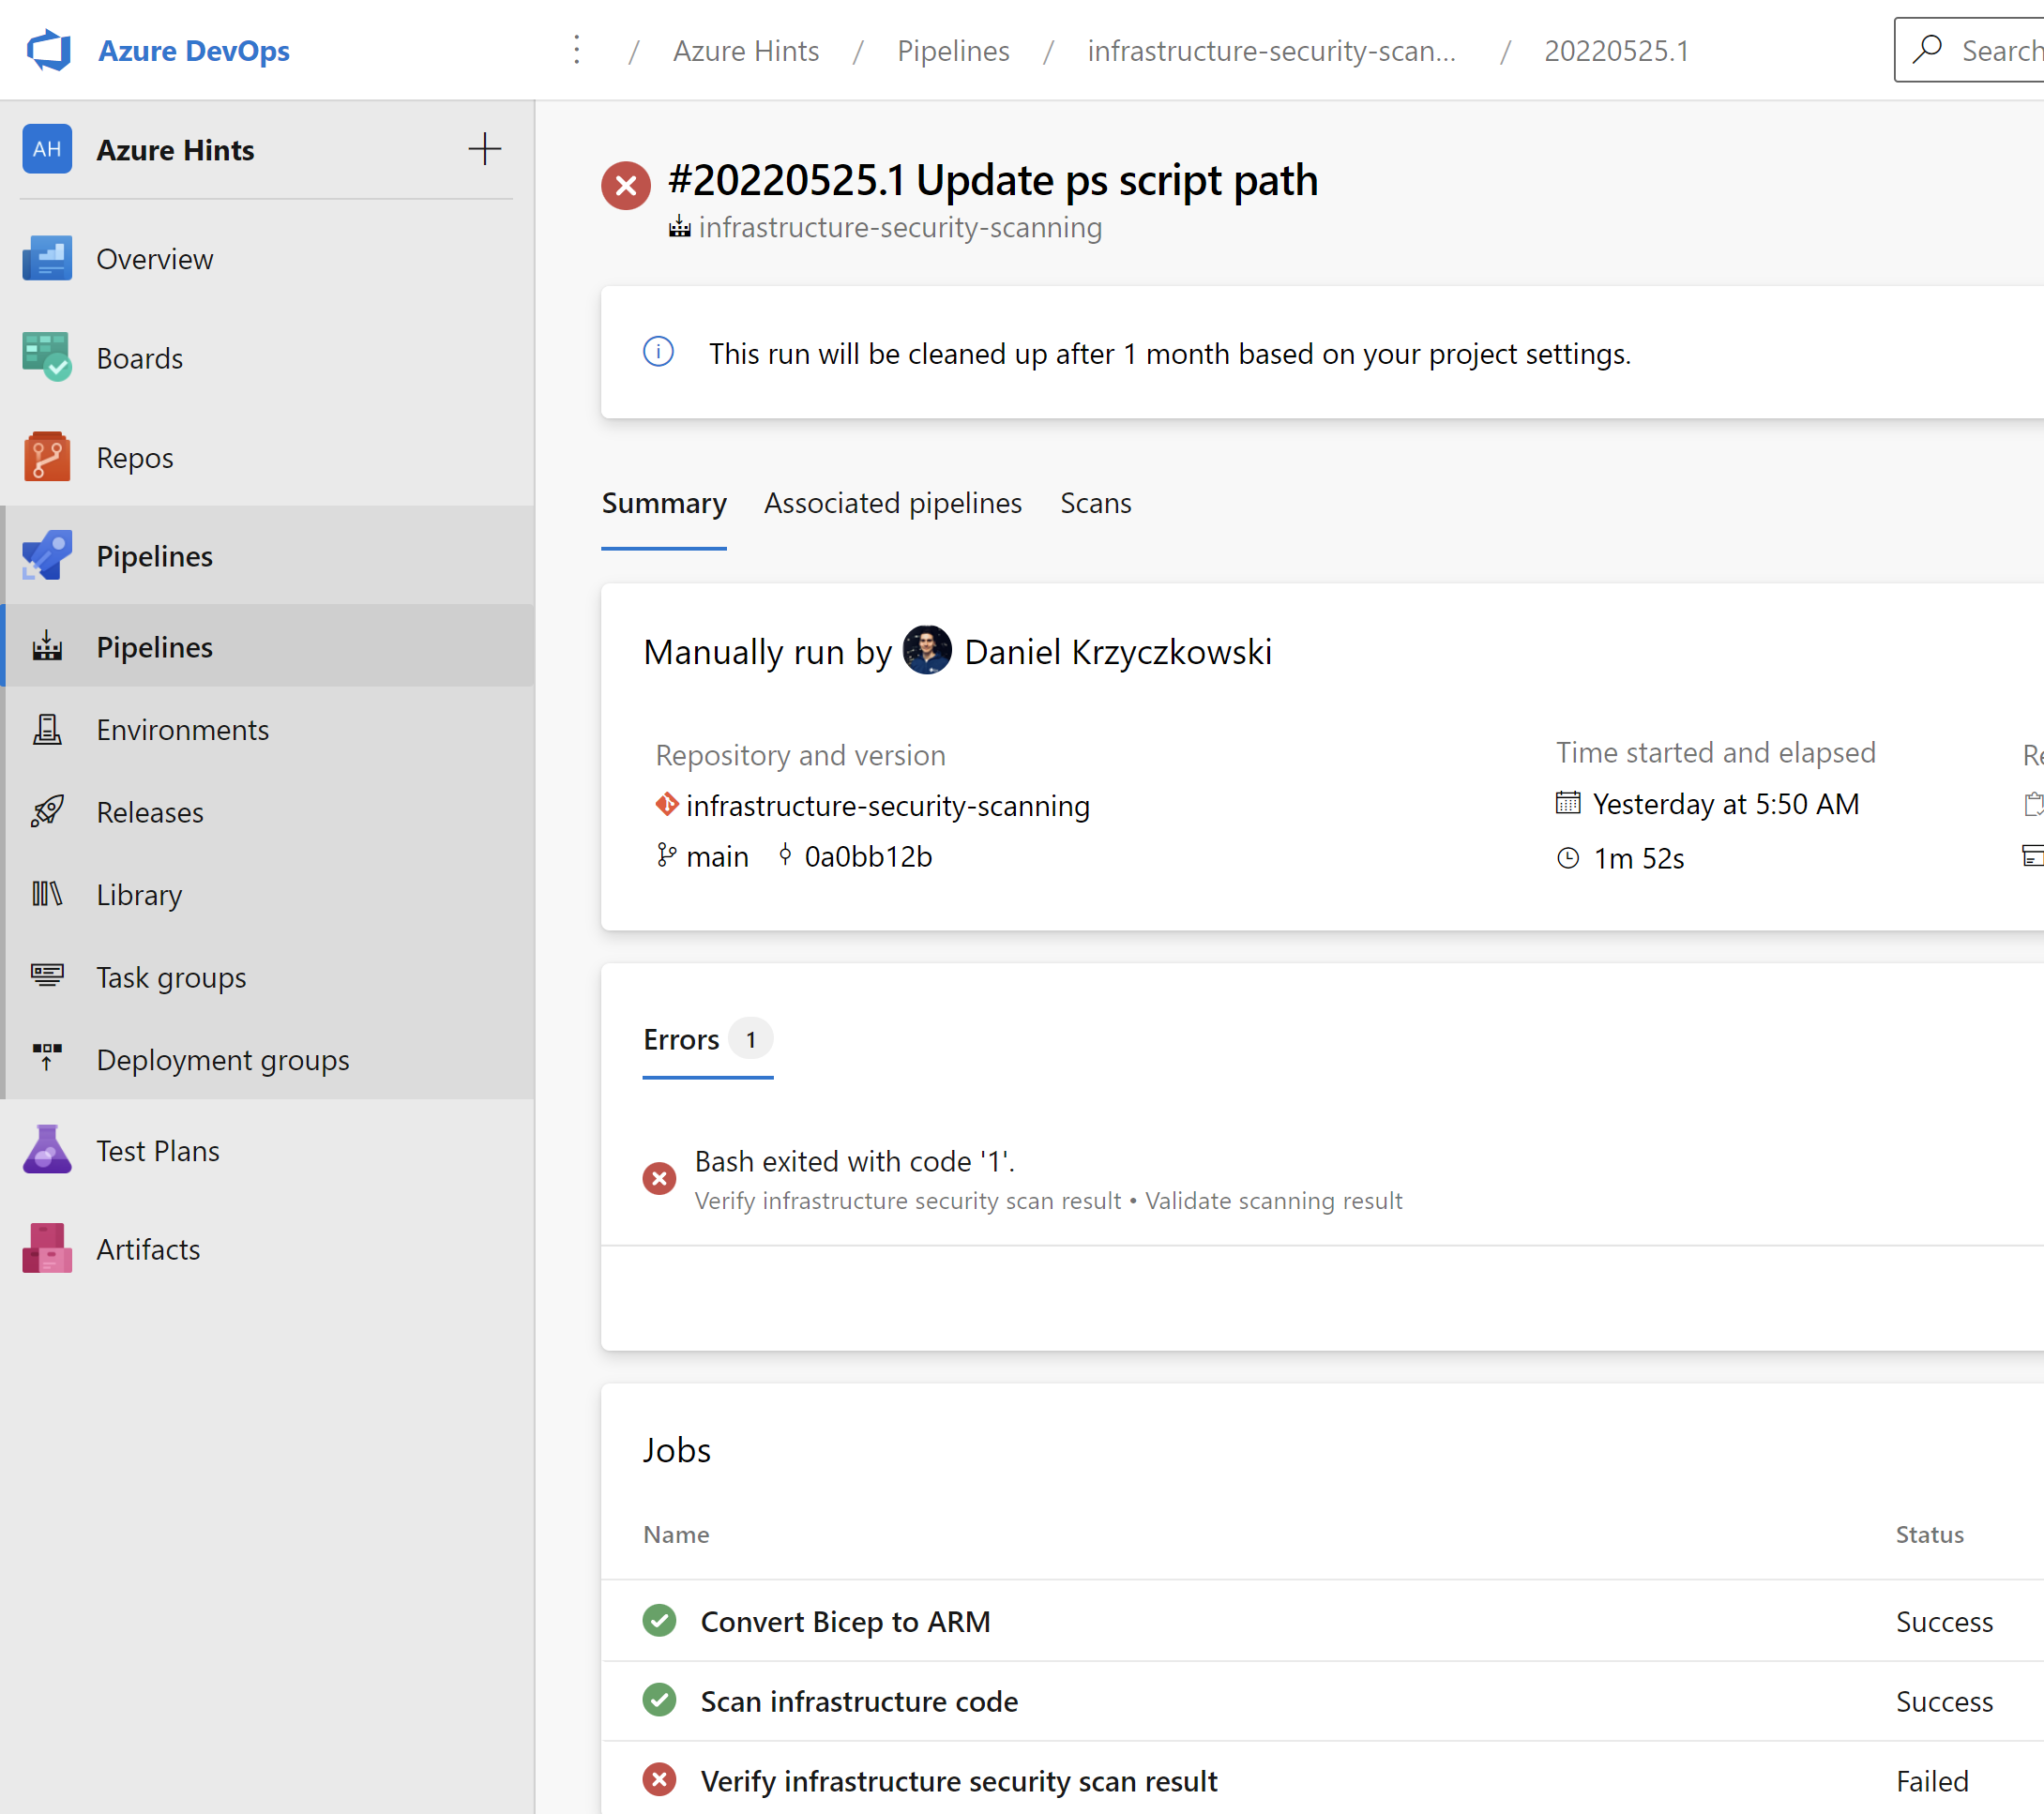
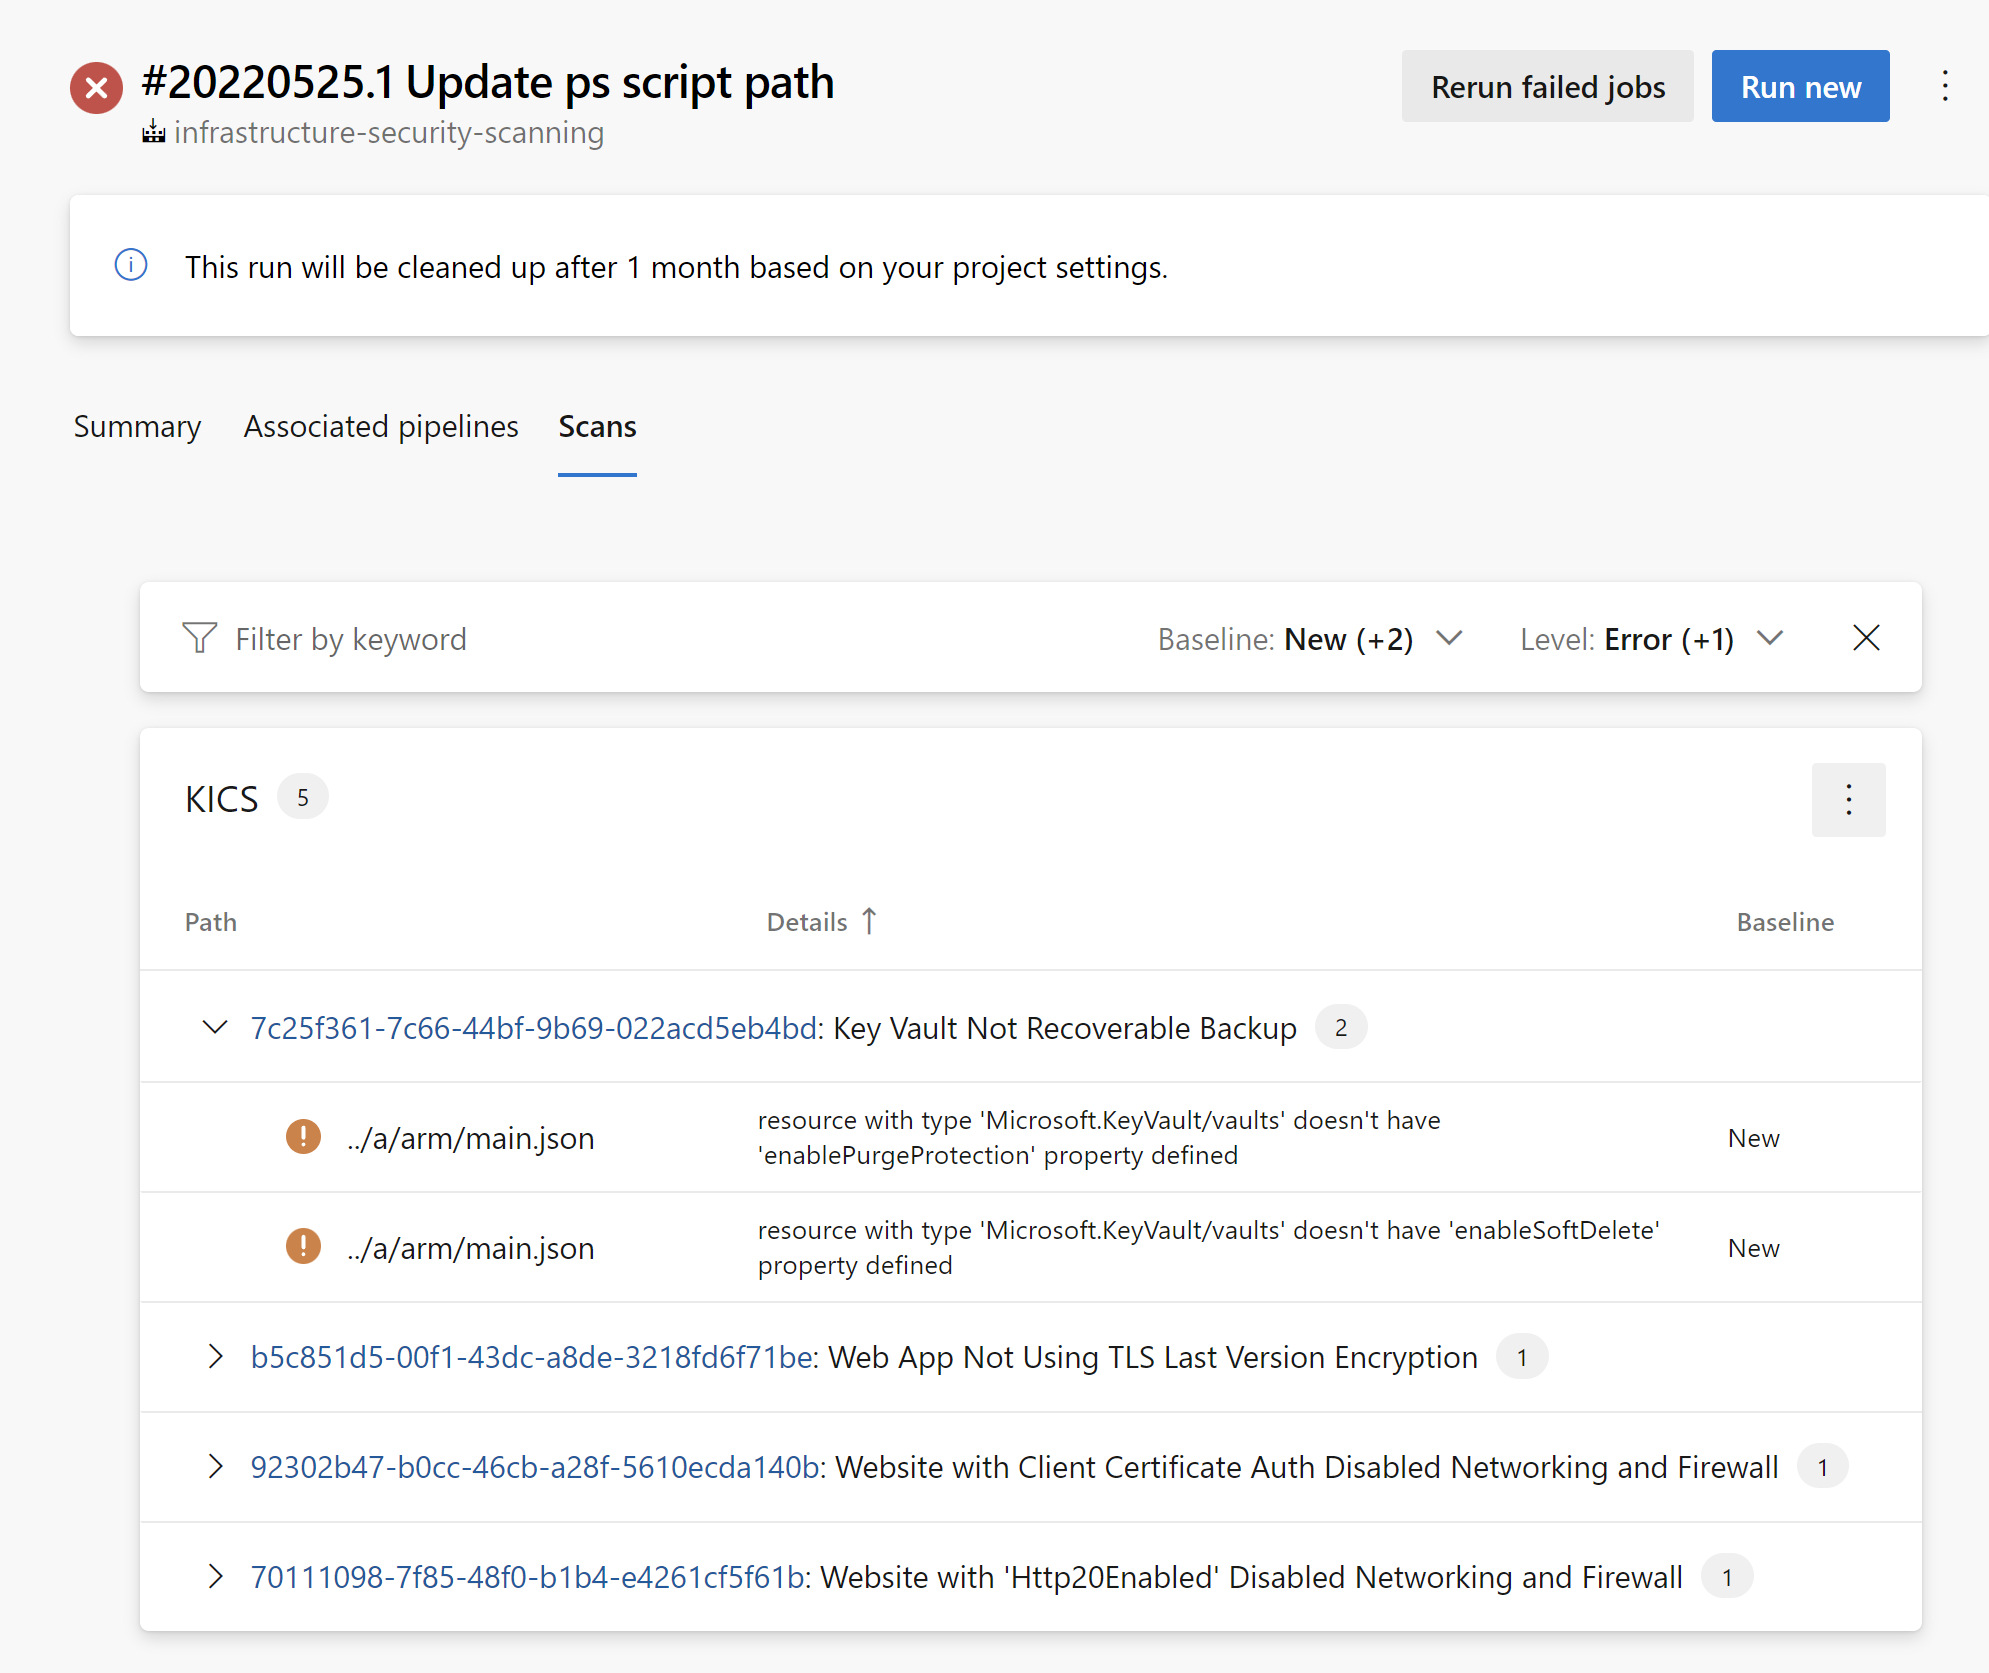
Below I provided some screenshots to show the result.
Azure DevOps pipeline
Scanning result
Implementation
Now it is time to talk a little bit about implementation.
Convert Bicep to ARM task
As I mentioned before, first we have to convert Bicep to ARM (JSON) files. Here is the task responsible for this operation:
      - task: AzureCLI@2
        displayName: 'Convert Bicep template to ARM'
        inputs:
          azureSubscription: $(azureSubscriptionConnectionName)
          scriptType: bash
          scriptLocation: inlineScript
          inlineScript: |
            az bicep build --file $(bicepFilePathForSecurityScan) --outdir $(Build.ArtifactStagingDirectory)
We have to provide azureSubscriptionConnectionName parameter together with the path to Bicep file that should be converted (the main one) using bicepFilePathForSecurityScan parameter.
Scan infrastructure code with Checkmarx’s KICS
The next step is to scan infrastructure (ARM) code with KICS tool. Here is the code to achieve it:
    - script: |
        /app/bin/kics scan --ci -p $(System.ArtifactsDirectory)/arm -o ${PWD} --report-formats json,sarif --ignore-on-exit results
        cat results.json
        TOTAL_SEVERITY_COUNTER=`grep '"total_counter"':' ' results.json | awk {'print $2'}`
        export SEVERITY_COUNTER_HIGH=`grep '"HIGH"':' ' results.json | awk {'print $2'} | sed 's/.$//'`
        SEVERITY_COUNTER_MEDIUM=`grep '"INFO"':' ' results.json | awk {'print $2'} | sed 's/.$//'`
        SEVERITY_COUNTER_LOW=`grep '"LOW"':' ' results.json | awk {'print $2'} | sed 's/.$//'`
        SEVERITY_COUNTER_INFO=`grep '"MEDIUM"':' ' results.json | awk {'print $2'} | sed 's/.$//'`
        echo "TOTAL SEVERITY COUNTER: $TOTAL_SEVERITY_COUNTER"
        echo "##vso[task.setvariable variable=highSeverityIssuesCounter;isOutput=true]$SEVERITY_COUNTER_HIGH"
      displayName: 'Scan infrastructure code'
      name: infraCodeSecurityScan

    # scan results should be visible in the SARIF viewer tab of the build - SCANS tab
    - task: PublishBuildArtifacts@1
      displayName: 'Generate infrastructure scanning report in SARIF'
      inputs:
        pathToPublish: $(System.DefaultWorkingDirectory)/results.sarif
        artifactName: CodeAnalysisLogs

    - task: PublishBuildArtifacts@1
      displayName: 'Generate infrastructure scanning report in JSON'
      inputs:
        pathToPublish: $(System.DefaultWorkingDirectory)/results.json
        artifactName: CodeAnalysisJson
First, code is analyzed with KICS, then SARIF raport is generated, and report in JSON format. We will use the last one to send logs to Azure Log Analytics.
One more important notice - KICS requires using container job in the Azure DevOps pipeline:
  - job: Scan_With_Kics
    dependsOn: Conver_Bicep_To_ARM
    condition: succeeded()
    displayName: 'Scan infrastructure code'
    pool:
      vmImage: "ubuntu-latest"
    container: checkmarx/kics:debian
    steps:
    - task: DownloadPipelineArtifact@2
      displayName: 'Download ARM files'
      inputs:
          artifactName: 'armFiles'
          downloadPath: '$(System.ArtifactsDirectory)/arm'

    - template: ../tasks/scan.infrastructure.with.kics.task.yml
Here is the structure of generated JSON report:
{
  "kics_version": "v1.5.8",
  "files_scanned": 1,
  "lines_scanned": 1246,
  "files_parsed": 1,
  "lines_parsed": 1246,
  "files_failed_to_scan": 0,
  "queries_total": 42,
  "queries_failed_to_execute": 0,
  "queries_failed_to_compute_similarity_id": 0,
  "scan_id": "console",
  "severity_counters": {
    "HIGH": 4,
    "INFO": 0,
    "LOW": 1,
    "MEDIUM": 0,
    "TRACE": 0
  },
  "total_counter": 5,
  "total_bom_resources": 0,
  "start": "2022-05-25T03:51:29.661322371Z",
  "end": "2022-05-25T03:51:32.356792905Z",
  "paths": [
    "/__w/1/a/arm"
  ],
  "queries": [
    {
      "query_name": "Key Vault Not Recoverable",
      "query_id": "7c25f361-7c66-44bf-9b69-022acd5eb4bd",
      "query_url": "https://docs.microsoft.com/en-us/azure/templates/microsoft.keyvault/2019-09-01/vaults?tabs=json#vaultproperties-object",
      "severity": "HIGH",
      "platform": "AzureResourceManager",
      "category": "Backup",
      "description": "Key Vault should have 'enableSoftDelete' and 'enablePurgeProtection' set to true",
      "description_id": "8e3ca202",
      "cis_description_id": "CIS Security - CIS Microsoft Azure Foundations Benchmark v1.3.1 - Rule 8.4",
      "cis_description_title": "Ensure the key vault is recoverable",
      "cis_description_text": "The key vault contains object keys, secrets, and certificates. Accidental unavailability of a key vault can cause immediate data loss or loss of security functions (authentication, validation, verification, non-repudiation, etc.) supported by the key vault objects. It is recommended the key vault be made recoverable by enabling the \"Do Not Purge\" and \"Soft Delete\" functions. This is in order to prevent the loss of encrypted data including storage accounts, SQL databases, and/or dependent services provided by key vault objects (Keys, Secrets, Certificates) etc., as may happen in the case of accidental deletion by a user or from disruptive activity by a malicious user.\nThere could be scenarios where users accidentally run delete/purge commands on key vault or attacker/malicious user does it deliberately to cause disruption. Deleting or purging a key vault leads to immediate data loss as keys encrypting data and secrets/certificates allowing access/services will become non-accessible.There are 2 key vault properties that plays role in permanent unavailability of a key vault. enableSoftDelete : Setting this parameter to true for a key vault ensures that even if key vault is deleted, Key vault itself or its objects remain recoverable for next 90days. In this span of 90 days either key vault/objects can be recovered or purged (permanent deletion). If no action is taken, after 90 days key vault and its objects will be purged. enablePurgeProtection : enableSoftDelete only ensures that key vault is not deleted permanently and will be recoverable for 90 days from date of deletion. However, there are chances that the key vault and/or its objects are accidentally purged and hence will not be recoverable. Setting enablePurgeProtection to \"true\" ensures that the key vault and its objects cannot be purged. Enabling both the parameters on key vaults ensures that key vaults and their objects cannot be deleted/purged permanently.",
      "files": [
        {
          "file_name": "../a/arm/main.json",
...REMOVED FOR BREVITY...
      ]
    },
        ...
  ]
}
Validate HIGH severity results and stop the pipeline
Once logs are sent, I want to break the pipeline execution if there are HIGH severity issues with the infrastructure code. To do it I have created the below task:
  - script: |
      echo "SEVERITY COUNTER: $(highSeverityIssuesCounter)"
      SEVERITY_COUNTER_HIGH=$(highSeverityIssuesCounter)
      if [ "$SEVERITY_COUNTER_HIGH" -ge "1" ]; then
        echo "Please review all $SEVERITY_COUNTER issues with infrastructure code" && exit 1;
      fi
    displayName: 'Validate scanning result'
Summary
In this article, I explained Microsoft Azure Security Benchmark, and where to find information about security recommendations. I also presented how to set up Azure infrastructure code scanning and auditing using Azure DevOps, and Checkmarx’s KICS. It is worth mentioning that when it comes to KICS, it can be used to scan other platforms like CDK, or Terraform. In the next article, we will discover how to deploy securely to Azure resources in the Azure Virtual Network.
If you like my articles, and find them helpful, please buy me a coffee:


