DevSecOps on Azure - part4: Enhance security in Continuous Integration pipeline
Introduction
This is the next article from the series called DevSecOps practices for Azure cloud workloads. In this article, I would like to talk about the security aspect of the Continuous Integration pipelines. We can do our best to secure the Azure environment where our workloads are running but it is also important to enhance security at the earlier stage. This is why in this article we will discover how to enhance security when architecting a Continuous Integration pipeline. I will use GitHub, and Azure DevOps tools to show sample implementations.
Introduction to SBOM
Every software consists of many different components. Software Bill of Materials (SBOM) is the list of ingredients that make up software components, providing software transparency so organizations have insight into their supply chain dependencies. An SBOM is a formal, machine-readable inventory of software components and dependencies, information about those components, and their hierarchical relationships. SBOM was mentioned as a formal requirement in the Executive Order on Improving the Nation’s Cybersecurity document. There are many different details and statements, and one of them requires providing a purchaser a Software Bill of Materials (SBOM) for each product directly or by publishing it on a public website. Here is also a very important part:
The term “Software Bill of Materials” or “SBOM” means a formal record containing the details and supply chain relationships of various components used in building software. Software developers and vendors often create products by assembling existing open-source and commercial software components. The SBOM enumerates these components in a product. It is analogous to a list of ingredients on food packaging. An SBOM is useful to those who develop or manufacture software, those who select or purchase software, and those who operate the software. Developers often use available open source and third-party software components to create a product; an SBOM allows the builder to make sure those components are up to date and to respond quickly to new vulnerabilities. Buyers can use an SBOM to perform vulnerability or license analysis, both of which can be used to evaluate risk in a product. Those who operate software can use SBOMs to quickly and easily determine whether they are at potential risk of a newly discovered vulnerability. A widely used, machine-readable SBOM format allows for greater benefits through automation and tool integration. The SBOMs gain greater value when collectively stored in a repository that can be easily queried by other applications and systems. Understanding the supply chain of software, obtaining an SBOM, and using it to analyze known vulnerabilities are crucial in managing risk.
This is why it is very important to be able to generate SBOM report. Before we will discover how to do it, let’s talk a little bit about the structure.
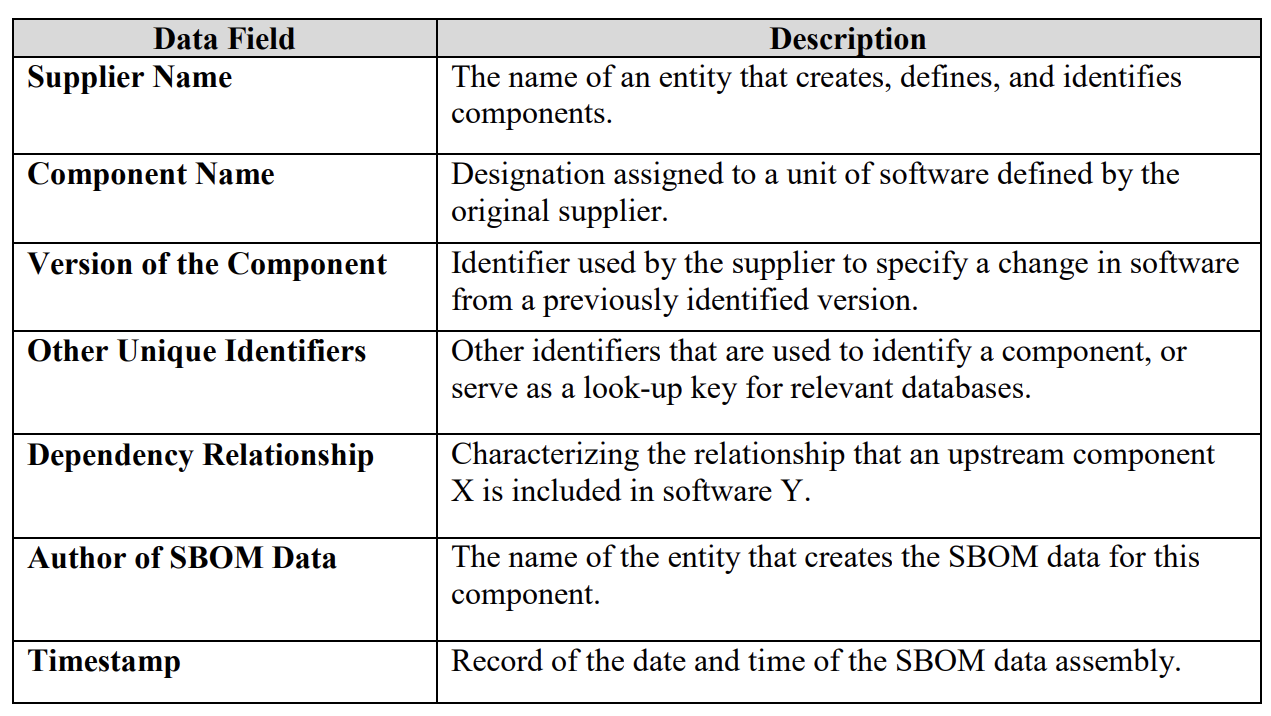
The Minimum Elements for an SBOM
The core of an SBOM is a consistent, uniform structure that captures and presents information used to understand the components that make up software. The goal of these fields is to enable sufficient identification of these components to track them across the software supply chain and map them to other beneficial sources of data, such as vulnerability databases or license databases. This baseline component information includes:
While a single standard may offer simplicity and efficiency, multiple data formats exist in the ecosystem and are being used to generate and consume SBOMs like:
- Software Package Data eXchange (SPDX)
- CycloneDX13
- Software Identification (SWID)
Open-source SBOM tool from Microsoft
Many tools can be used to generate SBOM reports. In this article, I would like to show how to use SBOM Tool - an open source tool from Microsoft. SBOM tool is a general purpose, enterprise-proven, build-time SBOM generator. It works across platforms including Windows, Linux, and Mac, and uses the standard Software Package Data Exchange (SPDX) format mentioned above.
It can be easily integrated into and auto-detects NPM, NuGet, PyPI, CocoaPods, Maven, Golang, Rust Crates, RubyGems, Linux packages within containers, Gradle, Ivy, GitHub public repositories, and more.
SBOM report generated by this tool contains four main sections based on the SPDX specification:
- Document creation information - General information about the SBOM document, such as software name, SPDX license, SPDX version, who created the document, and when it was created.
- Files section - A list of files that compose the piece of software. Each file has some properties including the hashes of its content (SHA-1, SHA-256).
- Packages section - A list of packages used when building the software. Each package has additional properties such as name, version, supplier, hashes (SHA-1, SHA-256) and a Package URL (purl) software identifier.
- Relationships section - A list of relationships between the different elements of the SBOM, such as files and packages.
I took the above information from the official announcement made in this Microsoft open sources its software bill of materials (SBOM) generation tool blog post.
It is worth mentioning that the above tool can be integrated with Azure DevOps and GitHub.
Generate SBOMs with SBOM Tool
In this section, we will see how to generate SBOM report on the local machine. First, we have to download MS SBOM Tool. Once the tool is downloaded, we can use it using command line interface (CMD). For the demo purpose, I created new Class Library project, and added two nuget packages to it: Dapper, and Microsoft Identity Web.
Next, I moved the SBOM Tool exe file to the folder where my project is located. Here is the command I used to generate SBOM report:
sbom-tool generate -b C:\Users\Daniel\Desktop\demo-tmf-package\TMF\sbom-report -ps DanielK -bc C:\Users\Daniel\Desktop\demo-tmf-package\TMF\TMF.MyOSSLibrary -pn myTMFPackage -pv 1.0.0 -nsb https://techmindfactory.com/TMF
- BuildDropPath (-b) - The root folder of the drop directory for which the manifest file will be generated.
- PackageSupplier (-ps) - Supplier of the package that this SBOM represents.
- BuildComponentPath (-bc) - The folder containing the build components and packages.
- PackageName (-pn) - The name of the package this SBOM represents. If this is not provided, we will try to infer this name from the build that generated this package.
- PackageVersion (-pv) - The version of the package this SBOM represents. If this is not provided, we will try to infer the version from the build that generated this package, if that also fails, the SBOM generation fails.
- NamespaceUriBase (-nsb) - The base path of the SBOM namespace URI.
We can find the list of all available parameters in the official documentation here.
Here is the information provided in the console after executing the command:
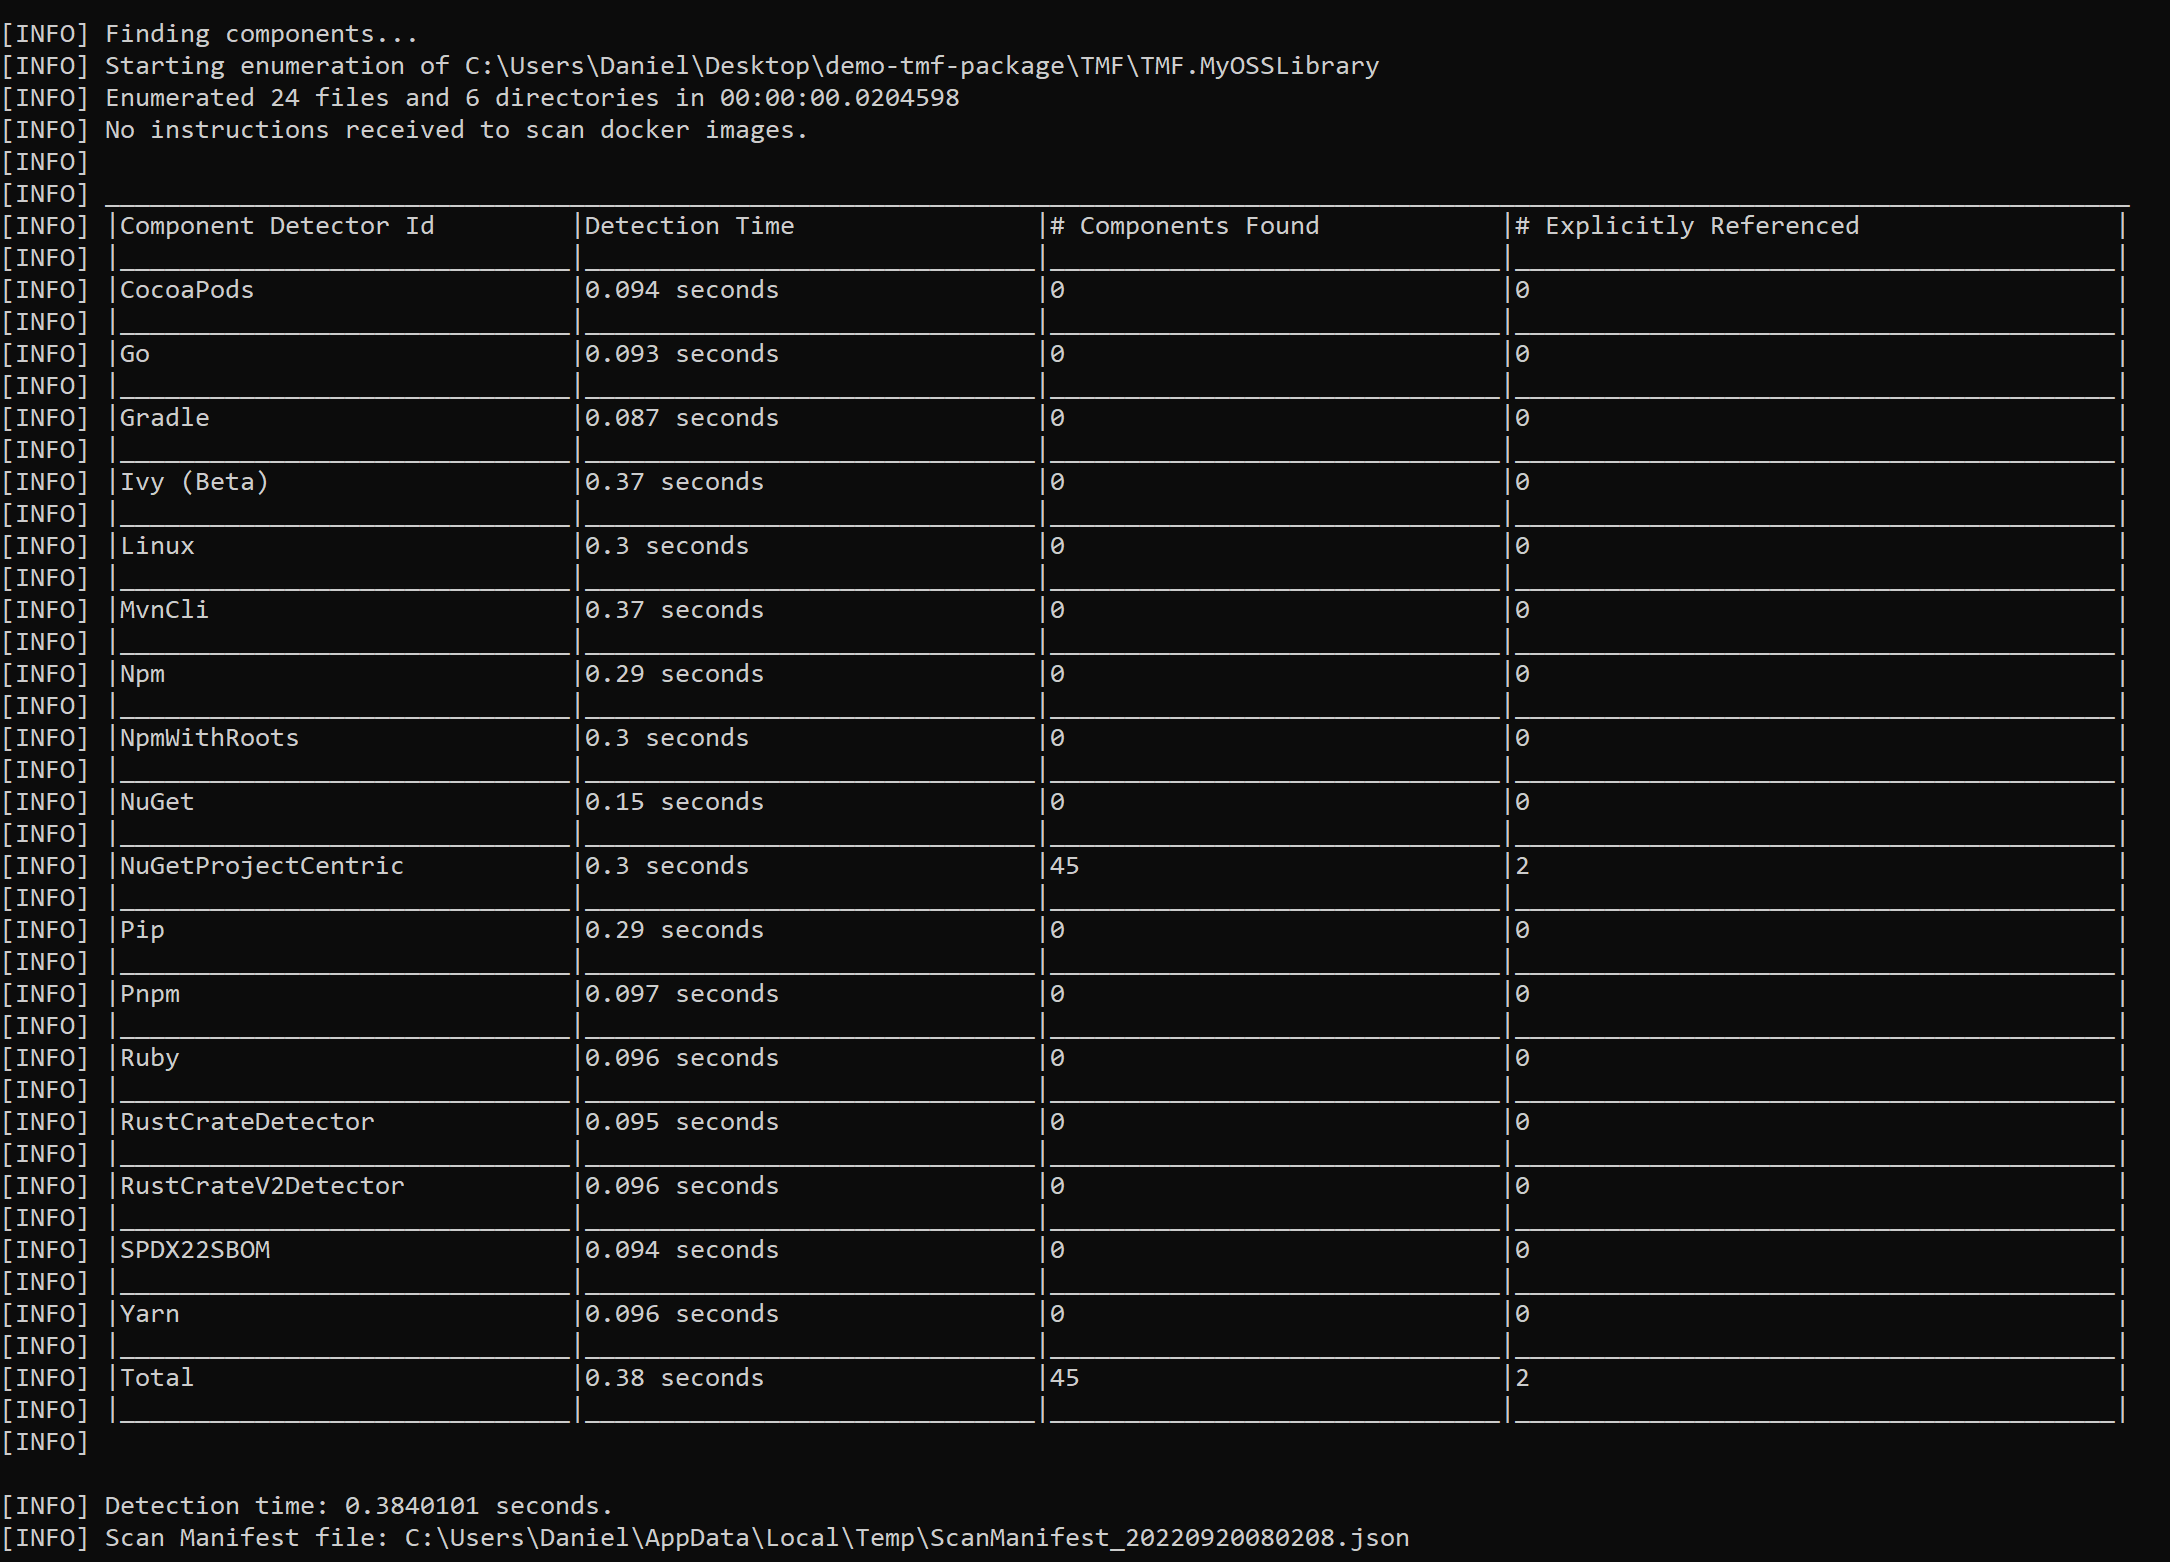
We can see above that NuGet packages were detected in my project. There is also information about the packages I directly referenced in my project. This is the SBOM report generated in the SPDX format:
{
  "files": [],
  "packages": [
    {
      "name": "Microsoft.AspNetCore.DataProtection",
      "SPDXID": "SPDXRef-Package-E3723B6678C04E67E73EC2476C2547059AC85B447FF43D195026C6586B0AD2A5",
      "downloadLocation": "NOASSERTION",
      "filesAnalyzed": false,
      "licenseConcluded": "NOASSERTION",
      "licenseInfoFromFiles": [
        "NOASSERTION"
      ],
      "licenseDeclared": "NOASSERTION",
      "copyrightText": "NOASSERTION",
      "versionInfo": "5.0.8",
      "externalRefs": [
        {
          "referenceCategory": "PACKAGE-MANAGER",
          "referenceType": "purl",
          "referenceLocator": "pkg:nuget/Microsoft.AspNetCore.DataProtection%405.0.8"
        }
      ],
      "supplier": "NOASSERTION"
    },
    {
      "name": "Microsoft.Extensions.DependencyInjection.Abstractions",
      "SPDXID": "SPDXRef-Package-FE12D2A286D8EC366C3A77906C3D32888C2FDFB4609B60F36C2159748DCFFF53",
      "downloadLocation": "NOASSERTION",
      "filesAnalyzed": false,
      "licenseConcluded": "NOASSERTION",
      "licenseInfoFromFiles": [
        "NOASSERTION"
      ],
      "licenseDeclared": "NOASSERTION",
      "copyrightText": "NOASSERTION",
      "versionInfo": "5.0.0",
      "externalRefs": [
        {
          "referenceCategory": "PACKAGE-MANAGER",
          "referenceType": "purl",
          "referenceLocator": "pkg:nuget/Microsoft.Extensions.DependencyInjection.Abstractions%405.0.0"
        }
      ],
      "supplier": "NOASSERTION"
    },
    {
      "name": "Microsoft.IdentityModel.JsonWebTokens",
      "SPDXID": "SPDXRef-Package-960EFB2FD9AD5C0686431D828FDD93A0061F91ECC33AC3DF0CAFFE9F815DE41B",
      "downloadLocation": "NOASSERTION",
      "filesAnalyzed": false,
      "licenseConcluded": "NOASSERTION",
      "licenseInfoFromFiles": [
        "NOASSERTION"
      ],
      "licenseDeclared": "NOASSERTION",
      "copyrightText": "NOASSERTION",
      "versionInfo": "6.23.1",
      "externalRefs": [
        {
          "referenceCategory": "PACKAGE-MANAGER",
          "referenceType": "purl",
          "referenceLocator": "pkg:nuget/Microsoft.IdentityModel.JsonWebTokens%406.23.1"
        }
      ],
      "supplier": "NOASSERTION"
    },
    ...REMOVED FOR BREVITY...
  ],
  "externalDocumentRefs": [],
  "relationships": [
    {
      "relationshipType": "DEPENDS_ON",
      "relatedSpdxElement": "SPDXRef-Package-EE0742950FBD84D832594518492E8ACD511A6DF57408D54450151DE8C6BB8A23",
      "spdxElementId": "SPDXRef-RootPackage"
    },
    ...REMOVED FOR BREVITY...
  ],
  "spdxVersion": "SPDX-2.2",
  "dataLicense": "CC0-1.0",
  "SPDXID": "SPDXRef-DOCUMENT",
  "name": "myTMFPackage 1.0.0",
  "documentNamespace": "https://techmindfactory.com/TMF/myTMFPackage/1.0.0/E6YXRbOoqkajQfABNmDhTQ",
  "creationInfo": {
    "created": "2022-09-20T06:06:54Z",
    "creators": [
      "Organization: DanielK",
      "Tool: Microsoft.SBOMTool-0.2.2"
    ]
  },
  "documentDescribes": [
    "SPDXRef-RootPackage"
  ]
}
Generate SBOMs in Azure DevOps pipeline
Generating SBOM report locally is always helpful but having it automated, and integrated into CI pipeline can be also beneficial. Below we can see example how to extend Azure DevOps pipeline to generate SBOM report.
pool:
  vmImage: ubuntu-latest

steps:
- task: UseDotNet@2
  inputs:
    packageType: 'sdk'
    version: '6.x'

# First, we have to build our project:
- script: |
    dotnet build $(Build.SourcesDirectory)/TMF.CoreLibrary.csproj --output $(Build.ArtifactStagingDirectory)
  displayName: 'Build the project'

# Next, we have to use CURL to get sbom-tool and run scunning:
- script: |
    curl -Lo $(Agent.TempDirectory)/sbom-tool https://github.com/microsoft/sbom-tool/releases/latest/download/sbom-tool-linux-x64
    chmod +x $(Agent.TempDirectory)/sbom-tool
    $(Agent.TempDirectory)/sbom-tool generate -b $(Build.ArtifactStagingDirectory) -bc $(Build.SourcesDirectory) -pn Test -pv 1.0.0 -ps TechMindFactory -nsb https://techmindfactory.com/TMF -V Verbose
  displayName: Generate SBOM report

- task: PublishBuildArtifacts@1
  inputs:
    PathtoPublish: '$(Build.ArtifactStagingDirectory)'
    ArtifactName: 'drop'
    publishLocation: 'Container'
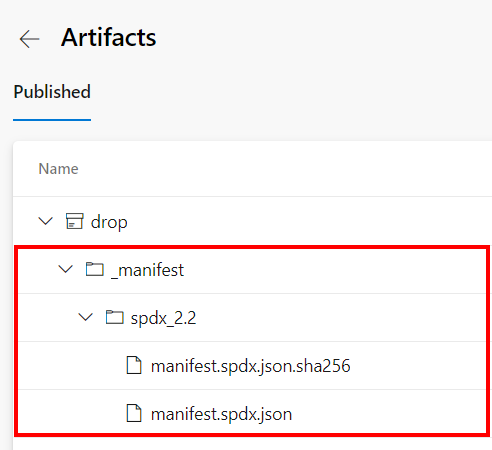
Report is available under artifacts:
Generate SBOMs in GitHub Actions
Below we can see example how to extend GitHub Actions to generate SBOM report.
name: Tech Mind Factory SBOM

on:
  workflow_dispatch:

jobs:
  build:

    runs-on: ubuntu-latest

    steps:
    - uses: actions/checkout@v3
    - name: Setup .NET
      uses: actions/setup-dotnet@v2
      with:
        dotnet-version: 6.0.x
    # First, we have to build our project:
    - name: Build
      run: dotnet build Sample.sln --output buildOutput
    # Next, we have to use CURL to get sbom-tool and run scunning:
    - name: Generate SBOM
      run: |
        curl -Lo $RUNNER_TEMP/sbom-tool https://github.com/microsoft/sbom-tool/releases/latest/download/sbom-tool-linux-x64
        chmod +x $RUNNER_TEMP/sbom-tool
        $RUNNER_TEMP/sbom-tool generate -b ./buildOutput -bc . -pn Test -pv 1.0.0 -ps TechMindFactory -nsb https://techmindfactory.com/TMF -V Verbose

    - name: Upload a Build Artifact
      uses: actions/upload-artifact@v3.1.0
      with:
        path: buildOutput
With such SBOM report generated, as software supplier we can provide transparent information about the components that make up our software.
Software Composition Analysis to detect vulnerabilities
Now that we know what Software Bill of Materials (SBOM) is, we can talk about Software Composition Analysis (SCA). With Software Composition Analysis we cab inspect package managers, manifest files, source code, binary files, and container images. The identified open source is compiled into a Software Bill of Materials (SBOM), which is then compared against a variety of databases, including the National Vulnerability Database (NVD). Open source components are becoming major building blocks in software, and SCA tools help keep track of their version, and security state. SCA tools can also compare SBOMs against databases to discover licenses associated with the code and analyze overall code quality.
There are many good SCA tools. One of them is Snyk Open Source. Snyk Open Source allows to find and fix vulnerabilities in the open source libraries used by our applications. It also allows you to find and address licensing issues in (or caused by) these open-source libraries. This is the big advantage of using Snyk as not every product on the market for code scanning has a license scanning feature.
Snyk Open Source with Azure DevOps and GitHub
We can easily integrate Snyk with Azure DevOps using SnykSecurityScan@1 task:
  - task: SnykSecurityScan@1
    displayName: "Apply security scan"
    inputs:
      serviceConnectionEndpoint: "snyk-connection"
      testType: "app"
      severityThreshold: "medium"
      monitorWhen: "always"
      failOnIssues: true
      additionalArguments: "--file=src/TMF.sln"
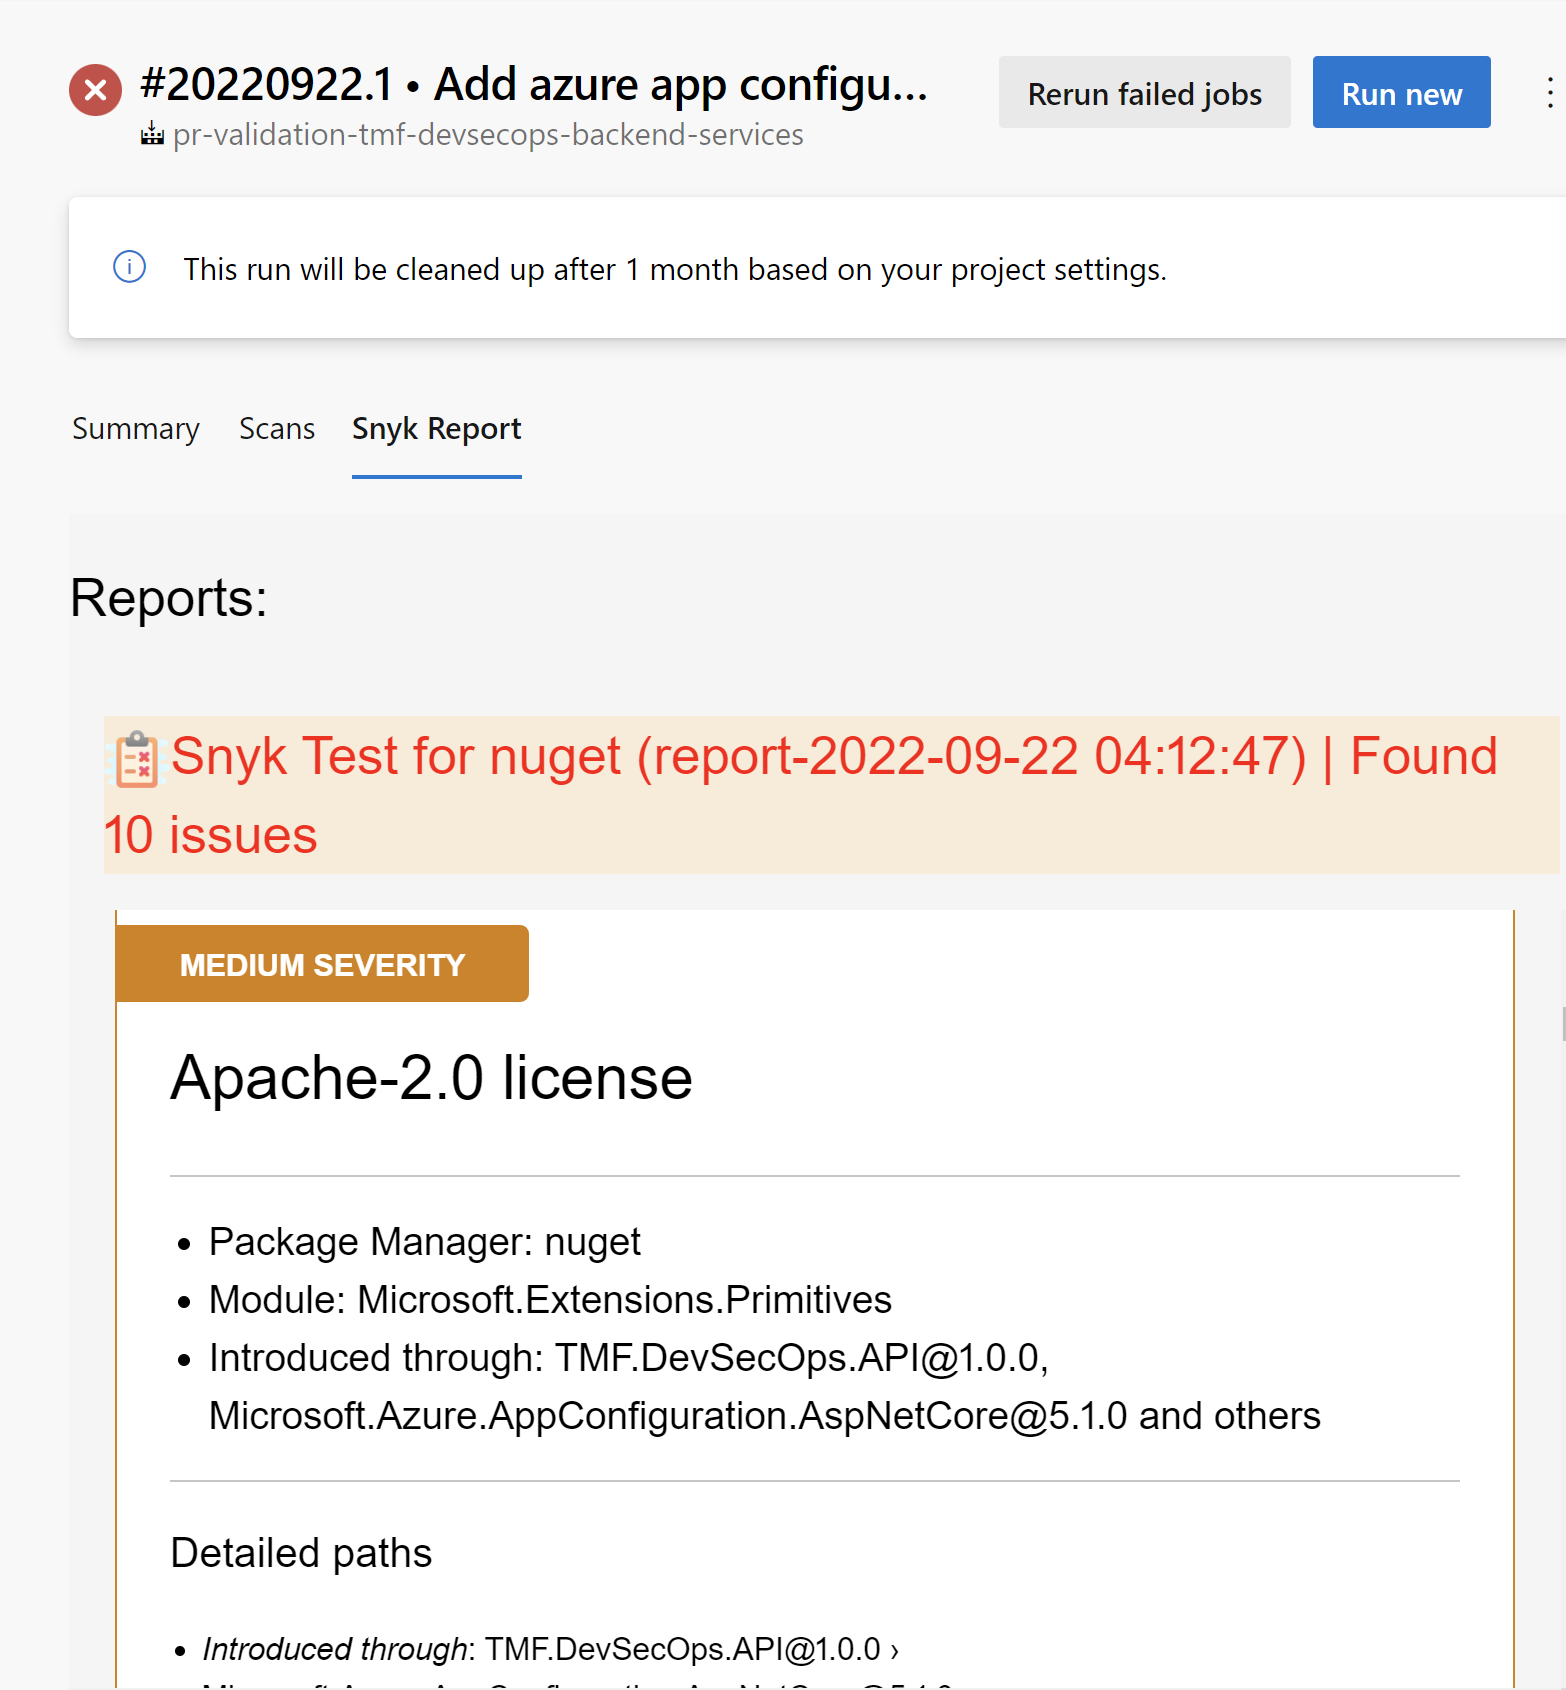
Above task ca be used in the PRD build validation process:
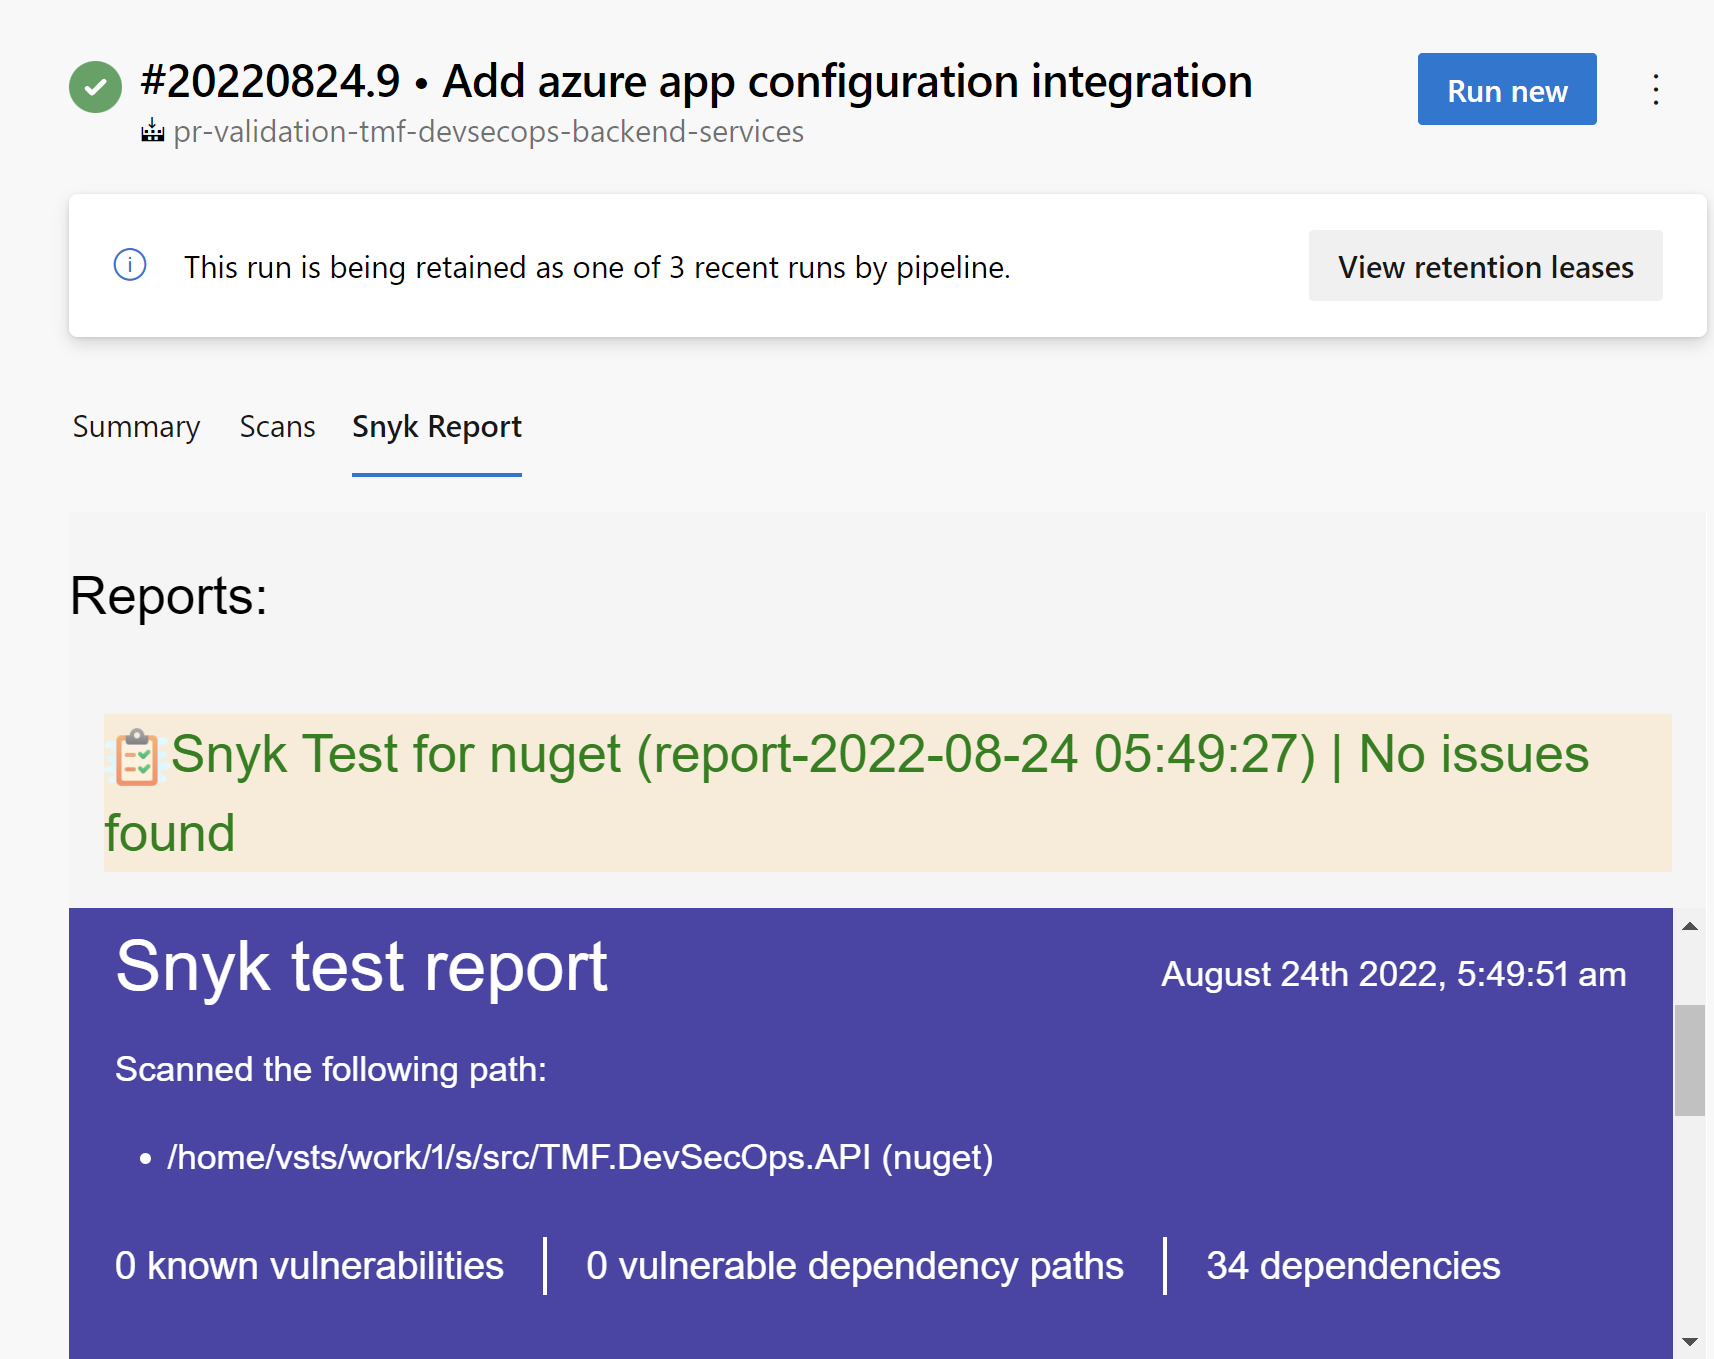
If any issues are detected, Snyk task will break the pipeline execution. Additionally, we can configure Open Source license policies to make sure that our software does not utilize any packages with problematic licenses:
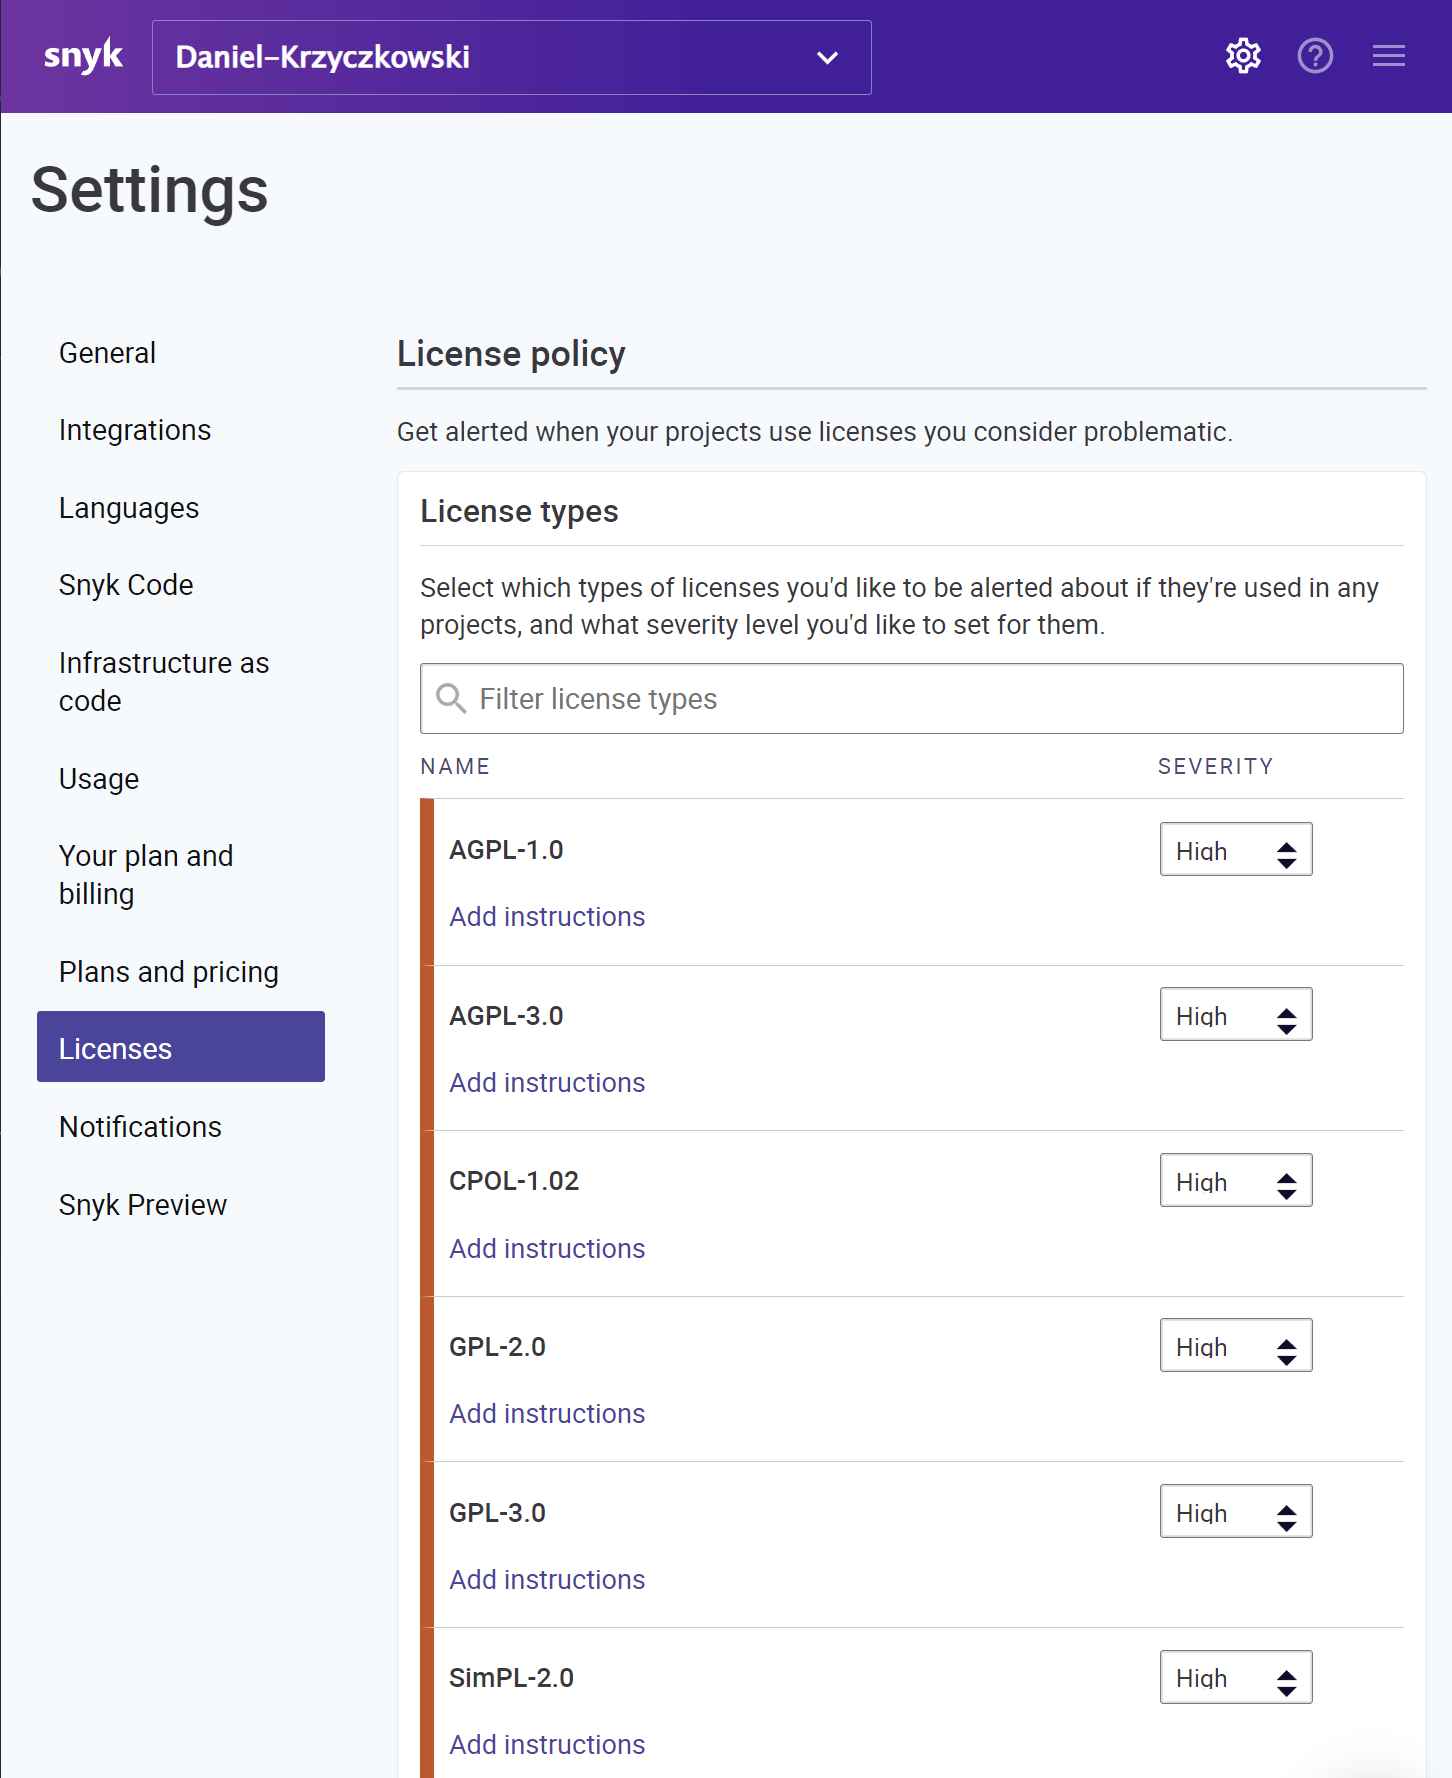
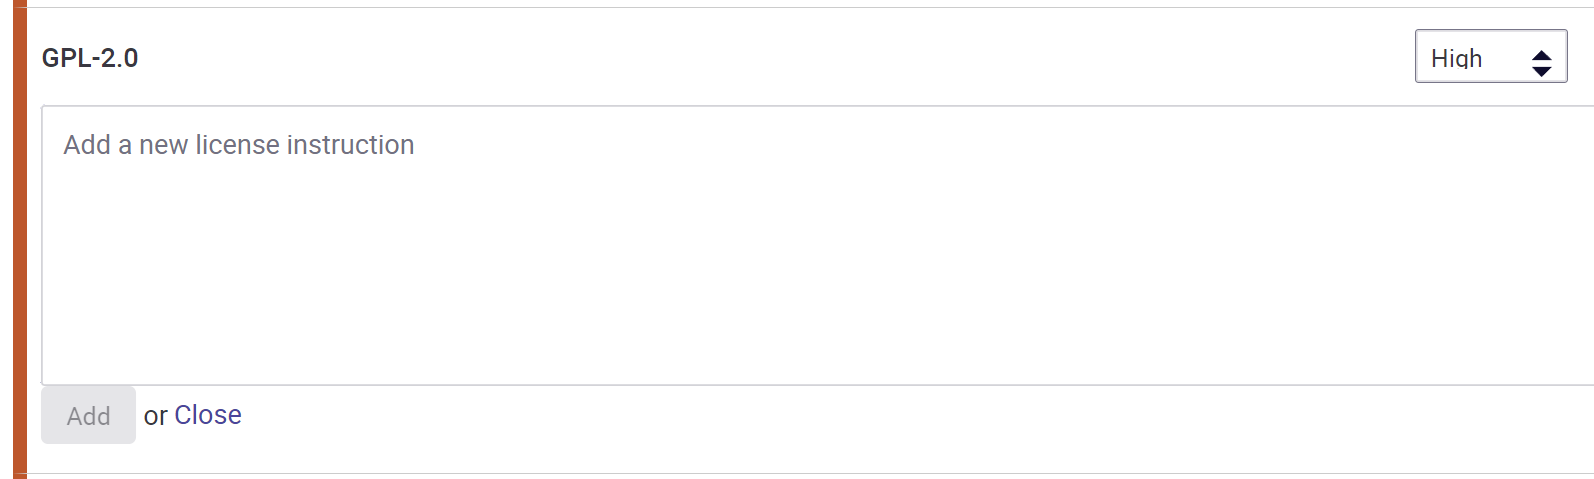
In the Snyk portal, under Licenses section we can define policies for many different kinds of licenses. We can set severity level (low, medium, high), together with instruction that will be displayed in the final result, if Snyk detecs any license types marked with specific severity (like high):
I encourage you to read more in the official documentation.
Similarly, we can add scanning on GitHub, using Snyk action:
    - name: Run Snyk to check for vulnerabilities
      uses: snyk/actions/dotnet@master
      continue-on-error: true # To make sure that SARIF upload gets called
      env:
        SNYK_TOKEN: $
      with:
        args: --sarif-file-output=snyk.sarif --file=./src/web-game/Globomantics.sln --severity-threshold=medium


    - name: Upload result to GitHub Code Scanning
      uses: github/codeql-action/upload-sarif@v1
      with:
        sarif_file: snyk.sarif
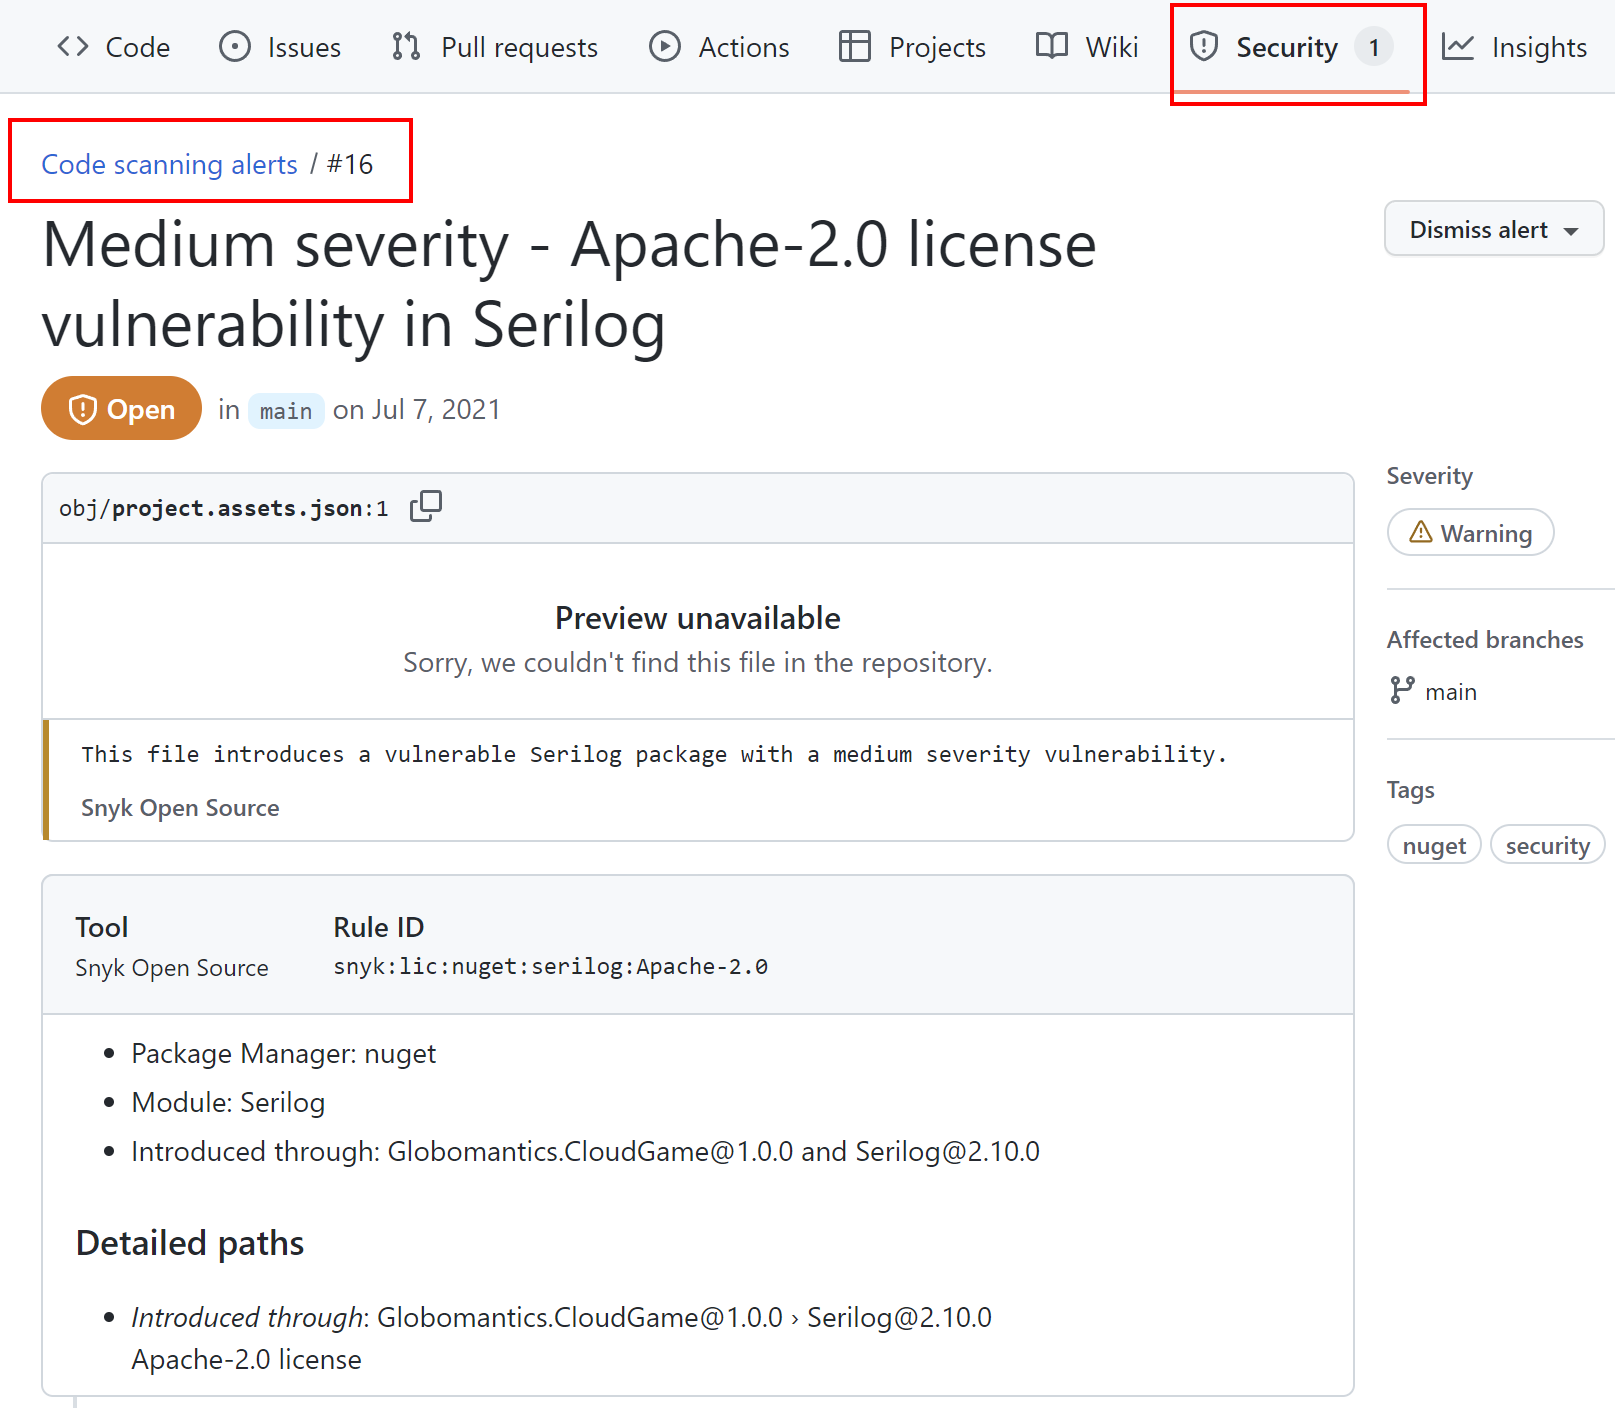
Please note that in the above code there is upload-sarif@v1 action. With this one, security issues reported detected by Snyk will be visible under Security tab:
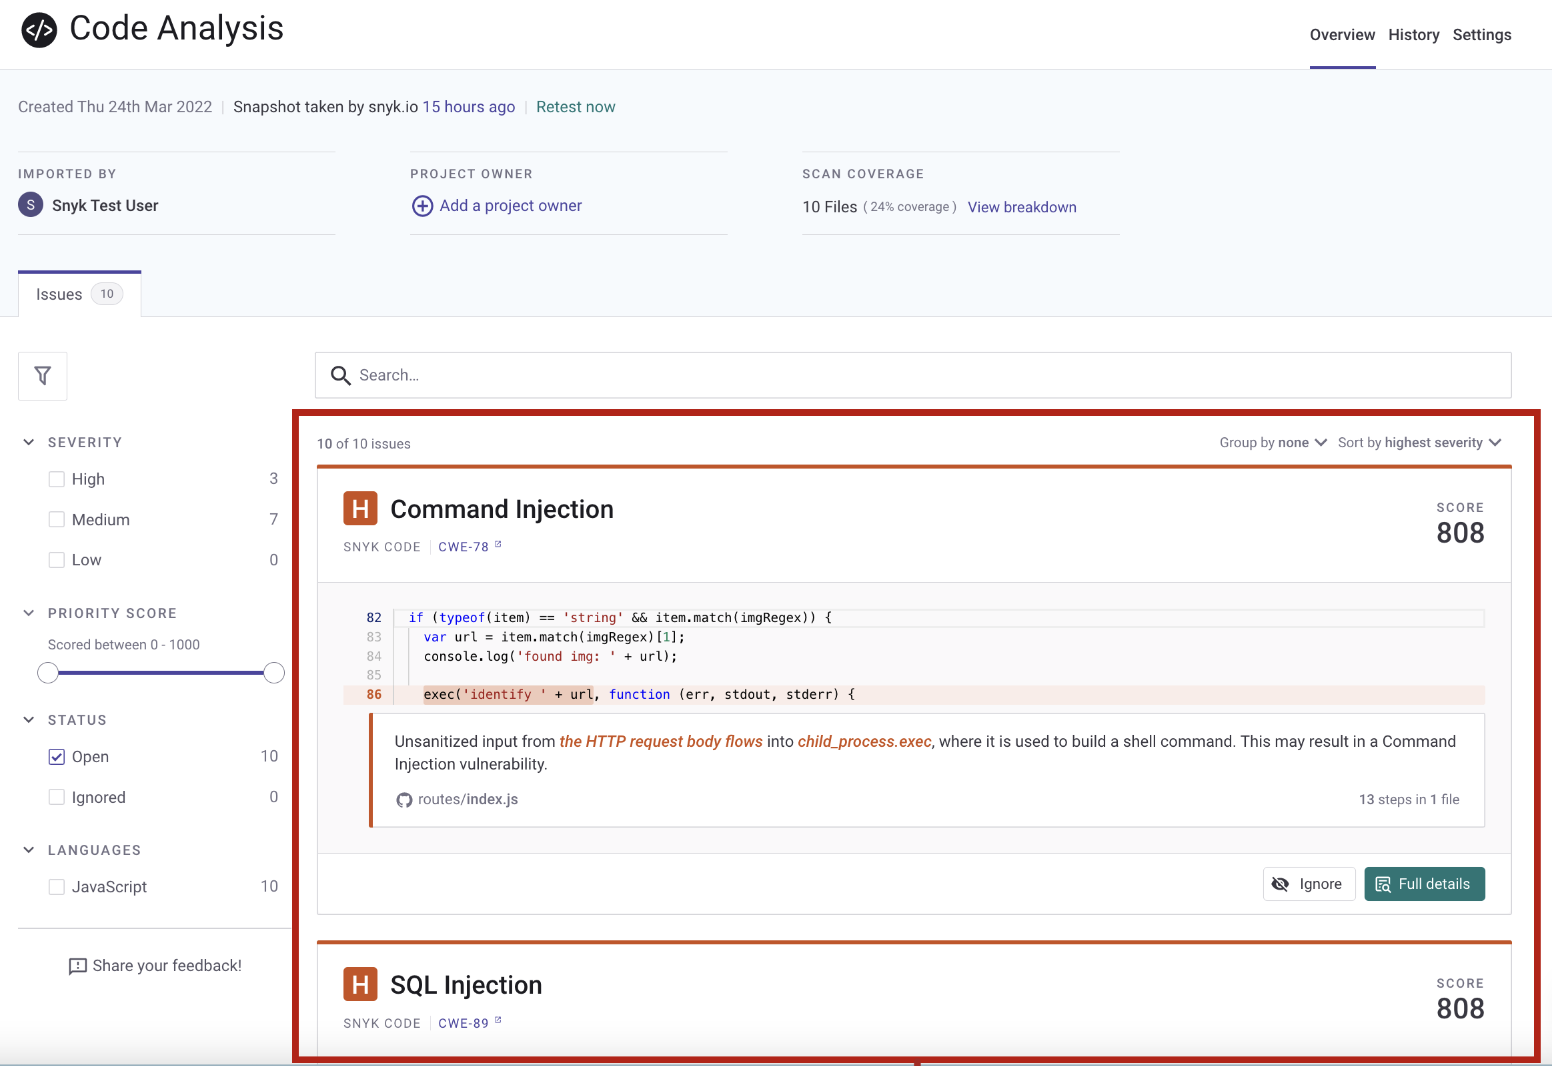
Snyk can also detect issues related to the code quality and security. We can read more under Getting started with Snyk Code section:
Here is the Plans & Pricing where we can check which features are available. It is worth to mention that with Free account, we get:
- 200 Open Source tests/month
- 100 Container tests/month
- 300 IaC tests/month
- 100 Code tests/month
Securely storing and using parameters in the Continuous Integration pipelines
Code security scanning is important but we have to also remember that CI/CD pipelines can be also potential place for attackers. This is why one of the key elements of secure DevOps is to store parameters securely. We should remember that we should not store any secrets directly in the source code. Let’s see how we can store and pass parameters securely in our CI/CD pipelines.
Securely store and access parameters in Azure DevOps
Azure DevOps provides great enhancements when it comes to storing, and passing parameters. In this section I would like to present how to securely store, and pass parameters in the Azure DevOps pipelines.
Use Variable Groups
To securely store parameters in Azure DevOps, we should utilize Variable Groups. We can create them under Pipelines section, by clicking Library. We have to define the unique name of the group, provide an optional description (I recommend adding it always so everyone in the team is aware of what is the purpose of a specific group), and provide parameters. Please note that by default parameters are stored in plain text. We can use small locker icon next to value of the parameter to convert it to be secret:
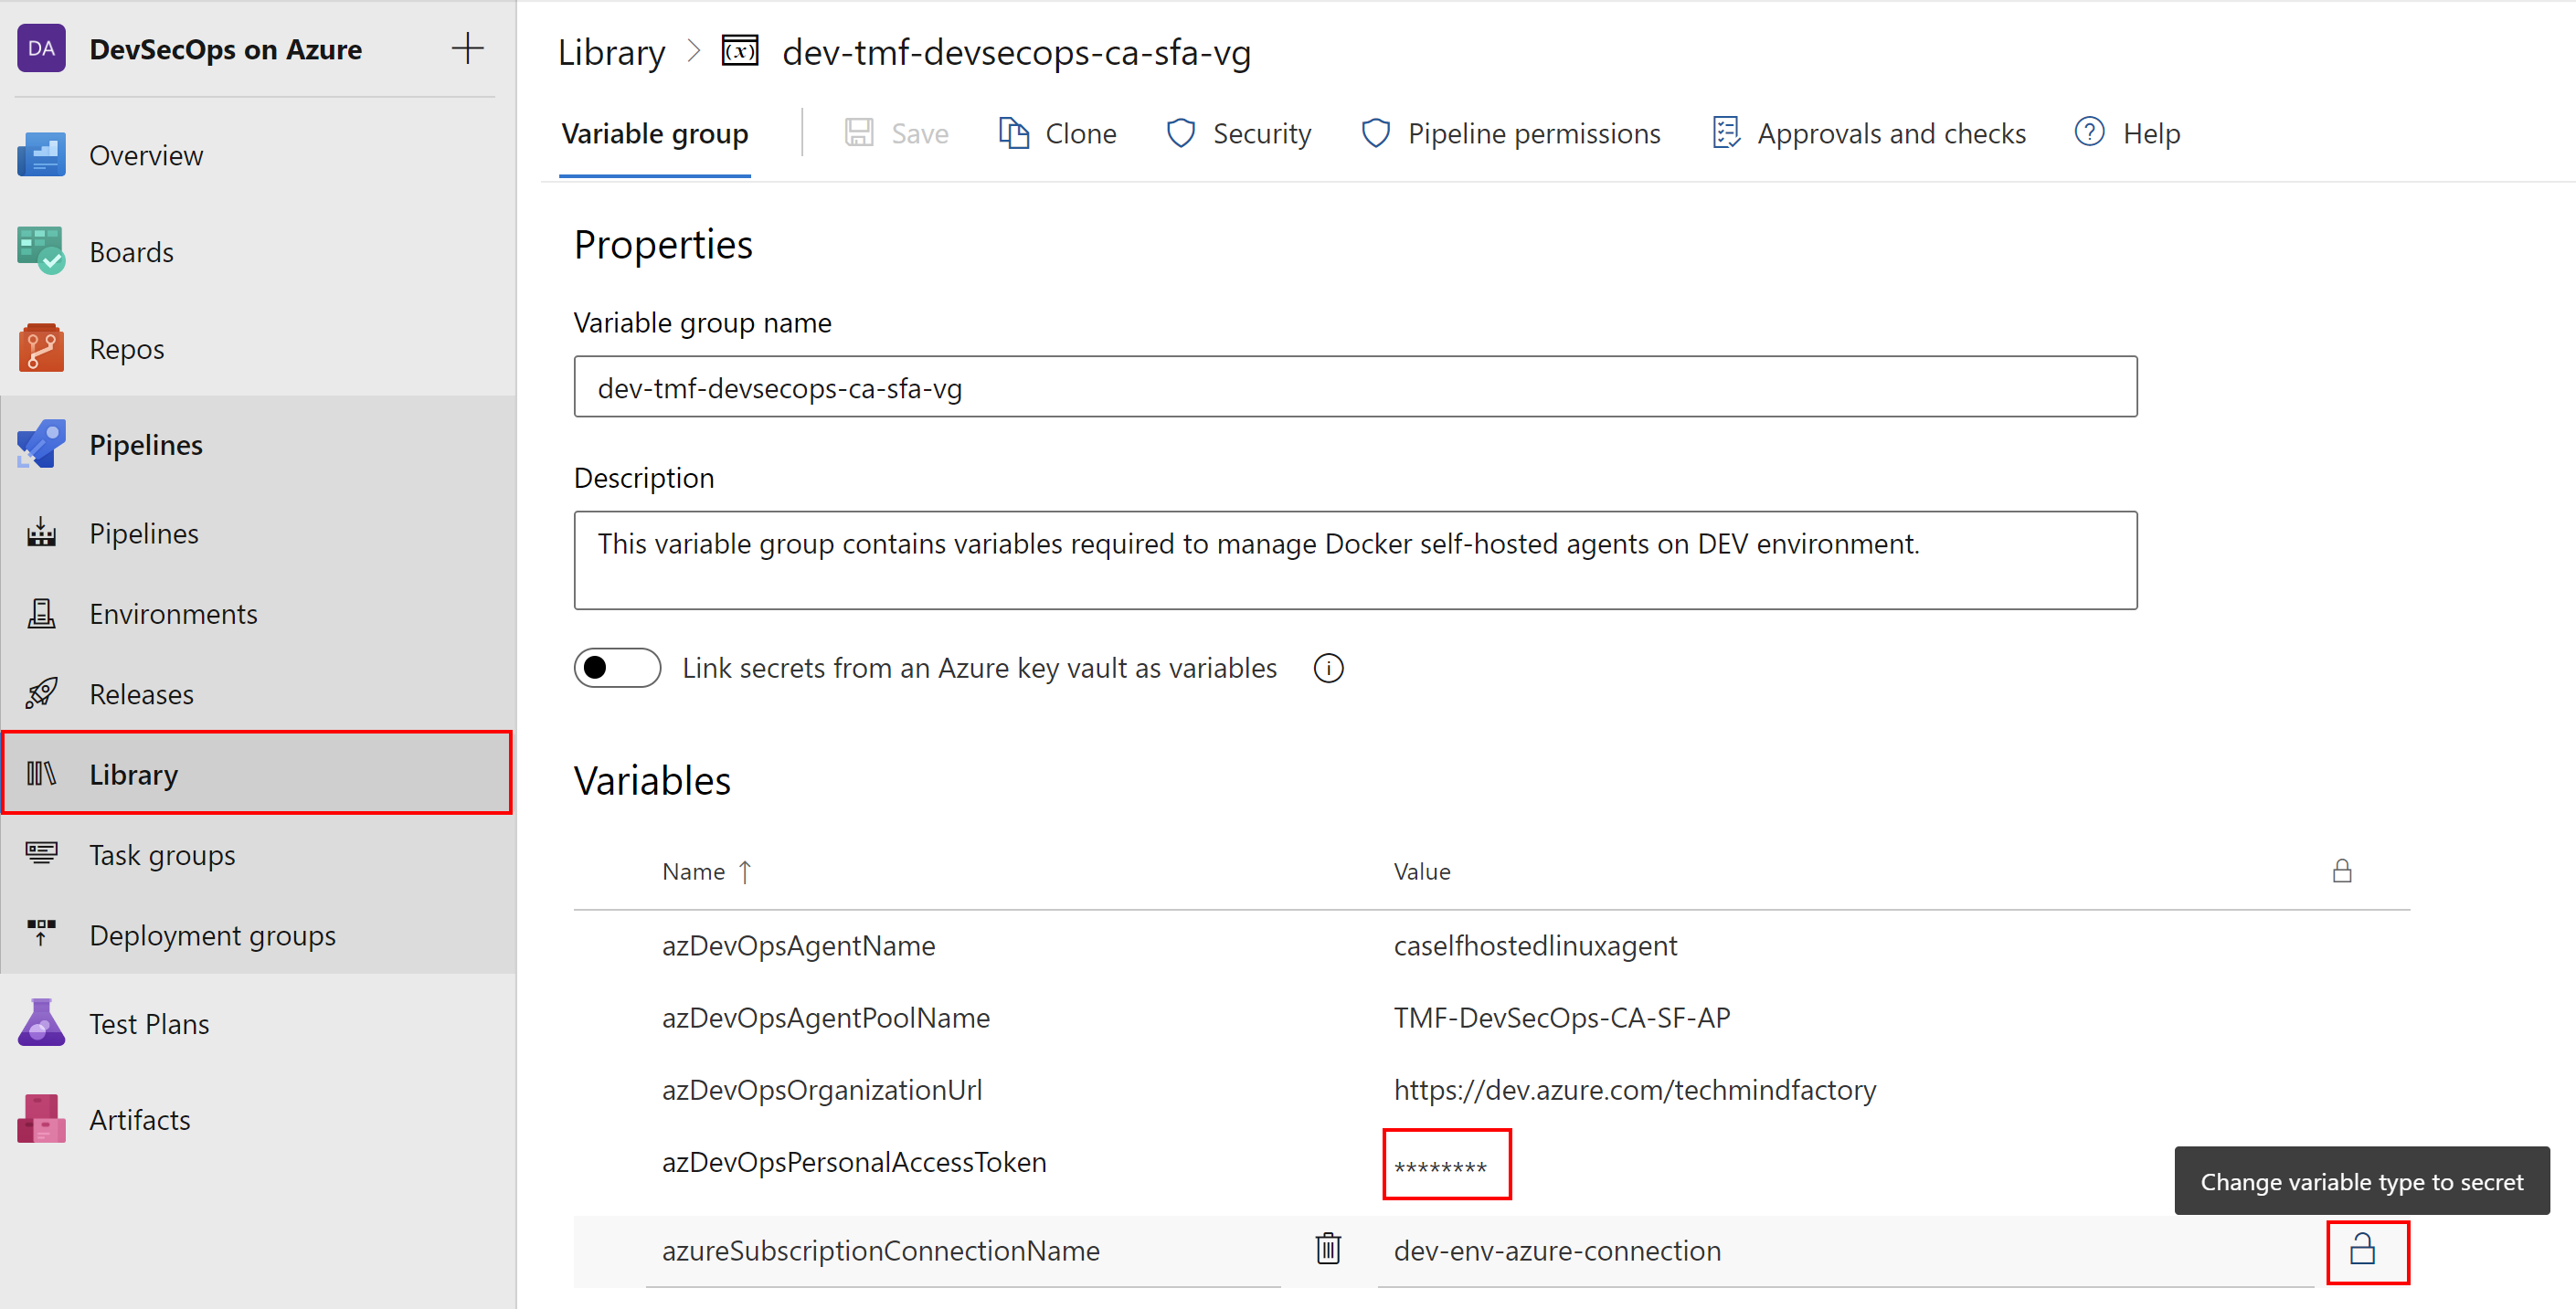
Once we do it and save changes, the parameter is always treated and passed as a secret in Azure DevOps pipelines. It is never exposed in any logs. Here is how to access the secret parameter. We do it exactly in the same way as we access standard parameters:
trigger:
- develop
- main

pool:
  vmImage: 'ubuntu-latest'

stages:

- stage: DEPLOY_DEV_ENVIRONMENT_SELF_HOSTED_AGENT
  condition: and(eq(variables['build.sourceBranch'], 'refs/heads/develop'), eq(variables.environmentType, 'DEV'))
  displayName: 'Deploy self hosted agent for DEV environment'
  variables:
  # Here we provide the reference to the variable group we created earlier:
  - group: 'dev-tmf-devsecops-ca-sfa-vg'
  jobs:
  - template: 'templates/az-devops-ca-sfa-build-template.yml'
    parameters:
      environment: 'DEV'
      environmentType: '$(environmentType)'
      azureSubscriptionConnectionName: '$(azureSubscriptionConnectionName)'
      azDevOpsAgentName: '$(azDevOpsAgentName)'
      azDevOpsAgentPoolName: '$(azDevOpsAgentPoolName)'
      azDevOpsOrganizationUrl: '$(azDevOpsOrganizationUrl)'
        # Here we can pass secret parameter:
      azDevOpsPersonalAccessToken: '$(azDevOpsPersonalAccessToken)'
      containerRegistryName: $(containerRegistryName)
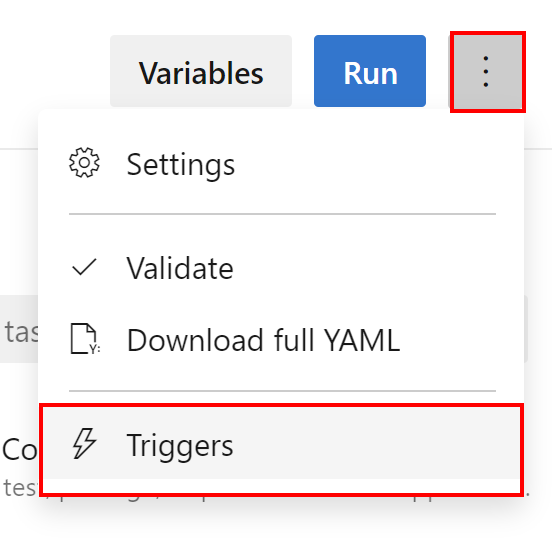
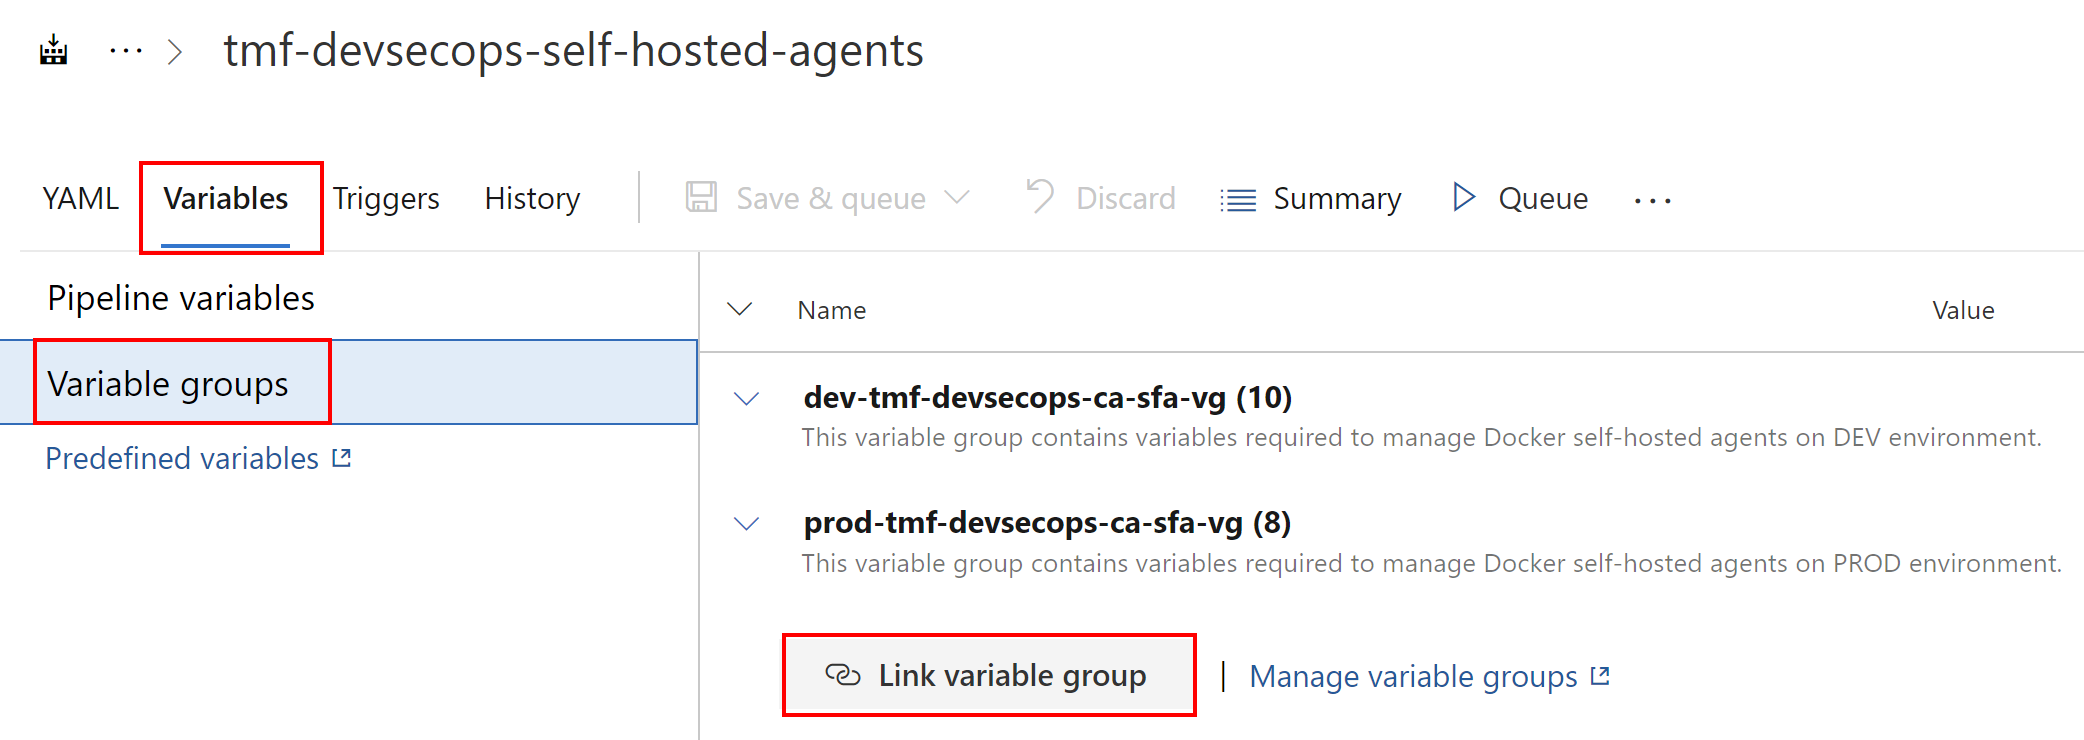
We have to remember that we have to first link the variable group from the pipeline settings:
Access Azure Key Vault secrets in the Azure DevOps Release Pipelines
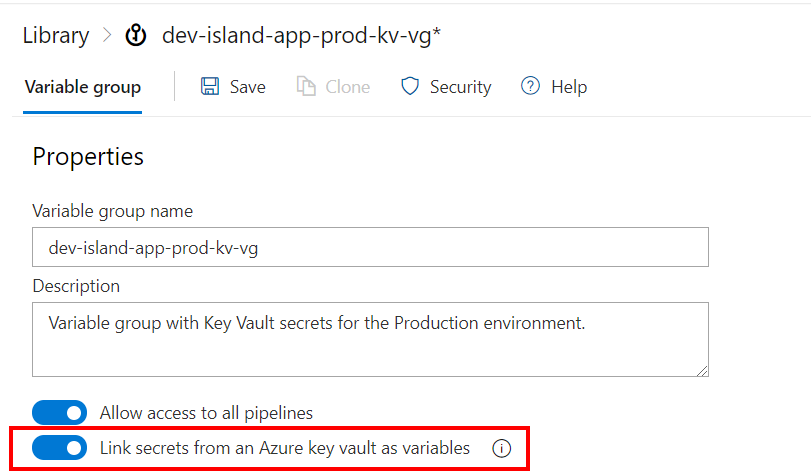
Storing parameters in Azure DevOps as secrets is safe option but sometimes we need to store (or we just have them there already) secrets in the Azure Key Vault. In this case we would like to access Azure Key Vault’s secrets from the Azure DevOps pipelines. To do it we can leverage variable groups too. In Access Azure Key Vault secrets in the Azure DevOps Release Pipelines article I explained in details how to achieve this.
Eventually, we can access those secure parameters in the exactly same way as presented above in the snippet.
Securely store and access parameters on GitHub
GitHub also offers a secure way to store secrets. We have basically two options available. We can define:
- Secrets that will be available in the specific source code repository
- Secrets which will be available only when using a specific environment
Let’s talk about the two options mentioned above in detail.
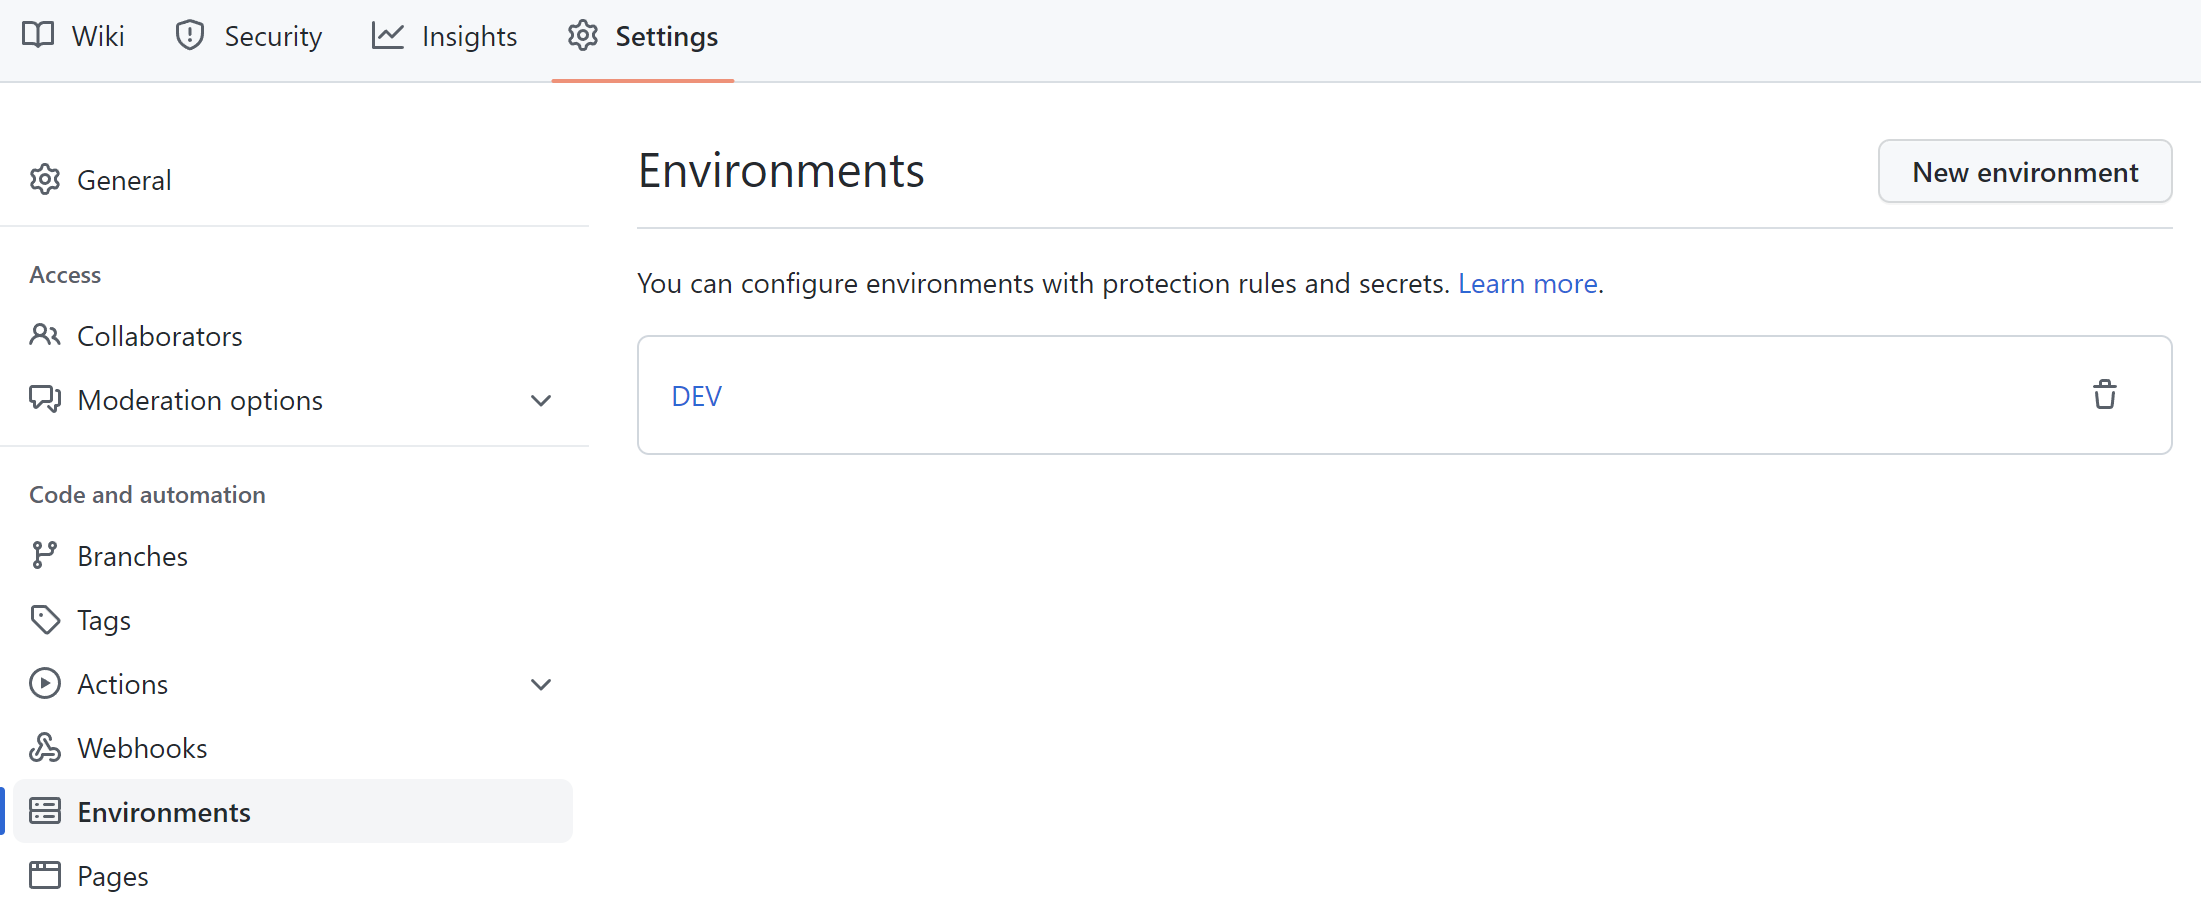
Repository-level secrets
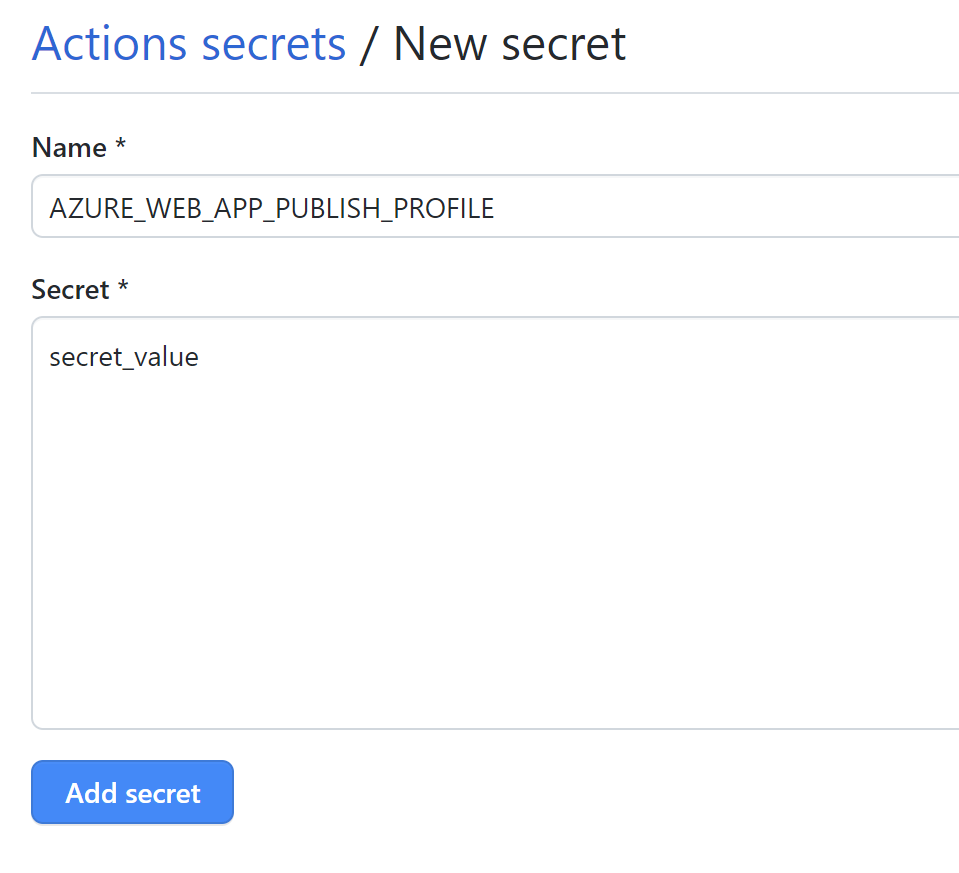
To access the secrets section on GitHub for our repository, we have to open Settings tab, and select Secrets section:

This is the place where we can store parameters securely, and then access them from GitHub Actions. Here is the sample secret definition:
Here is how to access it from the GitHub Actions:
name: Deploy Web App to Azure cloud

on:
  push:
    branches: [ main, develop ]
    paths:
      - src/web-application/TMF.Management.WebApp/**

  workflow_dispatch:

env:
  AZURE_WEBAPP_NAME: app-tmf-web-dev
  AZURE_WEBAPP_PACKAGE_PATH: '.'

jobs:
...
  deploy-tmf-web-app-to-dev-env:
    needs: [build-cloud-predicans-web-app]
    runs-on: ubuntu-latest

    steps:
      - uses: actions/download-artifact@v2
        with:
          name: web-app-package
          path: '$/web-app-package'

      - name: Deploy Cloud Predicans Web App to Azure
        uses: Azure/webapps-deploy@v2
        with:
          app-name: $
          # Here we access the secret:
          publish-profile: $
          package: '$/web-app-package'
We can also define secrets which will be available only for specific environments defined on GitHub:
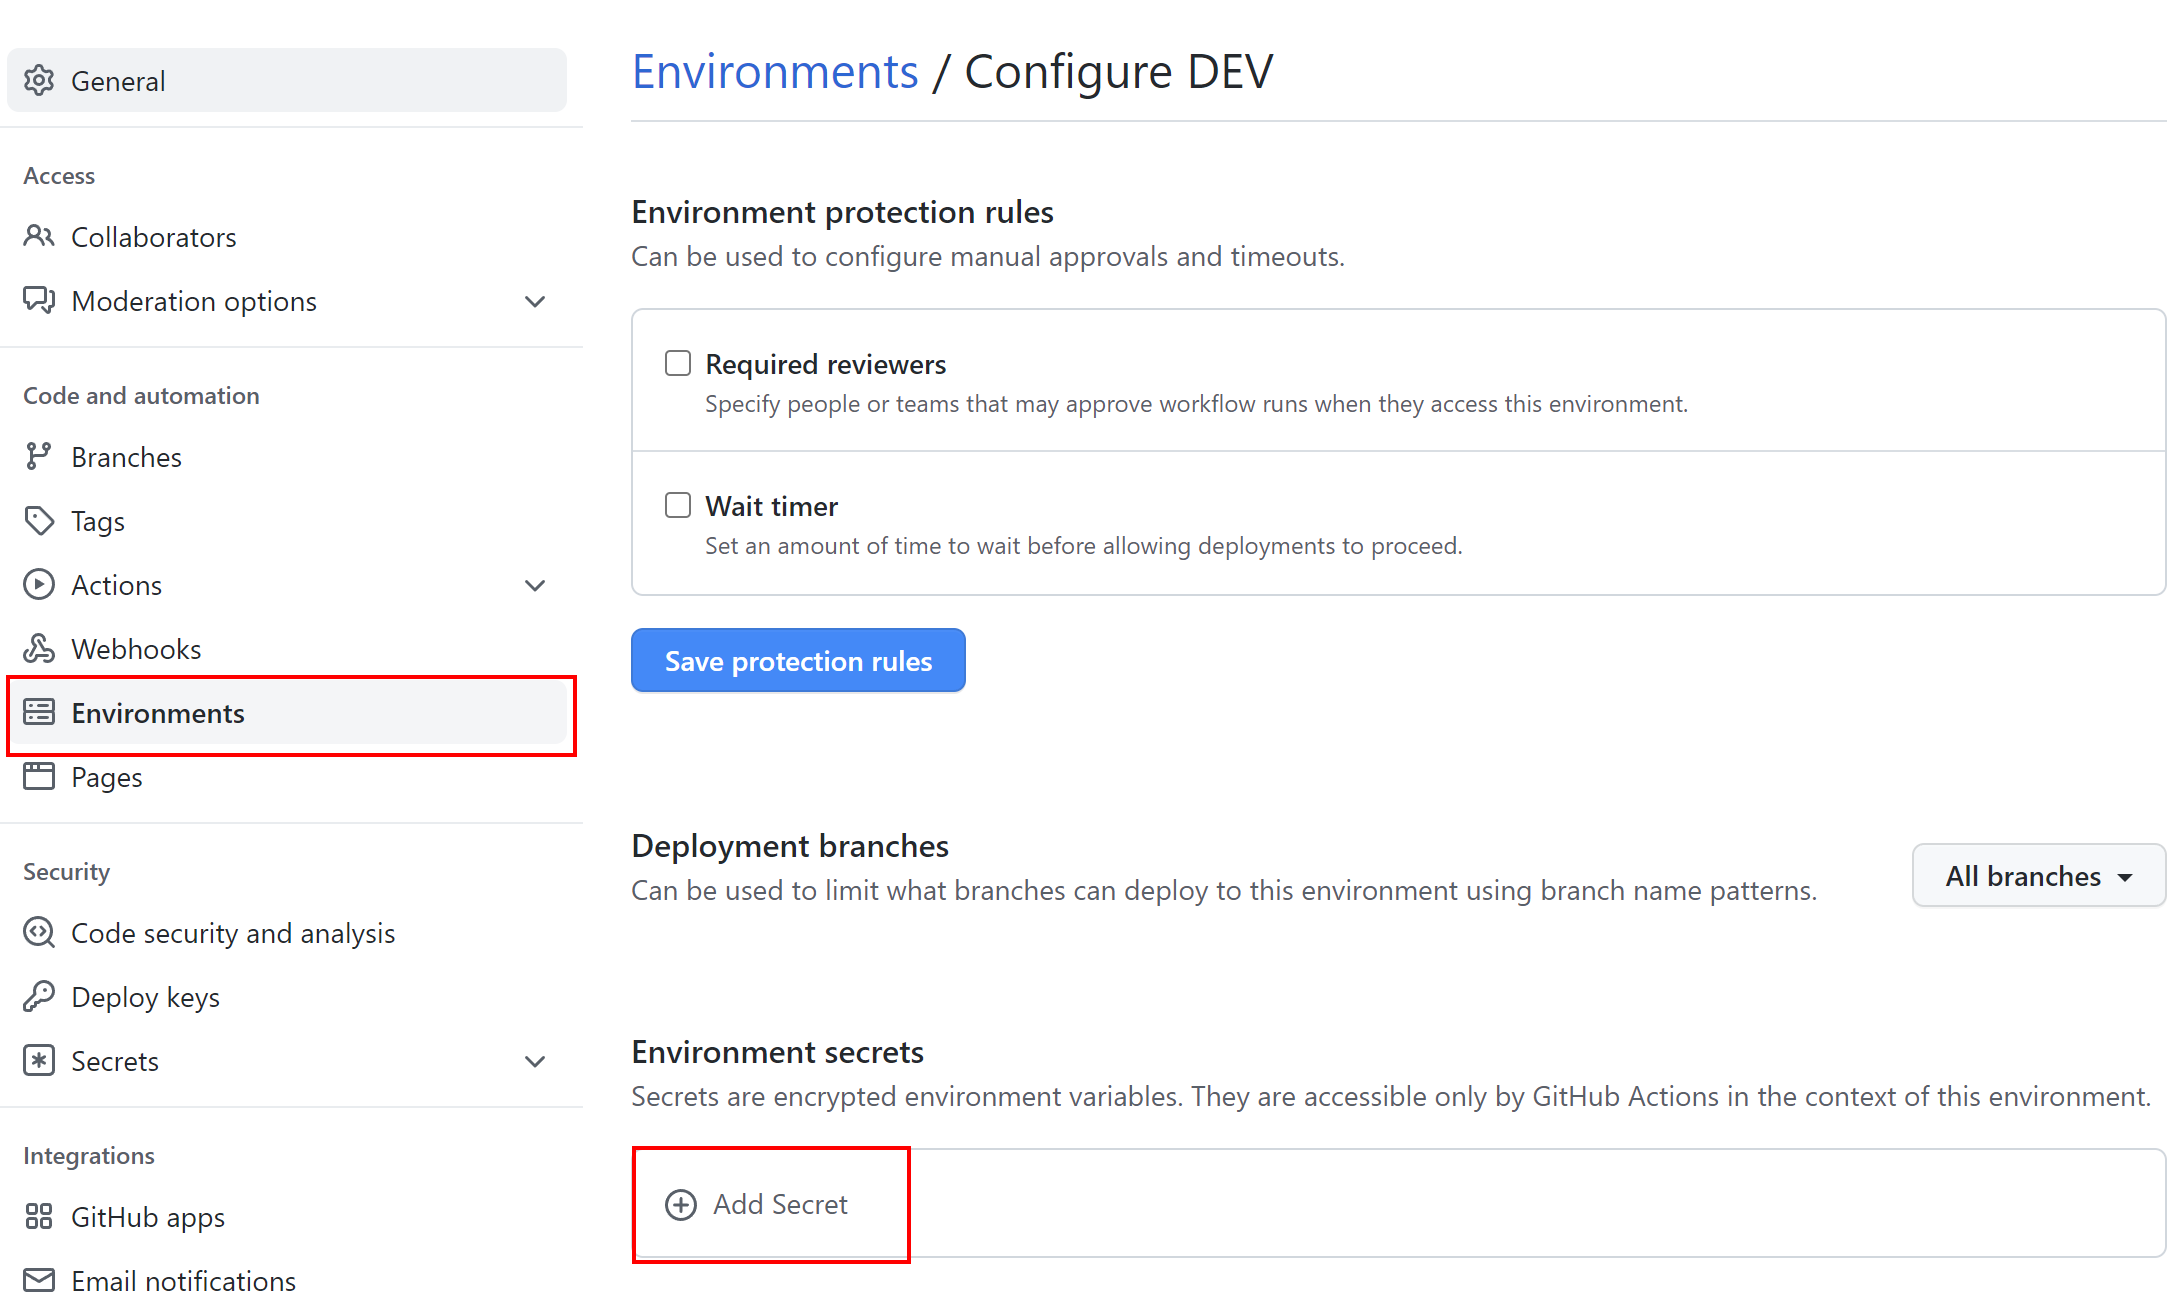
The secret will be used only when deploying to a specific environment:
name: Deploy Web App to Azure cloud

on:
  push:
    branches: [ main, develop ]
    paths:
      - src/web-application/TMF.Management.WebApp/**

  workflow_dispatch:

env:
  AZURE_WEBAPP_NAME: app-tmf-web-dev
  AZURE_WEBAPP_PACKAGE_PATH: '.'

jobs:
...
  deploy-tmf-web-app-to-dev-env:
    needs: [build-cloud-predicans-web-app]
    runs-on: ubuntu-latest
   # DEV environment used:
    environment: DEV

    steps:
      - uses: actions/download-artifact@v2
        with:
          name: web-app-package
          path: '$/web-app-package'

      - name: Deploy Cloud Predicans Web App to Azure
        uses: Azure/webapps-deploy@v2
        with:
          app-name: $
          # Here we access the secret:
          publish-profile: $
          package: '$/web-app-package'
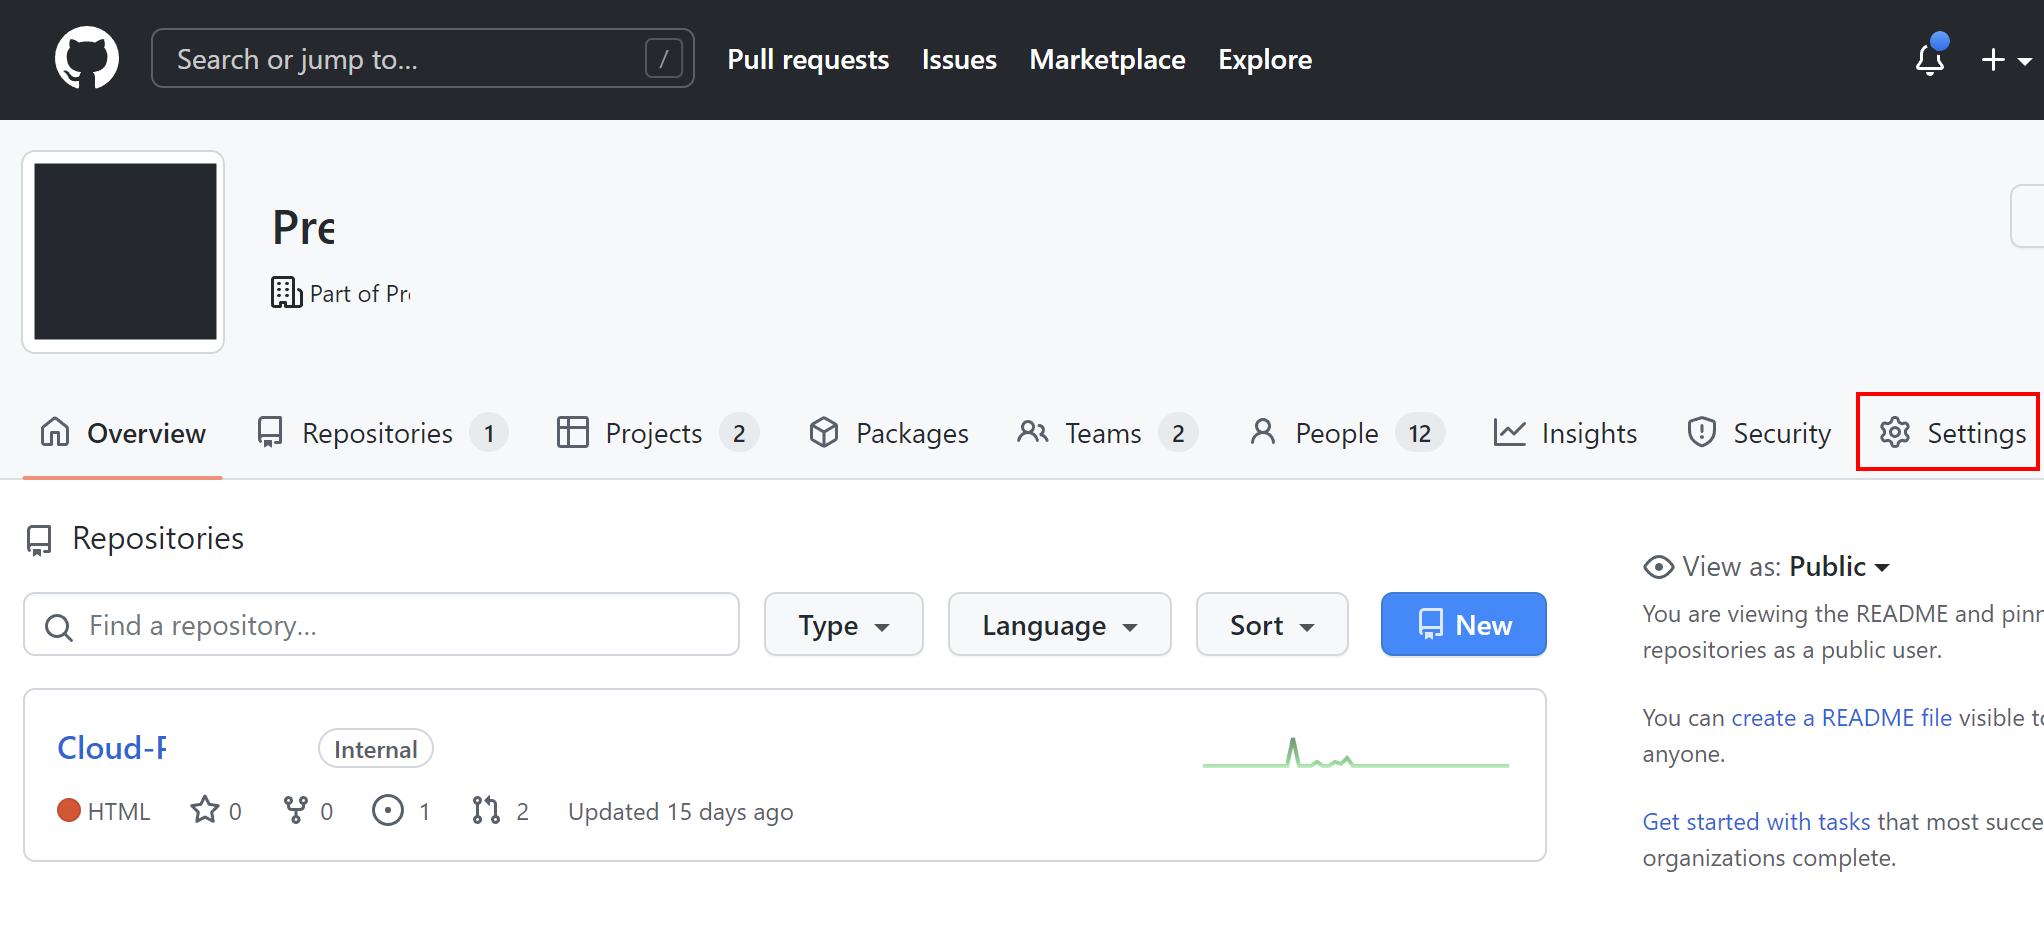
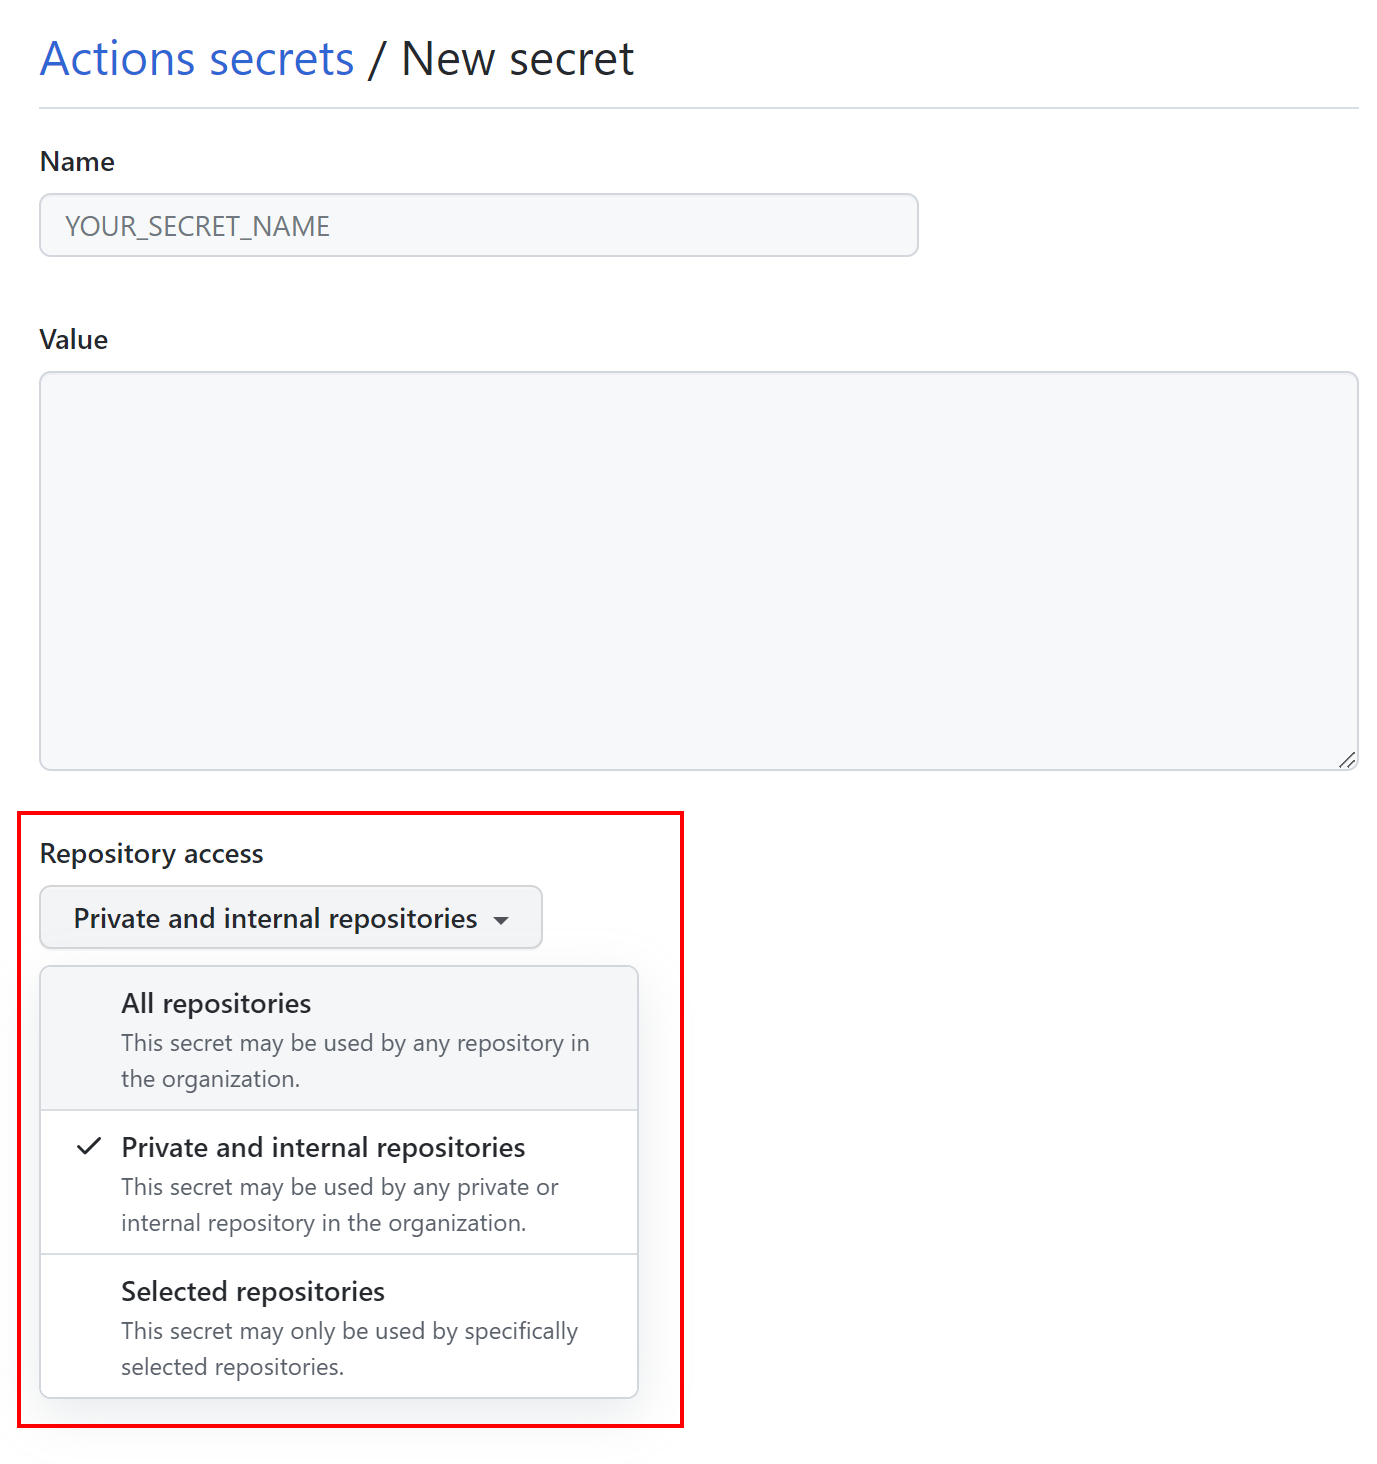
Organization-level secrets
We can also define secrets at the Organization level so we can access it from multiple respositories:
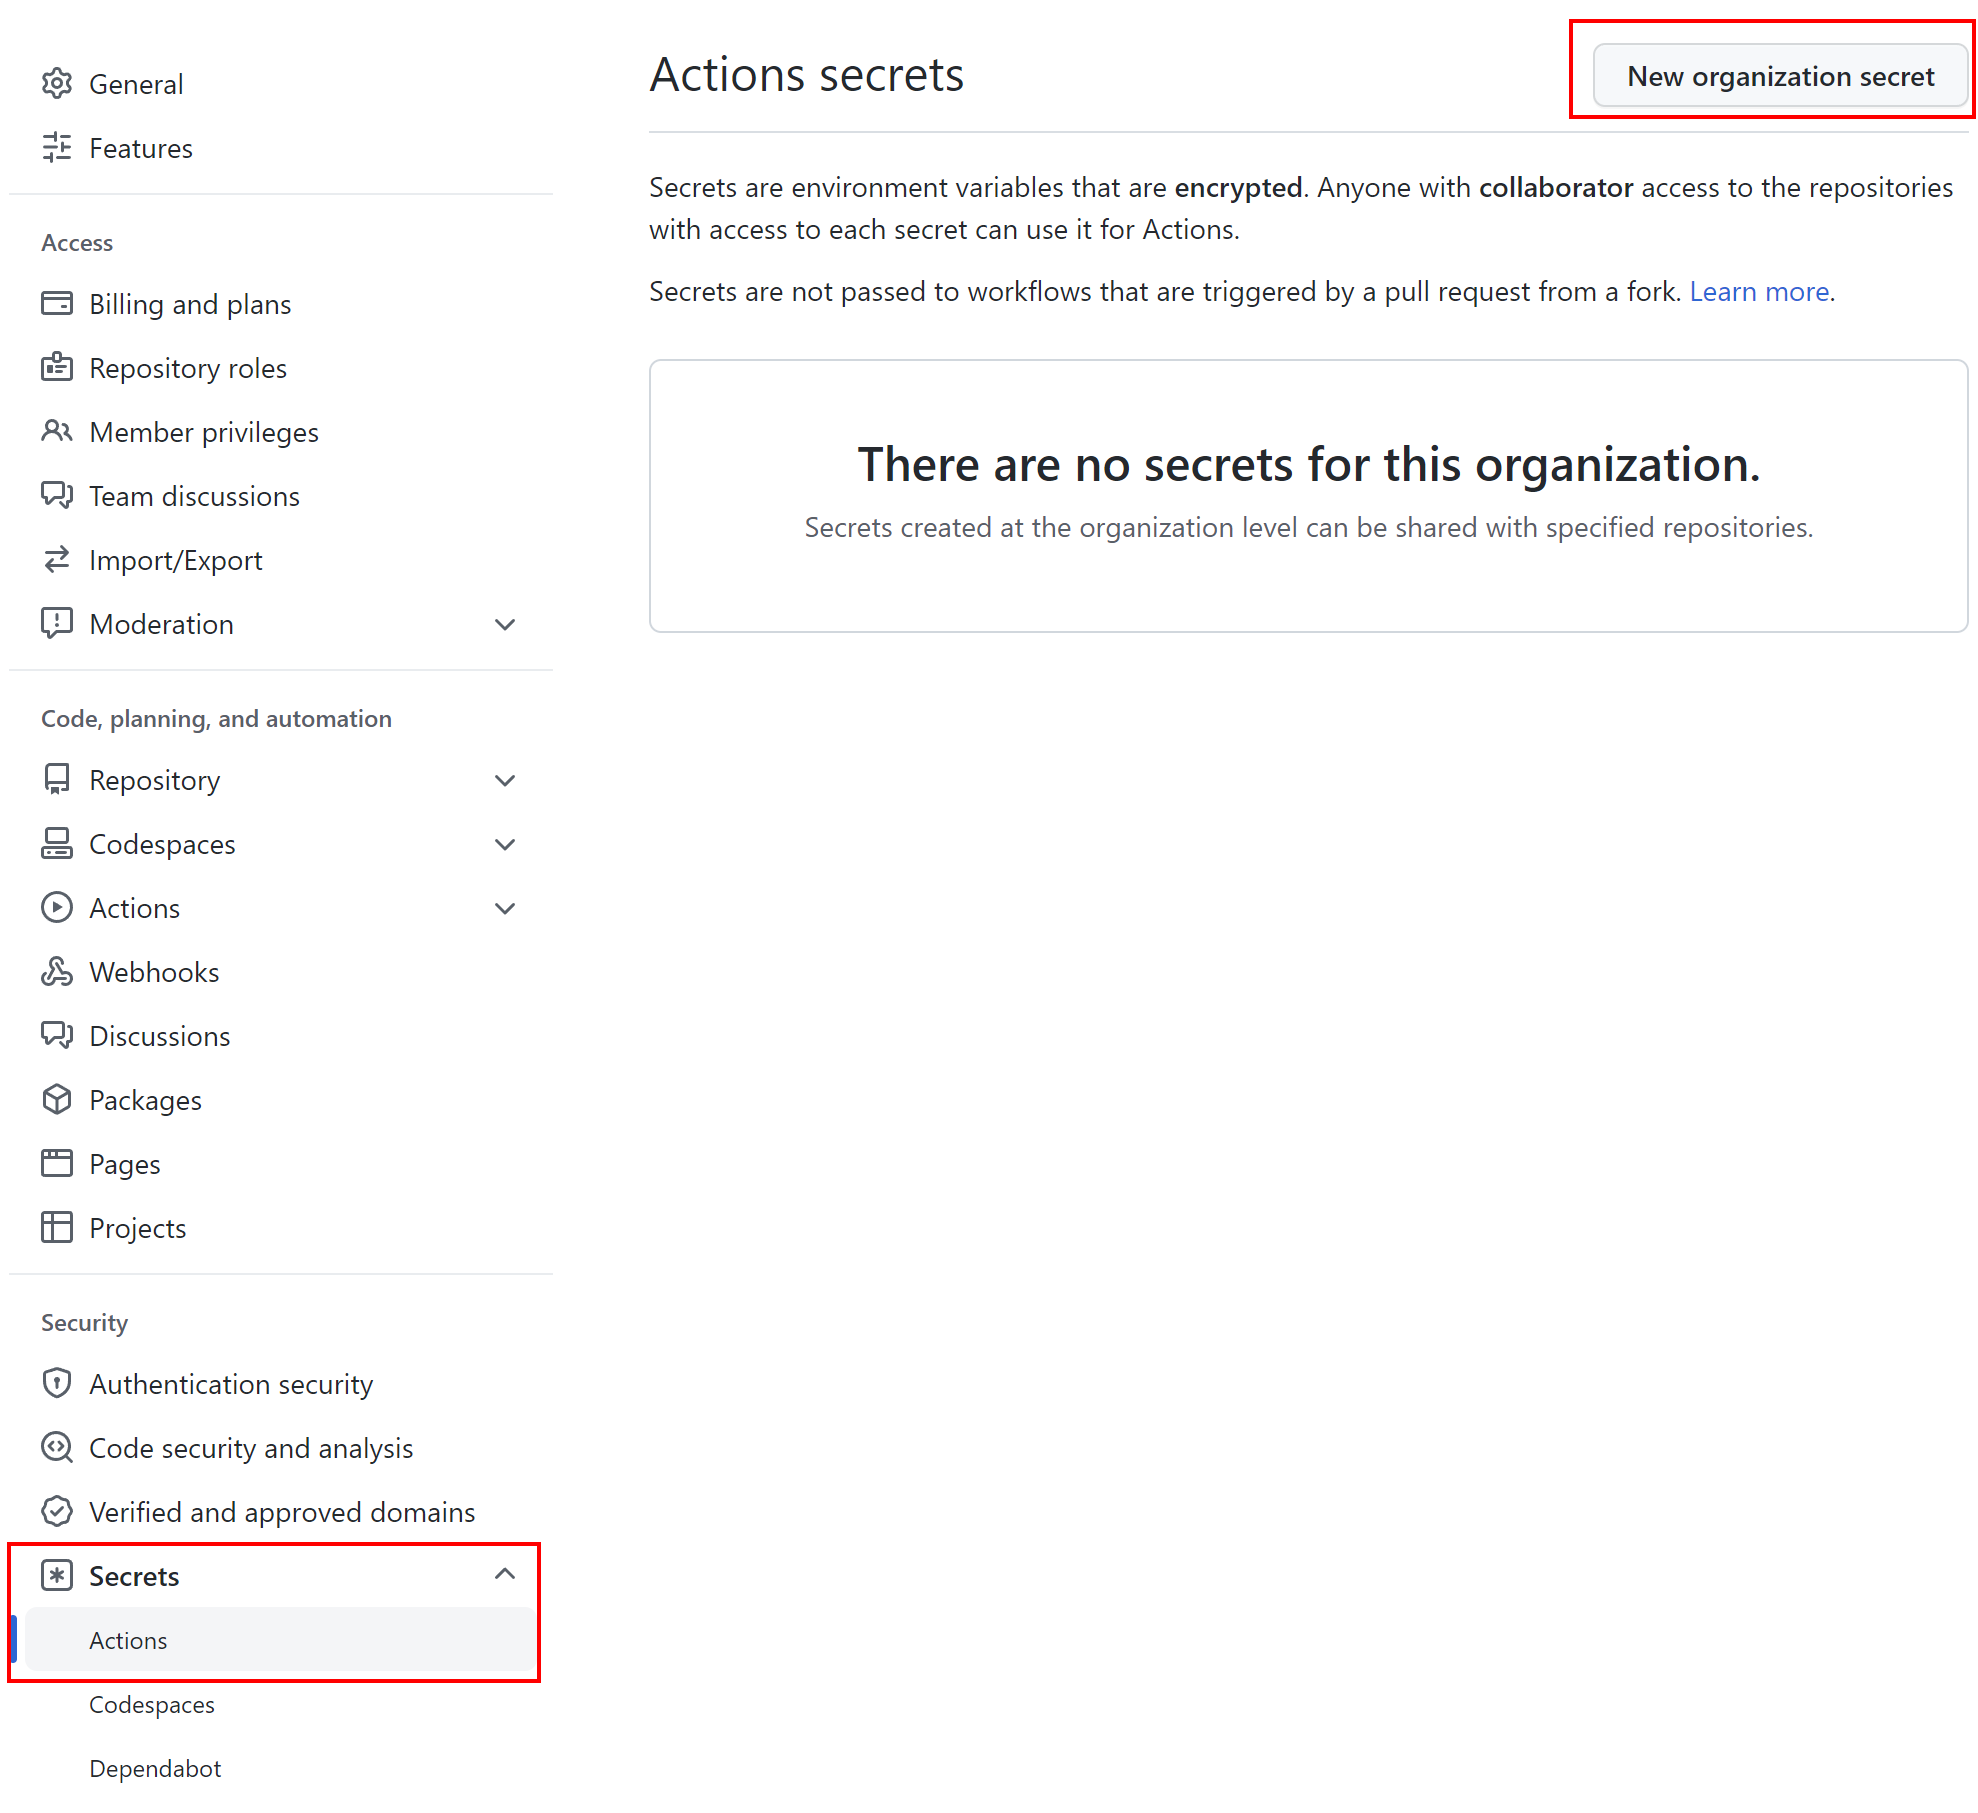
When defining secrets at the Organization level, we can decide for which repositories specific secrets will be available:
Access Azure Key Vault secrets in the GitHub Actions
Exactly as mentioned before, there can be a situation when we would like to reference secrets from the existing Azure Key Vault. In this official documentation we can find a step-by-step explanation of how to connect to Azure Key Vault secrets from GitHub Actions. Here is the sample snippet to show how to connect to Azure Key Vault from GitHub Actions, and use secrets:
name: Example Azure Key Vault secrets access

on: [push]

jobs:
  build:
    runs-on: ubuntu-latest
    steps:
    # checkout the repo
    - uses: actions/checkout@v2
    - uses: Azure/login@v1
      with:
        creds: $
    - uses: Azure/get-keyvault-secrets@v1
      with:
        keyvault: "containervault"
        # Here we define which secrets we would like to reference:
        secrets: 'containerPassword, containerUsername'
      # Here we define the unique ID for the step as we will reference it below:
      id: myGetSecretAction
    - uses: azure/docker-login@v1
      with:
        login-server: myregistry.azurecr.io
        # Use username secret:
        username: $
        password: $
    - run: |
        docker build . -t myregistry.azurecr.io/myapp:$
        docker push myregistry.azurecr.io/myapp:$
    - uses: azure/webapps-deploy@v2
      with:
        app-name: 'myapp'
        publish-profile: $
        images: 'myregistry.azurecr.io/myapp:$'
Summary
In this article, I explained SBOM concept and how it helps make the software supply chain more secure. We learned how to generate SBOM reports, and how to enable Software Composition Analysis (SCA) to detect potential vulnerabilities and license issues. We also discovered how to securely define and reference secrets on GitHub and in Azure DevOps. In the next article, we will learn how to keep Azure infrastructure code secure.
If you like my articles, and find them helpful, please buy me a coffee: