DevSecOps on Azure - part7: Control access to Azure resources with Azure AD and Azure RBAC
Introduction
This is the next article from the series called DevSecOps practices for Azure cloud workloads. In this article, I would like to talk about Azure Active Directory, together with Azure role-based access control (RBAC), and what is their role in the DevSecOps world. When we talk about DevSecOps practices, we focus on security scanning, secret detection, and in general on a secure approach to CI/CD. However, DevSecOps is not only about the CI/CD pipelines and security incorporated into them. It is important to remember identity and access management. For instance - who can sign in to our organization’s Azure DevOps/GitHub or which Azure resource can access another one with a specific permissions level.
Azure AD and RBAC relation to DevSecOps practices
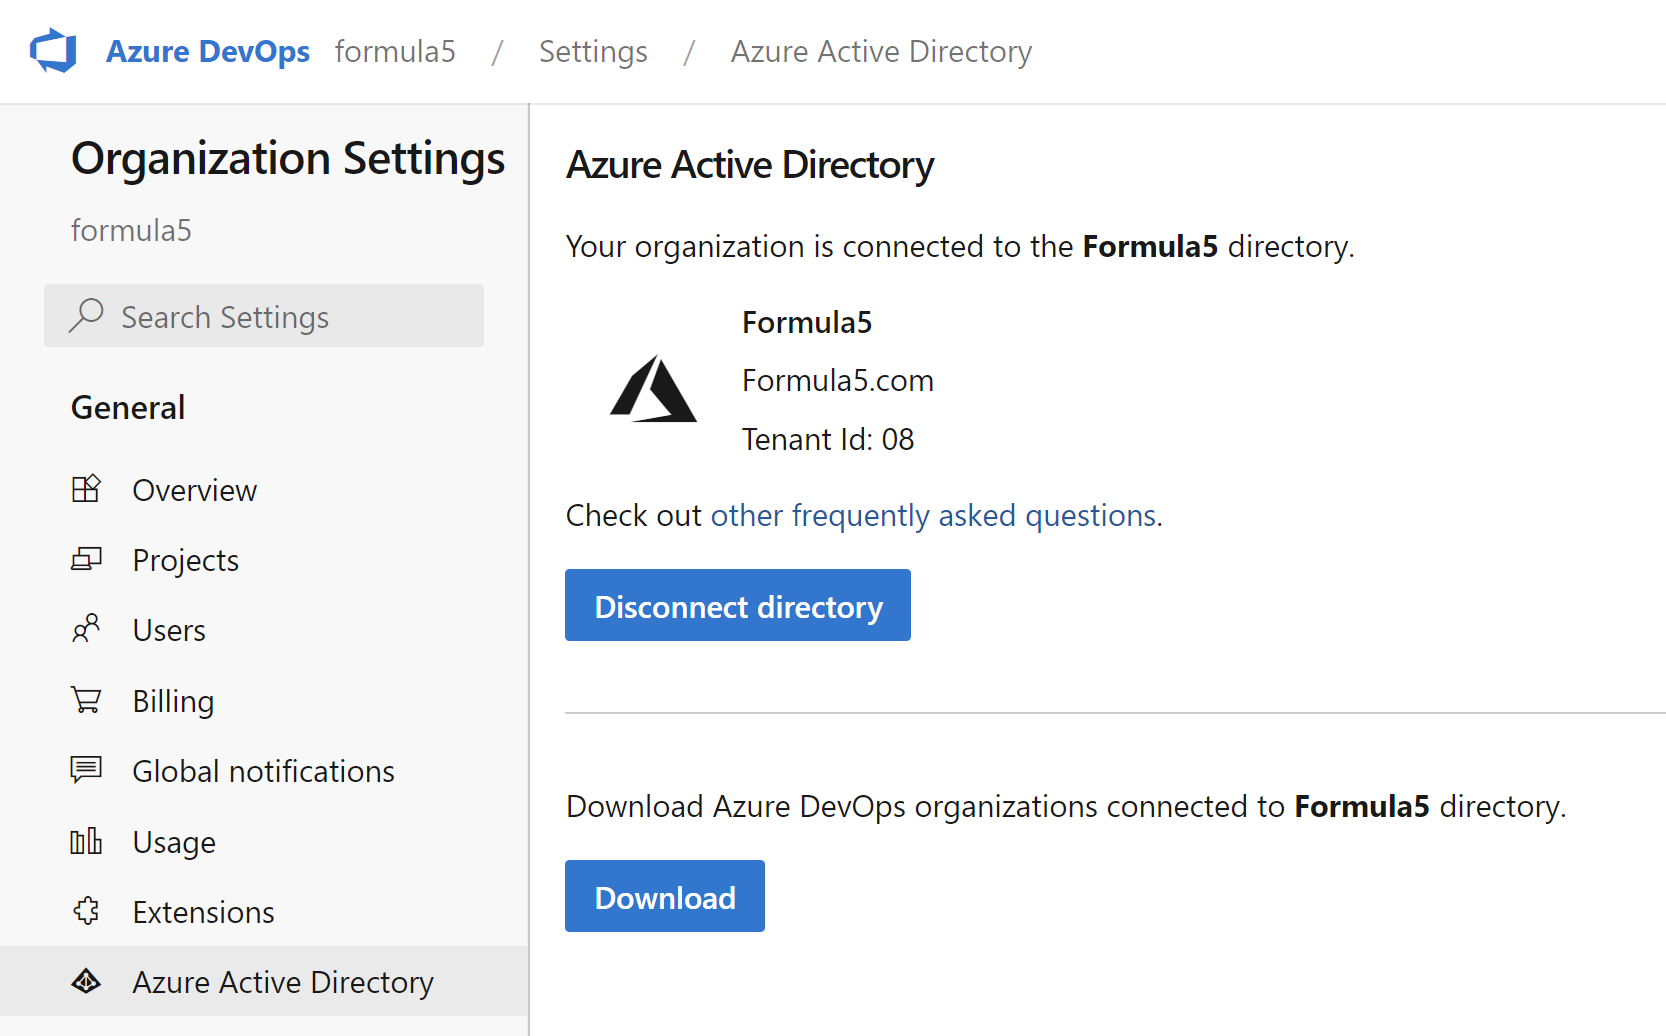
Probably most of us noticed that in the corporate world, access to Azure DevOps or GitHub is provided using the corporate account we receive when we join the company. Maybe some of you do not realize but in most such cases Azure Active Directory is used. When we want to access Azure DevOps projects or GitHub organizations, we have to be first assigned to these, and then we can use our corporate Azure AD account to authenticate and access them. Here is an example of an Azure DevOps organization connected with Azure Active Directory:
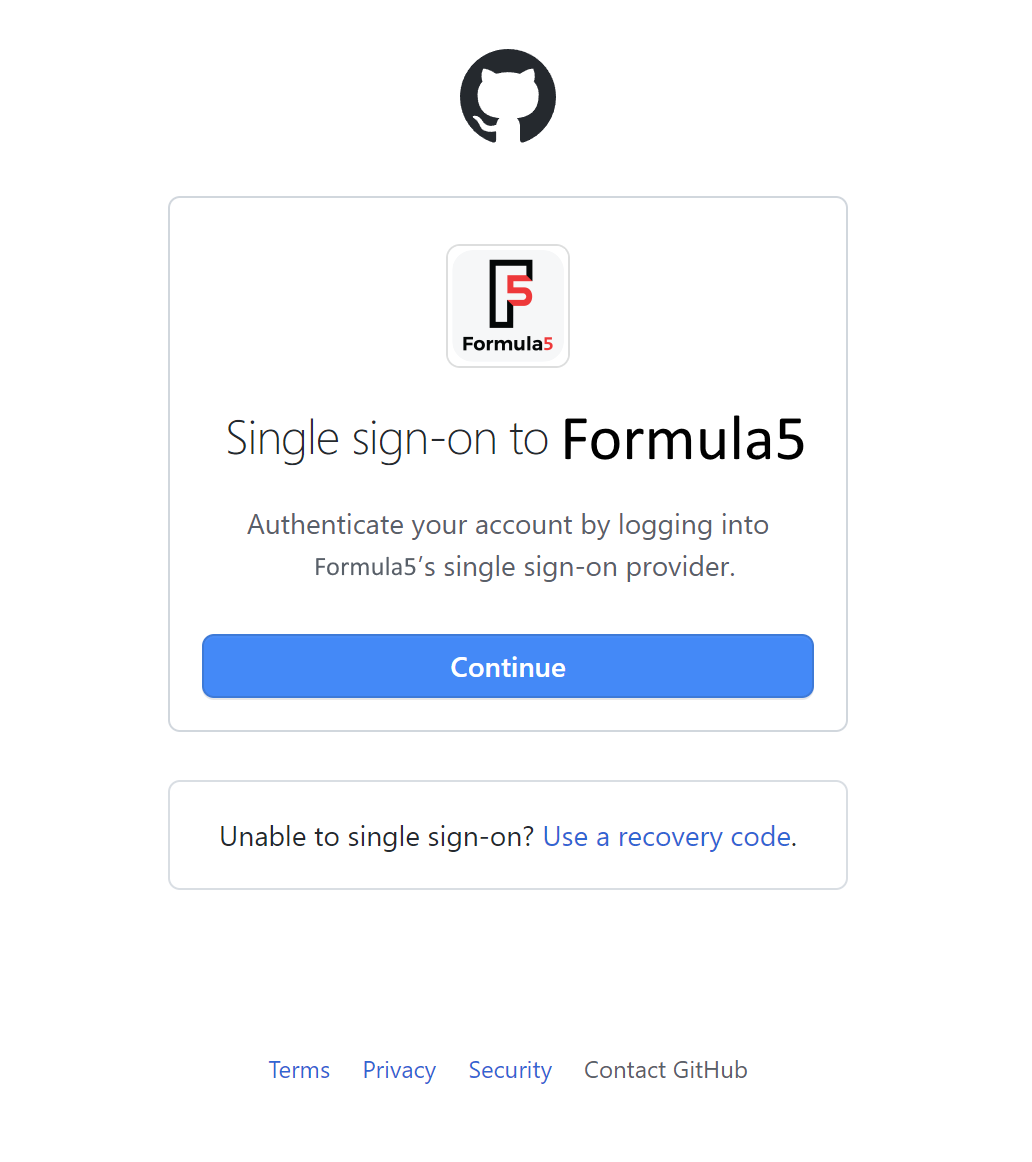
We can also enable login with Azure Active Directory for GitHub:
By default, we can use our own (private) accounts to authenticate to Azure DevOps or GitHub. However, in a world where there are so many different cyber-security threats, it is not a good idea to use personal accounts with corporate assets. Utilizing Azure Active Directory provides security enhancements like Identity Protection. Microsoft analyses trillions of signals per day to identify and protect customers from threats. Identity Protection allows organizations to accomplish three key tasks:
- Automate the detection and remediation of identity-based risks.
- Investigate risks using data in the portal.
- Export risk detection data to other tools.
To make access to Azure DevOps and GitHub (and in general to all other resources in our organization) it is crucial to use Azure Active Directory. Azure AD Identity Protection protects users and responds to suspicious activities like:
- Users with leaked credentials.
- Sign-ins from anonymous IP addresses.
- Impossible travel to atypical locations.
Azure AD Identity Protection protects users and responds to suspicious activities using the following three policies:
- User risk policy - Identifies and responds to user accounts that may have compromised credentials. Can prompt the user to create a new password.
- Sign-in risk policy - Identifies and responds to suspicious sign-in attempts. Can prompt the user to provide additional forms of verification using Azure AD Multi-Factor Authentication.
- MFA registration policy - Makes sure users are registered for Azure AD Multi-Factor Authentication. If a sign-in risk policy prompts for MFA, the user must already be registered for Azure AD Multi-Factor Authentication.
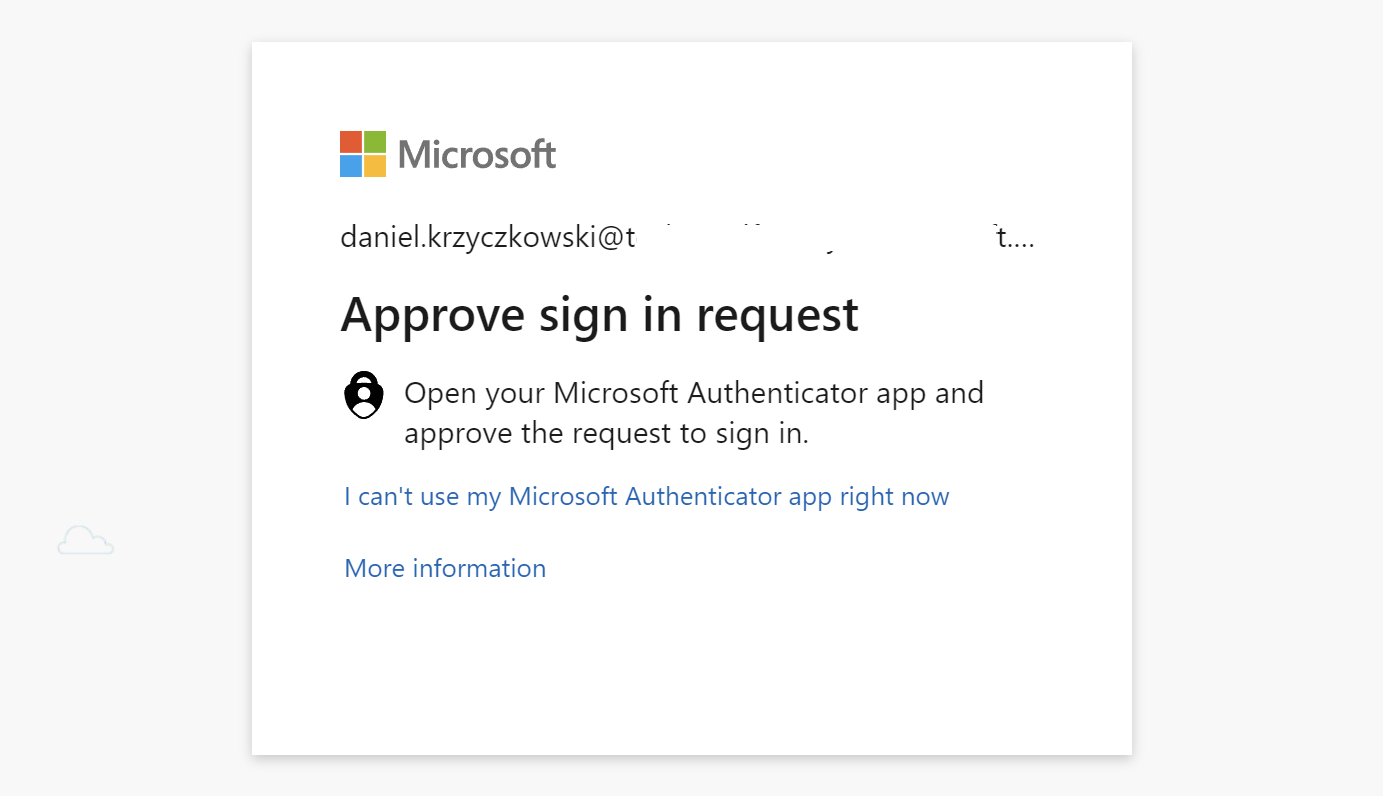
For each policy, we can set a threshold for risk level - low and above, medium and above, or high. Eventually, when we want to access Azure Portal, Azure DevOps, or GitHub, it is not enough to provide a username and password. We have to also approve the request in the Microsoft Authenticator App:
This is about the access to the platforms but there are some other important aspects like:
- Connection between Azure DevOps or GitHub and Azure cloud subscription
- Possibility to access one Azure resource from another one (like accessing Azure Key Vault secrets from the Azure Web App)
All these different aspects are related to DevSecOps practices on Azure. Let’s dive into the topic a little bit more.
Identity and access security on Azure
When we look into Security Control v3: Identity management from the Azure Security Benchmark, we will see many recommendations for identity and access management. For instance:
Use centralized identity and authentication system
Use a centralized identity and authentication system to govern your organization’s identities and authentications for cloud and non-cloud resources.
Manage application identities securely and automatically
Use managed application identities instead of creating human accounts for applications to access resources and execute code. Managed application identities provide benefits such as reducing the exposure of credentials. Automate the rotation of credentials to ensure the security of the identities.
The above (and more) points refer to Azure Active Directory to establish a secure identity and access controls. Then, we can utilize Azure role-based access control (Azure RBAC) which helps manage who has access to Azure resources, what they can do with those resources, and what areas they have access to. Now it is time to talk and quickly explain some concepts behind Azure Active Directory, and RBAC.
Microsoft Zero Trust approach and architecture
Microsoft Zero Trust model assumes breach and verifies each request as though it originates from an open network. Core to Zero Trust, are the principles of verifying explicitly, applying for least privileged access, and always assuming breach:
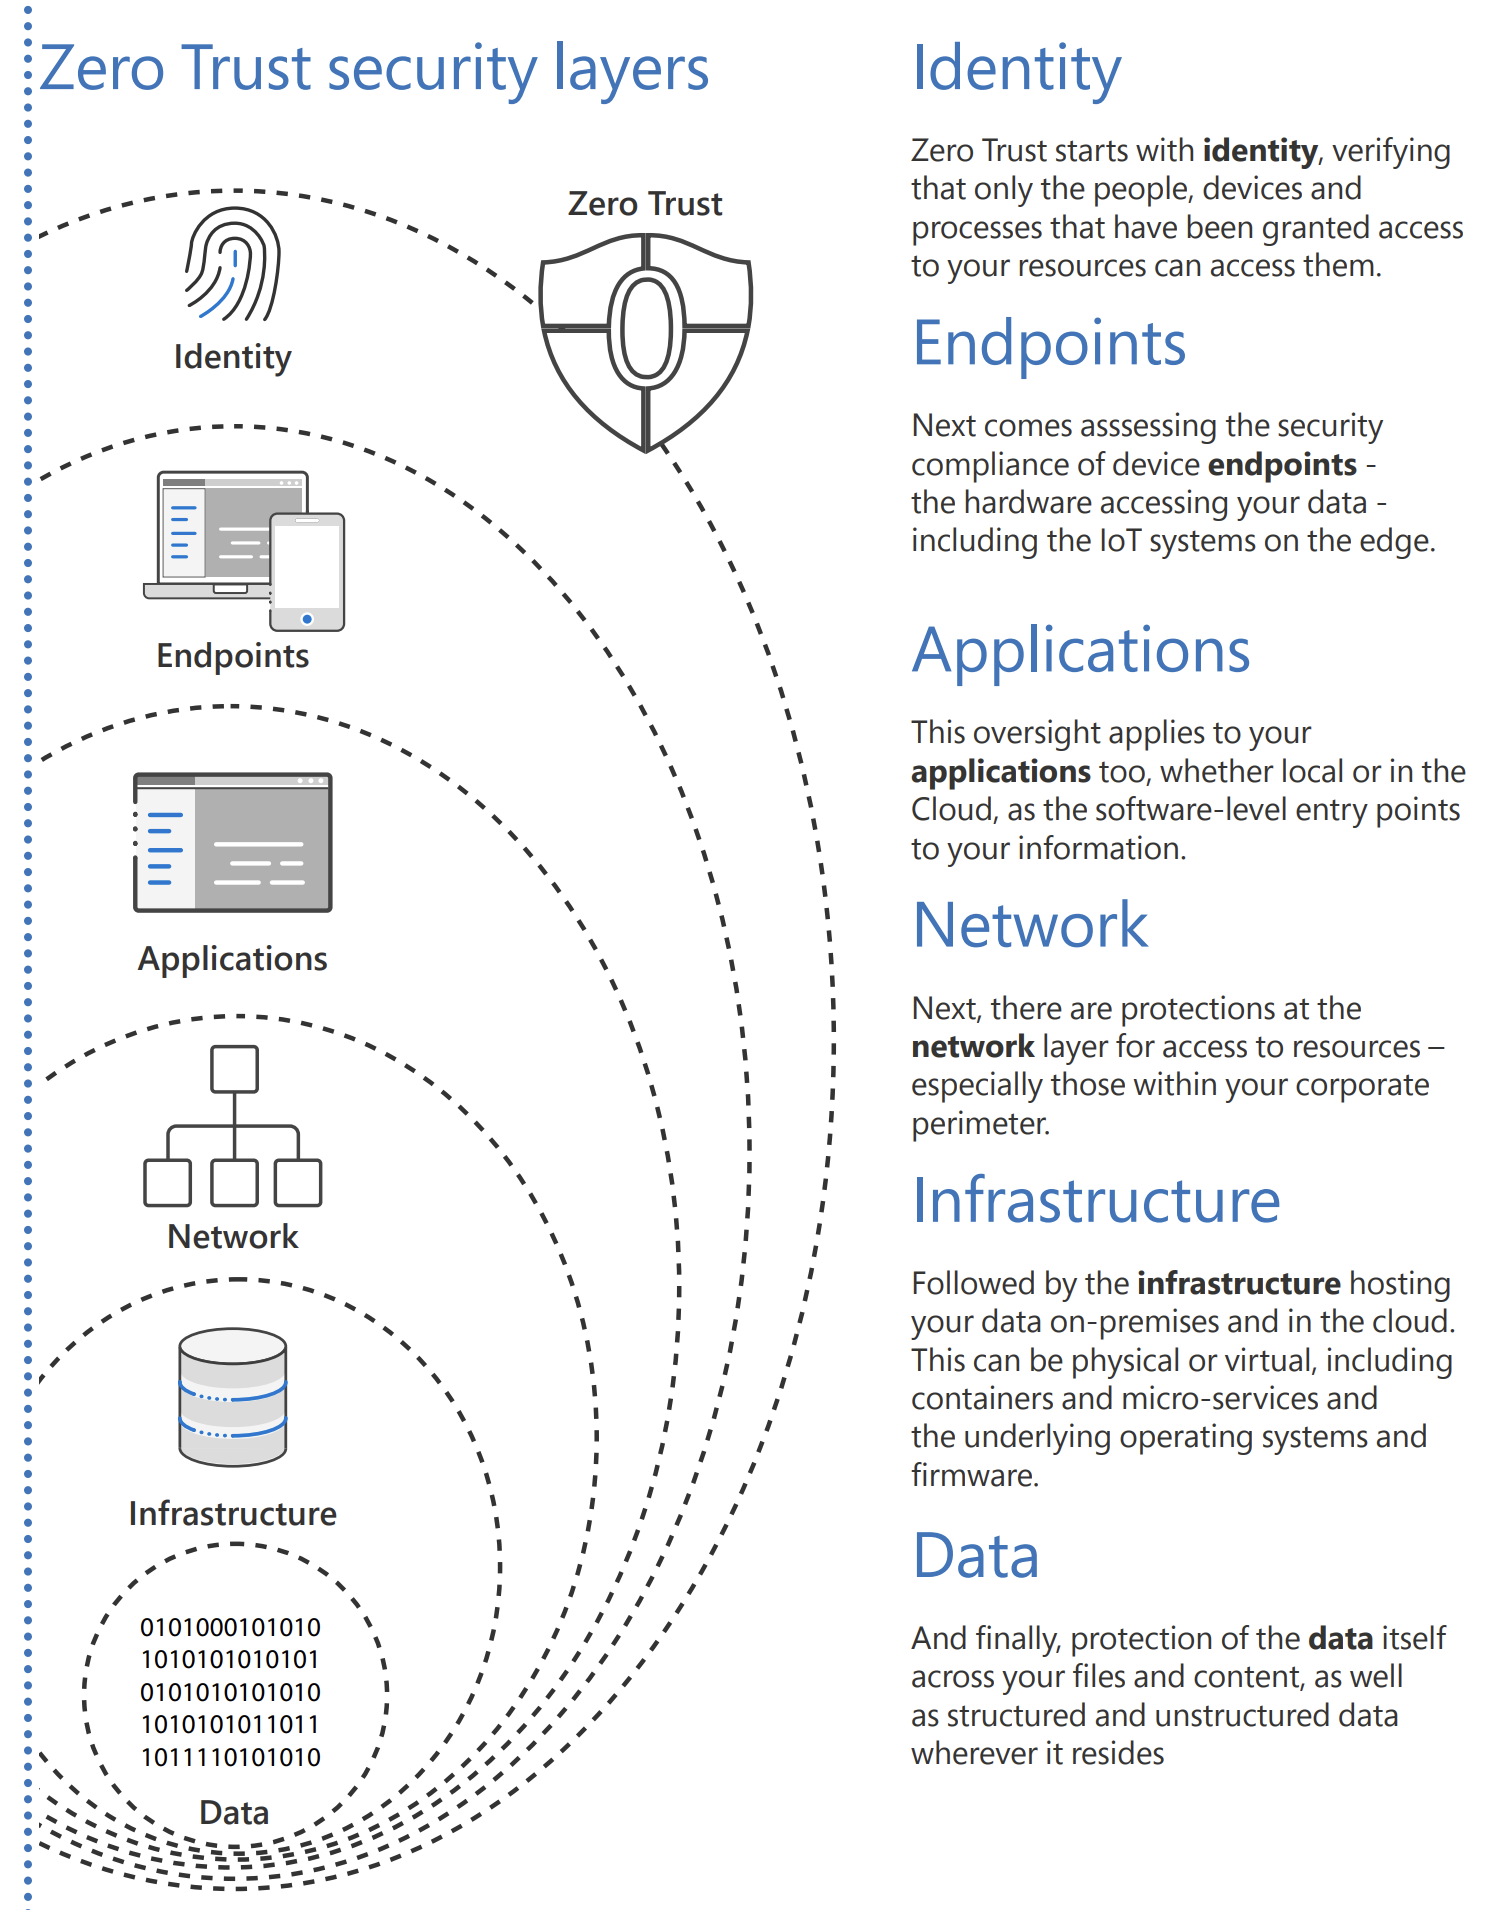
One of the key points of Zero Trust architecture is the Zero Trust User Access approach. It states that every access request is fully authenticated, authorized, and encrypted before granting access. Microsegmentation and least privileged access principles are applied to minimize lateral movement.
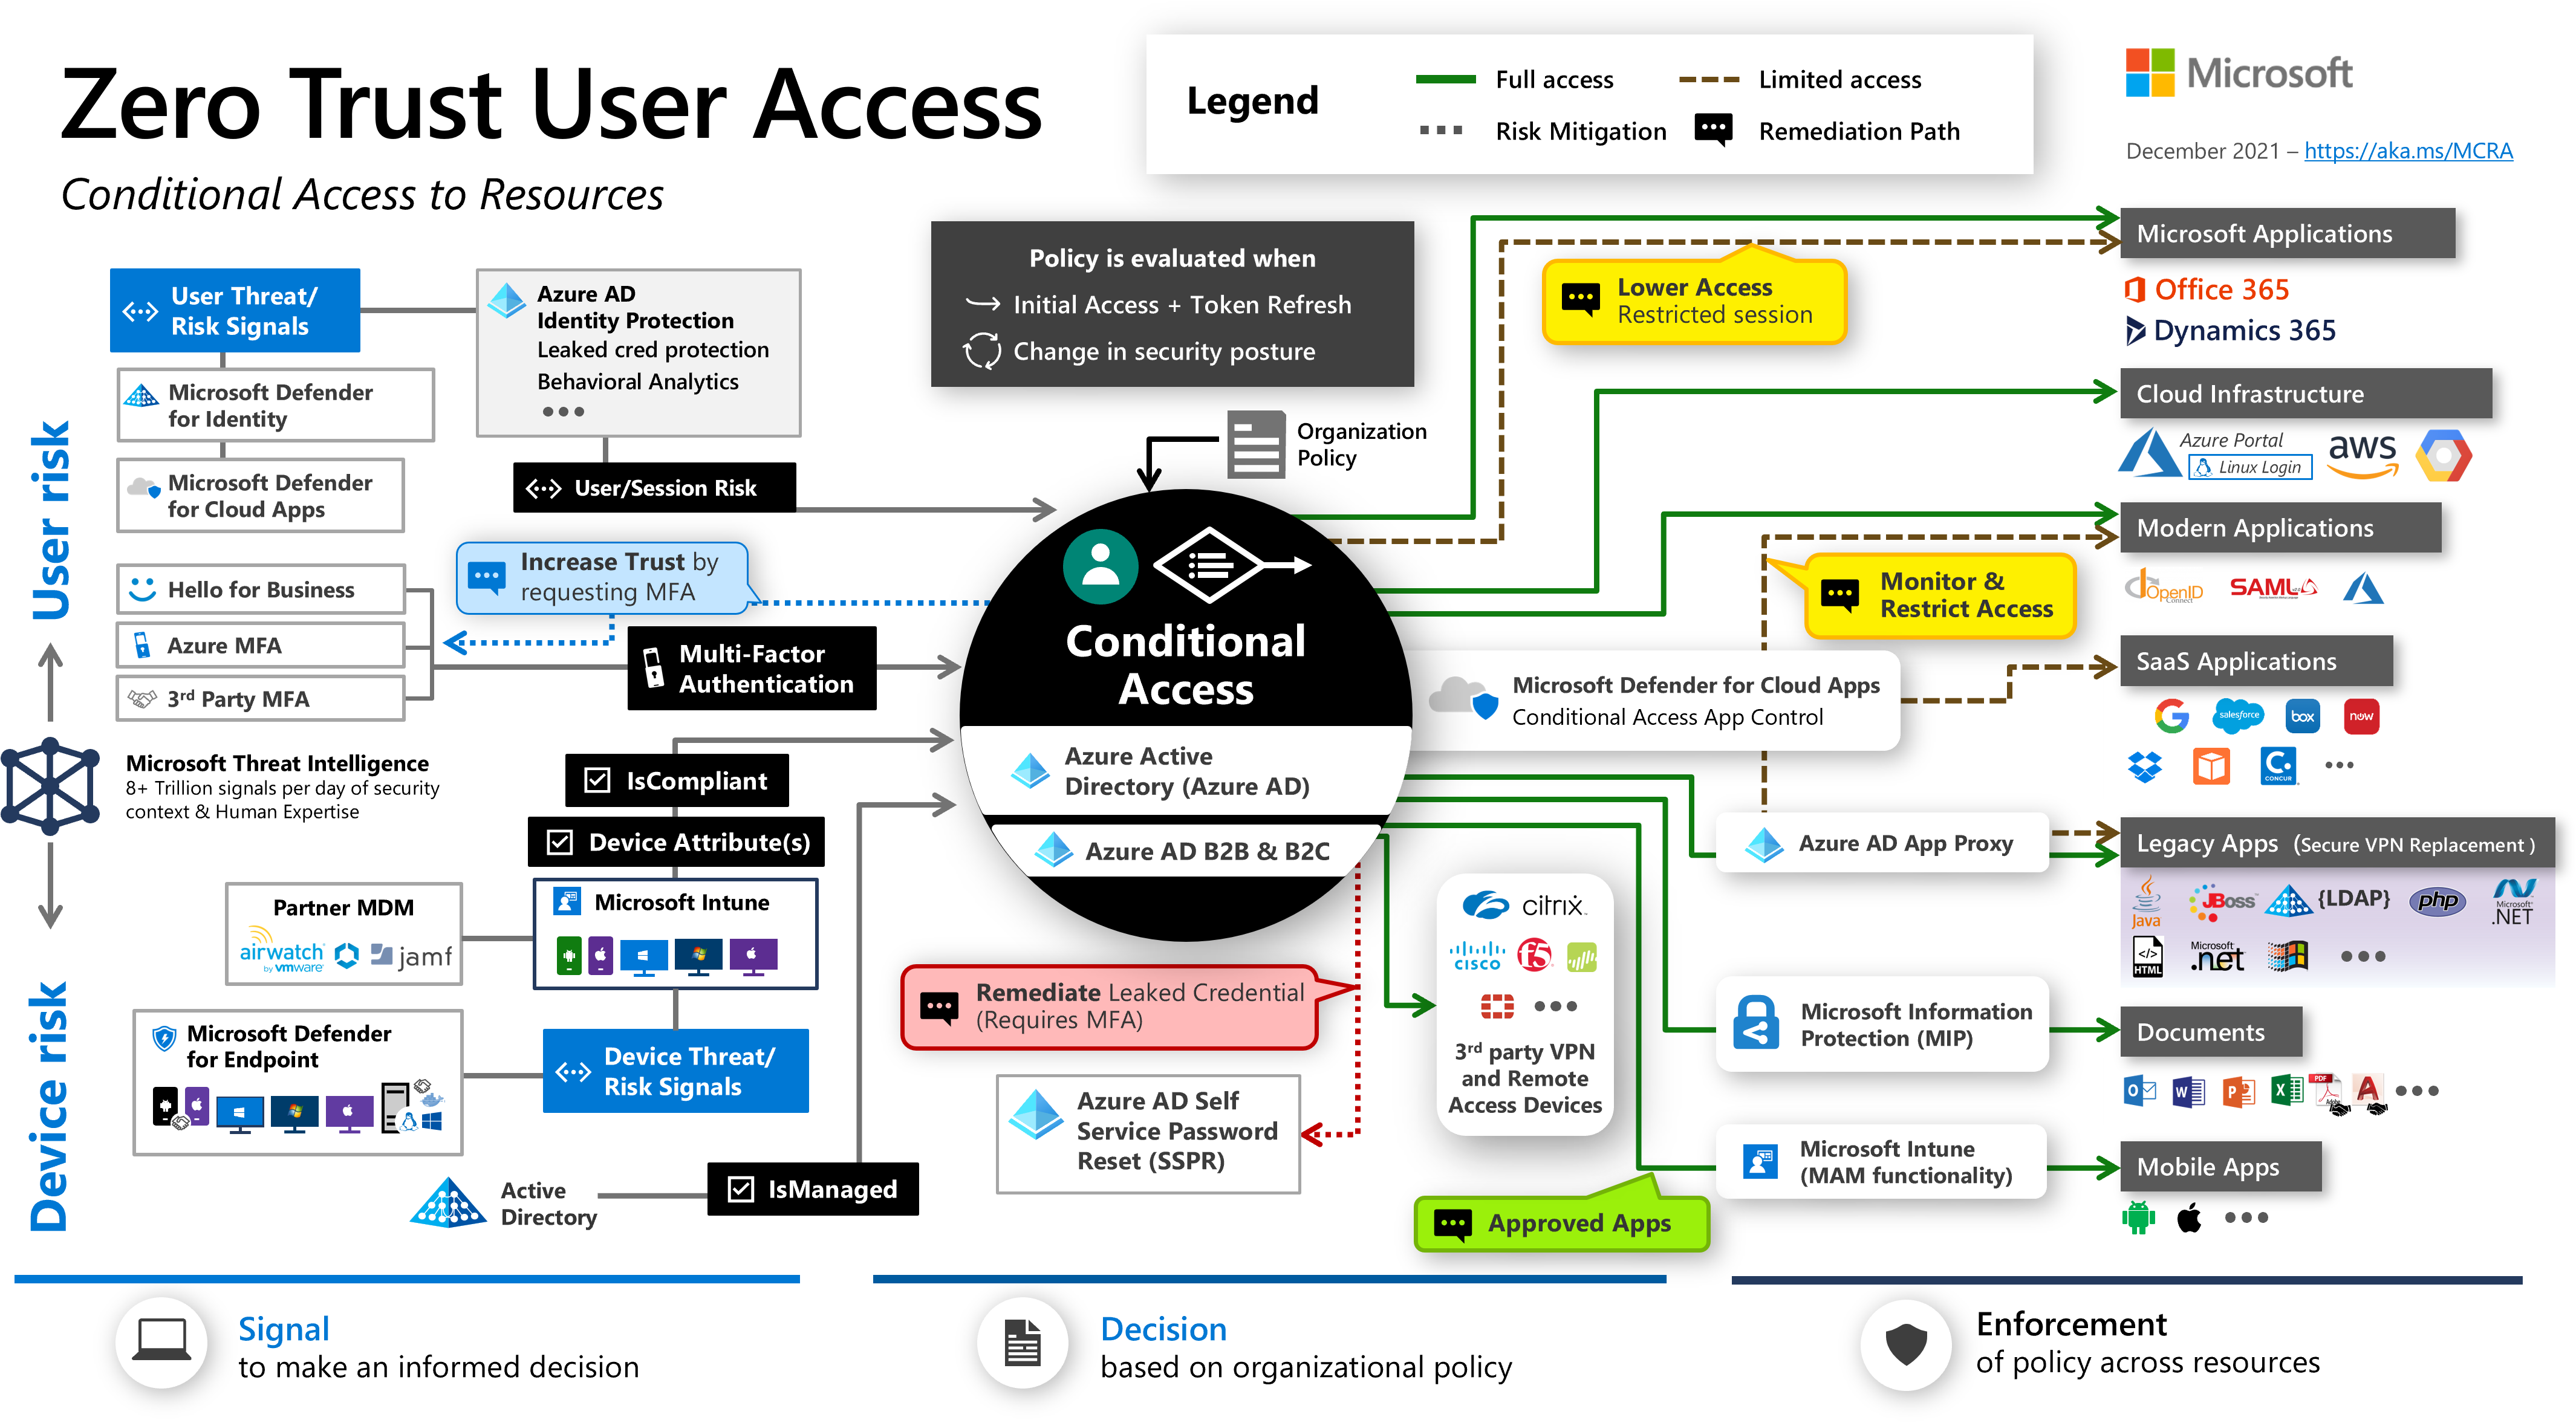
When it comes to Zero Trust architecture and approach it also refers to access to specific Azure resources and authorization mechanisms. There are two key elements here:
- Azure Active Directory roles
- Role-based access control
Let’s discuss them to better understand how they can help implement DevSecOps practices.
Azure Active Directory roles vs Azure Role-Based Access Control
To grant access to specific Azure resources, and applications secured by Azure Active Directory, we have to first add a user to the Azure AD tenant, and then assign a specific role to this user. We can also create a group in the Azure AD, add a user to this group, and set assign specific role/roles to this group. Eventually, all users within this group will have roles assigned to the group. When we want to specific Azure Web App to access secrets in the Azure Key Vault, we assign Managed Identity to Azure Web App, grant Key Vault Secrets User role, and then we can access secrets.
This is all great but now there is also the question: what is the difference between Azure AD roles, and RBAC in the context of roles?
To make it simple. Azure RBAC roles control permissions to manage Azure resources (like access to Key Vault secrets from different Azure resources), while Azure AD administrator roles control permissions to manage Azure Active Directory resources (users, groups, and applications). The following table compares some of the differences:
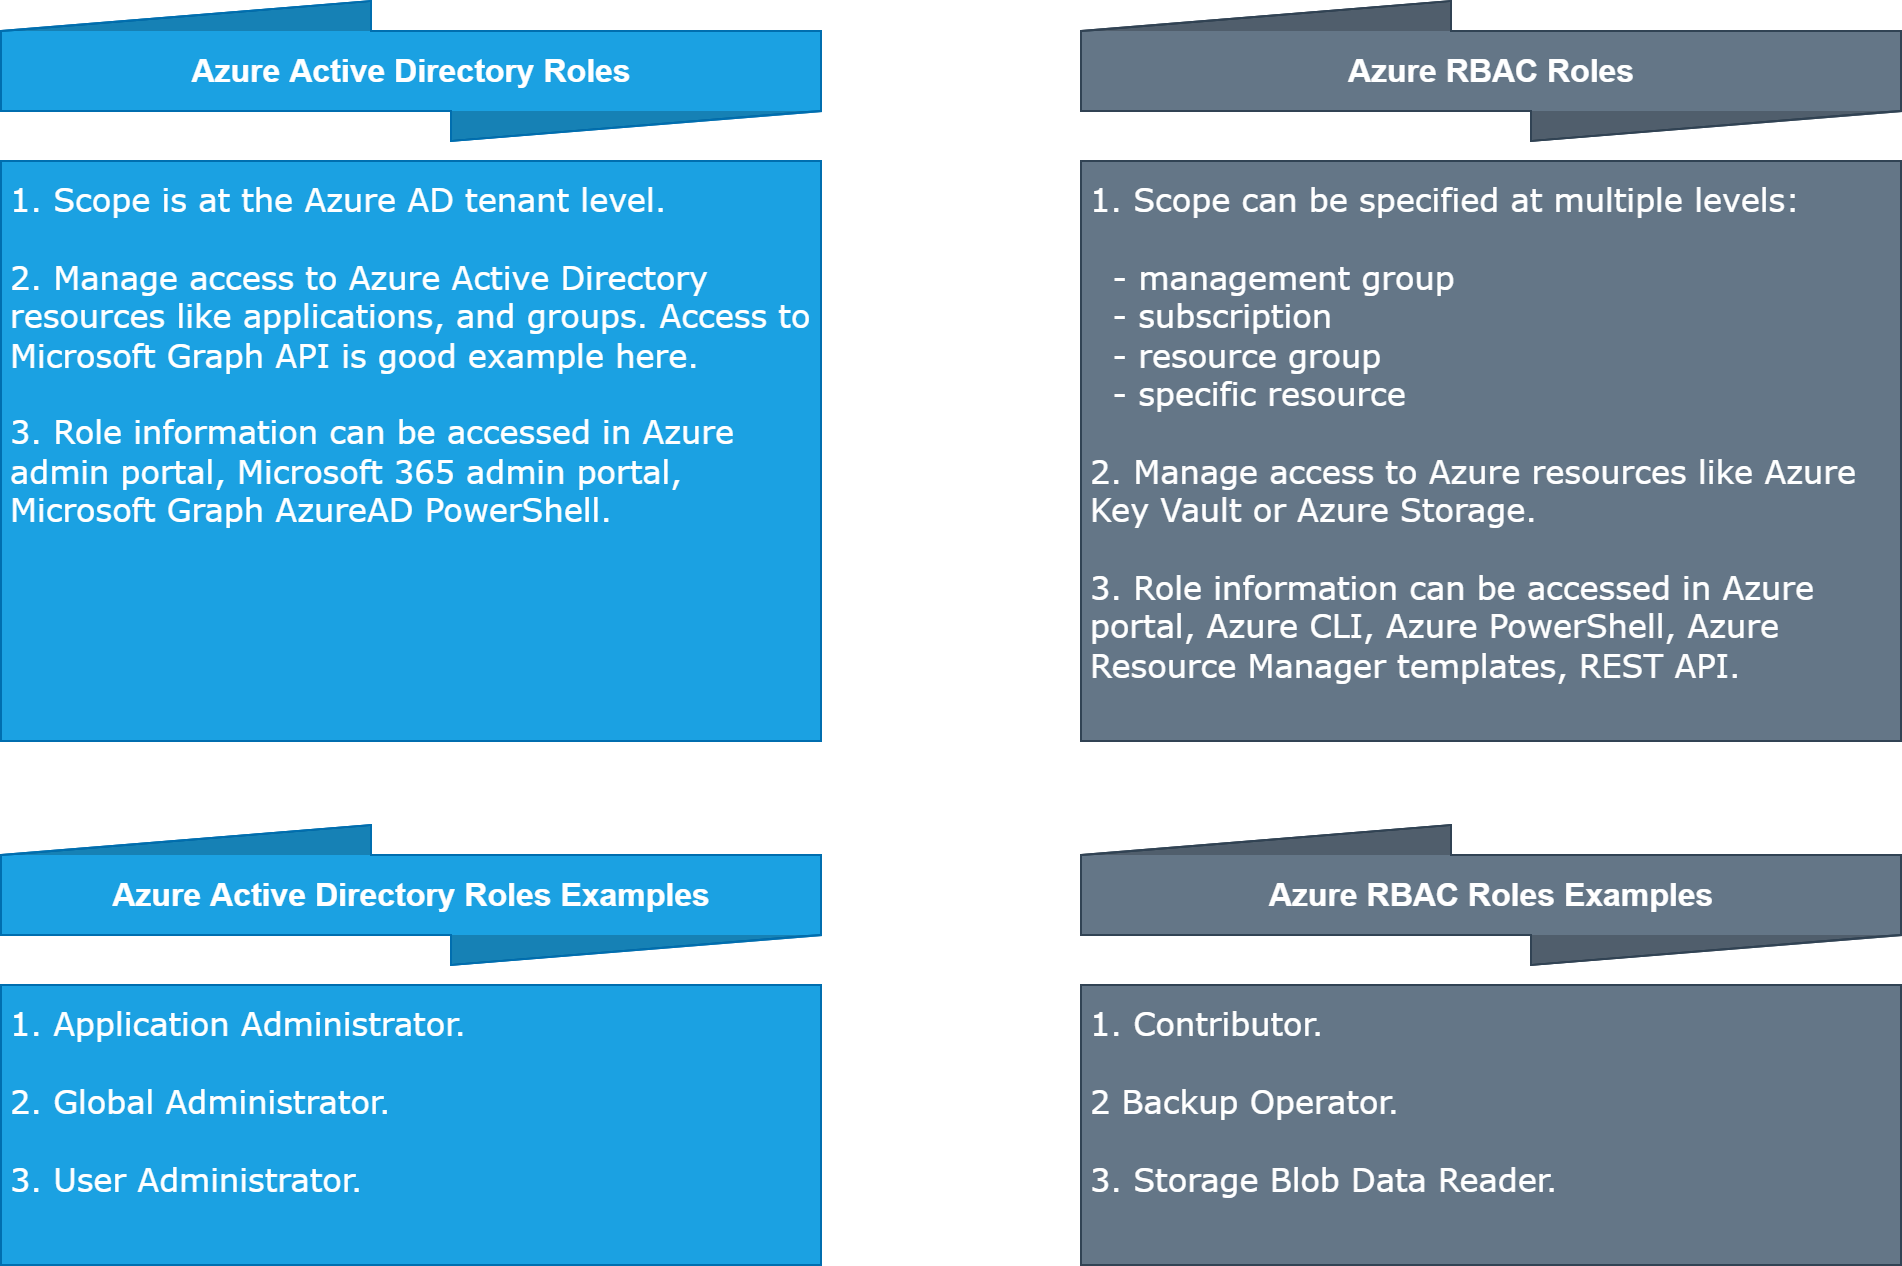
Now each role (RBAC or Azure AD) can be assigned to a specific user, group, or Service Principal. Let’s explain Service Principals, and Managed Identities first.
Introduction to Service Principals and Managed Identities
To access resources that are secured by an Azure Active Directory tenant, the entity that requires access must be represented by a security principal. An Azure Service Principal is an identity created in the Azure Active Directory for use with applications, hosted services, and automated tools to access Azure resources. This access is restricted by the roles assigned to the Service principal, giving us control over which resources can be accessed and at which level. For security reasons, it’s always recommended to use service principals with automated tools rather than allowing them to log in with a user identity. This is why we have users (user principal) and applications (service principal).
There are three types of service principal:
- Application - The type of service principal is the local representation, or application instance, of a global application object in a single tenant or directory.
- Managed identity - This type of service principal is used to represent a managed identity. Managed identities eliminate the need for developers to manage credentials. Managed identities provide an identity for applications to use when connecting to resources that support Azure AD authentication.
- Legacy - This type of service principal represents a legacy app, which is an app created before app registrations were introduced or an app created through legacy experiences in Azure AD.
Now when it comes to security best practices, we should eliminate the usage of any credentials when it is possible. This is why Managed Identities were introduced. We do not have to manage any credentials like secrets. Managed identities do not cost anything, and we can use them to securely access different kinds of Azure resources. Here is the official list of serices that can support Managed Identities. Using a Managed Identity, we can authenticate to any service that supports Azure AD authentication without managing any credentials. Here is an example of Managed Identity enabled for Azure Function App:
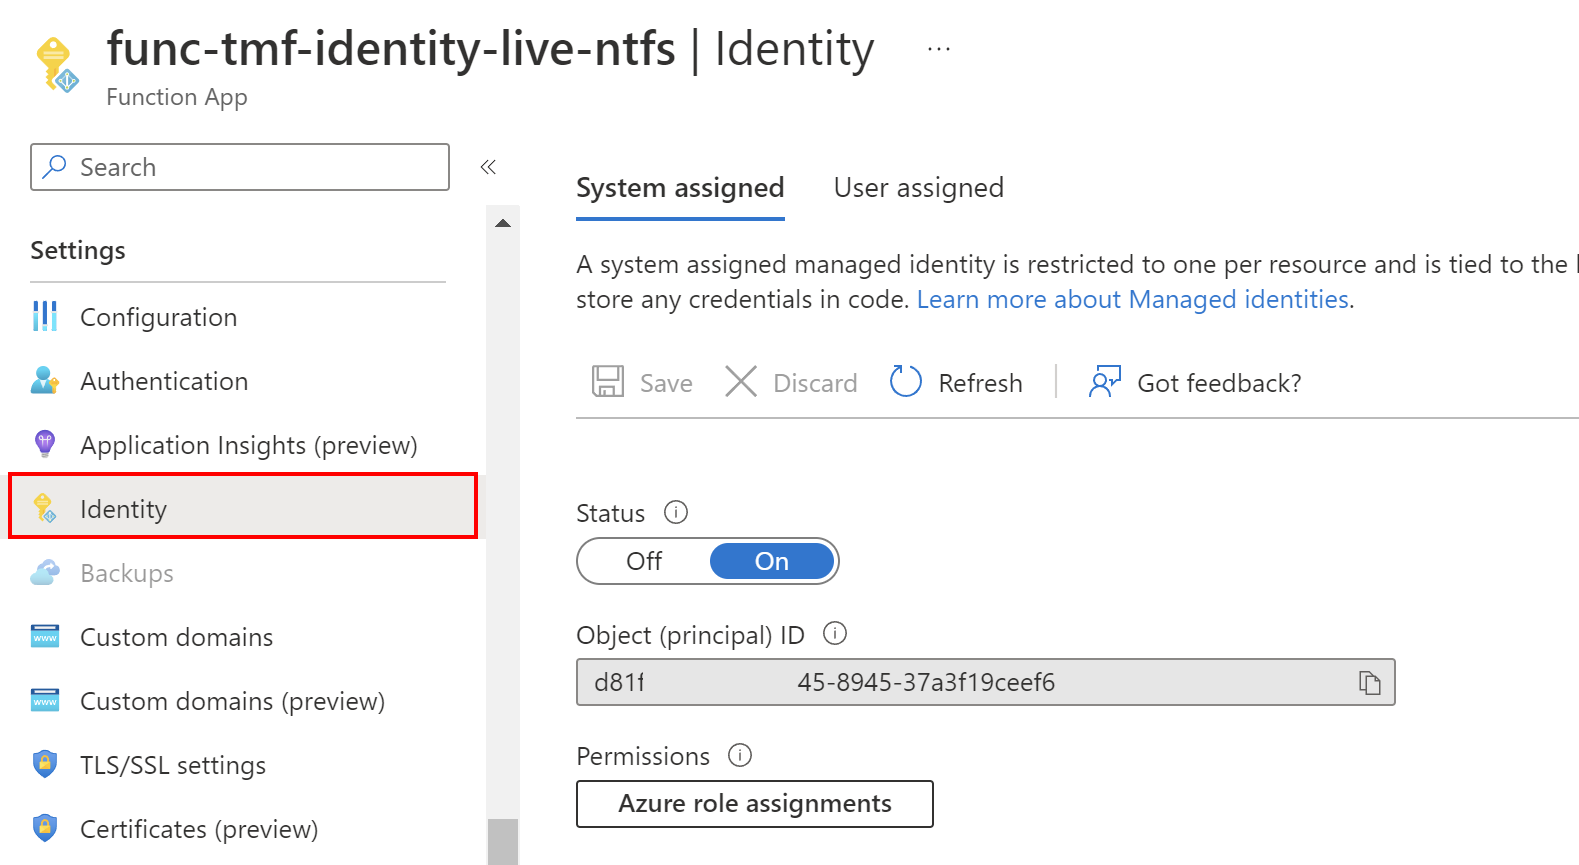
In the picture above probably you noticed two sections: System assigned, and User assigned. Let’s talk about differences here.
User-assigned vs System-assigned Managed Identity
There are some signifficant differences between User-assigned and System-assigned identities:
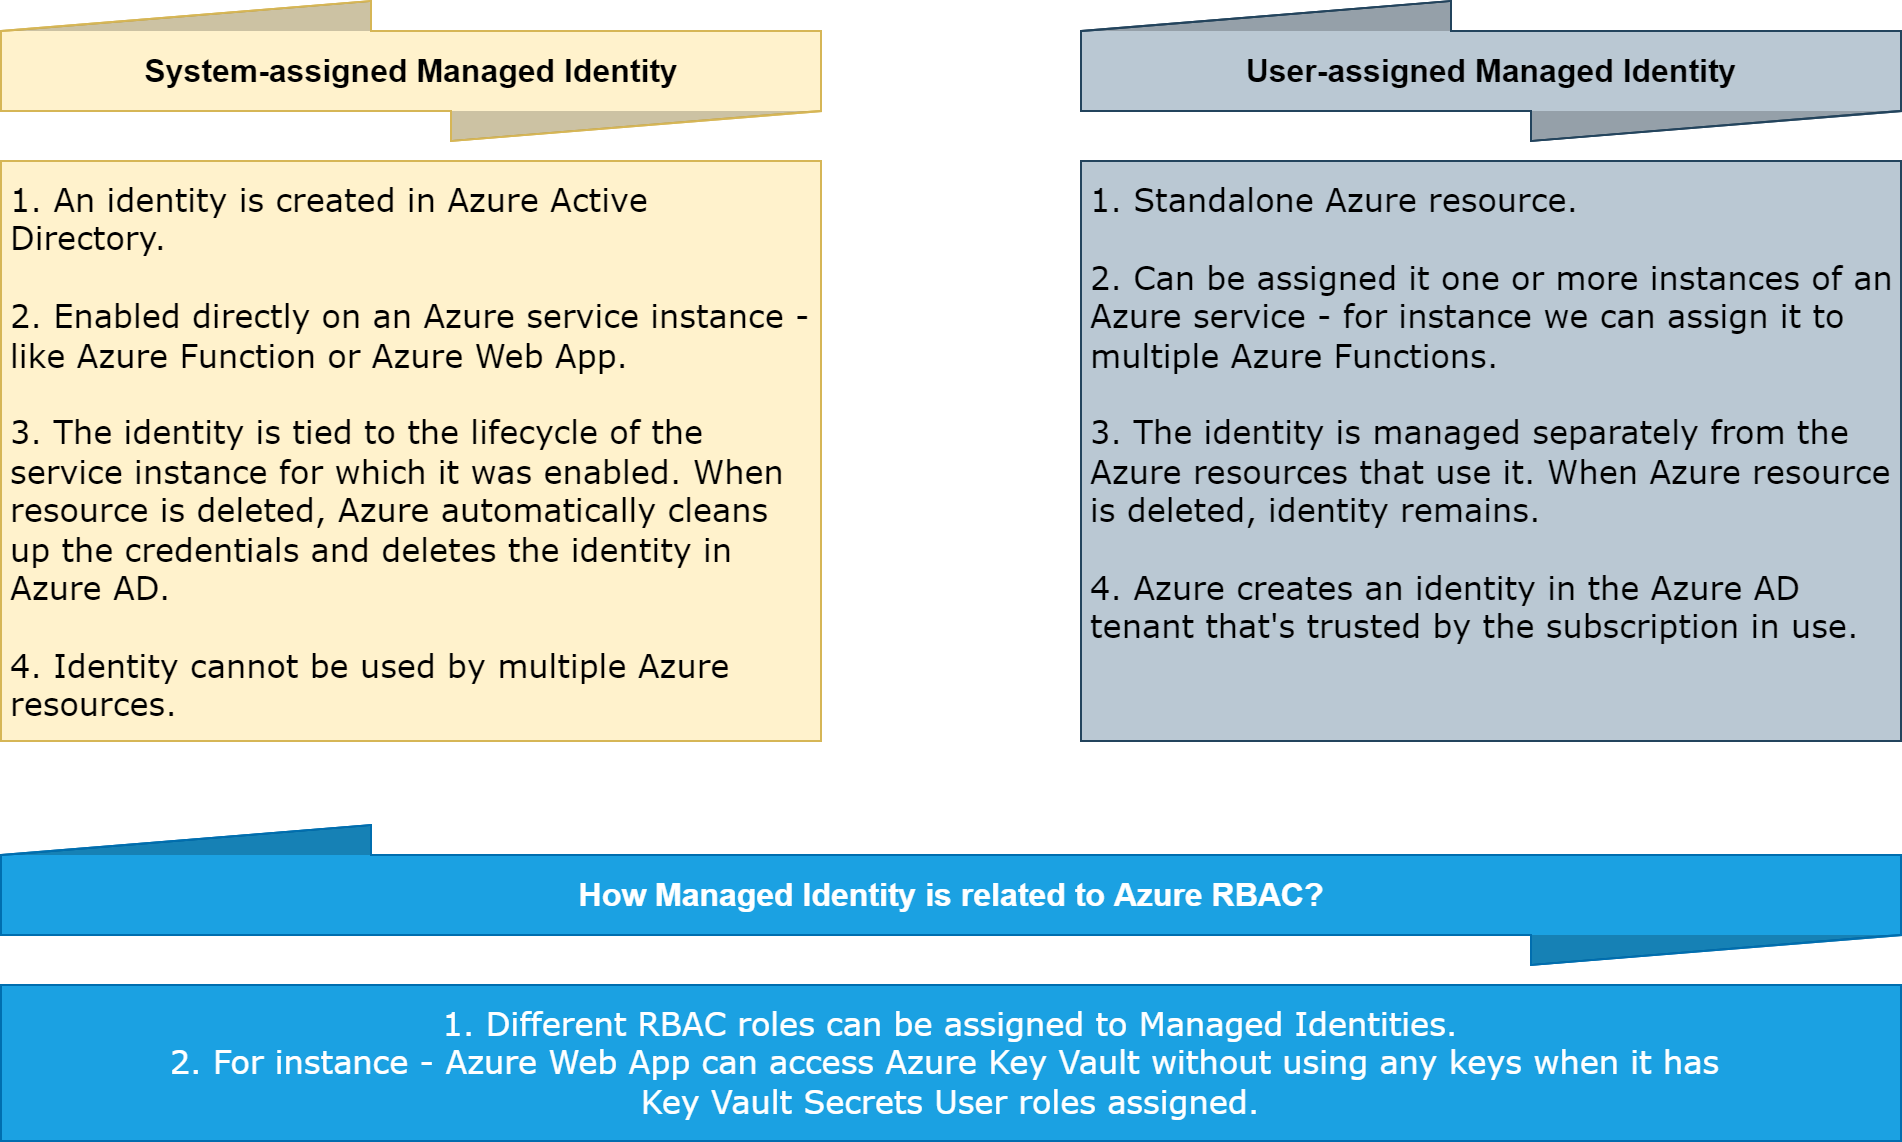
Once Managed Identity is created, we can assign Azure RBAC roles to it.
Managed identities are an important part of DevSecOps practices to limit credentials usage in the source code.
Understand role assignments
Once we create Manage Identity, we can assign RBAC roles to it. There are multiple ways to do it, like from the Azure portal or using Azure CLI. Let’s see how it is done in the Azure Portal. Let’s say that we want to grant access to read secrets in the Azure Key Vault from the Azure Container Apps. To do it, we have to first enable Managed Identity on Azure Container App (it can be used-assigned or system assigned) and then go to the Azure Key Vault resource tab. There from the Access control tab we can assign different roles to users, and Managed Identities:
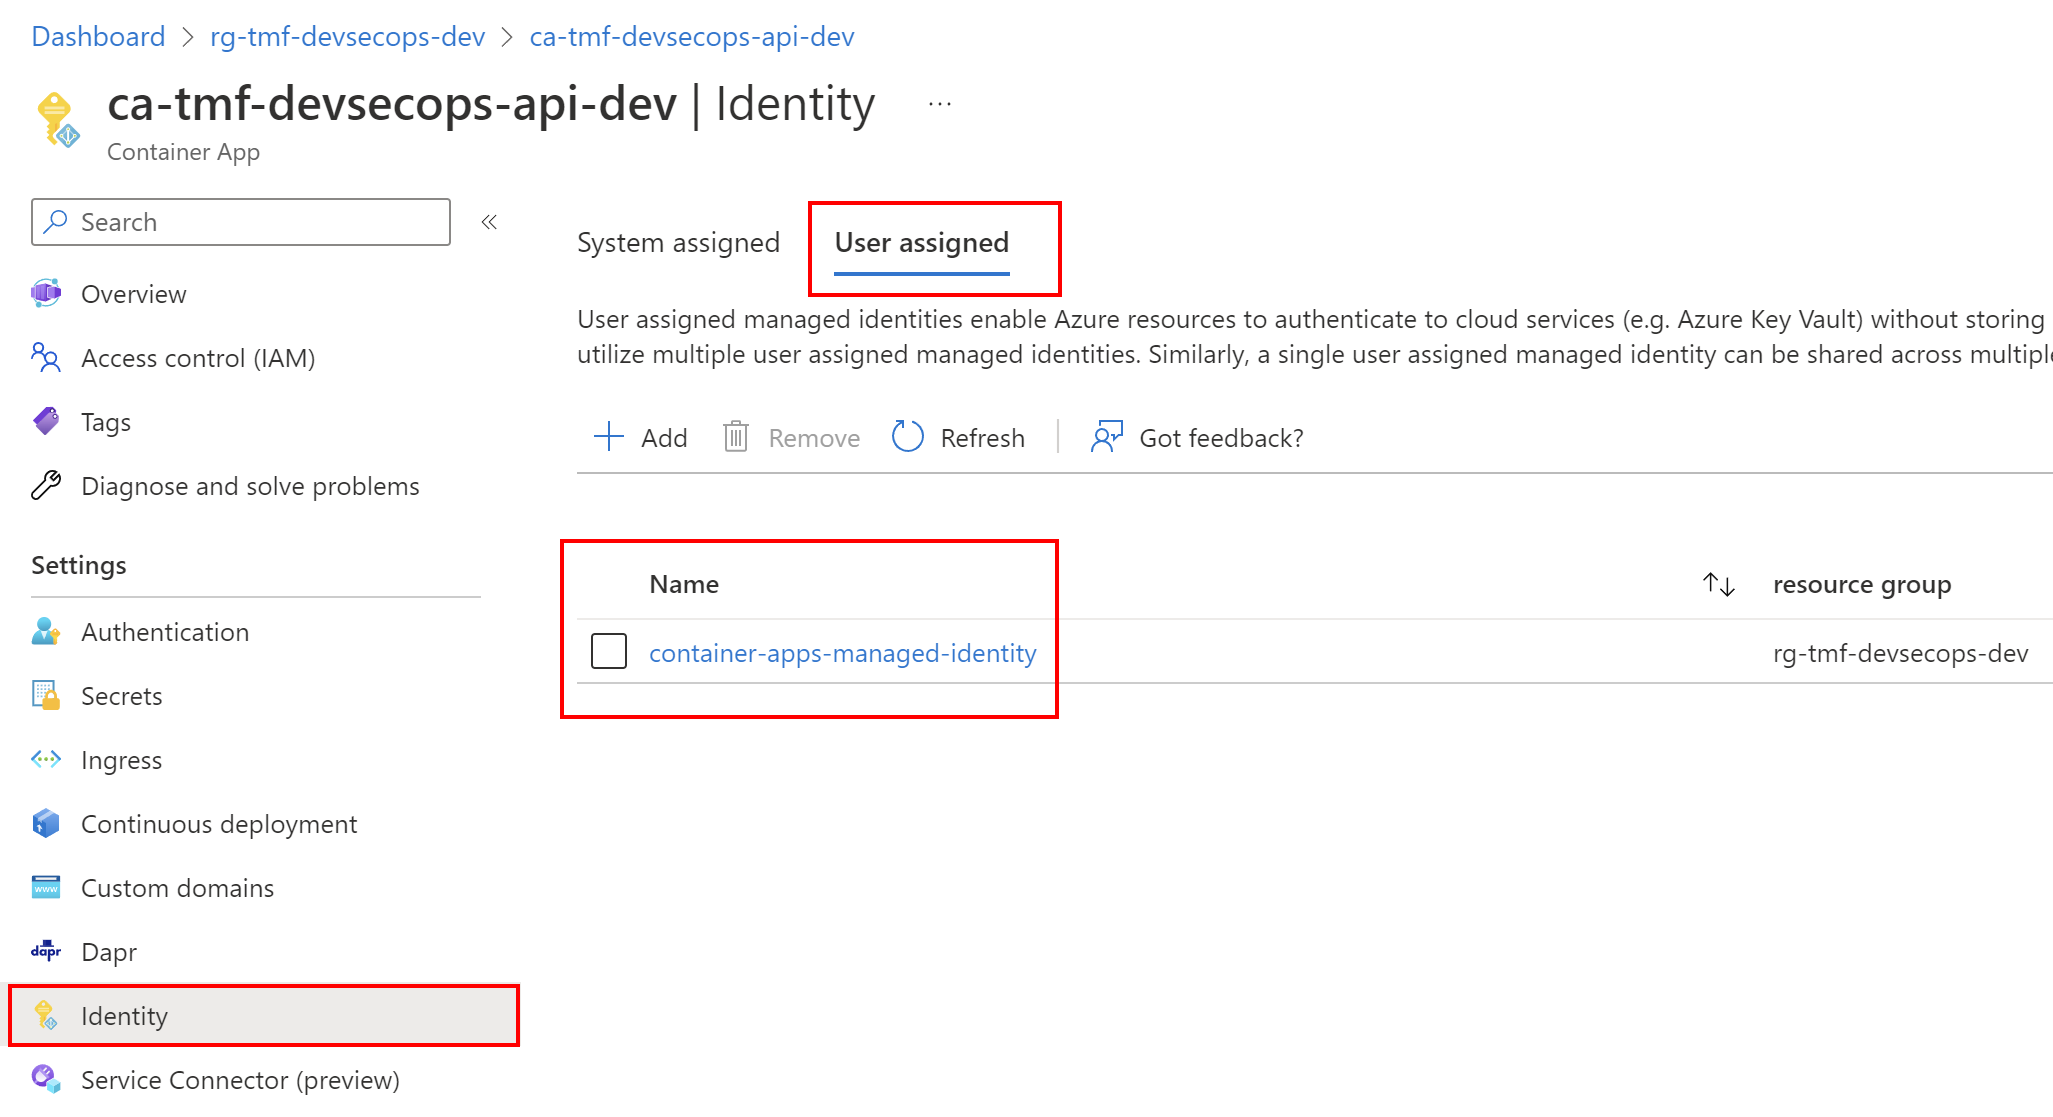

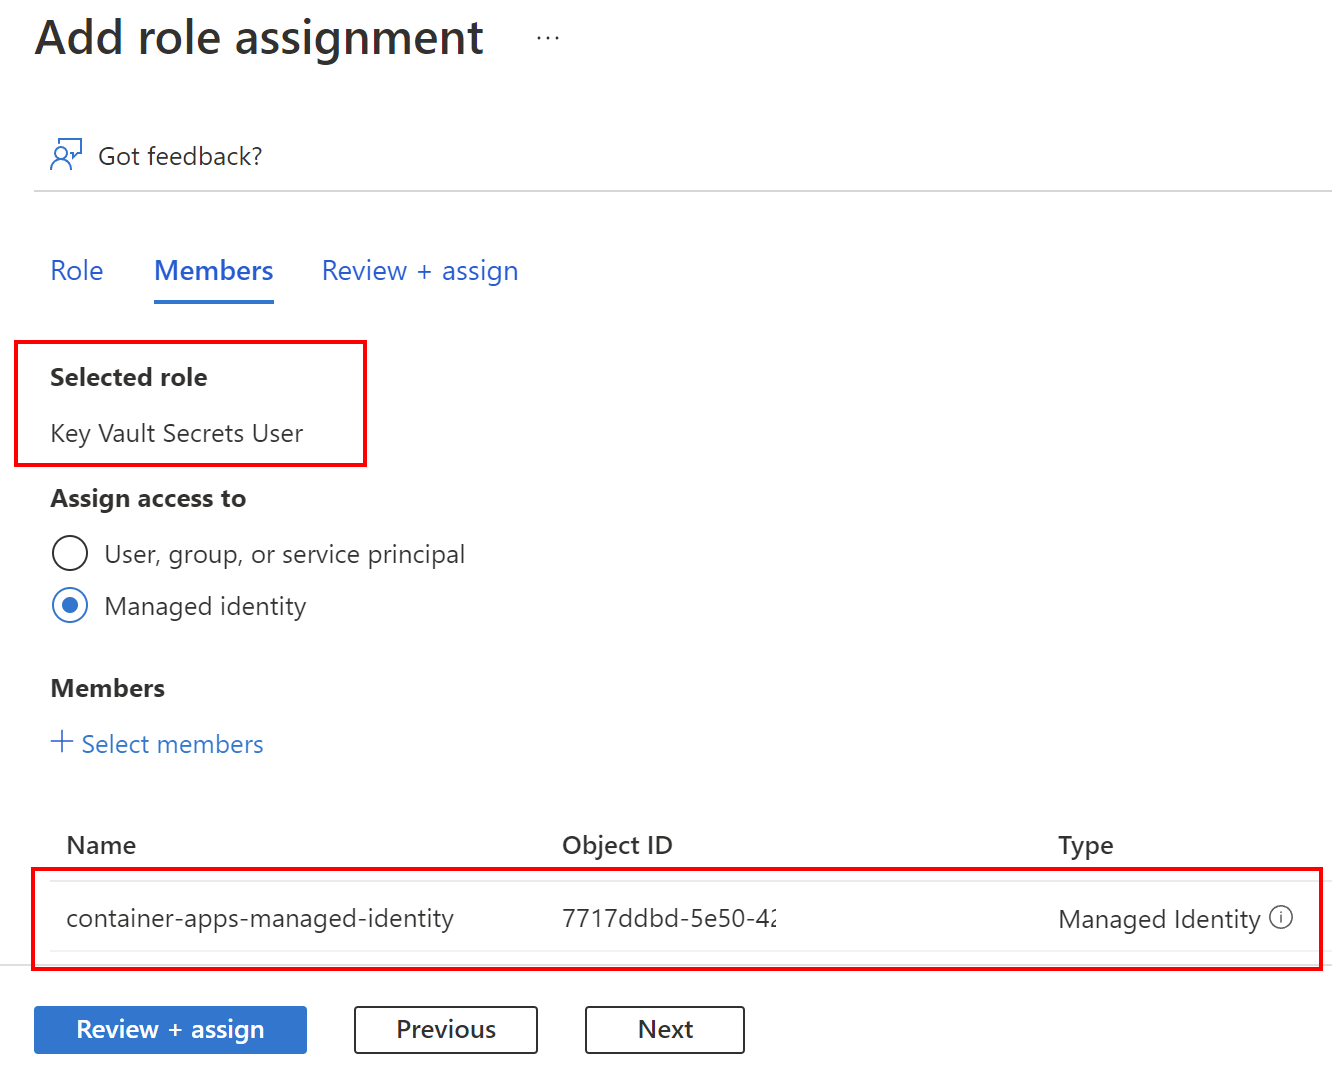
The most important aspect of using Managed Identities with Azure RBAC is the fact that we can grant access without using any credentials in the source code or Azure resource configuration.
How all above connects with Azure DevOps and GitHub
Now once we understand concepts around Azure AD roles, RBAC, Service Principals, and Managed Identities, we can get back to an important topic. How do we deploy from Azure DevOps or GitHub to Azure cloud securely?
Azure DevOps connected to Azure cloud
Probably most of us are familiar with this view in Azure DevOps:
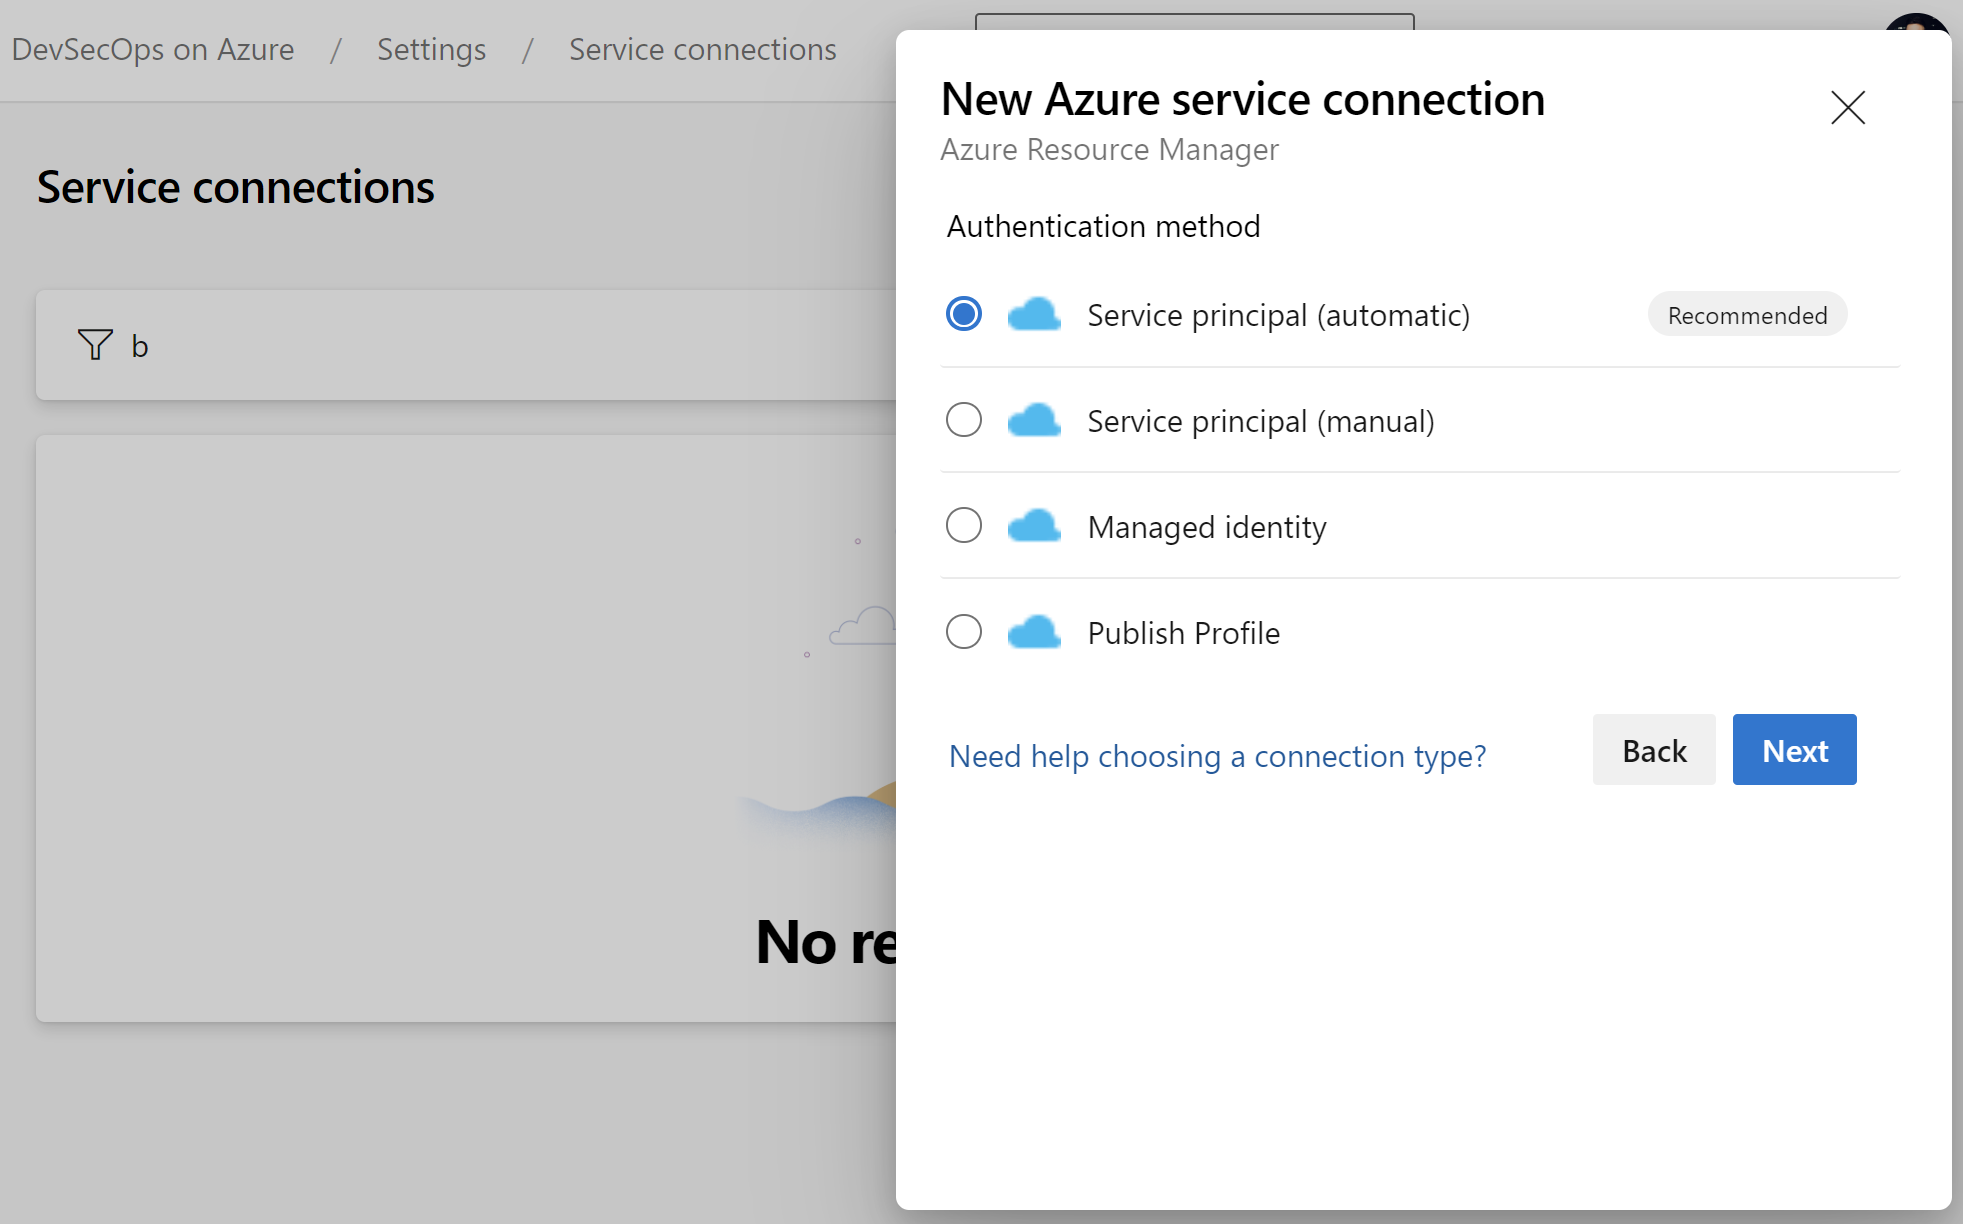
With this approach, we can automatically create a connection between Azure DevOps and our Azure subscription. However, it is worth understanding what is happening underneath and how service connections are configured in the real-world projects, especially when we want to deploy to anything in the client’s environment. Probably you faced a situation when during working on the project you did not get full access to your client’s Azure subscription. Cloud Team created Service Principal and provided details to you to set up deployments only to specific resource groups in Azure. In this section, I would like to explain the details.
Steps required on the Azure side
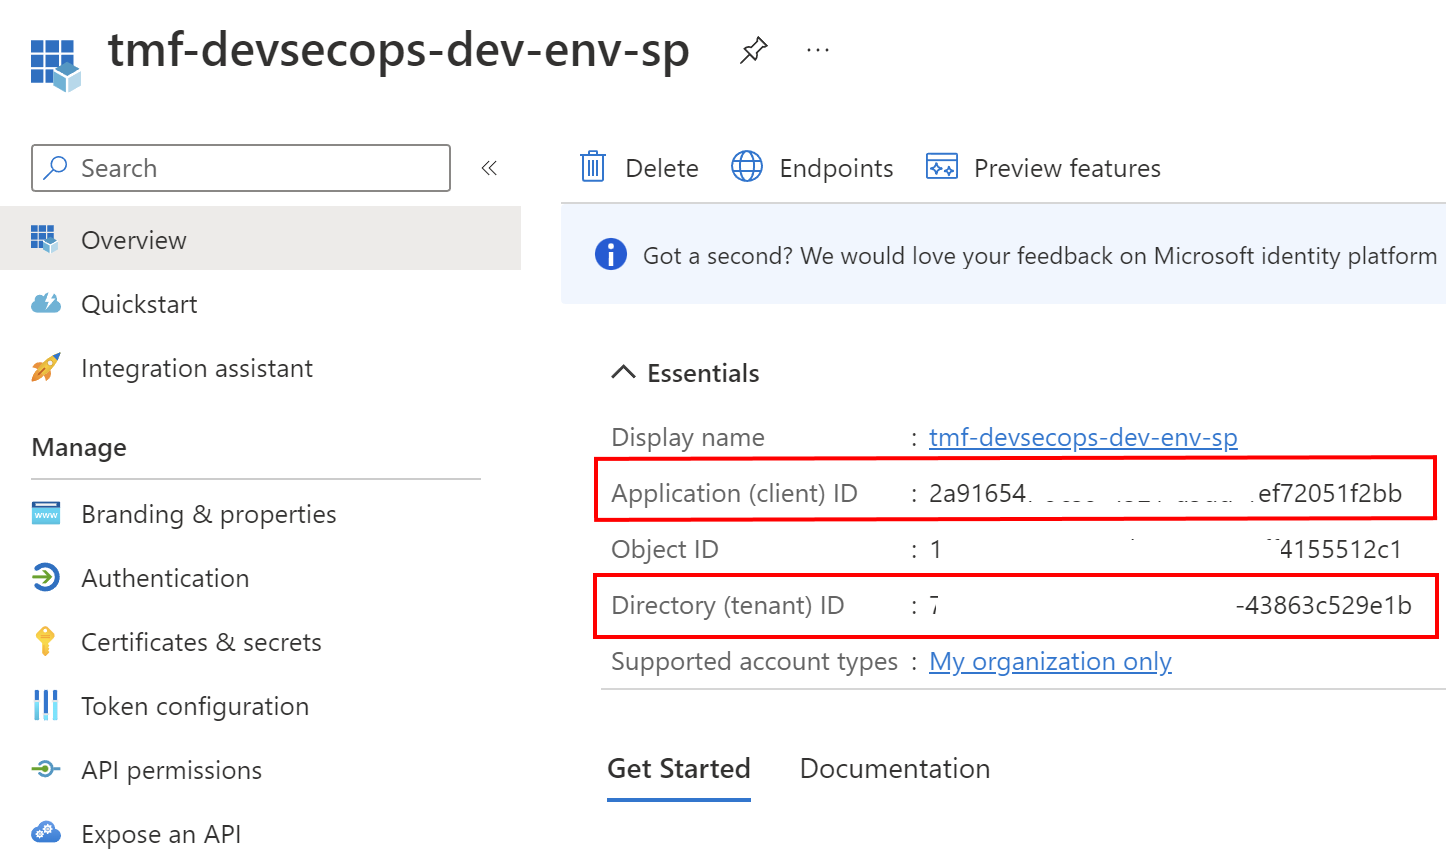
To securely configure the connection between Azure DevOps and Azure cloud, we have to register Service Principal (application) in the Azure Active Directory connected with Azure subscription. Here is the example of an application that I registered in my Azure Active Directory tenant:
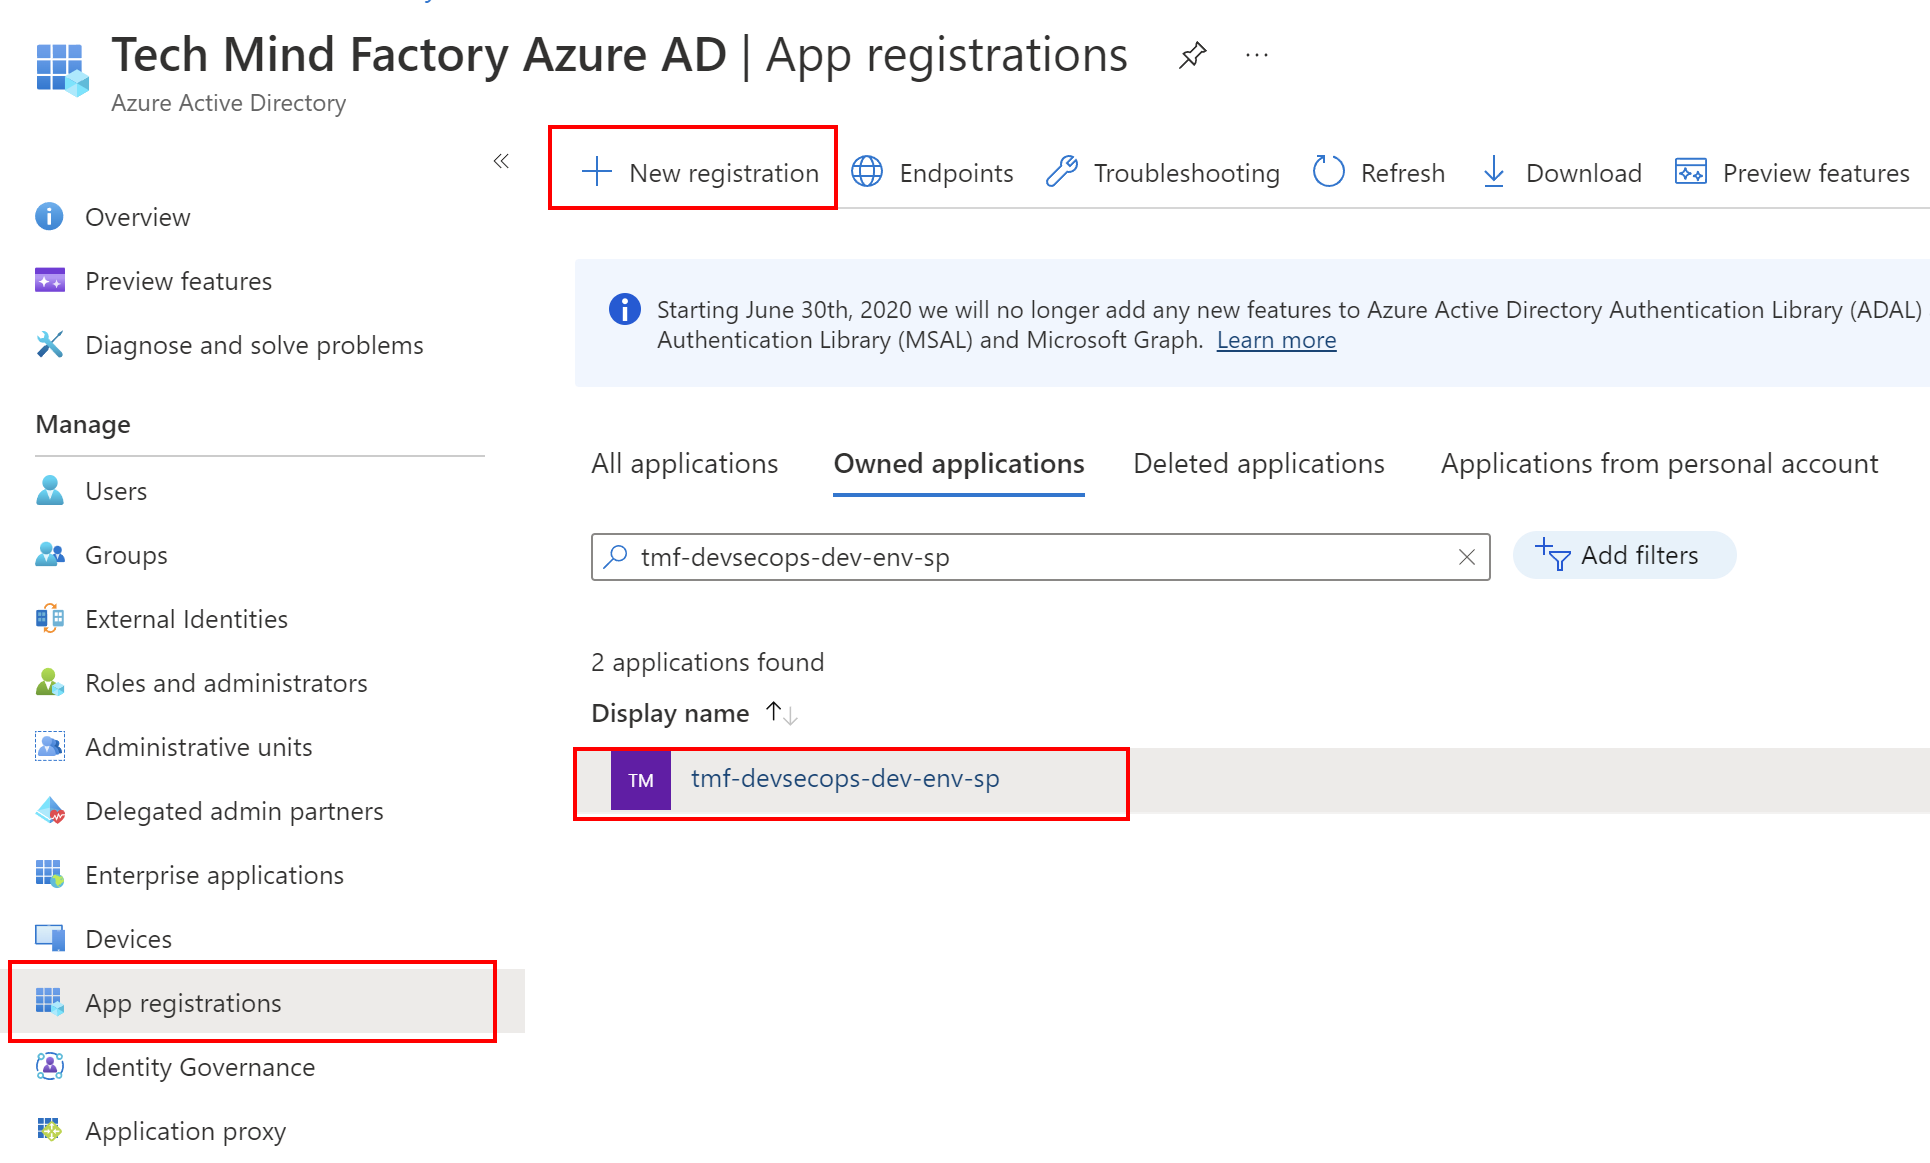
In the application’s overview tab we can find two important values which will be required to setup a connection between Azure DevOps and Azure cloud:
- Client ID
- Tenant ID
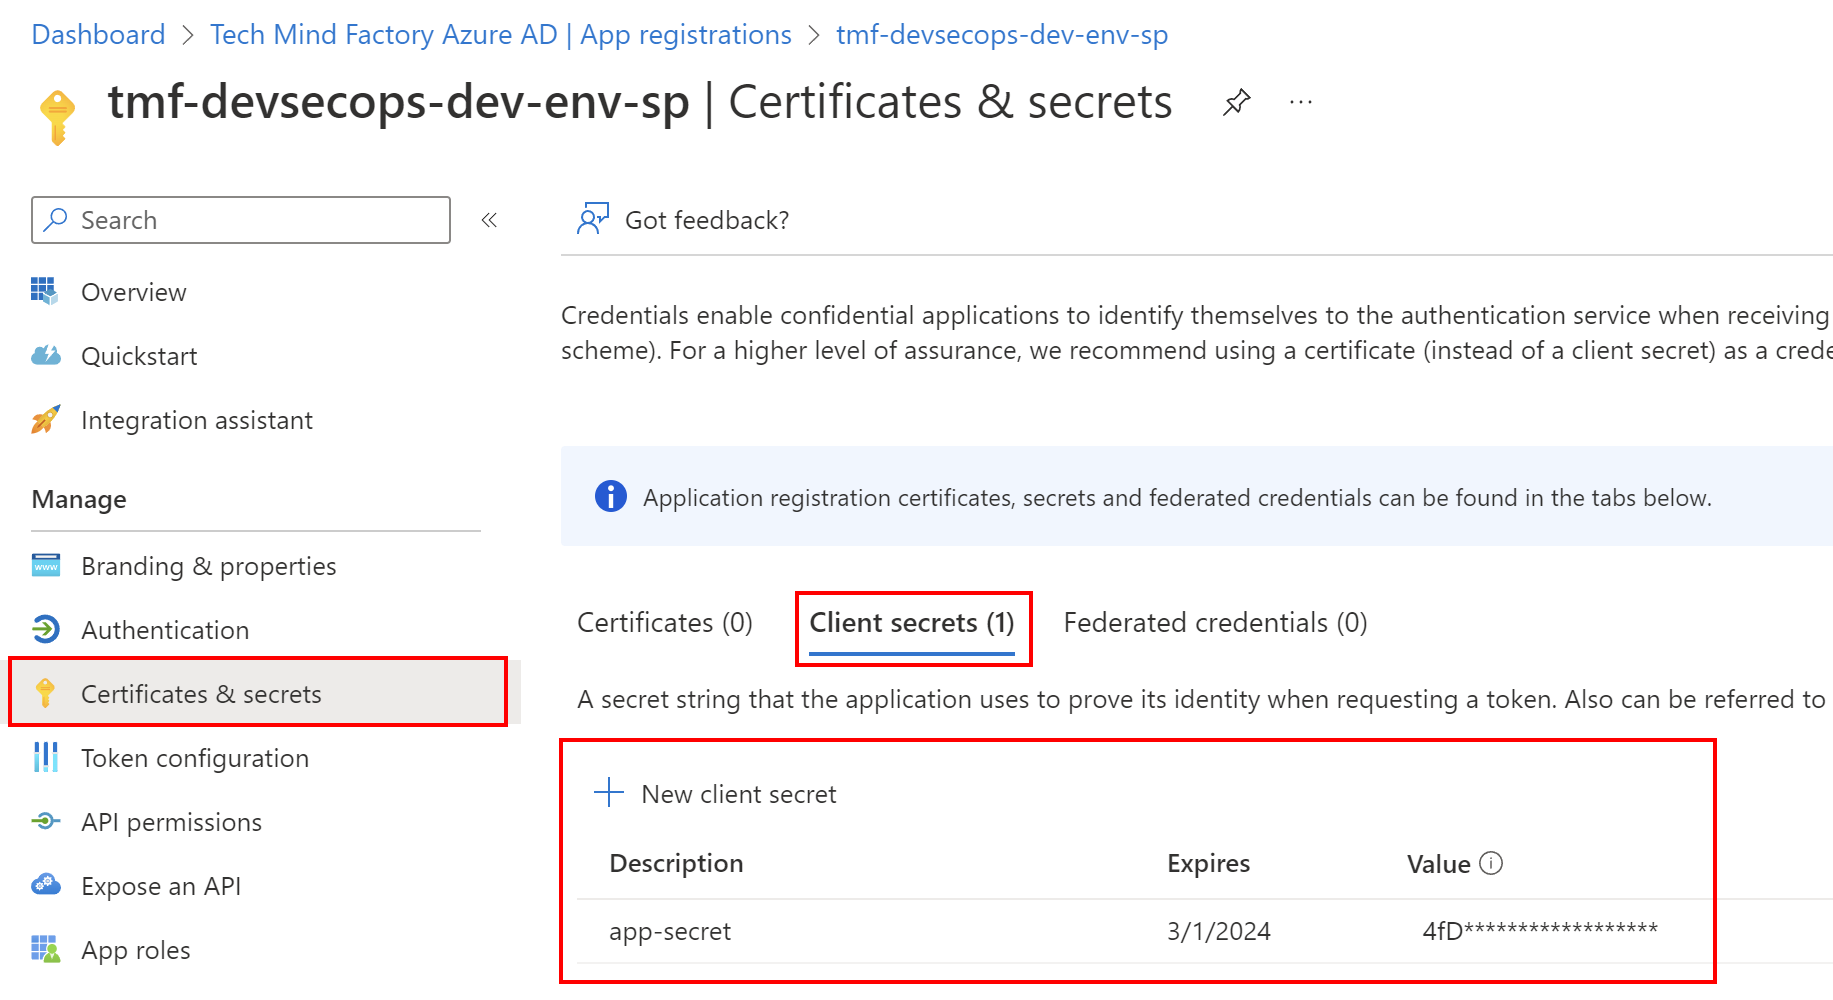
We need also client secret which can be created under Certificates and secrets tab:
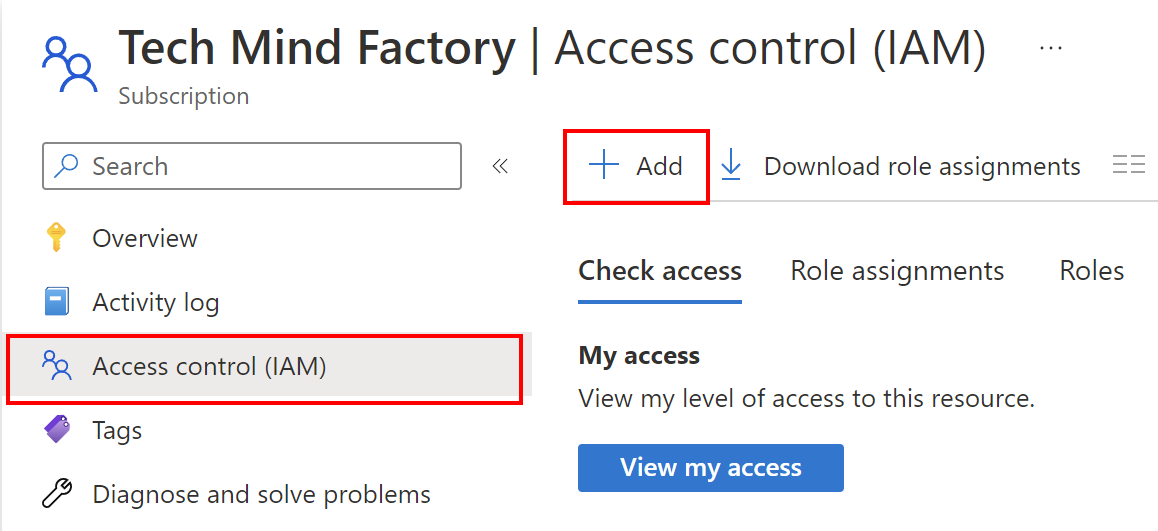
Now we have to assign RBAC role to the Service Principal we created above. We want to follow the least-privilege principle so Service Principal we have the below roles assigned:
Reader on our Azure subscription:
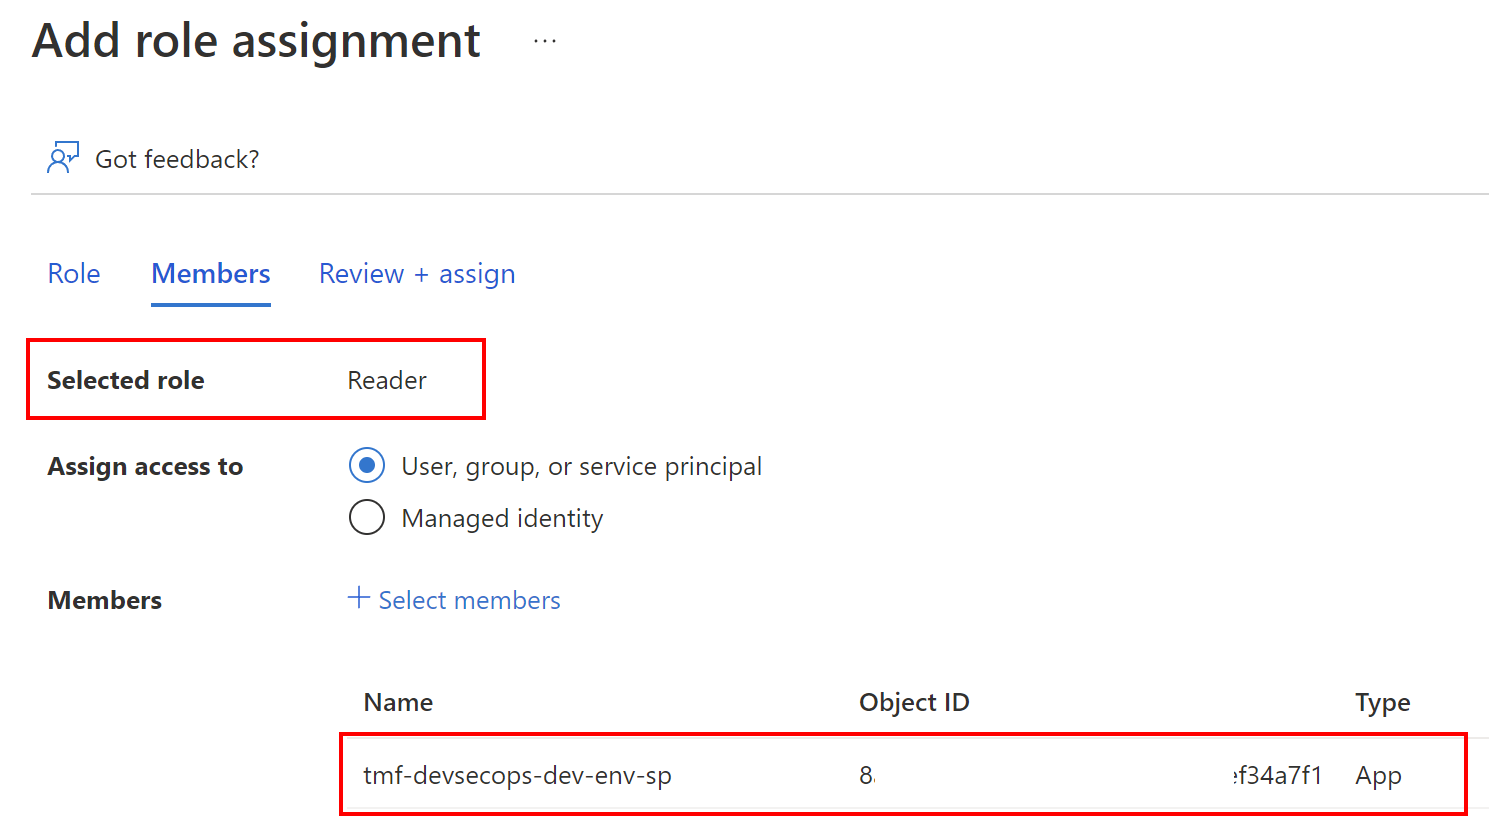
Contributor on our Azure resource group:
In this case, we assume that the resource group is already created. If not, please create one and then follow the steps below.
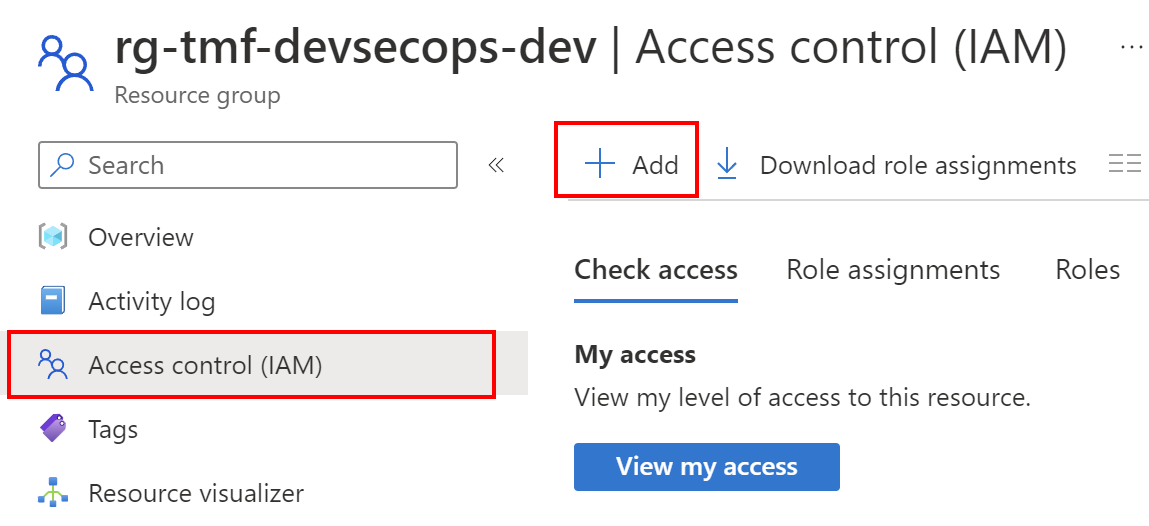
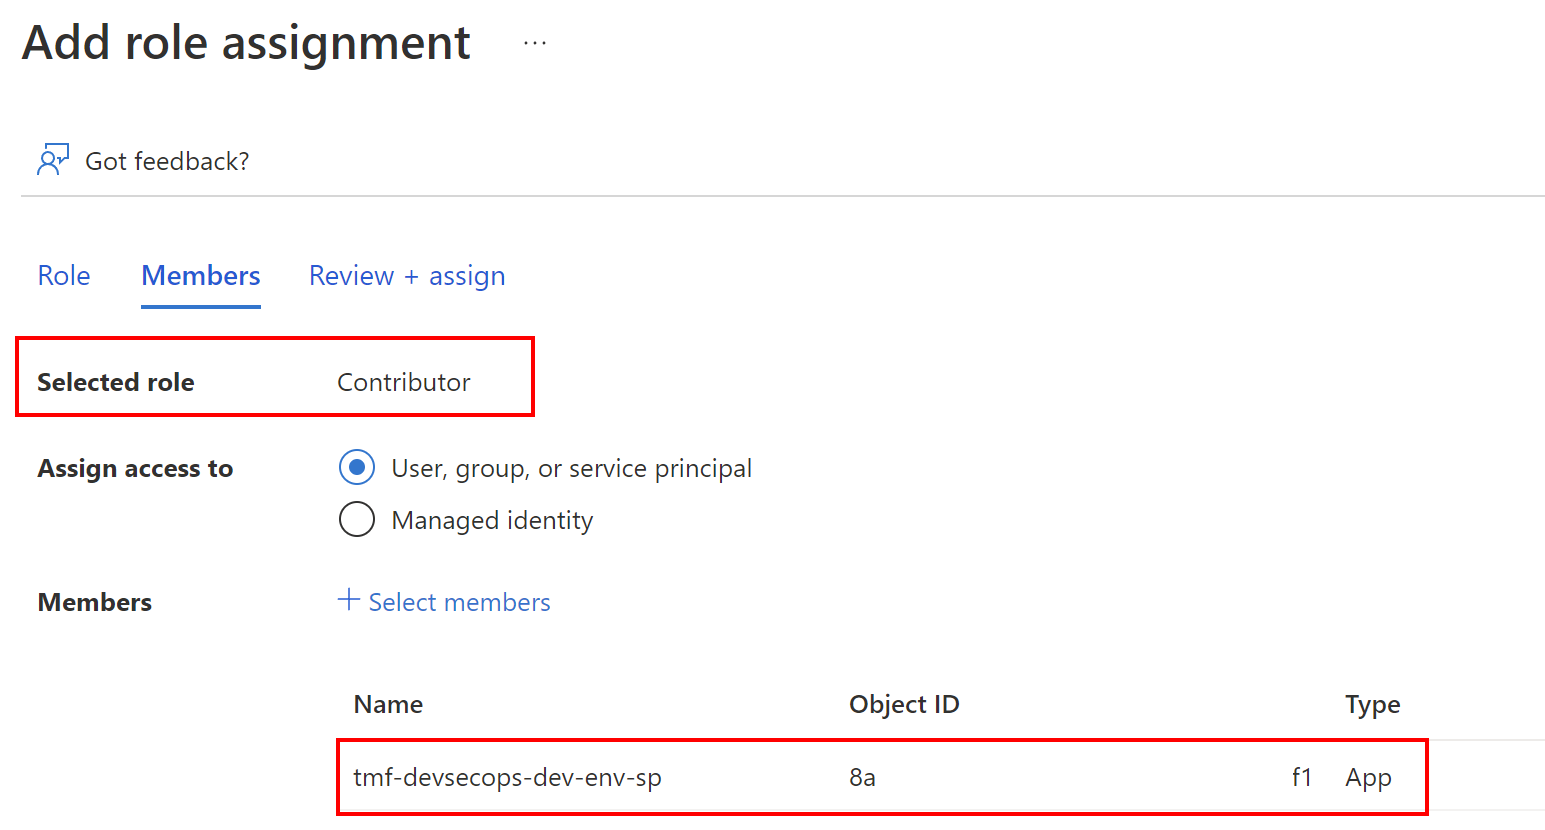
Important note here!
The description says that Contributor grants full access to manage all resources, but does not allow you to assign roles in Azure RBAC…. This is an important fact here! If you plan for instance to create User-assigned Managed Identities (using Bicep, ARM or PowerShell within your DevOps Pipeline), and assign roles to them, you will have to either set Owner role or create the custom one.
Once we have the above configured, with client ID, client secret, and tenant ID values we can go to Azure DevOps, and set up the connection.
Steps required on the Azure DevOps side
Now to successfully connect with Azure subscription and be able to deploy to the resource group we created earlier, we have to setup connection parameters for the Azure DevOps project:
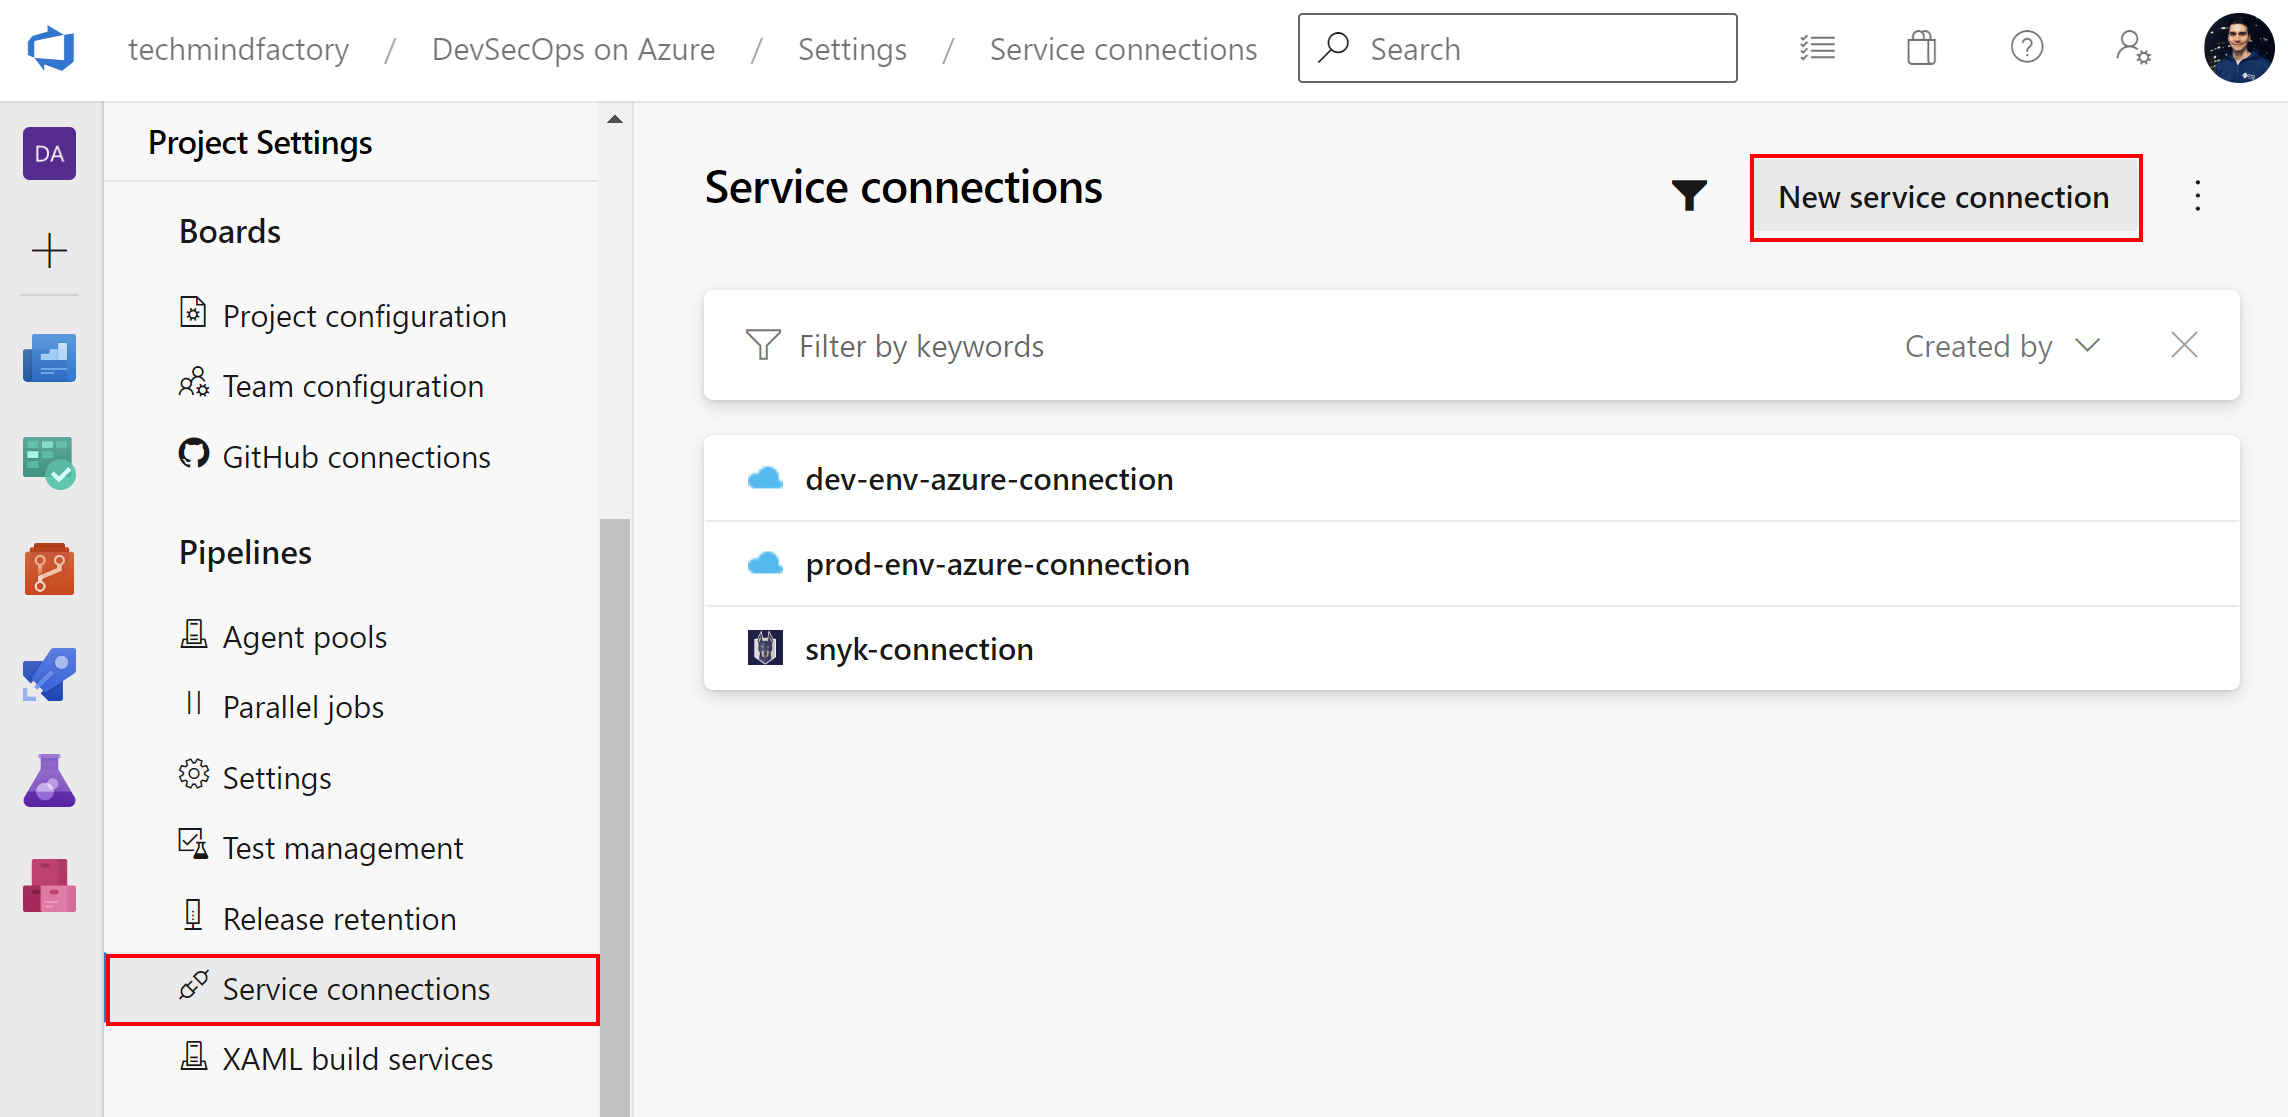
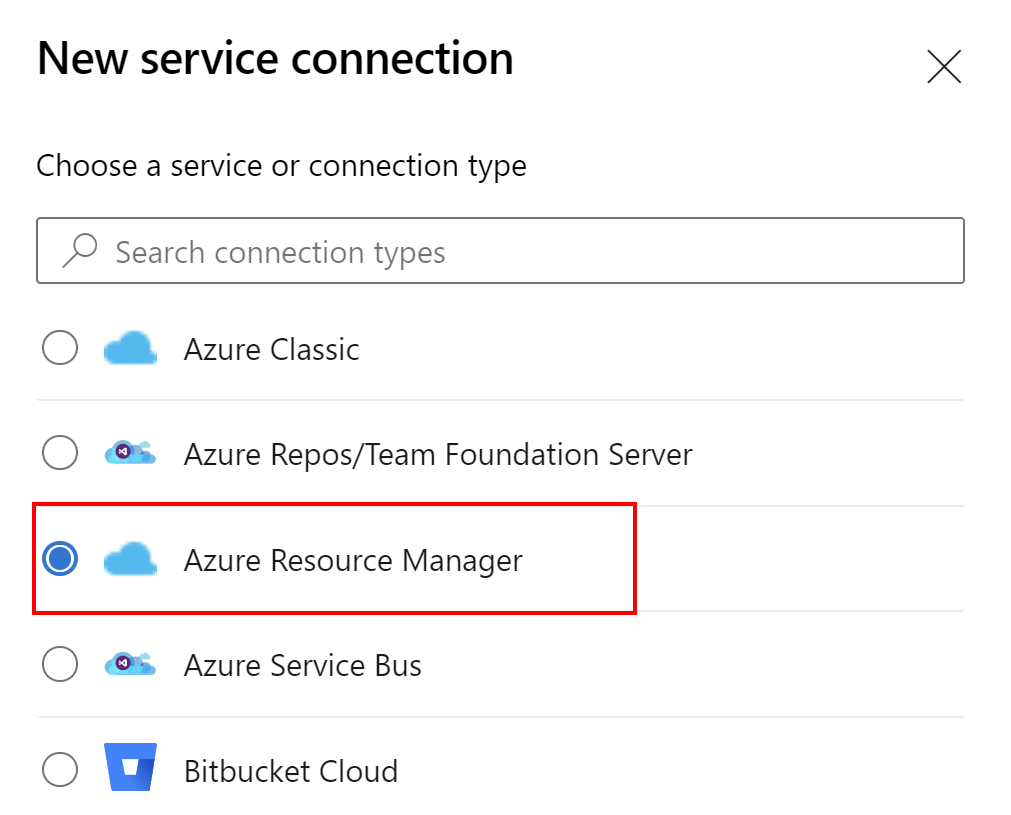
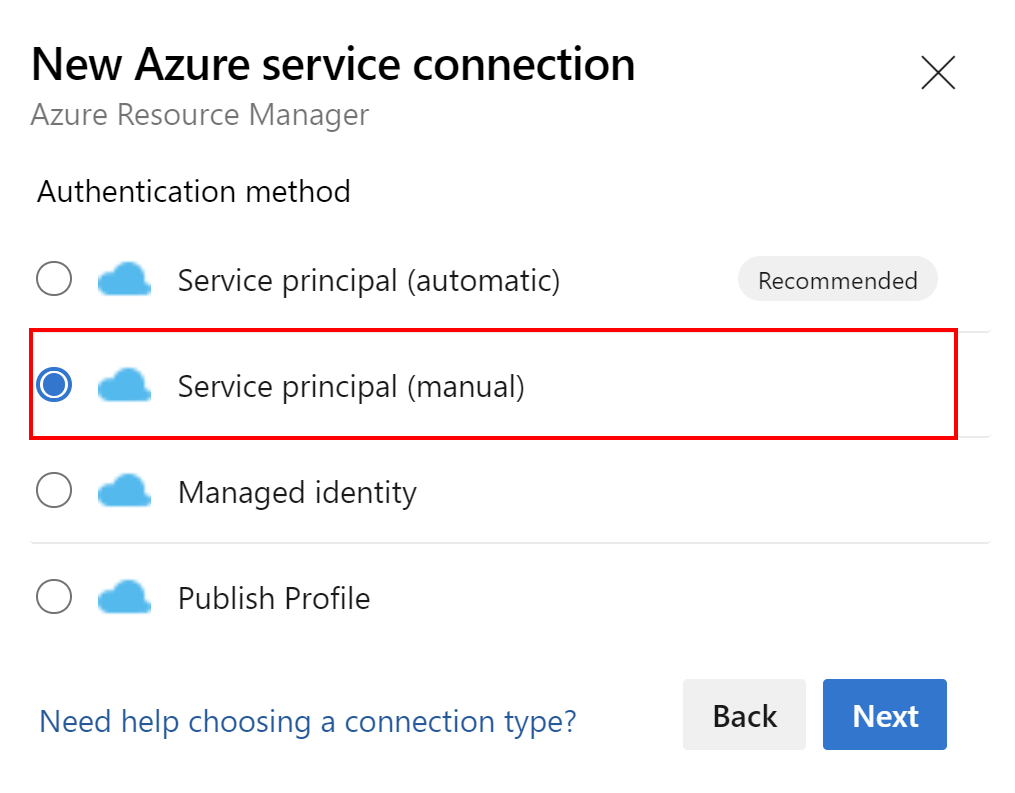
Instead of using Automatic approach, we select Manual:
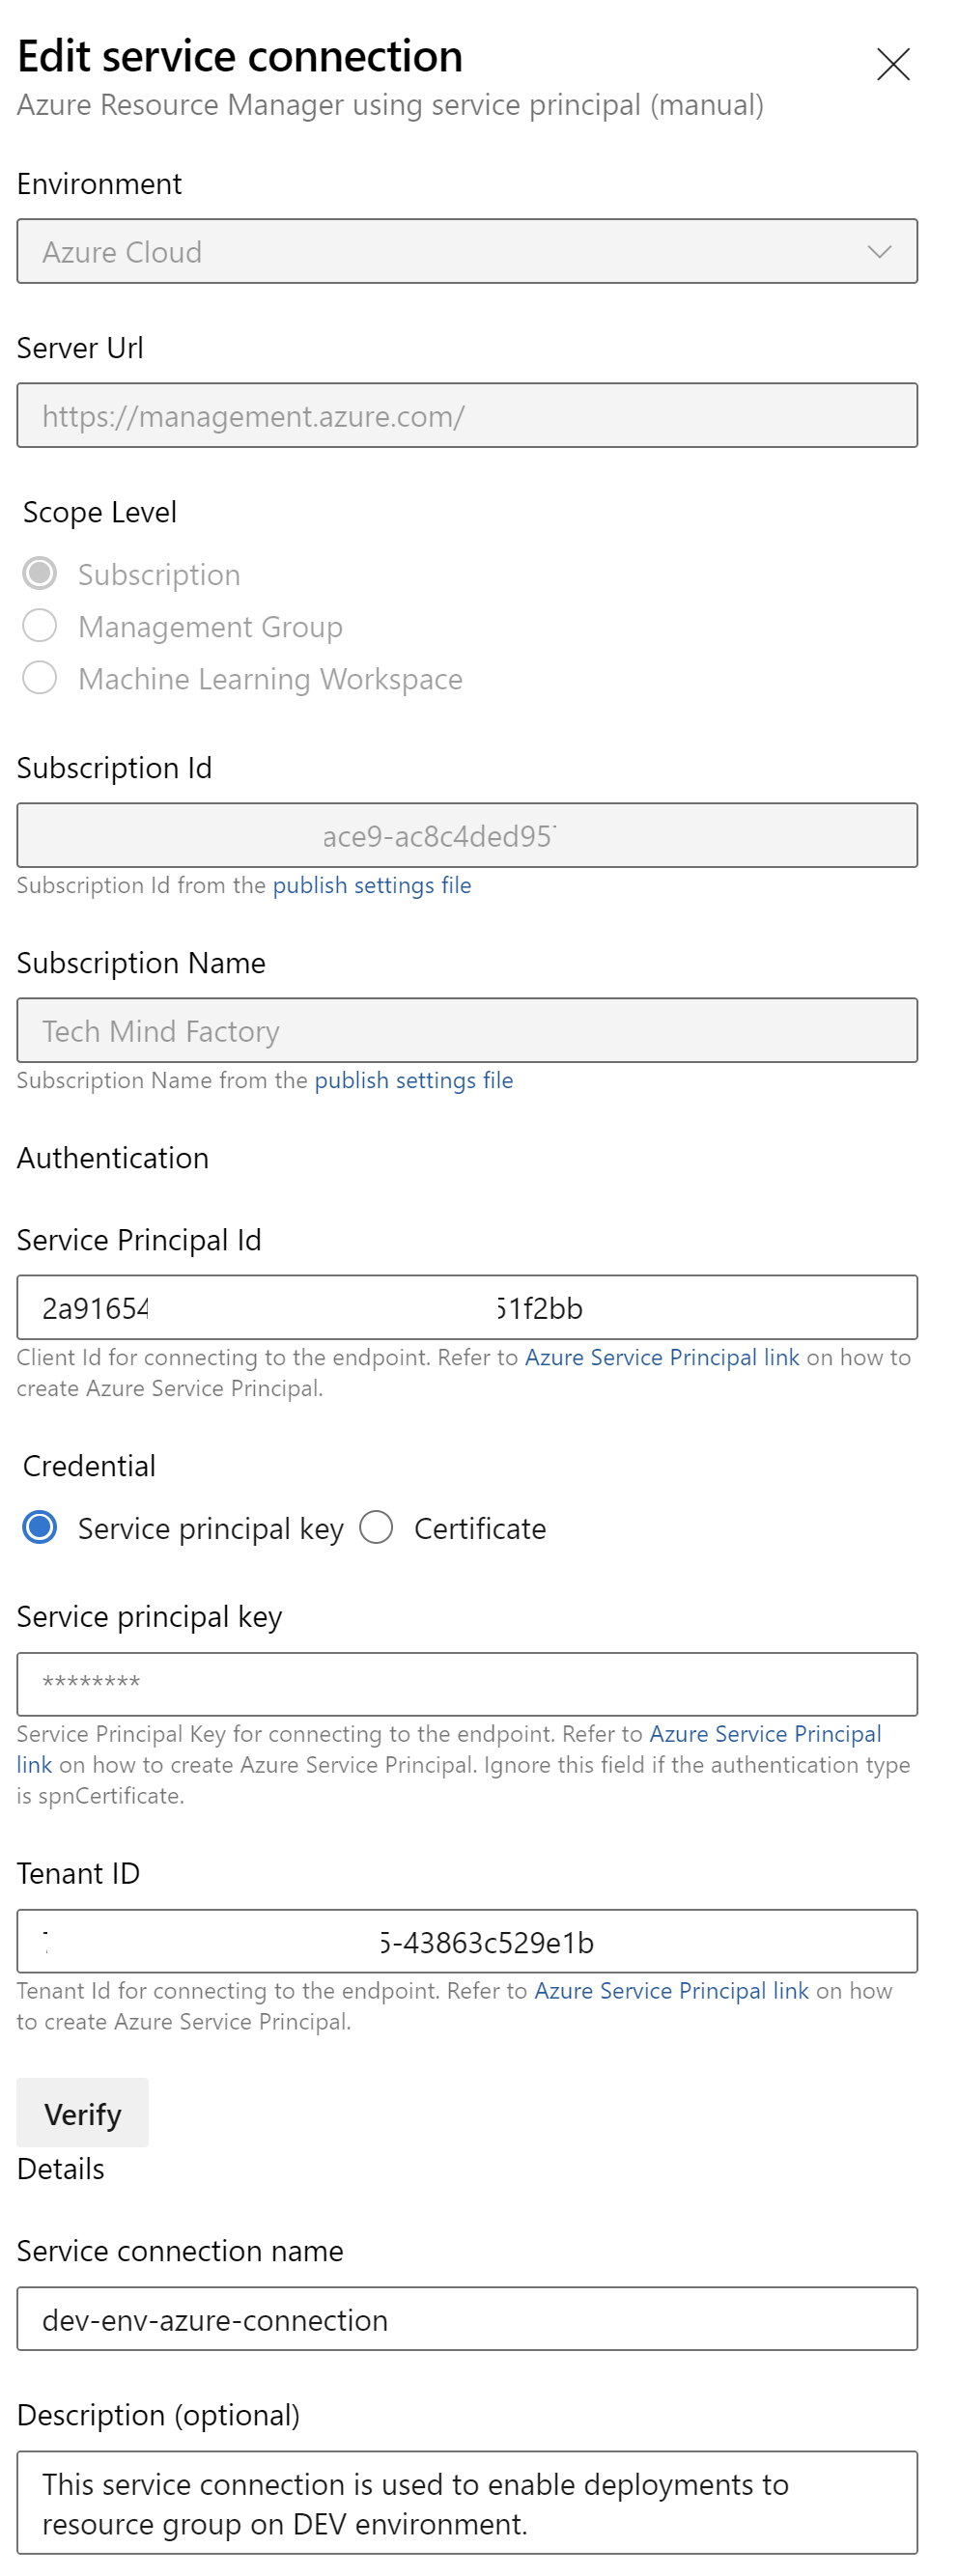
This is an example with parameters for the connection I created:
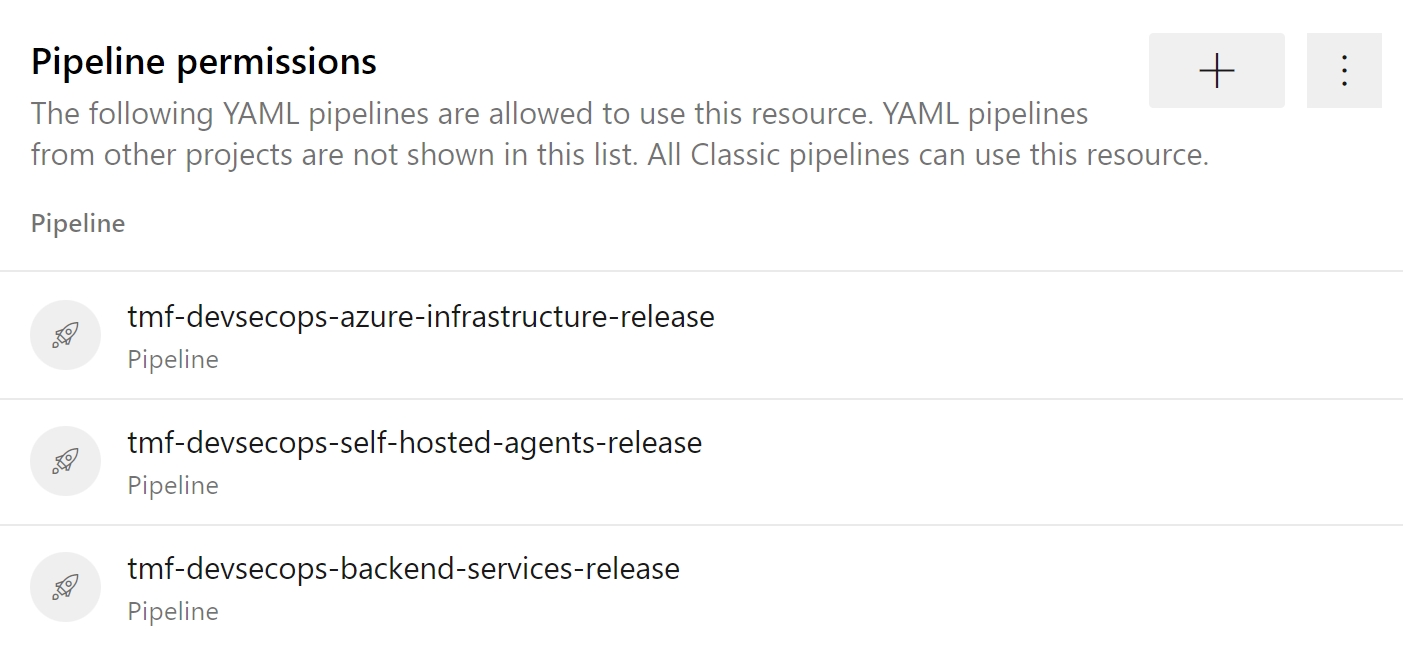
Please note that I do not grant access to this connection from any Azure DevOps pipeline. I want to be sure that only selected pipelines have access to it:

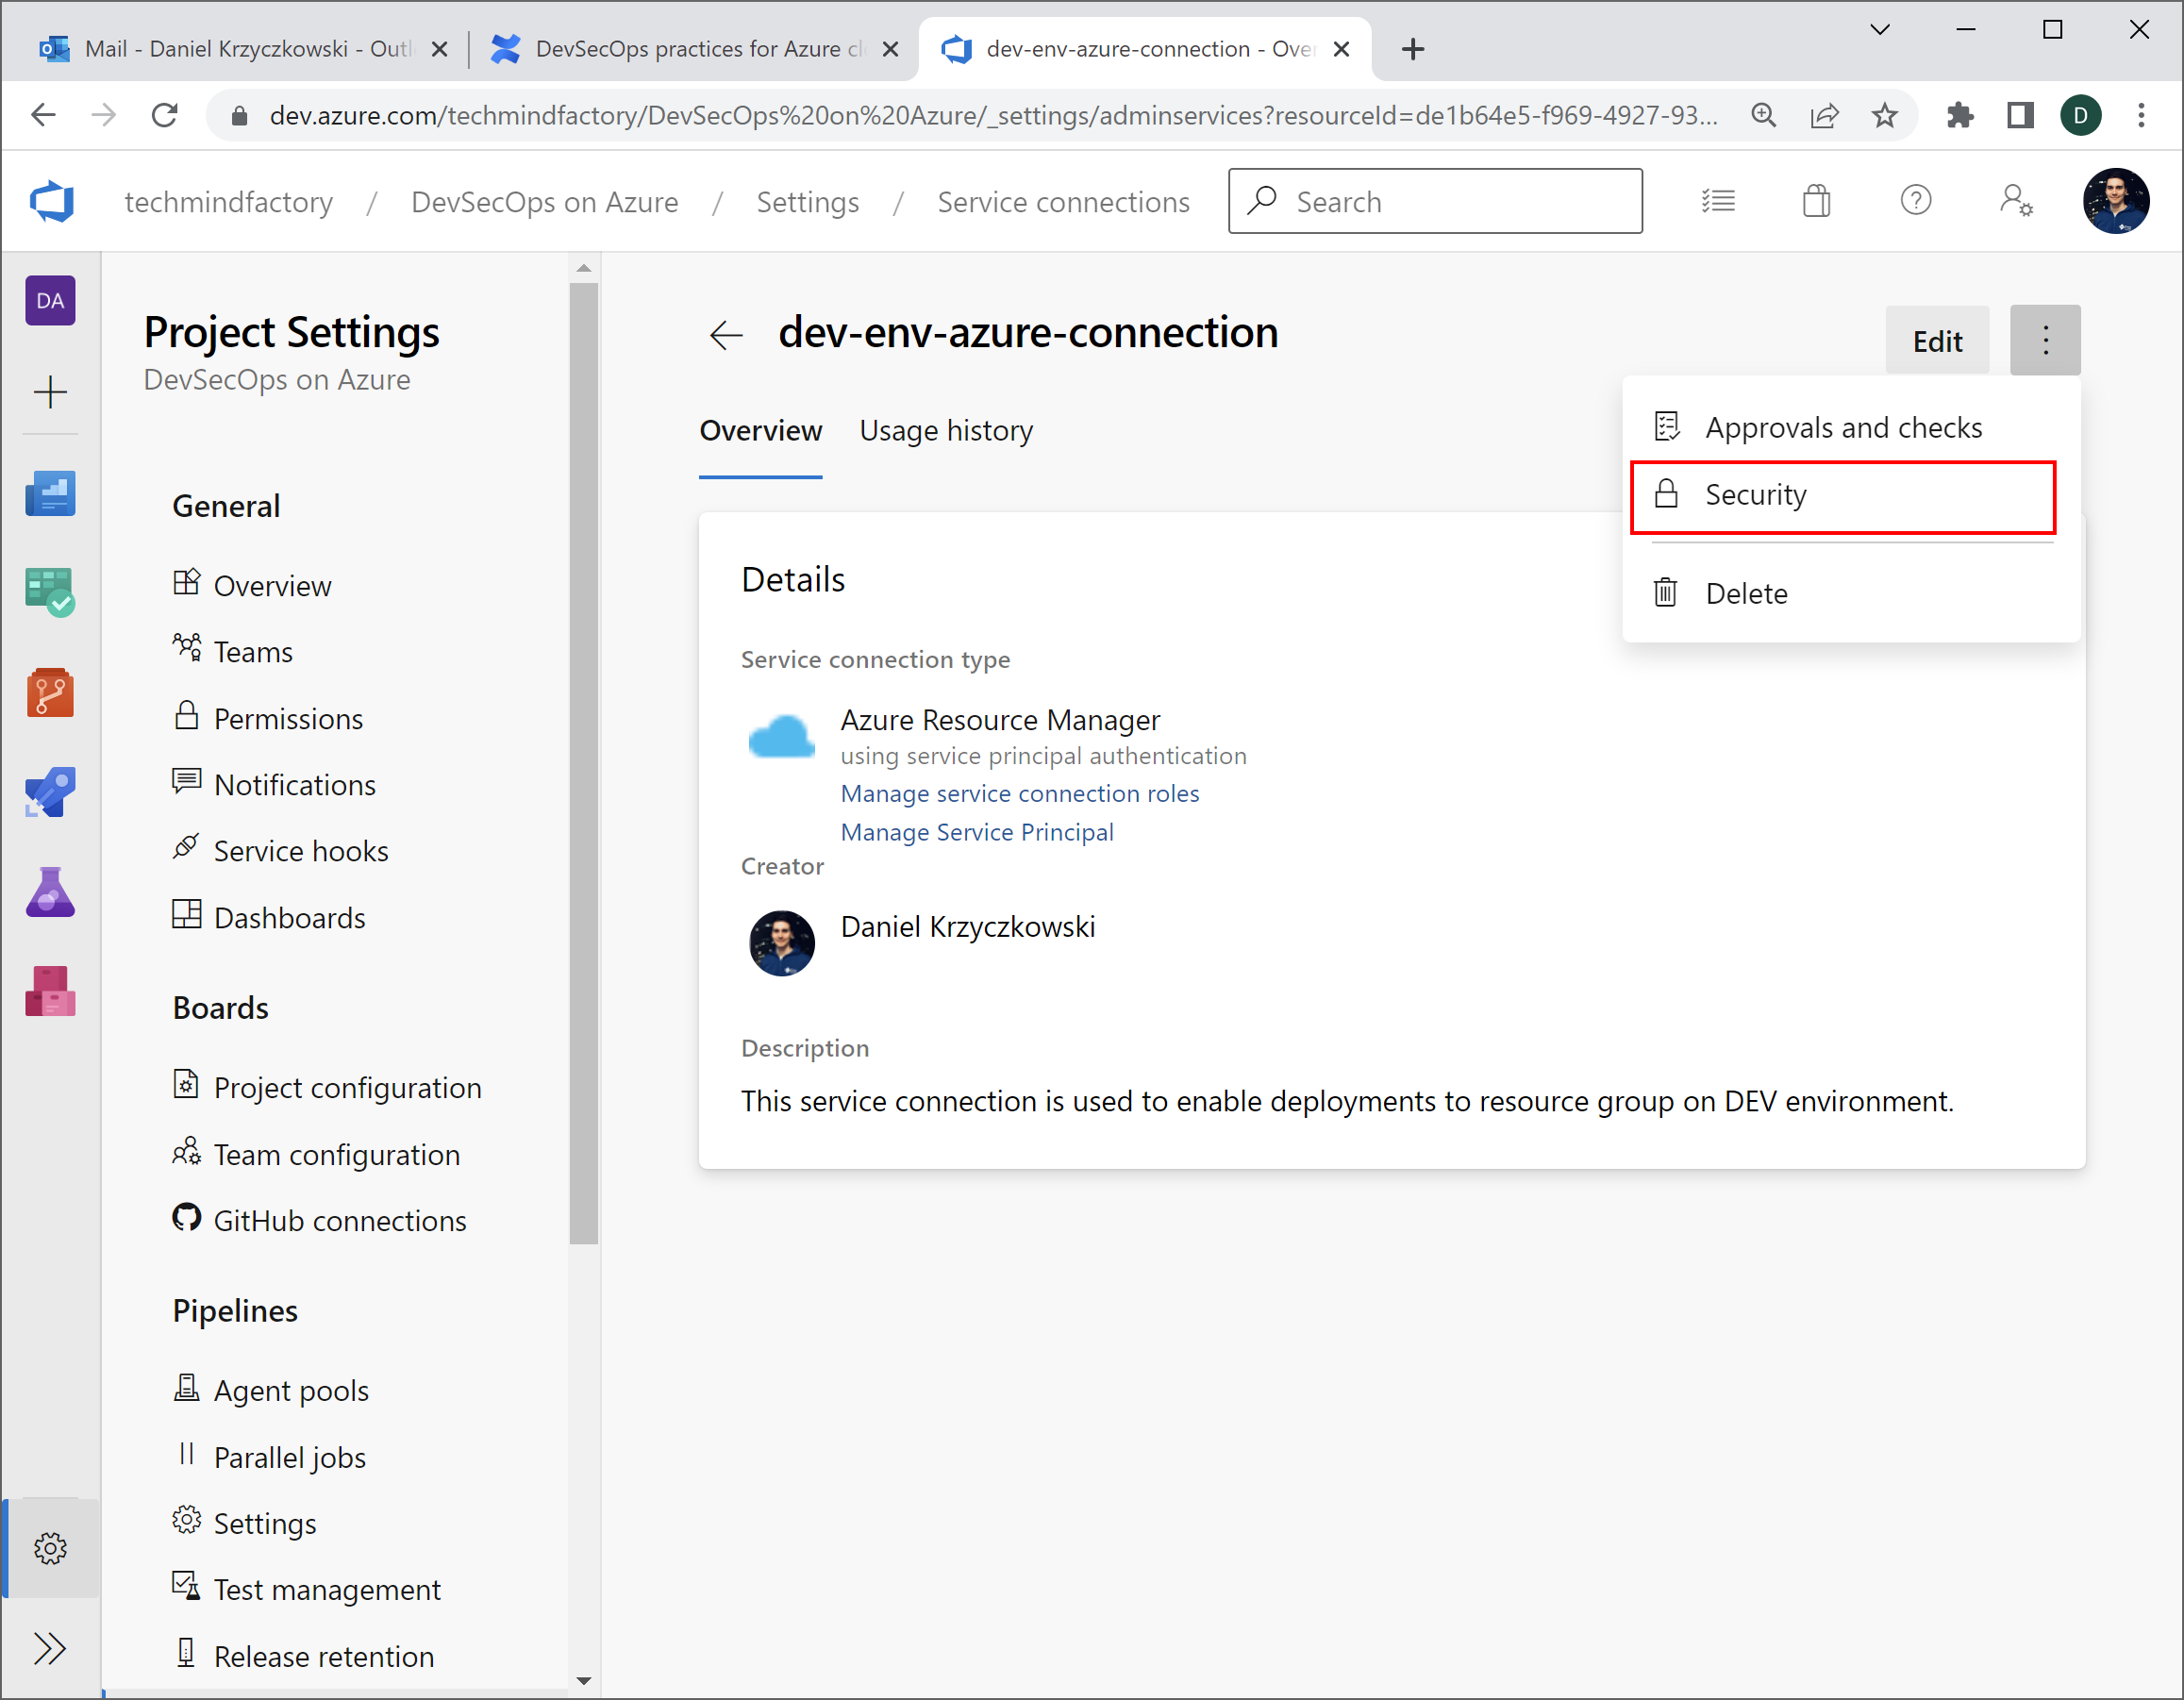
Now in the Security settings, I can set access to this specific service connection from specific pipelines:
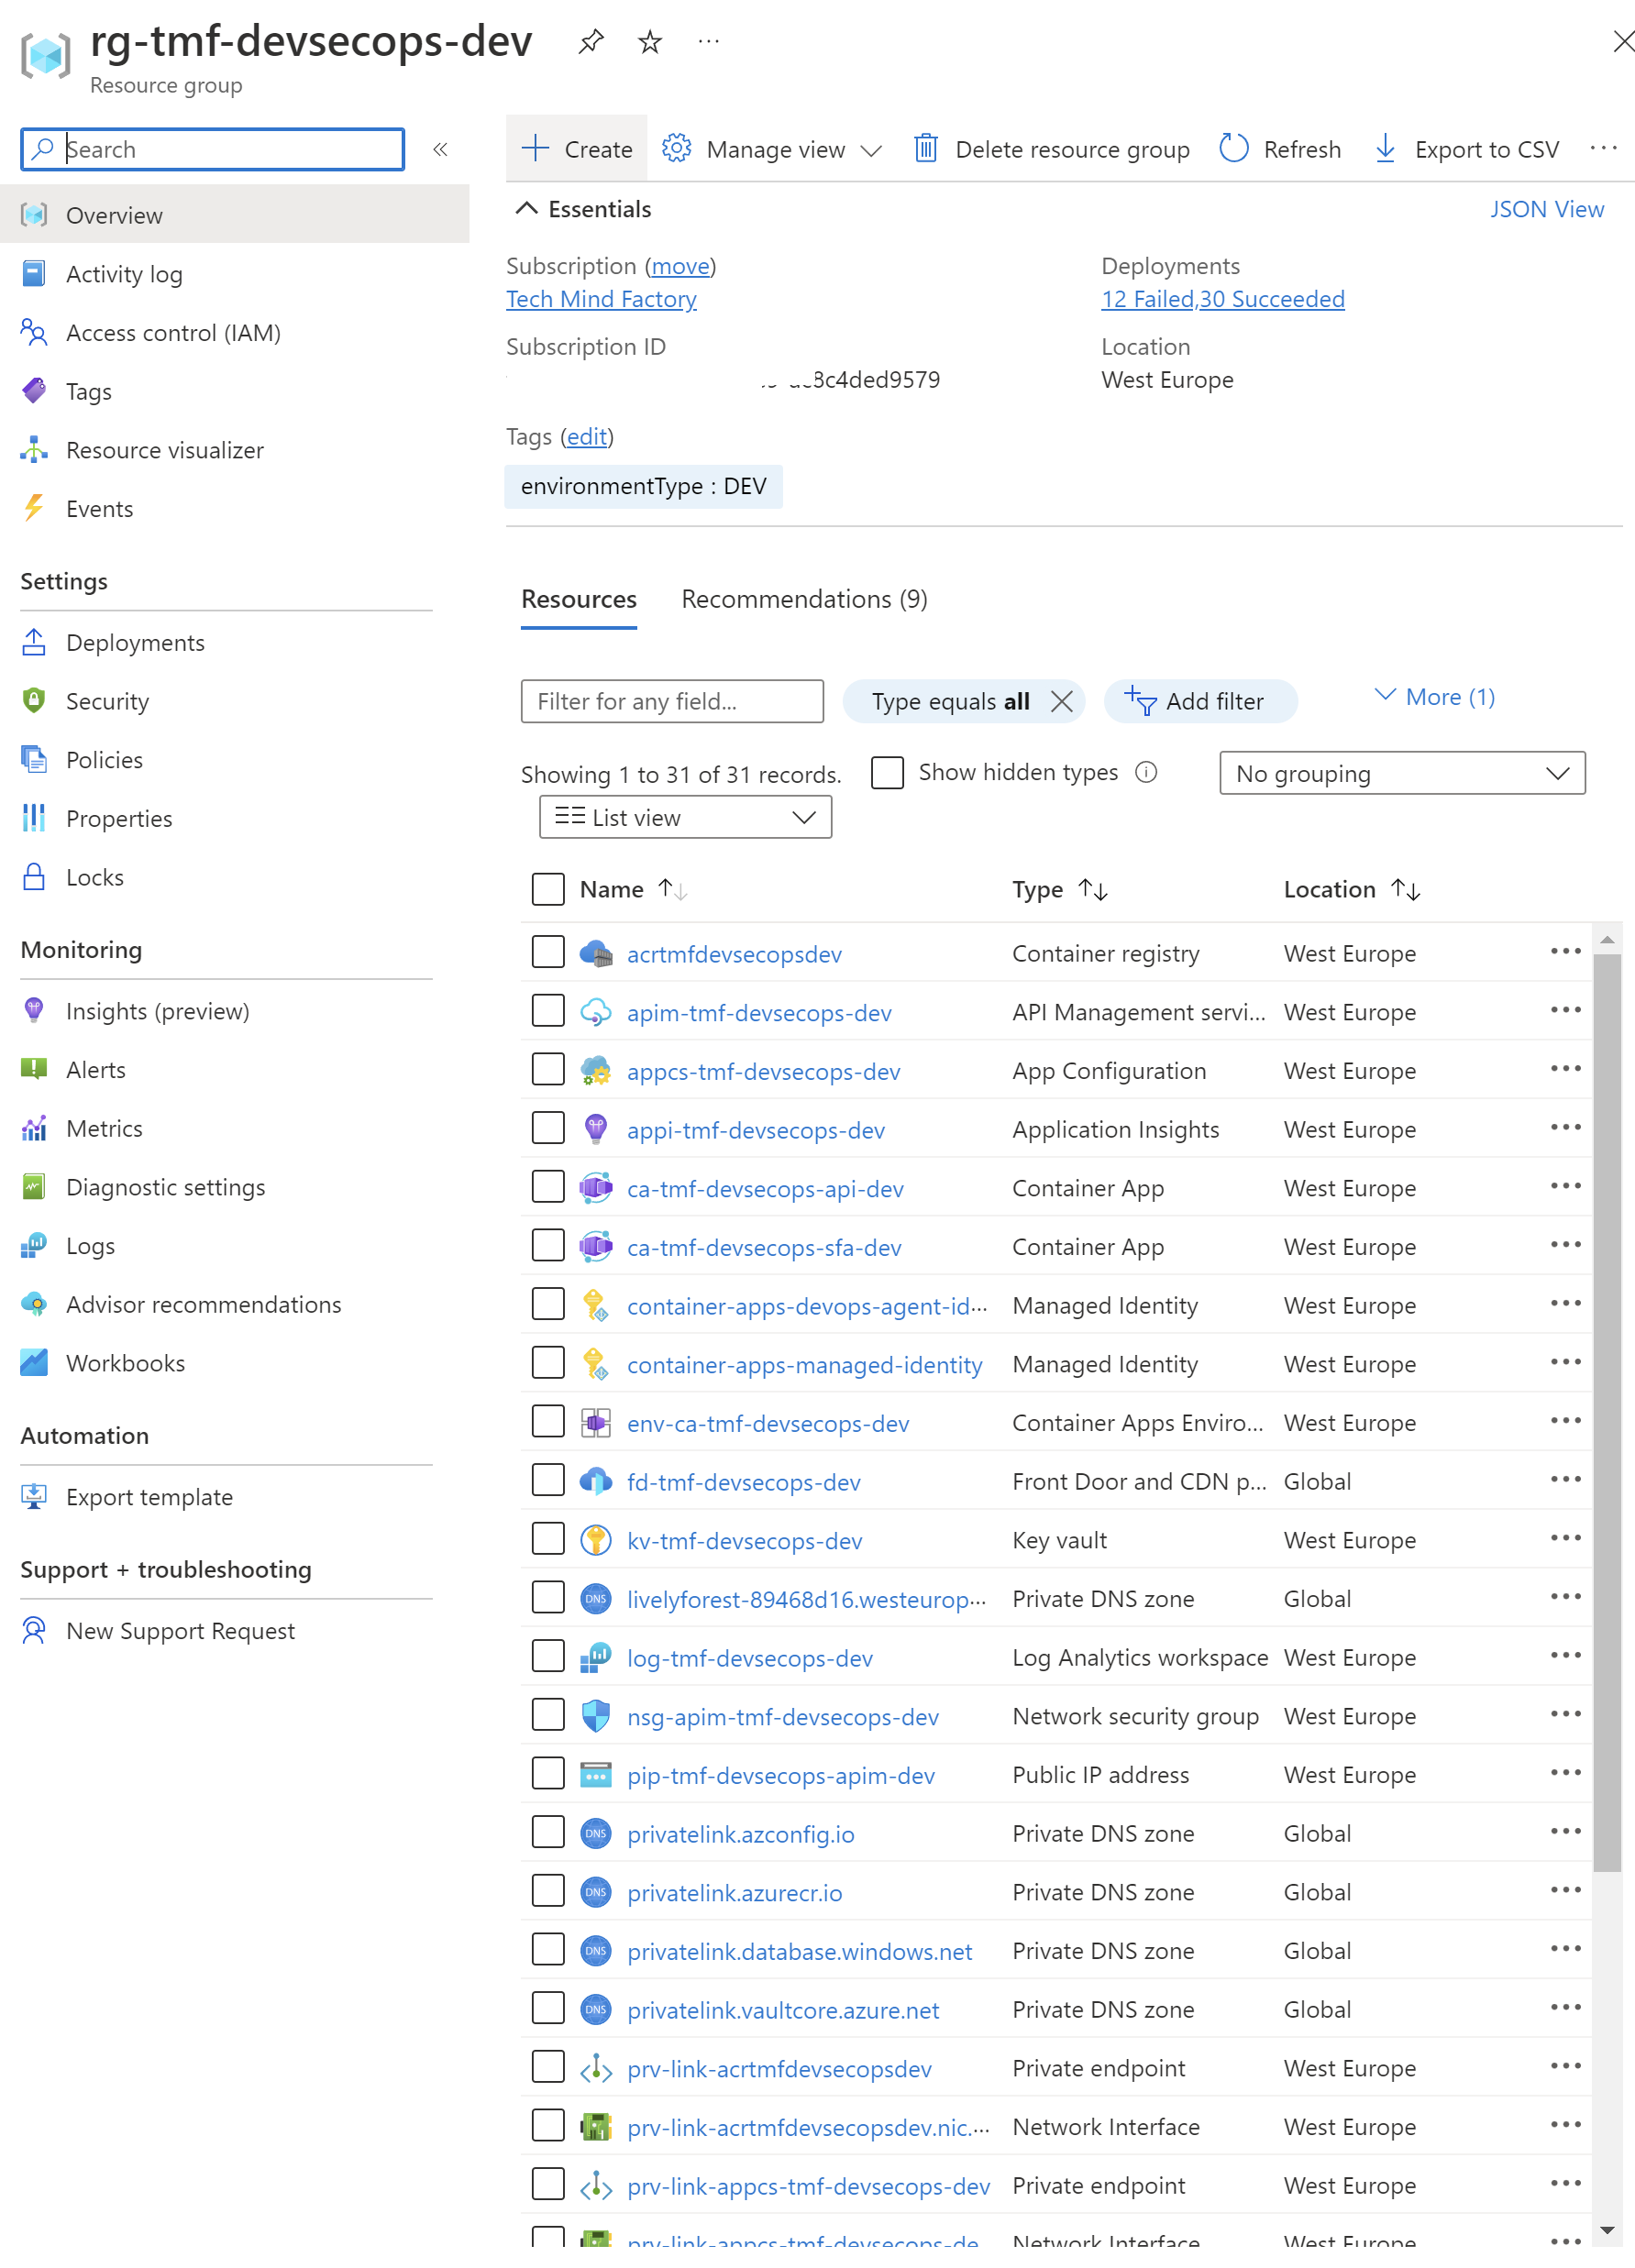
Now I can trigger the pipeline, and for instance create all Azure resources using Bicep in my pipeline:

Important
There is one downside of the solution above, we have to rotate the secrets of the Service Principal we created for the Azure DevOps service connection. I can confirm that the Product Group from Microsoft works hard to improve this element and switch to Workload Identity Federation. Let’s discuss it a little bit.
GitHub connected to Azure cloud
When it comes to GitHub, we can follow similar steps to configure connection to the Azure cloud. However, we can utilize Workload identity federation approach which allows accessing Azure Active Directory protected resources without needing to manage secrets. This is a huge benefit as we do not have to remember to rotate secrets as mentioned above.
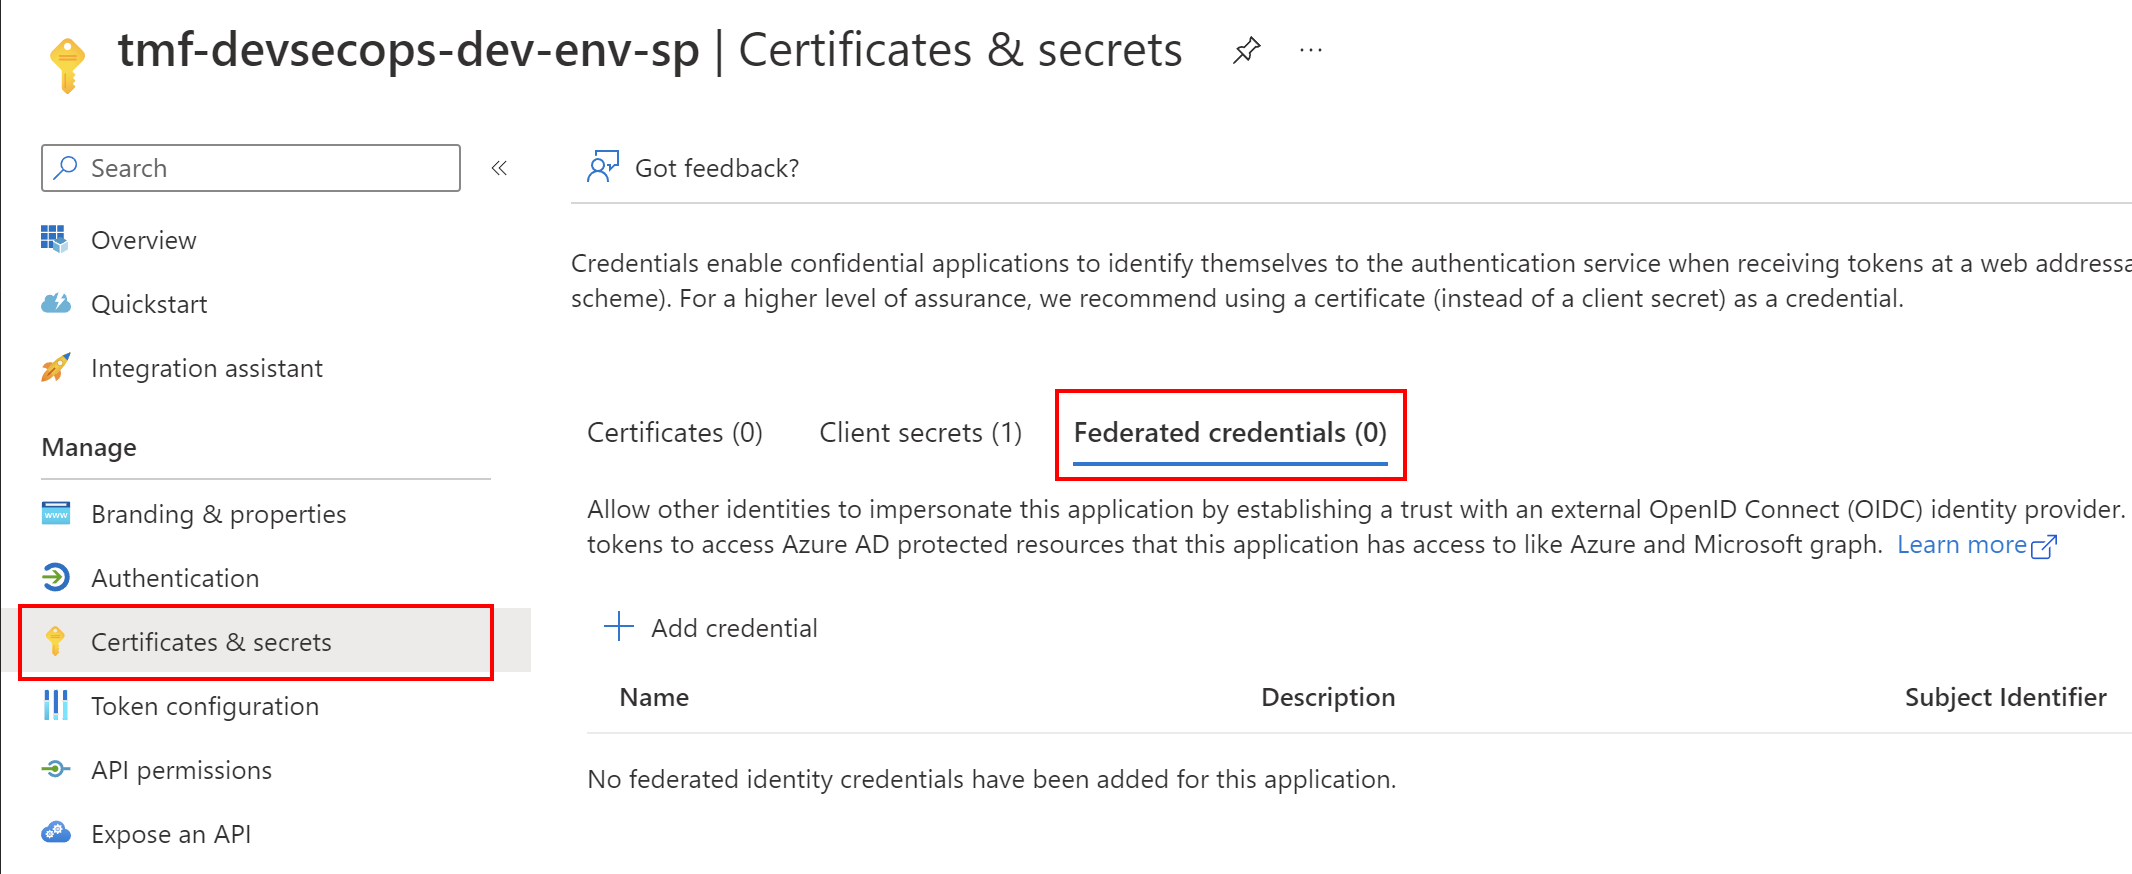
The main difference here is that instead of generating client secret, we use Federated credentials:
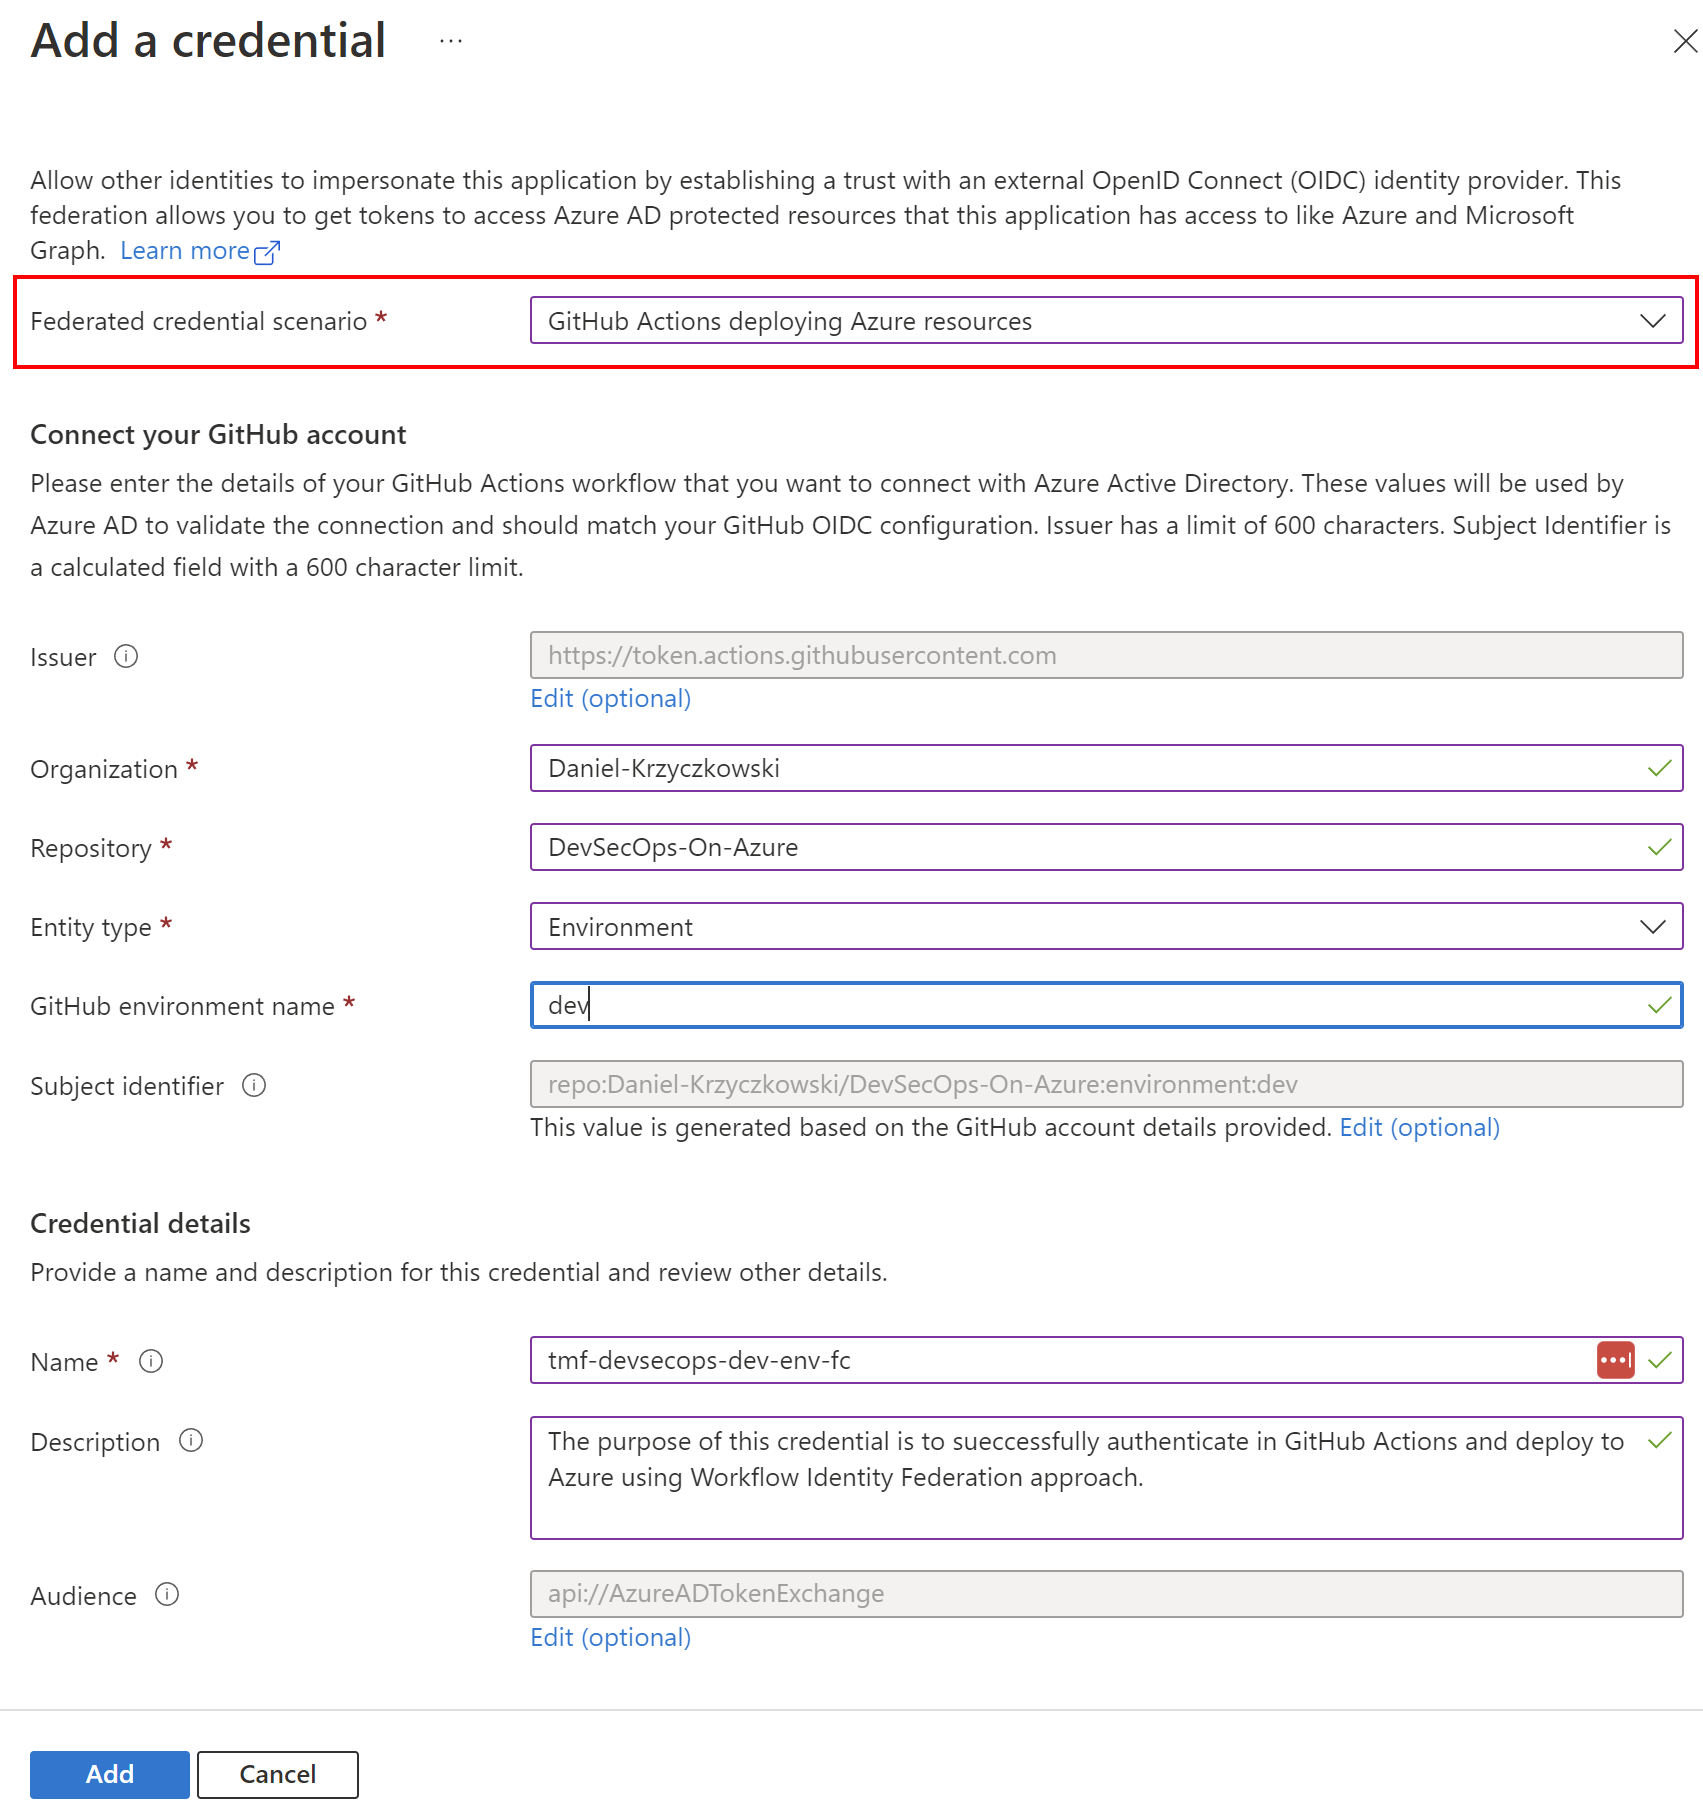
Then on the GitHub side we have to add below three secrets:
- AZURE_CLIENT_ID Application (our app registered in the Azure AD) ID
- AZURE_TENANT_ID Directory (tenant) ID
- AZURE_SUBSCRIPTION_ID Subscription ID
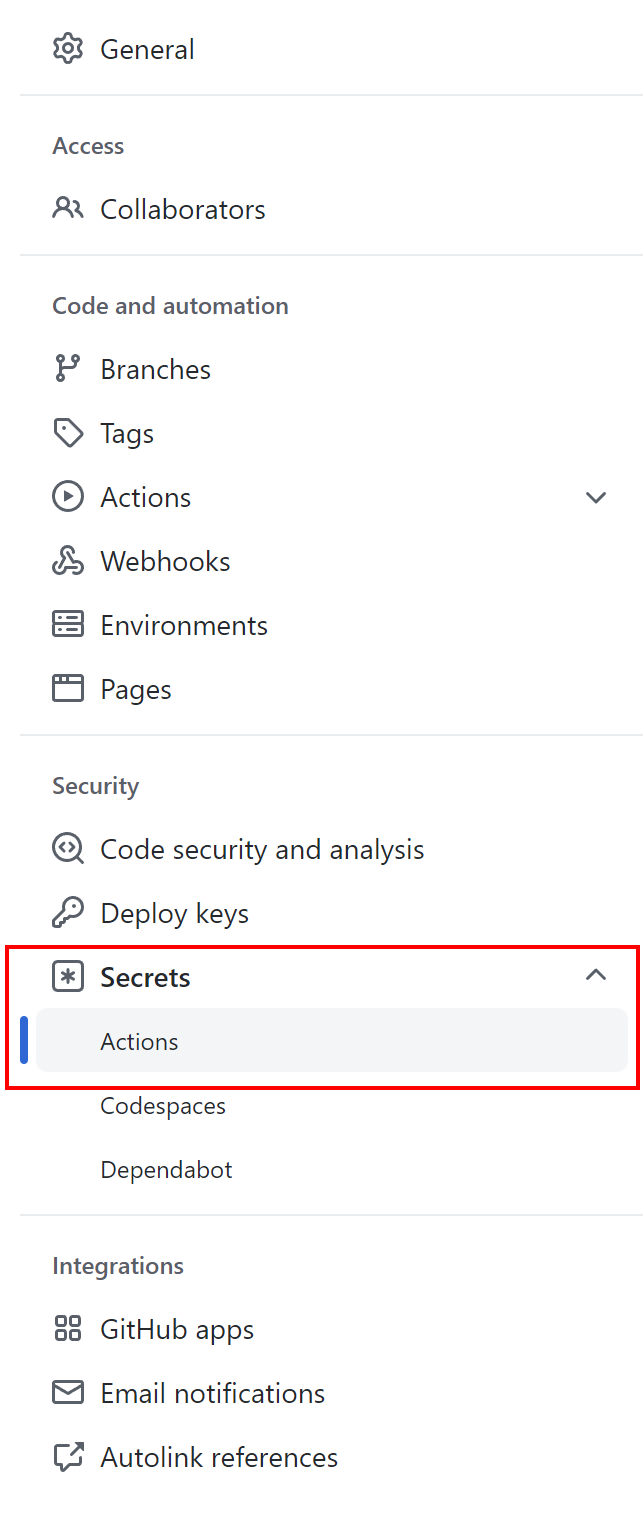
Now in the GitHub Action workflow, we can successfully authenticate and then deploy resources to the Azure cloud:
name: Build and deploy securely to Azure cloud

on:
  push:
    branches: [ main ]

  workflow_dispatch:

permissions:
      # This step is required to obtain ID Token from Azure AD during the authentication process:
      id-token: write
      contents: read
      packages: read

env:
  AZURE_FUNCAPP_NAME: func-tmf-func-app
  AZURE_FUNCTIONAPP_PACKAGE_PATH: '.'
  AZURE_RG_NAME: rg-tmf-devsecops-dev

jobs:

  build-func-app:
    needs: [clean-working-directory]
    runs-on: self-hosted

    steps:
      - uses: actions/checkout@v2
      # Here we use workload identity federation authentication approach:
      - name: Az CLI login
        uses: azure/login@v1
        with:
          client-id: $
          tenant-id: $
          subscription-id: $

      - name: Publish Function App to Azure
        run: |
          az functionapp deployment source config-zip -g $ -n $ --src '$/func-app-package.zip'
I created dedicated video on YouTube about this topic - it is not long, and I recommend to watch it to fully understand the concept:
Secure Cloud Deployments with GitHub
We can also read more in the official documentation here.
Summary
In this article, I explained the core concepts of Azure AD roles and Azure Role-based Access Control (RBAC). I hope that now it is more clear what is happening underneath when we want to connect GitHub or Azure DevOps to our Azure subscription securely. As I mentioned, Microsoft works hard to enable the workload identity federation approach for Azure DevOps so we can avoid using secrets. It is also important to remember that utilizing Managed Identities together with RBAC is recommended approach when setting up access from one Azure resource to another. With this approach, we can avoid using any secrets in our DevSecOps process. In the next article, we will talk about how to achieve continuous compliance with Azure Policy.
If you like my articles, and find them helpful, please buy me a coffee:


