Cars Island ASP .NET Core API - integration with Azure Cosmos DB - part 3

Introduction
In my first article, I introduced you to Cars Island car rental on the Azure cloud. I created this fake project to present how to use different Microsoft Azure cloud services and how to their SDKs. I also presented what will be covered in the next articles. Here is the third article from the series where I would like to discuss how to integrate with Azure Cosmos DB (a globally distributed and elastically scalable database) and use the new .NET C# library.
In the Cars Island solution, Azure Cosmos DB is used to store data related to cars (like brand and model), customer’s enquiries, and car reservations. Below I present solution architecture:
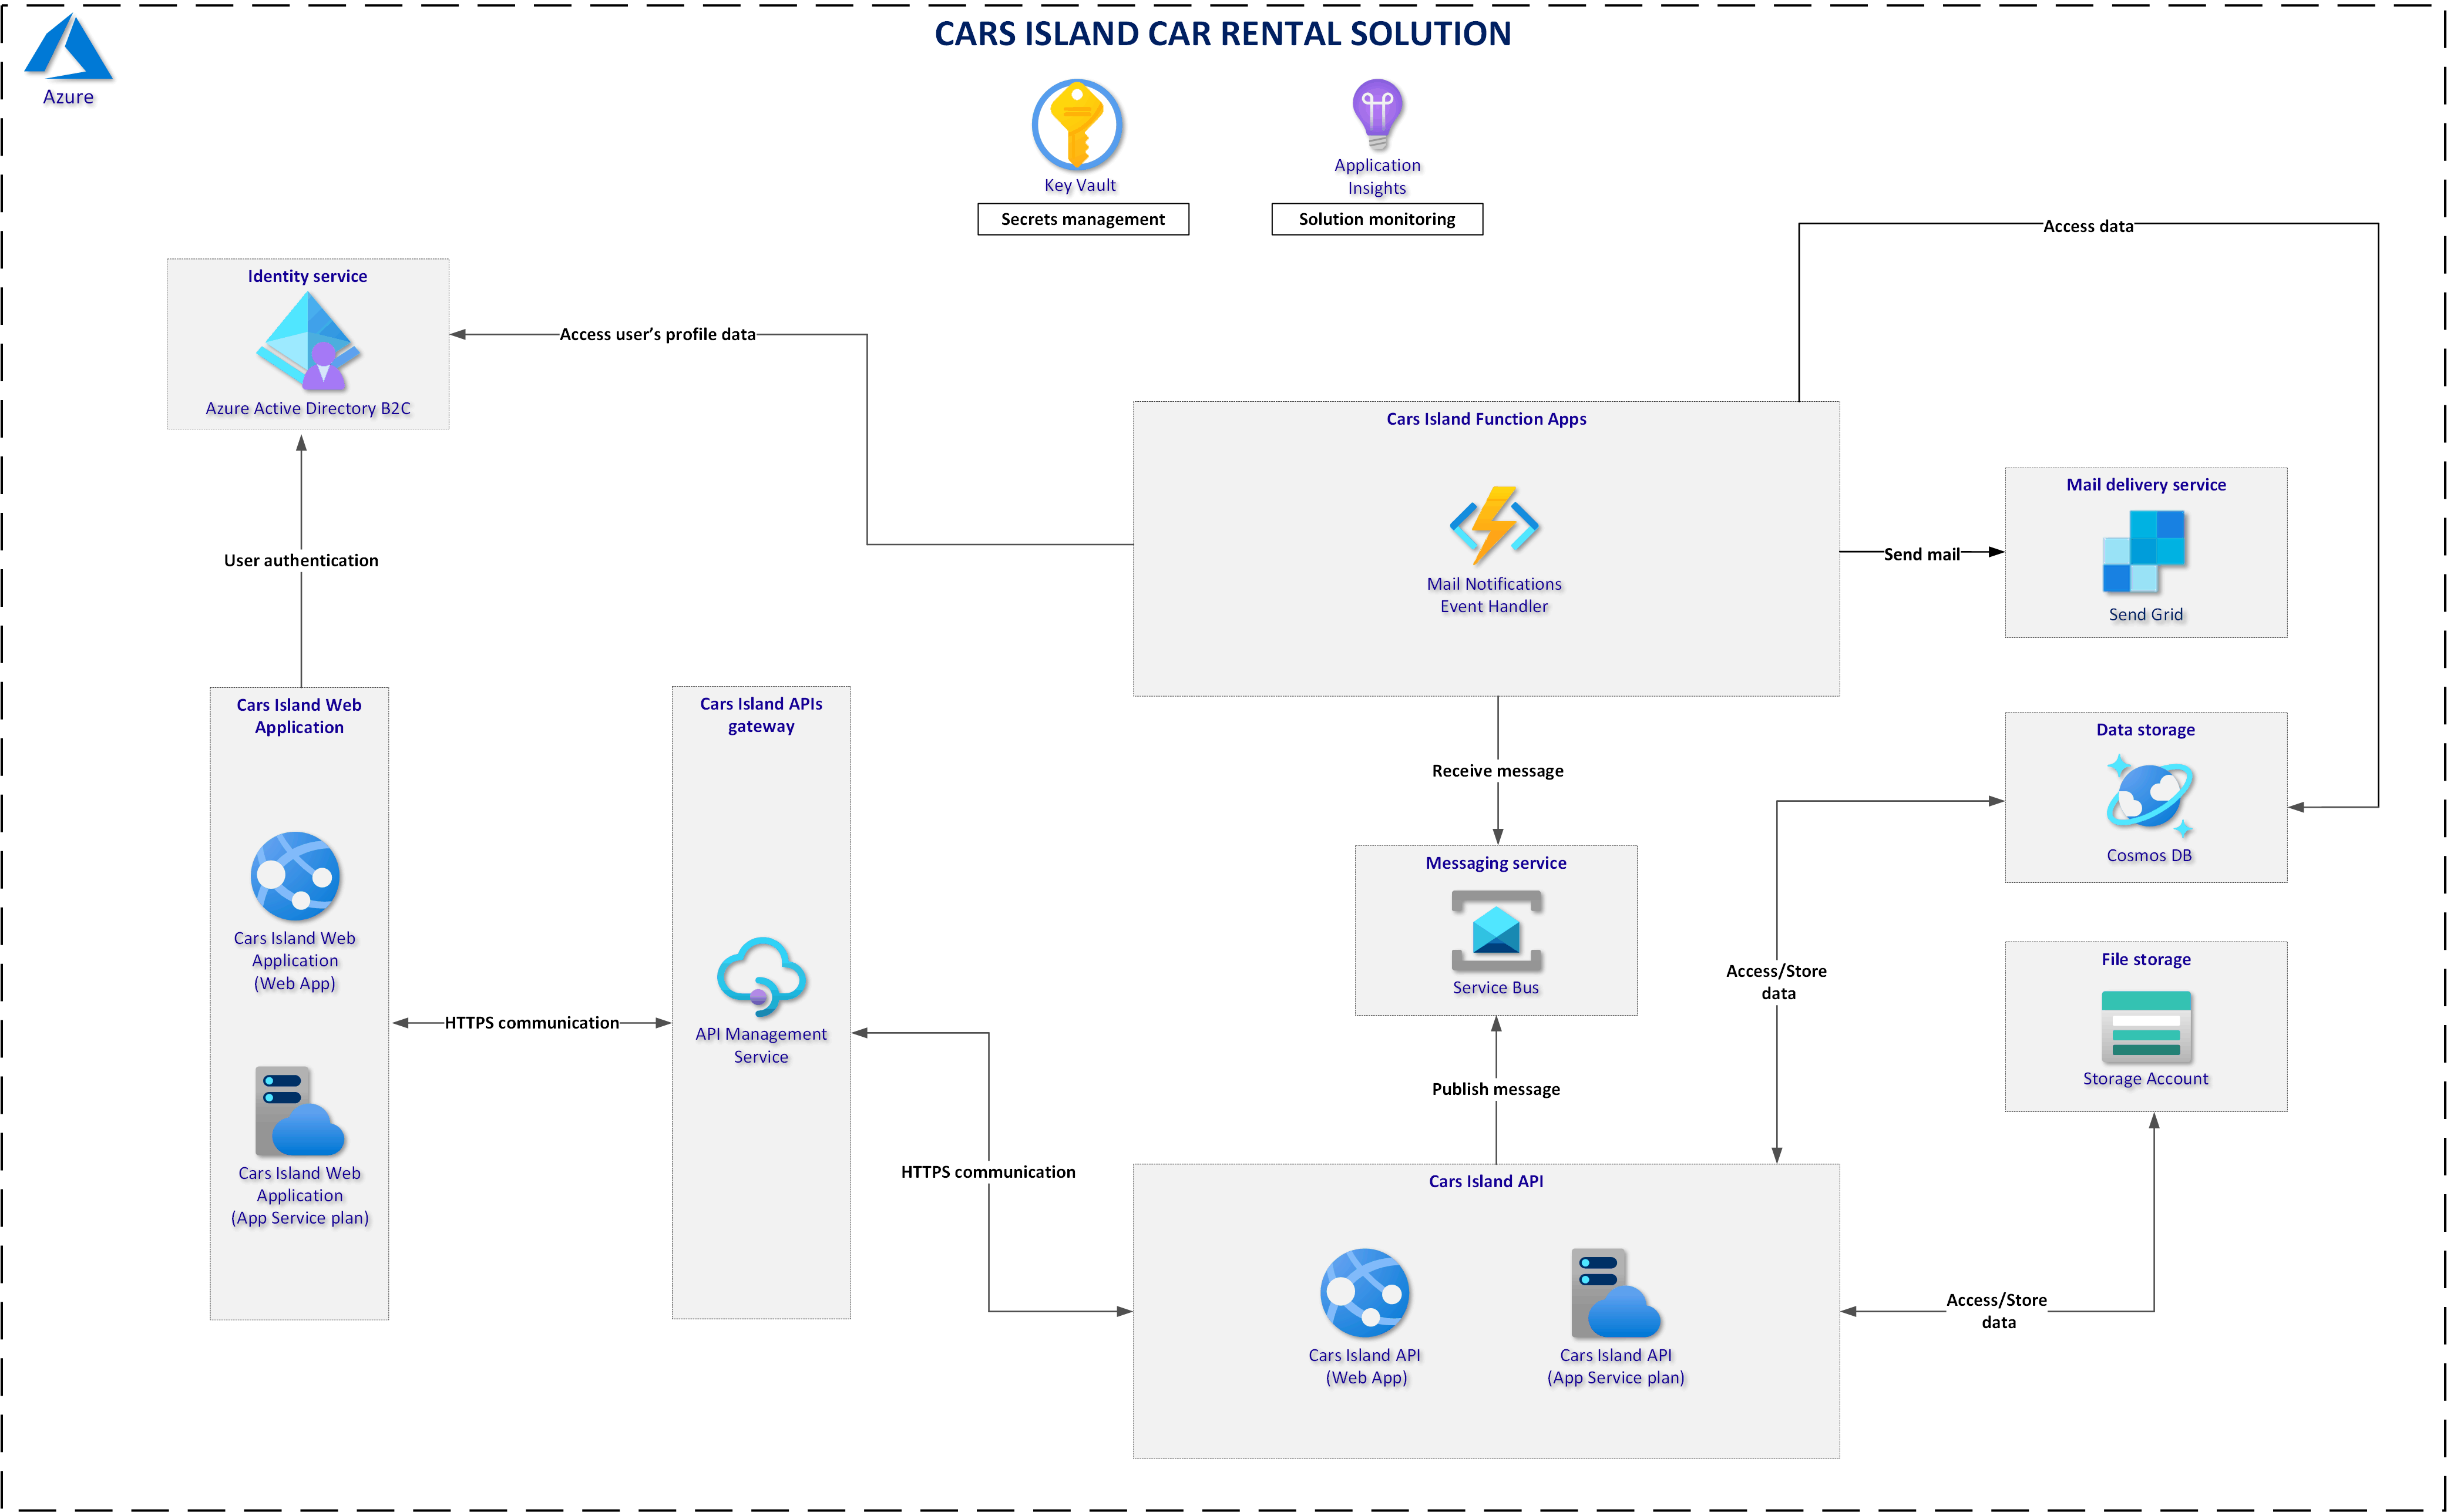
As you can see, Azure Cosmos DB is used by Cars Island Web API and Azure Function responsible for sending confirmation emails. In this article we are goind to dicuss how Azure Cosmos DB is integrated in the ASP .NET Core Web API project but please note that the same techniques are used to use this SDK in the Azure Function source code.
Cars Island project is available on my GitHub
Azure Cosmos DB setup
Azure Cosmos DB account creation
First of all, we have to create new instance of Azure Cosmos DB and configure it. I created the service with below configuration:
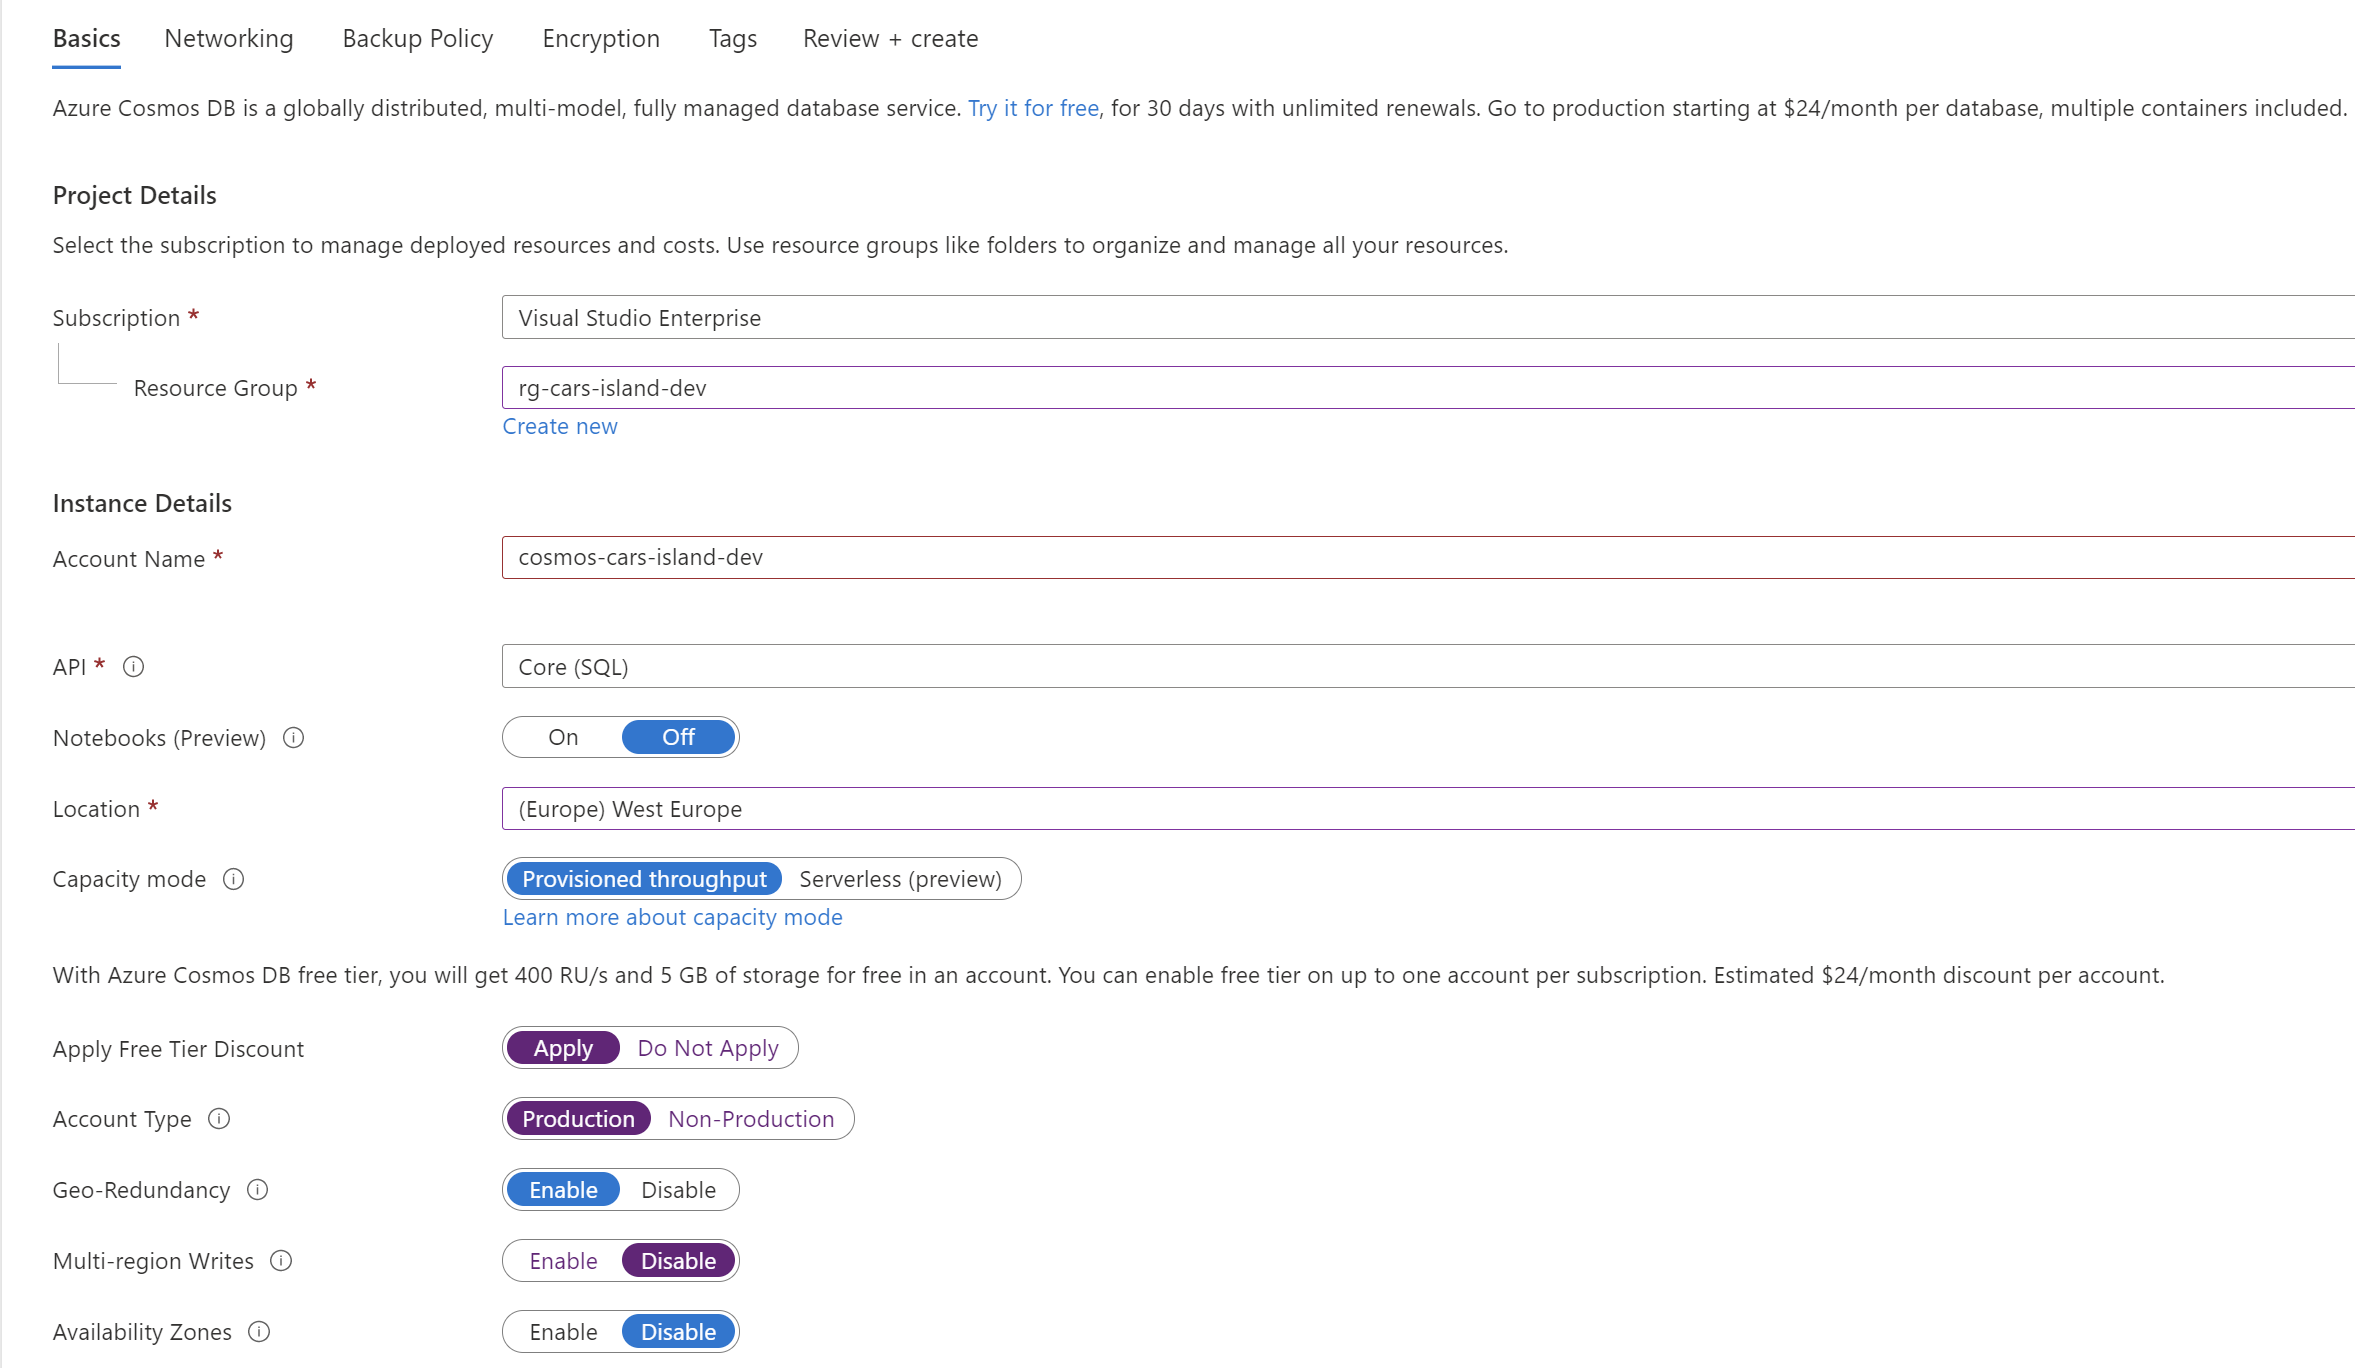
As you can see I applied free tier for the Cosmos DB account (with Azure Cosmos DB free tier, you will get 400 RU/s and 5 GB of storage for free in an account). For the account type I have selected Production one but please note that for development purposes you can start with the Non-Production one. The main difference between these two is about geo-replication and multiple write regions. If you plan to run your solution on the production environment you should think about geo-replication (for multiple read regions) and consider multi-write regions (this setting enables you to write to multiple regions at the same time. This setting can only be configured during account creation). If you want to read more about this aspect of Azure Cosmos DB service, please check official documentation. I also encourage you to watch my course on Pluralsight called Designing a Disaster Recovery Strategy on Microsoft Azure where I explained what are the possible options in the Azure Cosmos DB related to geo-replication and high availability.
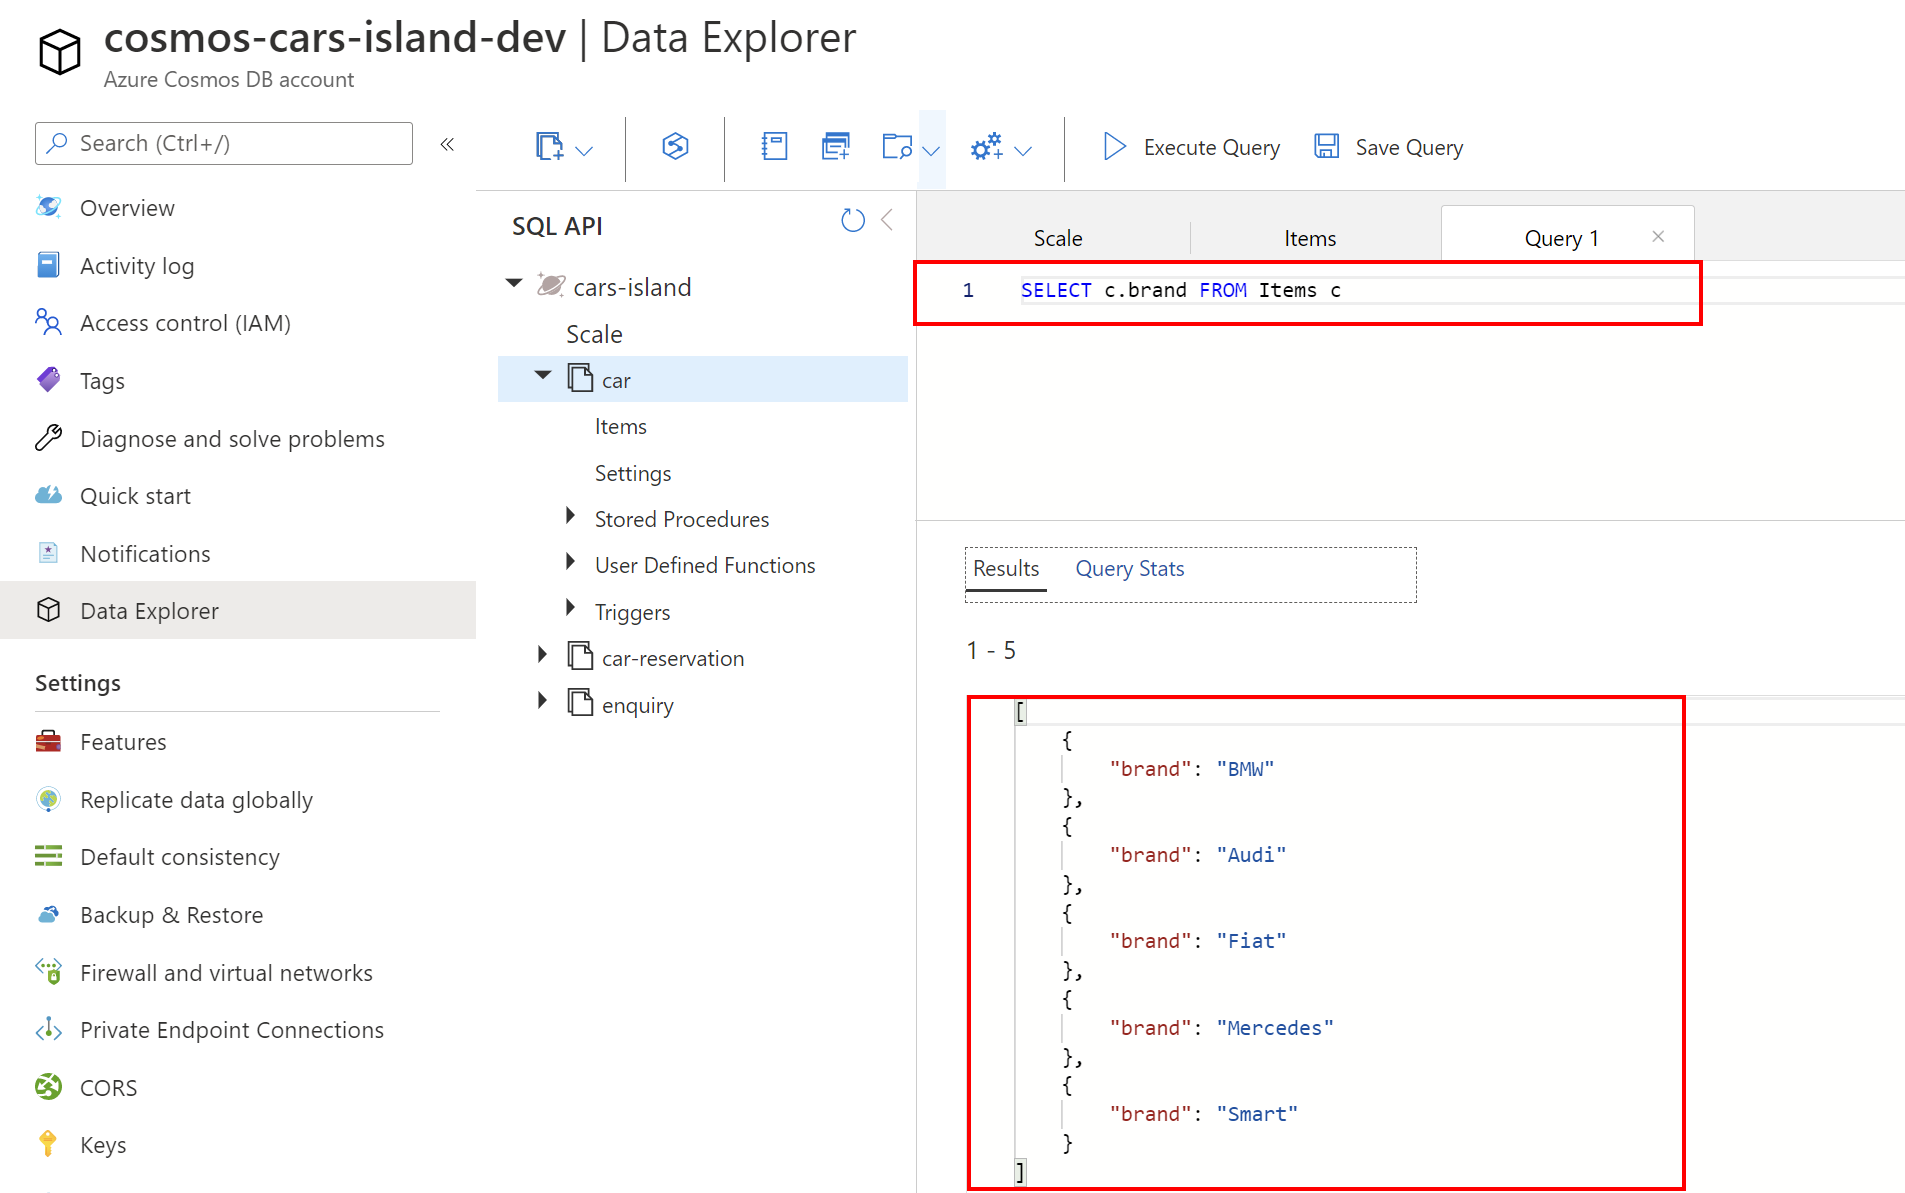
As you can see API is set to Core SQL. It is the default API for Azure Cosmos DB, which provides you with a view of your data that resembles a traditional NoSQL document store. You can query the hierarchical JSON documents with a SQL-like language. For instance, to get all the brands of cars in my car rental company, I can use the below query:
SELECT c.brand FROM Items c
Azure Cosmos DB - multiple regions
Once Azure Cosmos DB is created, we can select regions for data replication. This can be done under Replicate data globally section:

Now you can ask if this configuration with multiple reads is needed. No, it is not but please remember that having more than one read regions provides two important benefits:
- When there is a disaster in one region, data becomes unavailable and your app will stop working (or will just not display data to the users)
- If your application is available for users in the different regions of the world (like in Europe and the United States) it is better (and faster) to serve data from the nearest data center of Azure
As you can see above I set two read regions: North Europe and East US2. Data can be read from these two regions. The Azure Cosmos DB SDKs implement a regional discovery protocol that allows them to automatically detect when a region is available and redirect read calls to the next available region in the preferred region list. If none of the regions in the preferred region list is available, calls automatically fall back to the current write region.
To take advantage of global distribution, client applications can specify the ordered preference list of regions to be used to perform document operations. Based on the Azure Cosmos DB account configuration, current regional availability, and the preference list specified, the most optimal endpoint will be chosen by the SQL SDK to perform write and read operations. This preference list is specified when initializing a connection using the SQL SDKs. The SDKs accept an optional parameter PreferredLocations that is an ordered list of Azure regions. If PreferredLocations is not set, it defaults to read from the write region. The SDK will automatically send all writes to the current write region. All reads will be sent to the first available region in the preferred locations list. If the request fails, the client will fail down the list to the next region.
Below example presents how to configure preffered read locations using .NET C# SDK for Azure Cosmos DB:
CosmosClientOptions options = new CosmosClientOptions();
options.ApplicationName = "CarsIsland";
options.ApplicationPreferredRegions = new List<string> {Regions.WestEurope, Regions.WestUS2};

CosmosClient client = new CosmosClient(connectionString, options);
You can also specify the preffered region directly:
CosmosClientOptions options = new CosmosClientOptions();
options.ApplicationName = "CarsIsland";
options.ApplicationRegion = Regions.WestEurope;

CosmosClient client = new CosmosClient(connectionString, options);
The SDK can be used without any code changes like presented above. Then the SDK automatically directs both reads and writes to the current write region.
Azure Cosmos DB .NET SDK integration
In the Cars Island project, I integrated ASP .NET Core Web API application with Azure Cosmos DB using new library. Please note that this NuGet package is in the preview at the moment of writing this article. I decided to use this library because it follows best practices and implement common patterns. If you want to learn more about new Azure SDKs, please check this official documentation.
Let’s start with an explanation of how the initial setup looks like. In the DataServiceCollectionExtensions.cs file you can find out how CosmosClient is instantiated. To follow best practices related to lifetime management, CosmosClient type is registered as a singleton in the IoC container. You can also ask why I have used services.TryAddSingleton with implementationFactory instead of just using services.AddSingleton. First of all you can use both TryAddSingleton and AddSingleton with implementationFactory and this will cause automatic object disposal. If you would take the approach like this: services.AddSingleton(new CosmosClient()) where you pass specific instance, then automatic object disposal would not take place. I did it because it enables automatic object disposal so once the application is closed, all resources will be released automatically. You can read more about service registration methods.
    public static class DataServiceCollectionExtensions
    {
        public static IServiceCollection AddDataServices(this IServiceCollection services)
        {

            services.TryAddSingleton(implementationFactory =>
            {
                var cosmoDbConfiguration = implementationFactory.GetRequiredService<ICosmosDbConfiguration>();
                CosmosClient cosmosClient = new CosmosClient(cosmoDbConfiguration.ConnectionString);
                CosmosDatabase database = cosmosClient.CreateDatabaseIfNotExistsAsync(cosmoDbConfiguration.DatabaseName)
                                                       .GetAwaiter()
                                                       .GetResult();
                database.CreateContainerIfNotExistsAsync(
                    cosmoDbConfiguration.CarContainerName,
                    cosmoDbConfiguration.CarContainerPartitionKeyPath,
                    400)
                    .GetAwaiter()
                    .GetResult();

                database.CreateContainerIfNotExistsAsync(
                    cosmoDbConfiguration.EnquiryContainerName,
                         cosmoDbConfiguration.EnquiryContainerPartitionKeyPath,
                    400)
                    .GetAwaiter()
                    .GetResult();

                database.CreateContainerIfNotExistsAsync(
                    cosmoDbConfiguration.CarReservationContainerName,
                         cosmoDbConfiguration.CarReservationPartitionKeyPath,
                    400)
                    .GetAwaiter()
                    .GetResult();

                return cosmosClient;
            });

            services.AddSingleton<IDataRepository<Car>, CarRepository>();
            services.AddSingleton<IDataRepository<Enquiry>, EnquiryRepository>();
            services.AddSingleton<ICarReservationRepository, CarReservationRepository>();

            services.AddSingleton<ICarReservationService, CarReservationService>();

            return services;
        }
    }
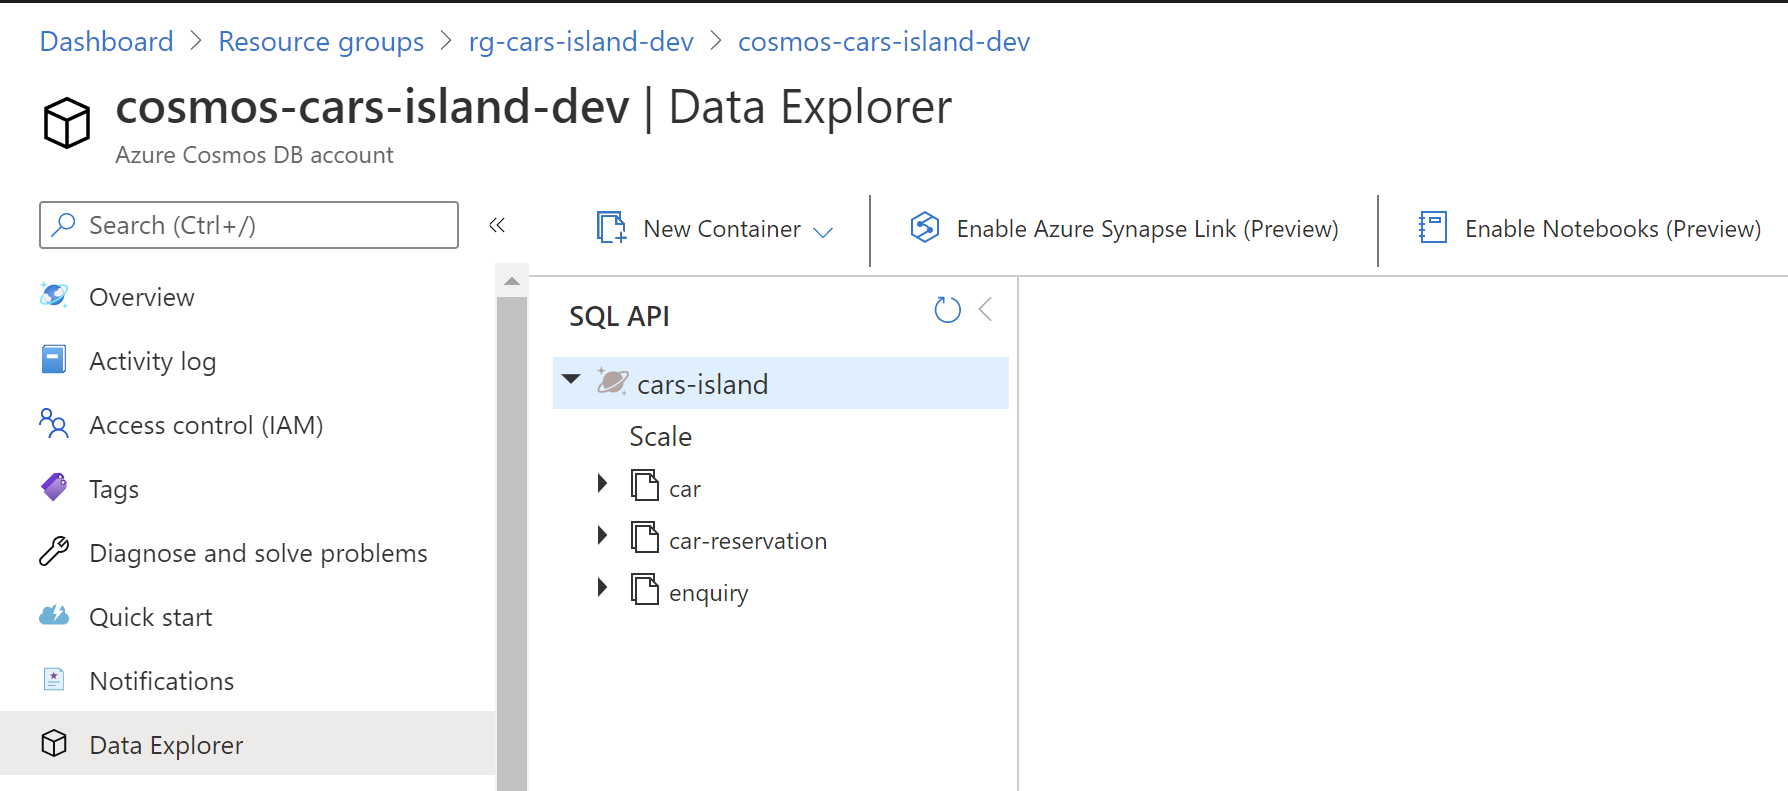
As you can see there is also container initialization. Three containers will be created if none of the exits: car, car-reservation and enquiry. There are also repositories initialized together with CarReservationService instance.
Let’s talk about IDataRepository interface first:
    public interface IDataRepository<T> where T : BaseEntity
    {
        Task<T> AddAsync(T newEntity);
        Task<T> GetAsync(string entityId);
        Task<T> UpdateAsync(T entity);
        Task DeleteAsync(string entityId);
        Task<IReadOnlyList<T>> GetAllAsync();
    }
As you can see it defines basic operations for data like add or get. It is also generic and the target type has to derive from BaseEntity:
    public abstract class BaseEntity
    {
        [JsonPropertyName("id")]
        public string Id { get; set; }
    }
Now let’s look at CosmosDbDataRepository class implementation:
    public abstract class CosmosDbDataRepository<T> : IDataRepository<T> where T : BaseEntity
    {
        protected readonly ICosmosDbConfiguration _cosmosDbConfiguration;
        protected readonly CosmosClient _client;

        public abstract string ContainerName { get; }

        ...

        public async Task<T> AddAsync(T newEntity)
        {
            try
            {
                CosmosContainer container = GetContainer();
                ItemResponse<T> createResponse = await container.CreateItemAsync(newEntity);
                return createResponse.Value;
            }
            catch (CosmosException ex)
            {
                Log.Error($"New entity with ID: {newEntity.Id} was not added successfully - error details: {ex.Message}");

                if (ex.Status != (int)HttpStatusCode.NotFound)
                {
                    throw;
                }

                return null;
            }
        }

        public async Task DeleteAsync(string entityId)
        {
            try
            {
                CosmosContainer container = GetContainer();

                await container.DeleteItemAsync<T>(entityId, new PartitionKey(entityId));
            }
            catch (CosmosException ex)
            {
                Log.Error($"Entity with ID: {entityId} was not removed successfully - error details: {ex.Message}");

                if (ex.Status != (int)HttpStatusCode.NotFound)
                {
                    throw;
                }
            }
        }

       ...


        protected CosmosContainer GetContainer()
        {
            var database = _client.GetDatabase(_cosmosDbConfiguration.DatabaseName);
            var container = database.GetContainer(ContainerName);
            return container;
        }
    }
As you can see it implementes *IDataRepository
Here is CarRepository example:
    public class CarRepository : CosmosDbDataRepository<Car>
    {
        public CarRepository(ICosmosDbConfiguration cosmosDbConfiguration,
                         CosmosClient client) : base(cosmosDbConfiguration, client)
        {
        }

        public override string ContainerName => _cosmosDbConfiguration.CarContainerName;
    }
Data operations
Once we discussed Azure Cosmos DB setup and integration with the .NET SDK in the source code, we can discuss how one of the repositories is used. Let’s talk about CarReservationService class presented below. As you can see we call methods on CarRepository and CarReservationRepository instances to check if car exists or is not already reserved:
    public class CarReservationService : ICarReservationService
    {
        private readonly ICarReservationRepository _carReservationRepository;
        private readonly IDataRepository<Car> _carRepository;
        private readonly IIdentityService _identityService;

        ...

        public async Task<OperationResponse<CarReservation>> MakeReservationAsync(CarReservation carReservation)
        {
            var carFromReservation = await _carRepository.GetAsync(carReservation.CarId);
            if (carFromReservation == null)
            {
                return new OperationResponse<CarReservation>()
                                       .SetAsFailureResponse(OperationErrorDictionary.CarReservation.CarDoesNotExist());
            }

            var existingCarReservation = await _carReservationRepository.GetExistingReservationByCarIdAsync(carReservation.CarId, carReservation.RentFrom);

            if (existingCarReservation != null)
            {
                return new OperationResponse<CarReservation>()
                                       .SetAsFailureResponse(OperationErrorDictionary.CarReservation.CarAlreadyReserved());
            }

            else
            {
                carReservation.Id = Guid.NewGuid().ToString();
                carReservation.CustomerId = _identityService.GetUserIdentity().ToString();
                var createdCarReservation = await _carReservationRepository.AddAsync(carReservation);
                return new OperationResponse<CarReservation>(createdCarReservation);
            }
        }
    }
CarReservationService is used in the CarReservationController.
Summary
In this article, I described how to set up an Azure Cosmos DB account and how to integrate it in the ASP .NET Core Web API application. Source code of the Cars Island solution is available on my GitHub so you can see all implementation details.
If you want to learn more about Azure Cosmos DB service, check this official documentation.